Expanded polystyrene is a heat-insulating building material that is popular for insulating the facades of private houses and apartments located in multi-storey buildings. Insulating the facade with polystyrene foam is a quick and simple solution to the problem of heat loss in the room. The article describes in detail all the features and nuances of the insulation process.
Before you start purchasing building materials, you need to determine the quantity. This is not difficult to do; just measure the area of the walls and, based on these values, calculate the required number of sheets of expanded polystyrene.
Criteria for choosing expanded polystyrene
The main characteristic when choosing insulating building materials for the facade of a house and roof is the density of polystyrene foam, its numerical expression is indicated in the brand. PSB-15 has the minimum indicator, and PSB-S-15, PSB-S-25, PSB-S-35 are recommended for outdoor work.
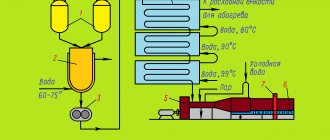
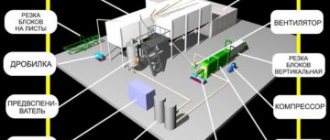
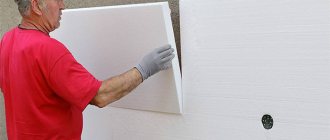
Figure 1. Facade insulation with polystyrene foam
The choice of thickness of expanded polystyrene slabs is focused on the climatic features of the region where the building is located. It should be noted that a 3 cm sheet of PSB-15 in terms of thermal conductivity is similar to 40 cm of brickwork, 25 cm of gas or foam concrete or 10 cm of wood. In addition, the foam plastic is necessarily covered with a layer of plaster, which also acts as insulation for the facade walls.
Insulation of slopes and window perimeter
To insulate slopes, it is necessary to cut strips of foam plastic according to the dimensions of the slopes so that they fit tightly on the slope, resting on the ends of the slabs laid on the walls.
As an option, you can first paste over (or otherwise strengthen) the window opening with PPS strips so that the cut of the insulation strip lies flush with the plane of the wall.
Insulation of slopes
Then polystyrene slabs, cut to length, are laid on the plane.
All joints and junctions must be tightly covered with insulation ; possible cracks are filled with polyurethane foam or coated with glue.
Preparatory work
Before insulation of the external walls of the house begins, it is necessary to prepare the working surface.
Preparation of external walls
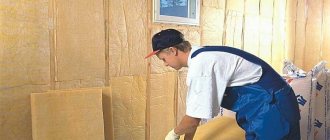
The surface to which the insulation will be attached must be smooth and clean. All differences when preparing the walls of the house must be removed, because this can cause fractures of the polystyrene foam during its installation. Fluctuations in uniformity should not exceed 1-2 cm, and large tubercles can be knocked down with a hammer, after which all peelings can be carefully removed. Also, if paint or whitewash was previously applied, it must be removed and dust and dirt removed.
Figure 2. Wall preparation process
To prime or not
After leveling, the surface of the wall should be treated with a soil mixture, because in this way small particles are removed and maximum adhesion and protection against the spread of microorganisms and fungi is ensured.
You can avoid priming the walls; running your palm over them does not leave any dirt behind. The choice is yours, but this inexpensive process improves the quality of facade insulation with polystyrene foam.
Any priming mixture can be used for exterior use according to the instructions on the package. Apply by brush, roller or spray.
Preparation of EPPS
In fact, foam boards are already ready to go, but if you have chosen extruded polystyrene foam, then you should pay special attention to it. A very smooth surface does not adhere well to glue, so it is necessary to make it looser before installing the slabs. This procedure is carried out with a needle roller for working with drywall; if such a tool is not in your arsenal, then it can be done using a mounting knife, which you need to make grooves. If you plan to apply the insulation in two layers, then treat both sides.
Finishing window sills and slopes
The structures of window sills, slopes and “drip” should be installed before the walls are insulated. Particular attention should be paid to the following points:
- The window sill should have a protrusion of 30-40 mm from the finish, so 10-11 cm must be added to the width, because the width of the polystyrene foam, as well as the finish, is taken into account.
- When finishing slopes, insulation with a smaller thickness is used - 2-3 cm is enough to prevent the wall from moving onto the glass. When performing installation, the foam board should protrude 10 mm beyond the facade wall for easy joining.
- Between the base and the insulation, it is necessary to install a so-called “drip line” made of galvanized steel, so that natural precipitation does not accumulate on the walls, but flows off.
Figure 3. Finishing near the windows
Thus, you see that the preparatory work stage requires special attention and a lot of time and effort, however, the service life and effectiveness of polystyrene insulation will depend on the quality of their implementation, so you should not neglect this.
Where is extruded polystyrene foam used?
Thermal insulating material is almost always used for thermal insulation of floors. It does not raise the level of floors in the room, so it is also used when installing underfloor heating systems. This option is used in rooms where the floors are laid on the ground or on a subfloor.
Extruded polystyrene foam is also used for thermal insulation of concrete walls of houses. Installation of the material can be carried out both outside and inside, but it is best to do this from the outside of the building. They insulate from the inside only if it is impossible to do this from the outside or if there is not enough time for installation. Expanded polystyrene is also used to insulate basements and building foundations. When constructing a monolithic foundation, polystyrene foam can be used as permanent formwork, which reduces the amount of reinforcement and concrete used. This method of using insulation can significantly extend the service life of reinforced concrete foundations and basement walls.
Extruded polystyrene foam can also be used to insulate balconies and loggias to increase the average temperature in a living space. During installation, a frame is first erected, into which heat-insulating material is laid, and then the material is covered with plywood. Due to its ability to withstand mechanical loads and low temperatures, polystyrene foam is sometimes used to extend the life of highways in the city of Moscow and some other regions.
Installation of the starting profile
After all the preparatory work regarding the surface of the walls, so that the first row when insulating the facade with extruded polystyrene foam is installed correctly, it is necessary to install the starting profile. For this design, you can use a metal profile for working with plasterboard or a special plinth. The width of the load-bearing support must be selected according to the thickness of the slab of insulating material.
The starting metal profile is attached along the entire perimeter of the facade using a dowel fastening (the dowel is driven in at a distance of 30 cm), and the horizontal plane is controlled by the building level.
Figure 4. Beginning of installation
And so as not to doubt the correct vertical arrangement of the sheets? It is advisable to install plumb lines every 50-60 cm; a nylon thread with a weight attached to one end is ideal for this.
Mechanical fastening of thermal insulation
Mechanical fastening of expanded polystyrene sheets is carried out using self-tapping screws, dowels and self-adhesive pins. Self-tapping screws for this task are shaped like a mushroom with a wide cap, which is made from high-quality polymers. During installation, holes are made in the slab with a drill, into which self-tapping screws are then screwed.
To install a standard-sized polystyrene foam block, use 4 self-adhesive pins with a rectangular “die”. Thanks to the notch on the pin, the foam is pressed tightly against the wall surface.
Installation of polystyrene foam boards
According to the technology for insulating a façade with extruded polystyrene foam, the slabs are first glued, and the second step involves fixing them using special dowels.
Figure 5. Facade insulation with polystyrene foam
Choosing an adhesive composition
To choose the right adhesive mixture for installation work, you should not “go into the weeds”; builders claim that there are no special requirements, so any type of adhesive with a universal composition for working with tiles will do. Such mixtures from well-known companies are characterized by moisture resistance, resistance to temperature changes, are quite elastic and durable, and are absolutely safe for humans. However, when visiting a building materials store, purchase glue for exterior finishing; both dry mixtures and glue in bottles will do.
Expanded polystyrene installation technology
All work with polystyrene insulation materials is carried out in the following sequence:
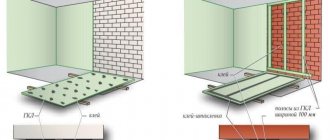
- On prepared slabs of polystyrene foam or EPS 35 kg m3 100 mm or higher density, as well as on smooth facade walls, glue should be applied with a notched spatula. The mixture can be applied in a continuous layer or spotwise (in the center and in the corners) with a thickness of 3-5 mm.
- The first row is glued to the starting strip, which prevents the slabs from moving.
- Subsequent rows are glued in a checkerboard pattern.
- If gaps are formed when joining the sheets, it is necessary to prevent glue from getting into them; in the future, by applying plaster, everything can be corrected.
- Throughout all work, check the levelness using plumb lines and a mounting level.
- After pasting all the sheets, you must wait for the glue to dry and proceed to the next step of insulating the facade of the house with polystyrene foam.
- After the adhesive mixture has dried, usually for 24 hours, they proceed to driving in the dowels, while the fungi should be driven into the drilled holes in the center and in the corners, and the “cap” should be located flush with the surface of the slab.
Figure 6. Installation of polystyrene foam boards
There are situations when, to improve the quality of thermal insulation, the technology of laying polystyrene foam in two layers is used, which has distinctive features:
- The first layer of slabs cannot be putty; all finishing work is carried out after installing the second layer of slabs.
- To fix the second layer, you don’t even need to use glue; you can only hammer in disc-shaped dowels, taking into account the thickness of both layers.
It is important to take into account the places where the previous layer was fixed in order to prevent repeated driving in.
Before moving on to further work, you need to rub and putty the seams and caps to level the surface.
Features of the work on insulation with polystyrene foam from inside the house
Insulating walls with foam plastic from the inside of a house has its advantages and disadvantages. The work on fastening to the wall is not affected by external weather factors; the area of the insulated surface is relatively small, which eliminates unwanted sliding of the sheets. As a disadvantage, one can note the reduction in the internal volume of the building.
The additional thickness of the insulating structure further reduces the area of the rooms. For internal installation of insulation, the thickness of the foam sheets can be no more than 40 mm, and fastening can only be done with glue. The use of profiles for laying foam plastic and additional fastening with dowels can be abandoned.
It is quite possible to do this work yourself. How to attach polystyrene foam to the wall. There are two ways to attach foam to the wall - using glue and mechanical fastening with dowels “fungi”. Mechanical fastening is usually used as additional fixation of glued foam. To fasten using this method, it is necessary to profile the wall with thin wooden blocks or special profiles.
They are aligned in a plane; this determines how evenly the polystyrene sheets can be strengthened. Holes are drilled in the profile according to the diameter of the dowels used, usually 8 mm. Using dowels and these holes, the material is attached to the bars. We will not consider fastening with drilling directly into the wall as extremely inconvenient.
Reinforcement and plastering of foam plastic
Occasionally, experts recommend insulating with polystyrene foam for two seasons, that is, allowing it to overwinter at a certain stage, preferably after applying a leveling layer of plaster. Sheets should not be left unfinished; even packaged slabs must be stored indoors and not outdoors.
Sticker of reinforcing mesh on corners
To give additional density and strength, a reinforcing mesh is attached to the corners and other sheets.
First of all, the mesh is pasted on the corners: external, internal, as well as on slopes. A universal composition is used as an adhesive base, which should be prepared according to the instructions, but more liquid so that it can be pressed well through the mesh with a spatula.
Figure 7. Sticker of reinforcing mesh on the corners
It is more convenient to mount ready-made corners, but they are more expensive. If you are interested in an economical option, then you can cut strips 30 cm wide and 100 cm long and fold them in half by pressing them with a spatula.
The fastening technology is almost the same: glue is applied to the working tool and it must be applied in a strip 6-7 cm wide, in a layer of 2-3 mm, retreating 5-7 cm in height for further joining of the cuts. Movements with a spatula are made in a “herringbone” pattern from top to bottom and to the sides; for convenience, you can purchase an angle tool, which will greatly facilitate this work.
Foam reinforcement on walls
Expanded polystyrene on the walls should also be reinforced using a special mesh, glued with adhesive with a universal composition.
The algorithm is as follows:
- The adhesive base is applied to the slabs using a spatula.
- The mesh is unwound from top to bottom so that 5-7 cm of glue does not overlap on one side.
- It is pressed with a spatula to sink the mesh into the glue, while it is desirable to make the surface as smooth as possible.
- The next strip is rolled out from the free edge, thus duplication is formed at the joints, but due to the fact that there is less glue, the overall level of the facade remains the same.
Upon completion of the reinforcement, you should expect complete drying: 12-24 hours, after which grouting is carried out using fine-grained sandpaper to smooth out the slightest imperfections.
Foam plastic plaster: applying a leveling layer
To perform final leveling, mixtures with polymer compounds are used that are more resistant to negative environmental influences: moisture, frost, and do not change their structure and color when exposed to ultraviolet radiation.
The prepared mixture should have the consistency of liquid sour cream, and the thickness of the layer depends on the evenness of the previous level, so the leveling layer can be applied only a few millimeters.
Just like the previous layers, they must be completely dried and sanded before painting or applying decorative plaster.
What you need
In order to properly insulate your home and then live peacefully in warmth and comfort, you will need the following materials:
- Expanded polystyrene sheets. Their number is equal to the wall area, not taking into account the windows. If the thickness turns out to be very non-standard, then two layers will be required. And the second of them should be attached only after this glue has dried.
- Mineral slabs. They are laid for safe purposes, to avoid fires. Place around doors and windows. The slabs must be high-strength and dense, the same in thickness as the foam sheets. There are as many windows as there are slabs.
- Reinforcing mesh.
- Primer. If the surface is porous, two coats will be required.
- Glue presented as a dry mixture.
Tools and materials for insulation - Metal corner with perforation.
- Hammer drill with 10mm drill bit.
- Mixer for construction.
- Level.
- Stationery knife.
Advantages and disadvantages of the material
Any insulation is characterized by a number of signs, both positive and negative. Expanded polystyrene for facade insulation is no exception.
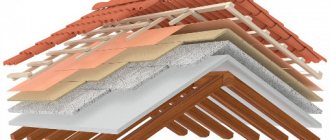
Figure 8. Facade insulation scheme
The benefits include the following:
- affordable price;
- ease of handling;
- minimizing the spread of bacteria;
- high moisture resistant qualities;
- light weight;
- hygienic properties: resistance to mold growth, as well as other forms of bacteria;
- good thermal conductivity;
- durability;
Negative aspects:
- flammability;
- toxicity;
- prone to damage by small rodents.
As you can see, there are more positive aspects than negative ones. This material does not lose its properties over time, like mineral wool, and does not change its size under the influence of negative environmental factors. As a result of completing all the stages of insulating the facade with polystyrene foam, the entire structure resembles a “sandwich” as in the photo.
How to insulate a house with polystyrene foam?
To do everything correctly and efficiently, you should adhere to a certain technology for installing and decorating insulation. It may be difficult for a beginner to cope with a large number of stages and processes, but if you wish, you can do everything yourself.
If you don’t have the energy and time, hire a professional team of workers. This will entail additional costs, but you will definitely save your time.
Materials and tools required for work
You don’t have to buy expensive equipment to process and install EPP boards. It is enough to use the tools that you already have on the farm or you can borrow from people you know. An approximate list of what you will need:
- EPP plates of the required thickness;
- tape measure and pencil for marking;
- building level;
- stationery knife;
- drill or hammer drill for making holes for dowels;
- umbrella dowels;
- specialized adhesive solution;
- facing material.
Cost of façade insulation with polystyrene foam (expanded polystyrene)
The cost estimate for façade insulation with polystyrene foam includes all necessary materials and work. If you want to save money, you can study the technologies and recommendations for insulating facades with expanded polystyrene and polystyrene foam and carry out the installation yourself. However, if your house has several floors, then it is better to trust the professionals.
To calculate the cost of work, you can take into account the following prices:
- installation and dismantling of scaffolding per m2 - 100-140 rubles;
- insulation per m2 - 300-360 rubles;
- reinforcement per m2 - 300-350 rubles;
- decoration per m2 - 300-350 rubles.
Thus, the final estimate will depend on the cost of materials and services, as well as the complexity of the object and deadlines.
Installing expanded polystyrene on the facade of a house is not a difficult task; the main thing is to know the basic rules of this process and choose the right consumables and tools.
Description of material
Expanded polystyrene is very similar to compressed foam. All this is due to the production process. It differs from polystyrene foam, which is processed with dry steam, in that it is produced by melting polystyrene granules. Then a single structure is obtained. This material has some advantages:
- Heat saving;
- Moisture resistance;
- Vapor permeability;
- Not subject to deformation.
Expanded polystyrene sheet
Plus, the insulation sheets do not rot, and this is a very important factor for residential buildings.
Polystyrene foam is divided into three main types: expanded polystyrene, polyisocyanurate and extruded. Absolutely all of them contain brominated fire retardant in their unusual composition - a dangerous substance.
Installation followed by plastering (wet facade)
This method of thermal insulation of a wall outside a room is the simplest and most “low-cost” in financial terms. Insulation is carried out with expanded polystyrene, fixation in the same way as when facing with siding - fungi - umbrellas. The difference is that in this case the installation of a sub-cladding system is not required, and the insulation is additionally fixed with an adhesive mixture. This allows you to firmly fix it to the surface.
Having secured the thermal insulation over the entire required area and reinforced it with mesh, you can begin cladding the facade. This is done in three ways:
- Decorative facade plaster;
- Painting with water dispersion paint;
- Decorative plaster followed by painting the facade.
Installation under siding
In order to perform insulation with polystyrene foam followed by finishing with siding, the installation of a sub-cladding system is required. It is constructed from a metal profile or wooden beam located vertically, with a pitch of no more than 40-60 cm. To fix the galvanized guides, brackets (suspensions) are used, which are attached to the wall with anchor elements or self-tapping screws.
The entire sheathing is leveled using a level, level, plumb line and fishing line. The type of material is selected depending on the panels used. Steel sheathing is ideal for metal siding. Its service life will be longer than wood.
It is important to know
Wooden beams must be treated with an antiseptic, and the use of a metal profile is allowed only if it is coated with zinc. To increase the service life, the profile can be painted using powder coating.
After the installation of the sheathing on the outside of the building is completed, insulation is carried out with polystyrene foam. If your choice fell on a wooden sheathing, then the slabs are installed between the guides, then fixed with the help of umbrella mushrooms. When using metal sheathing, the slabs are strung on brackets. Having completed fixing the panels to the walls, you can begin cladding with siding.
Issues of vapor barrier and waterproofing
An important requirement during the construction and improvement of a house is the correct implementation of all work to ensure ventilation and waterproofing, since it is the incorrect installation of these components that significantly reduces the performance of the structure.
When insulating walls with polystyrene, waterproofing is not needed . It should be taken into account that if there is a high passage of groundwater under the building, it is necessary to waterproof the basement and foundation.
Since polystyrene foam does not allow air and water to pass through, there is no need to lay a vapor barrier layer when insulating walls from the outside.
Wall insulation cake under siding
Preparation for installation
Preparation of sheets of material. The process of preparing insulation sheets for installation consists of processing them (cutting them to the required size), as well as selecting adhesive compositions and fasteners with which the heat-insulating material will be secured to the walls of the structure. Adhesive compositions should be applied to the heat insulation sheets about an hour before they are joined to the insulated surface.
Preparing the walls of the building. The insulated surface of the walls must be cleaned of dirt and all unnecessary elements (old cladding, protrusions and irregularities, fasteners) must be removed. The cracks and gaps are sealed with putty mixtures. If the walls have a significant surface curvature, then a rough leveling layer is applied. You can detect surface irregularities (dips and bulges) by using a nylon cord. If it is impossible to remove bulges on the surface, the heat insulation sheets should be trimmed from the inside.
The preparation of the walls ends with their treatment with deep penetration soils.
Application benefits
This material has a high degree of heat retention, since its structure is porous and consists almost entirely of air. Also among the advantages of polystyrene foam are the following:
- high level of compressive strength;
- moisture resistance, which prevents decomposition and deformation;
- low level of vapor permeability, which allows the material to be attached to the internal walls of buildings;
- resistance to external sources of influence, such as precipitation, temperature changes, atmospheric phenomena and ultraviolet rays;
- duration of use of the material. If all rules for installing insulation are followed, it can be used for 50 years or more;
- the material is unattractive to rodents, insects and birds;
- fire resistance of insulation;
- environmental friendliness of the material. As mentioned earlier, polystyrene foam is extruded without the use of harmful freons.
How is polystyrene foam extruded?
Extruded polystyrene foam is the most common type of gas-filled polymer. It is extruded using technology that was developed more than 50 years ago and continues to be successfully used today.
The material is extruded in the following way:
- polystyrene granules are mixed with a foaming agent at high temperature;
- Then, using an extruder, the resulting mass is squeezed out.
Previously, the material was extruded using hard freons, then they began to use a mixture of soft and hard ones, and then switched to freon-free systems. They began to extrude polystyrene foam in this way at the end of the last century, when most European countries banned freon-containing materials for insulation.