16.12.2020
Installation of thermal panels
With the advent of facade thermal panels on the market, in which the insulation layer is combined with a decorative layer, it is not necessary to hire a team of installers for finishing and insulation.
The installation of thermal panels can be done independently without complex manipulations. With the advent of facade thermal panels on the market, in which the insulation layer is combined with a decorative layer, it is not necessary to hire a team of installers for finishing and insulation. The installation of thermal panels can be done independently without complex manipulations.
Advantages of facade thermal panels:
- Operating temperature range from - 50 to + 50 degrees Celsius.
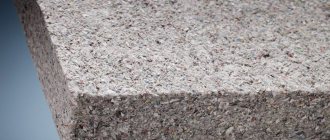
- Density 40-70 kg/cube, gives the product increased strength.
- Corrosion resistance.
- Long service life (about 50 years).
- Thermal conductivity 0.020 W/m2C.
- Excellent soundproofing characteristics.
- High resistance to fire.
- Good vapor permeability.
- Resistance to atmospheric agents.
- Easy to install.
Types of thermal panels
All panels on the market today are divided into several types, and all thermal plates have different installation methods:
- Depending on the type of insulation: polyurethane or polystyrene. Panels with polyurethane insulation have better thermal insulation with a smaller thickness. However, they are more expensive compared to polystyrene.
- The presence or absence of a solid base for installation (OSB or DSP).
- Also, facade thermal panels are distinguished by the type of polymer-sand layer.
- The slabs are classified according to the appearance of the decorative finish: imitation wood, stone, brick (clinker panels).
For frame wooden houses, thermal panels with a rigid base are mainly used.
Pros and cons of thermal lining
The main advantage of using such finishing is a significant (up to 30%) reduction in home heating costs. The cladding process itself can be reduced in cost and significantly speeded up by the absence of the need to plaster the walls, since the technology for installing panels involves correcting even pronounced unevenness on the base surface. The modules can be mounted on concrete, gas and expanded clay concrete blocks, brick, wood and even adobe (a mixture of clay, sand and straw). The fasteners used depend on the type of base: for mineral materials these are self-tapping screws, for wooden facades - self-tapping bushings.
Varieties of thermal panels
Panels weigh only 12–23 kg/m² and usually have a thickness of 40, 60 or 80 mm. But from some manufacturers you can find products with a thickness of 30 and even 20 mm. Their use is advisable if thermal lining is intended to be used, for example, during the reconstruction of a house that does not need to create full insulation, but only to increase the thermal insulation properties of the structure.
Since polymer insulation is resistant to the influence of negative external factors, and the decorative cladding of the panels is durable and does not change its appearance over the years, maintaining color saturation, manufacturers give a 50-year guarantee on their products.
And yet, thermal cladding has one drawback: the low vapor permeability of the insulation panels used in the panels. Therefore, in order to solve the problem of steam removal, you will have to install a supply and exhaust ventilation system in the house.
Preparatory work before installation
Before attaching thermal panels, it is necessary to make a thermal calculation, determine the “dew point” - the place where condensation forms at a certain temperature and humidity. If you insulate a house with thermal plates without proper calculations before installation, there is a risk of shifting the dew point inside the wall of the house, which will inevitably lead to the accumulation of condensation and, as a result, rot and mold.
It is important to correctly calculate the required amount of materials. Consumption is measured as follows: the wall area is divided by the area of one thermal panel. There is no need to take away areas occupied by openings (windows, doors, stained glass windows) - this is a sufficient supply of material.
Manufacturers of clinker panels
The Russian market offers cleaning thermal panels from domestic and foreign manufacturers. The range of products is constantly updated.
The price of clinker thermal panels for exterior decoration of a house depends on the manufacturer and on average varies from 1,600 to 2,500 rubles per square meter. The cost of sheets for finishing the base is higher, since massive clinker tiles are used for their production.
Due to their high quality, clinker panels from NPK Termosit (Russia), which are produced by the company using its own patented technology, are widely in demand. Among the domestic manufacturers whose products are in considerable demand are Forska and Fried.
Foreign manufacturers are represented mainly by German brands: ABC Klinkergruppe, Röben, Westerwalder Klinker, Wandstein and others.
Thermal panels Europe with tiles ABC klinkergruppe Source www.stroi-baza.ru
Clinker panel, produced by ABC klinkergruppe Source kamenhouse.ru
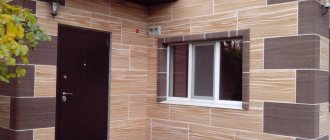
Cladding a house with Russian-made thermal panels Source lt.decorexpro.com
Panels with relief Source thewall.com.ua
Set for installation of thermal panels
To cladding facades with thermoplates you need:
- finishing panels (ordinary for walls and corner);
- profiles for the frame;
- basement flashings;
- starting profile (for installing first row slabs);
- hammer drill with 8 drills;
- level(rule);
- angle grinder with stone disc;
- screws with a length of at least 12 cm (dowels) - per 1 sq. m. about 8 pieces;
- screwdriver;
- foam glue (1 can for 20 panels);
- grout mixture.
Expanded polystyrene or polyurethane foam?
The assessment of a particular material is based on its technical characteristics, operating conditions and consumer opinions. The use of expanded polystyrene and polyurethane foam in panels under the same conditions gives us the opportunity to compare and obtain data for an objective conclusion.
Environmental Safety
Expanded polystyrenePolyurethane foam
| The material is biologically neutral and environmentally safe. That is why it is used not only in insulating various structures, but also in light industry as a filler for upholstered furniture, pillows, etc. | The material is capable of self-oxidation in air, which leads to the release of peroxide. At temperatures above +80 °C, mechanical destruction begins and phenol is released. |
Properties
Expanded polystyrenePolyurethane foam
| Vapor permeability – 0.05 mg/(m h Pa) Water absorption – 0.4% by volume Thermal conductivity – 0.038–0.041 W/(m K) | Vapor permeability – 0.05 mg/(m h Pa) Water absorption – 1–3% by volume Thermal conductivity – 0.019–0.035 W/(m K) |
Performance characteristics
Expanded polystyrenePolyurethane foam
| It is not destroyed by fungi and microorganisms, but can become the basis for the development of their colonies. Due to the presence of voids and a high coefficient of moisture absorption, moisture may enter the material and its subsequent destruction at subzero temperatures. Service life – about 15 years | Colonies of mold and moss do not form on the surface of this material. Provides reliable waterproofing; accordingly, there are no structural changes in the material even under conditions of significant temperature changes. Service life – about 60 years |
Conclusion: all things being equal, polyurethane foam is the most acceptable option.
Decorative coating. Which one is better?
Manufacturers offer several options for finishing panels: porcelain stoneware, concrete, ceramics, clinker tiles, etc.
Decorative coatingFeatures
| Porcelain tiles | Neutral to chemicals, wear-resistant, not subject to contamination, does not absorb moisture |
| Ceramics | It has similar characteristics to porcelain stoneware, but is less durable |
| Concrete tiles | Not suitable for climates with sudden temperature changes, as it has a high moisture absorption coefficient. More expensive options for concrete tiles have an additional protective layer against moisture penetration |
| Clinker | The most common and optimal decorative coating option |
The Russian companies listed above can be divided into two categories. The first is full-scale production with the production of both an insulating layer and a decorative coating, the second is the purchase of foreign-made finishing materials with the subsequent production of finished products. The cost of the panels depends on the choice of finishing material and the thickness of the insulation.
How façade thermal panels are attached
The base must be dry, without any remaining mixture, dirt or oil.
Straight panels are installed directly on the wall or on a sheathing (frame) made of profiles:
- Frameless installation of panels directly on the wall is possible with smooth walls with a difference of no more than 3 cm. In this case, the surface must be primed.
- In case of significant curvature of the walls, a frame of metal profiles is mounted, onto which thermal plates are then attached. The distance between the profiles depends on the size of the slabs, and each must have 3 support points (lathing).
The panels are cut to fit the openings using a diamond blade.
The first row of panels should extend 15-20 cm below the floor level of the first floor. When installing façade thermal slabs, it is imperative to install ebb sills on the plinth and only then begin laying the first row.
Thermal panel installation steps:
- It is convenient to start installation from the lower left corner of the wall and the corresponding corner element. Thermal panels are secured to metal corners.
If the PPU option is used, then the corner plate is cut at an angle of 45 or 90 degrees. - The plane is leveled using the rule. The ease of further installation and the quality of finishing in general depend on the verified horizontal position of the first row.
- Thermal panels are fastened using the tongue-and-groove principle onto construction foam and adhesive, and each is additionally secured with dowels or self-tapping screws. It is better to use polyurethane foam, as it does not deform over time and is not affected by high and low temperatures.
Finishing corner elements
For facing slopes, corner elements, internal and external, are provided. The All-Klinker company helps you calculate the required number of such elements for installing the sheathing.
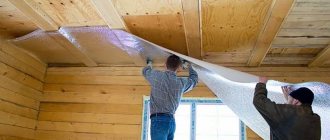
Installation of thermal panels is carried out using a frameless method, directly to the surface of the slopes. Finishing slopes is a simple process, but before installing thermal plates, the corners must be additionally insulated.
Check out the installation of clinker thermal panels in the video.
Required Tools
Another significant advantage of thermal panels is that there is no need to use special equipment. You can easily handle the installation yourself.
Here's what you'll need for this:
- marker for marking the facade;
- building level;
- screwdriver;
- hacksaw;
- hammer;
- sealant;
- perforator;
- grinder and diamond disc;
- trowel for applying adhesive composition.
Final stages
After installing thermal slabs made of polystyrene foam, grouting and jointing are done with a special jointing mixture.
Grouting work is carried out in the following order:
- First, dilute the jointing mixture with water, stirring it using a construction mixer.
- Then the gun is filled and applied to the seams using a mounting gun.
- Wait 40-60 minutes for the mixture to polymerize.
- After the grout has dried, you can open the seams using special spatulas. The forms of jointing are different and depend on the type of decorative finishing of the thermoslab.
PPU thermal plates do not require jointing.
The last task during installation is to install cornices to seal the gaps between the wall and the thermal panels.
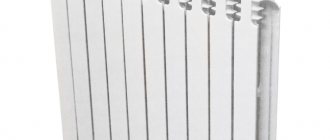
Types of material
Most often, the finishing layer material is clinker . The durable material looks rich and is highly expensive.
To diversify the choice for different categories of users, the surface of thermal tiles is made from materials :
- PVC;
- clay, ceramics;
- fiber cement;
- steel;
- SIP;
- wood.
Steel
SIP
Clinker
Fiber cement
Wood models are rare; they are often ordered at the factory for a specific project.
Plastic
Refers to budget options .
The material conducts heat better; it is installed like siding with snap locks; other models are installed end-to-end. The surface of the products imitates natural stone, wood, brick or masonry. Distinctive qualities of plastic thermal panels:
- water resistance;
- color constancy (the material is dyed in the mass during production);
- resistance to fungi, microorganisms, mold;
- ease of installation and speed of installation.
The disadvantages of the PVC top layer include low resistance to frost and sudden temperature changes; under these conditions, cracks may appear.
Clay/clinker
They are produced by pressing, so the joining of the insulation and the surface layer is strong. Extruded polystyrene foam or polyurethane foam serves as an insulator against cold.
Description of material:
- finished products are equipped with fasteners for fixation on the facade or sheathing;
- the tiles have grooves and ridges to obtain a monolithic finishing layer;
- Foamed plastic is protected from UV rays by ceramics and does not collapse.
The color of the clinker remains constant and does not fade during operation. The material does not require careful maintenance, the coating is resistant to impacts and abrasion.
Fiber cement
For the top layer , a mass consisting of cement, sand and cellulose fibers ; there are options using synthetic aggregate. A polymer coating of varying thickness is applied to the surface. The result is a pattern of marble, granite, basalt, beautiful wood, and sometimes embossing is done to make the texture three-dimensional.
Features of fiber cement thermal panels:
- resistance to low temperatures, frost;
- long service life;
- resistance to rot, mold, fire;
- additional sound insulation.
If fiber cement panels are uncoated, they are painted after installation. A frame is used for installation.
Metal
Steel heating panels are suitable for areas with cold climates. As the top layer, profiled metal sheets are used, on the surface of which a protective polyvinyl chloride, aluminum, aluminum-zinc or paint layer is applied.
Properties of metal thermal panels:
- shock resistant;
- moisture resistant;
- don't burn.
The metal coating conducts sound well, but the foam layer underneath serves as sound insulation, so the disadvantage is leveled out. Steel conducts heat, so its protective qualities are slightly reduced. Poor resistance to scratches and abrasion.
SIP
Thermal sandwich panels are multi-layered. In them, the inner layer, in addition to insulation, contains a vapor barrier membrane. The panels can withstand significant temperature fluctuations and belong to the group of environmentally friendly materials .
The weak point of the material is the connections, which can freeze if low-quality products are selected. The panel does not resist shock loads well. If a dent appears on the surface, the appearance of the facade can only be changed by replacing the damaged part.
Wooden
The top layer is based on wood fibers compressed under pressure at high temperatures. The products are easy to install due to the characteristic tongue-and-groove joint around the perimeter.
Material Features:
- formaldehyde emission class complies with group E1 standards;
- frost-resistant products;
- protect well from heat loss;
- conduct sound poorly.
Disadvantages include susceptibility to moisture, especially if it gets on the ends of the slabs.
The top covering can be covered with expensive veneer or plastic.
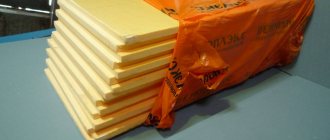
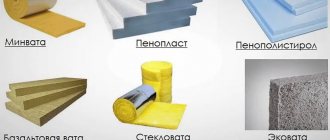
Types of fillers
Polystyrene foam is produced by foaming plastic, the main volume of the material being gas. This explains the high thermal protection ability. There are polyurethane, polyvinyl chloride, phenol-formaldehyde, and polystyrene foams. Short-lived and inexpensive insulation quickly deteriorates.
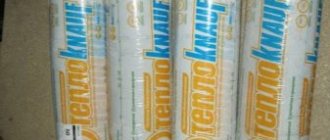
Mineral wool comes from molten glass, rocks, blast furnace slag (glass, stone, slag wool). It protects well from the cold, but is afraid of getting wet, so thermal panels based on mineral wool are placed on a lath with an additional counter-lattice.
Extruded polystyrene foam with its small thickness provides effective thermal insulation. Closed pores inside the material prevent it from absorbing water. A cubic meter of insulation weighs 60 kg.
Compound
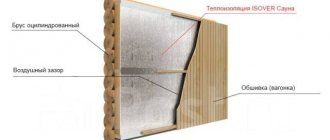
Before you buy thermal panels and start installing them, I advise you to familiarize yourself with their structure and design features.
The thermal panel includes facing tiles and an energy-saving layer. The first is decorative, the second layer is functional. In most cases, the decorative part is presented as brickwork, that is, its exact imitation.
Several different materials are used as insulation. But we'll talk about them later.
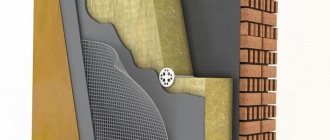
The thermal panel structurally consists of:
- clinker tiles;
- plywood sheets;
- insulation layer;
- reinforcing coating.
The connection between the panels occurs using tongue-and-groove fasteners. This prevents moisture and dirt from penetrating between the slabs.
Such thermal panels can be used for external wall decoration made of any materials:
- from aerated concrete;
- concrete;
- wood;
- bricks, etc.
This makes the products extremely versatile.
Surface preparation
- The walls of the house, corners, and the basement of the building are prepared for the installation of the material. To do this, all crumbling parts are removed, cracks are opened for further cleaning and drying;
- After cleaning, prime the surfaces, which will wash away dust layers and create a durable layer. It is done with a wide brush – a brush, at least 2 layers are needed;
- If necessary, the wall is plastered. For minor damage - with an appropriate spatula, for serious problems - using beacons or by machine;
- The finished plaster layer is additionally coated with a primer;
- Putty for installing thermal plates is optional.