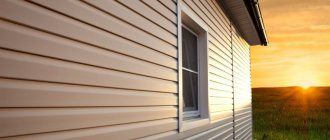
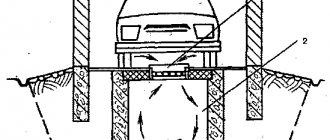
Almost every owner of a private house or country house knows that the main “enemy” of the roof is the steam released by a person when breathing, formed during cooking, which is converted into condensate and settles in the roofing carpet. This can lead to deterioration in the functioning of the thermal insulation layer and, ultimately, to the destruction of the roofing.
To avoid such situations, it is necessary to use a vapor barrier when laying the roofing. For this purpose, special building materials with a vapor permeability coefficient are used, which will reduce the risk of damage to the insulation.
Roof vapor barrier: installation rules and step-by-step instructions
Laying a vapor barrier has its own characteristics and subtleties, which you need to know about if you are going to carry out the installation yourself.
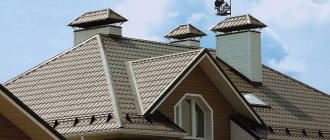
Before installing a vapor barrier, it is recommended to seal the places where it is attached to the roof elements. These include chimneys, ventilation, antennas and others.
It is important to note: If there are stove or fireplace pipes on the roof, then a double layer of vapor barrier is required next to them, since one can be damaged by the heat emanating from them.
Leave a gap between the vapor barrier material and the insulation for additional heat retention. The choice of film is best made taking into account the climatic conditions of your region, the area where the house is built and the type of roofing used.
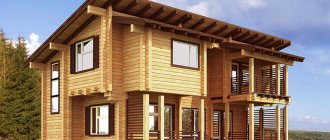
Note to owners of houses made of timber: When building a house made of timber, you can refuse vapor barrier, since this natural material has the ability to absorb moisture, thereby preventing the formation of condensation.
Instructions for laying roof vapor barrier
- Before installing a vapor barrier, install insulation and waterproofing; carefully stretch the vapor barrier film, otherwise it will not function in a sagging state; the film can be mounted using adhesive tape or double-sided tape on a metal, brick or concrete surface. When installing in a wooden house, you can use nails with a wide head, hammer them in at intervals of 30 centimeters; fasten the film overlapping in several layers, leaving gaps for ventilation of 5 cm.
It is important to note: In order to maintain the integrity of the vapor barrier of the entire house, it is necessary to ensure that the film is covered with a continuous carpet without tears, scratches or holes.
In general, the arrangement of the roofing carpet should look like this:
- installation of a vapor barrier film on the interior side; installation of insulation; installation of a windproof membrane; roof sheathing; installation of roofing.
Using a vapor barrier also helps prevent the formation of mold and mildew. By using this layer, you, first of all, take care of the health of your loved ones.
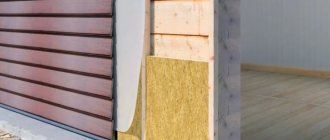
The roof structure is a complex system. It consists of several layers of dissimilar materials, each of which performs its own unique function.
To ensure comprehensive protection of the building from environmental influences, it is necessary to carry out all installation work with high quality, as well as the correct choice of basic and insulating materials. This whole process is briefly called roof insulation.
The standard composition of the roofing cake includes:
Next, we will look in detail at the roof vapor barrier and how to lay a vapor barrier on the roof without the use of special tools.
Laying stages
Let's look at the process of installing a vapor barrier step by step. It must be taken into account that the installation of insulating material is only an integral part of the overall process of installing the roofing and insulation pie. Therefore, it is quite difficult to highlight only the installation of a protective film.
The insulator is laid on both sides - between the roof and the insulation, and on the attic side on top of the heat insulation.
- The first step is usually to lay the outer layer. Most often, diffusion membranes or similar materials are used to remove residual water vapor from the heat insulator.
The membrane is laid before the roofing is laid. The material is laid in longitudinal strips, starting from the bottom (from the eaves area); strips are spread, trying to avoid wrinkles
This is important, since the connections are glued with a special adhesive tape. In some cases, two types are used - double-sided tape and a special wide adhesive tape to secure the connection line; The amount of overlap is usually 10-15 cm (it is often marked on the film with special marks)
When laying, you must act carefully, avoid tears or cuts of the tape. Particular attention is paid to the tension of the material - it should not sag, but excessive load is also dangerous, since when fixing the strips with a stapler, breaks are possible; the finished canvas must be completely sealed. All areas adjacent to supporting structures, cornices or ridges must be secured with double-sided tape or a special adhesive.
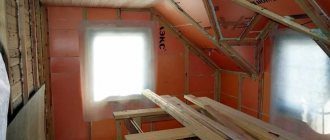
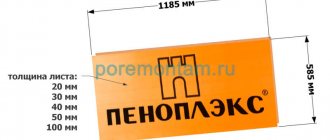
- Laying the heat insulator. This procedure is performed from the attic side (from the inside). Different materials are used - mineral wool, polystyrene foam, penoplex, etc. There is no point in considering the installation of insulation, since this is a separate and responsible procedure.
- Installing a vapor barrier from the inside. It uses a basic insulating film that is completely impermeable to any moisture. If the region has frosty winters, it is recommended to use foil material to save thermal energy. Installation procedure:
- The first strip is laid from the bottom. The side edges are glued (or fixed with slats) to the rafters. It is necessary to provide a temperature reserve in case of changes in the length of the web. To do this, a deformation fold is made near the edge of the strip, which is fixed with a clamp. With any changes in length, it will maintain the strength of the fastening and the overall tightness of the canvas. The length of the strip is attached to the rafters using a stapler;
- subsequent strips are installed overlapping. Its size is marked on the film and is 10-15 cm. The strips are connected to each other with double-sided tape and adhesive tape connecting the joint from the surface side;
- All areas of passage through the roof, adjoining walls or supporting structures are carefully glued with special acrylic glue or other materials. If the surfaces are smooth, you can use double-sided tape.
The last step should be the installation of longitudinal strips on top of the vapor barrier sheet. They are needed for installation of sheathing (OSB, chipboard, plywood, other sheet materials) and subsequent finishing. These strips are attached horizontally to the rafters. It is imperative to cover the joint lines of the vapor barrier strips with them. This will help protect the joint areas of the material from damage.
All passages of pipes, antennas or other structures must be insulated with special care. Special materials are used - adhesive tapes, sealant, etc. There should be no cracks, gaps or other openings through which moist air can enter the roofing pie. Otherwise, all efforts and expenses will be useless.
Why do you need a roof vapor barrier?
Why do you need a roof vapor barrier?
The vapor barrier layer protects the roof from the penetration of water vapor into the thermal insulation. The fact is that most insulating materials have a porous structure, since the air they contain acts as a heat insulator. When it comes into contact with a colder environment, the steam turns into condensate, which is retained in the voids.
This can lead to disruption of the functionality of the heat-insulating material, as well as the occurrence of decomposition and rotting processes in the summer. In winter, freezing water expands, thereby destroying the bonds between the cellular elements.
The release form of vapor barrier films is a roll.
Vapor barrier can be made from various materials. Some of them have additional positive properties that increase the efficiency of operation of the building’s interior. Installing a vapor barrier on a roof is not as difficult as it seems at first glance, but it requires a careful approach and accuracy.
Coating composition
Modern materials have multifunctional capabilities. To work in different conditions, new types of vapor barriers with expanded capabilities are being created. There are films that can perform additional tasks:
- impenetrable. This is a basic type, which is considered to be the main type of vapor barrier;
- semi-permeable. These are various membranes capable of either one-way conductivity or cutoff of vapor at a certain concentration.
Semi-permeable materials (membranes) are usually divided into several groups:
- conditionally conductive;
- conductive;
- superconducting.
The choice of one type or another depends on the operating conditions of the coatings. The materials for creating films are:
- polyethylene (regular or reinforced);
- polypropylene;
- glassine
Attention! Currently, glassine has practically fallen out of use due to poor performance.
Membranes (film for roof vapor barrier)
Membrane vapor barrier materials are divided into five main classes:
Type A.
Has increased resistance to moisture and wind. It is laid between the roofing covering and the heat-insulating layer. Manufacturing technology: spunbond.
This vapor barrier does not allow moisture to flow through the cracks of the roofing material, as well as from the condensation that forms. The absence of a laminating layer allows the use of such membranes in roofing structures with a slope of more than 35 degrees. To remove excess moisture, it is necessary to install ventilation holes from a double sheathing located between the membrane and the insulation. Type AM.
Unlike Type A, it has a multilayer structure. It is placed between the insulation and the roof to provide adequate protection from negative atmospheric influences. The most common is a three-layer construction, consisting of two layers of spunbond with a diffuse film located between them.
It acts as a waterproofer, as it allows steam to pass through, but retains water. Laying is done directly on the heat-insulating layer, which reduces labor costs for creating a ventilation gap. Type B. Two-layer material.
Consists of a layer of vapor barrier film and spunbond. It is used to protect insulation from internal building vapors. Used only in insulated roof structures. Type C.
It is manufactured similarly to type B membranes. It has a stronger and thicker layer of spunbond, which provides better protection of the insulation from moisture. Used in insulated and non-insulated, pitched and flat roofs. Type D.
Consists of polypropylene fabric, protected on one side with a laminating polymer coating. The structure of the material allows it to withstand significant mechanical stress. This dictates its installation between the insulation and the attic floor screed, as well as in non-insulated roof structures.
Varieties
Owners of companies specializing in the production of vapor barriers, unlike the owners of certain structures, understand that their product plays an extremely important role in the construction industry. Therefore, they produce material that differs in composition, price, properties and purpose. As they say, we are happy to try, which is quite good, since there is plenty to choose from.
So, the following types of protective material proudly flaunt on the market:
Ordinary polyethylene
Polyethylene film is the simplest material intended for vapor barrier. Today, perforated and non-perforated films are available for sale. For vapor barrier, non-perforated films are usually used. The advantage of the product is its low price. Disadvantages - short service life.
Reinforced polyethylene
Polyethylene, reinforced with twisted polymer thread, is usually used for vapor barrier of either the ceiling, walls, or floor. Why? Because it does not allow moisture or air to pass through - and this is a plus. However, if you decorate the whole room with it, you will get the effect of a thermos - and this is a minus. In addition, the raw material has the advantage of a reasonable price and the disadvantage of a minimal service life.
Membrane insulation
Membranes are an innovative material designed to reliably protect heat-insulating raw materials from steam. Single and double sided products available
The first conducts steam in one direction, which is why it is important not to confuse which side to lay the vapor barrier material towards the insulation. This is stated in the instructions for each material.
The second acts in two directions, so it is attached to the thermal insulation on either side. Single- and multi-layer membranes are also available. By the way, the second option can collect moisture, and then, when required, release it. Advantages: durability, wear resistance, environmental friendliness and functionality. The disadvantage is the high price.
Foil insulation
Foil vapor barrier is a universal raw material that also plays a role in vapor barrier. and hydro. and sound. and thermal insulation. And it is also an impeccable material for protecting insulation, where do you think? That's right, in a bathhouse or sauna, because it is not afraid of high temperatures and humidity.
It is attached using a furniture stapler. and the joints are glued with metallized tape for vapor barrier. A typical example is penotherm. Advantages: long service life, versatility, wear resistance. The disadvantage is the high price.
Burlap is a raw material designed to protect thermal insulation material. Its base is film-type polypropylene threads. They are laminated with low-density polyethylene. The layer thickness reaches 20 microns. Advantage – low price. The disadvantage is the formation of microcracks.
There are other types of material, but they are either “children” or “parents” of the above raw materials. In view of this, I see no point in talking about them. I will say one thing: today the best barrier is a membrane. It's expensive, but completely worth it.
Which side is the vapor barrier for the roof laid on?
The principle of installation of vapor barrier materials depends on which side the layer responsible for repelling water vapor is located:
- ordinary and reinforced polyethylene films, as well as membranes of type A and AM can be laid on the insulation on either side. Anti-condensation vapor barriers are laid with the smooth side towards the insulation, and the fleecy side towards the vapor formation. Foil elements are laid with a metal layer inside the room, since this is where the light coming out of the building should be reflected heat. Type B membranes are laid with the film side to the thermal insulation layer. Type C and D membranes must be adjacent to the insulation with their rough side.
We have figured out which side to lay the vapor barrier on the roof, now we will look in detail at how to properly lay the vapor barrier on the roof.
Video description
About the membrane installation technology in the following video:
The main condition for installation is that the film is fixed without tension, with a sag of approximately 2 cm. The reserve is created due to the ability of the wooden frame to change its dimensions with the change of seasons (with changes in humidity); otherwise there is a risk of the film tearing.
For horizontal installation, installation is carried out from above (from the ridge)
The strips are laid with a reverse overlap (the lower strip overlaps the upper), for additional protection of the insulation; they are connected with tape and secured to the structure with galvanized nails or a stapler. If the thermal insulation layer is not dense, the rolled sheet is fixed using slats, which must be antiseptic. Particular attention is paid to junction points (attics, windows, hatches, pipes, ventilation ducts); they are isolated especially carefully.
Fixing the filmSource pro-uteplenie.ru
Vapor barrier for the roof: how to install it correctly using special technology
Laying a vapor barrier on the roof is carried out as follows:
Laying can be done vertically and horizontally. In the second option, the installation of roof vapor barrier is carried out starting from the ridge part of the roof. Each subsequent strip is superimposed on the previous layer with an overlap, the value of which should not be more than 10 cm.
The vapor barrier is attached to wooden rafter elements using galvanized nails or a construction stapler. When installing films and membranes near attic hatches, you need to use a special vapor barrier apron, which is included in the standard package. At the junction with ventilation pipes, film and membrane structures are folded down and wrapped around pipes and are tightly fixed with construction tape. After laying the vapor barrier layer, it is necessary to nail wooden blocks.
The rules for laying vapor barrier on the roof dictate the following rule - the pitch between the sheathing bars should be 500 mm. In this case, a ventilation gap is formed, and additional fastening of the vapor barrier layer is carried out. Now you know how to lay a vapor barrier on a roof, you can move on to the issue of waterproofing. If the vapor barrier for the roof has been damaged, then small cuts or holes can be sealed with special tape for vapor barrier membranes.
Roofing pie diagram
Sealing joints with tape
Final vapor barrier option
Possible mistakes
During the installation of vapor barriers, various errors are possible. Some of them are a result of lack of experience or unfamiliarity with the technology. Other shortcomings arise due to ill-considered actions and lack of coordination between different stages of construction. For example, if the thickness of the strips installed on top of the insulating material is too small, it will be difficult to install sockets or lamps in the casing - during installation there is a great danger of breaking the tightness of the protection.
A common and very dangerous mistake is installing an impenetrable film on both sides. Water vapor is trapped inside the roofing pie. Since perfect tightness can never be achieved, the amount of moisture inside begins to increase. Over time, real puddles of water form inside the pie, the insulation ceases to perform its functions, and the wood begins to rot. Impermeable material is needed only from the attic side, and vapor-permeable material is needed between the roof and the heat insulator.
In addition, violations of film laying technology often occur. Most often, they occur due to the low qualifications of invited workers. Many owners, wanting to save money, hire dubious, low-paid crews. They work quickly, but after that they usually have to redo everything. It is recommended to contact authorized specialists from specialized organizations who provide an official guarantee for their work.
Application area
Today, modern SNiP standards regulate the use of vapor barriers in the following cases:
- When installing a heat-insulating layer of roofing coverings in warm attics and attics.
- In the case of insulation of walls of buildings from the inside. This is especially true for metal structures - garages, cabins, insulated containers and others. This measure will significantly increase the service life of mineral wool or expanded polystyrene used as insulation.
For vapor barrier of wooden floors of the first floor.
Often, in our conditions, the floors of the first floor are also equipped with an insulating layer to prevent heat from escaping from the room in winter. And if there is a significant difference in internal and external temperatures, drops of condensed moisture will naturally appear on cold floor surfaces. The result is, again, saturation of the insulation with water, which leads to a significant deterioration of its thermal insulation qualities and premature destruction of wooden floor structures.
Material requirements
The most primitive and cheap material for roof vapor barrier is glassine. But in modern realities, the installation of this outdated fabric is practically not carried out, since there are more effective and durable analogues. Current vapor barriers are made from high-strength polymers with improved performance characteristics. A properly selected vapor blocking film has the following qualities:
- Wide temperature range. To make installation possible in any climatic conditions, the film must withstand high, low temperatures and even sudden changes. The optimal temperature range for products of this type is considered to be between -70 and +100 degrees.
- High degree of vapor permeability. The lower this indicator is for the vapor barrier, the better. Previously, polyethylene films with a vapor permeability of 13-20 g/m2 were laid, but now polypropylene analogues with a permeability of no more than 0.4 g/m2 are used for roofing.
- Long service life. Installing a vapor barrier whose service life does not exceed 10 years is impractical, since modern roofing materials last more than 20-25 years, and it is almost impossible to replace the film without disassembling the structure.
- Elasticity. Vapor blocking film based on resistant polymers is highly elastic, which simplifies the installation of the material and also reduces the amount of damage during installation.
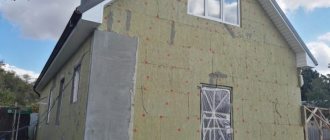
Installation of vapor barrier
Important! Experienced craftsmen believe that the main indicator of the quality of a vapor barrier is the high strength properties of the material. A properly installed vapor blocking sheet can even withstand the weight of snow, rain or melt water in the event of extensive damage to the roof.
Technology for proper installation of vapor barrier with your own hands
When laying a vapor barrier with your own hands, you should follow simple rules:
- The film must be mounted with the smooth side to the vapor barrier surface - insulation of the roof, walls or floor. If a foil modification of the film is used, it should be laid with the polyethylene side facing the surface to be insulated, and with the reflective screen facing the inside of the room. It will be especially effective when equipping internal hot rooms - baths and saunas.
- They are laid exclusively overlapping with an overlap of at least one hundred millimeters. Preliminary fastening to wooden structures is carried out using a construction stapler with staples, a hammer with galvanized nails or a screwdriver with anodized screws.
- A prerequisite is the tightness of its execution. In practice, this means the need for careful gluing of all canvases in areas of overlap and around the perimeter. For these purposes, it is recommended to use high-quality double-sided tape, and its width should not be less than 100 millimeters.
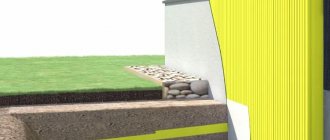
Waterproofing cold roofs - is it necessary?
The space under a cold-type roof is not heated, but the temperature inside is always different from the outside. For this reason, condensation collects at the bottom of the profiled sheets. Therefore, the answer to the question: “When a cold roof is built, is waterproofing necessary?” unambiguous Of course it is needed. Properly installed waterproofing on the roof under the corrugated sheeting will prevent moisture from entering the under-roof space.
This layer will prevent wet fumes from reaching the wooden elements of the rafter system and other parts of the roof structure. The waterproofing is laid on top of the rafters and then secured with a counter-lattice. Next, install the sheathing and corrugated sheet.
When the waterproofing layer does not prevent steam from escaping outside, then there is no need to install a vapor barrier for a cold roof. Having risen upward, water vapor gets through the film under the corrugated sheet and dries out in that place due to the movement of air currents. In this case, roofing felt, polypropylene, glassine and polyethylene are not suitable. For a cold roof, experts recommend using a non-woven vapor-permeable membrane.
Features of laying vapor barrier film on various structural elements of buildings
Direct installation of the vapor barrier is carried out as follows:
- In the case of a vapor barrier for the floor covering, the film is spread and fixed on the surface of the subfloor. After gluing all the overlaps and the perimeter, you can lay the finished floor and floor covering.
- For walls and pitched roofs, it is possible to lay a vapor barrier film with the panels arranged vertically or horizontally.
- When arranging a vapor barrier for a flat insulated roof, after laying it, it is necessary to fill a frame of wooden slats 10-20 millimeters thick on top of the film. These slats serve as additional fasteners for the film material and provide ventilation between the vapor barrier and the finishing of the flat roof.
Using double-sided tape
Double Sided Adhesive Tyvek Tape for Sealing Vapor Barrier
When organizing a vapor barrier layer, the following types of double-sided tape are used:
- paper based; polypropylene based.
The second option is of better quality in terms of durability and ability to withstand external destructive factors - moisture and high temperatures.
The use of double-sided polypropylene tape is especially justified when installing vapor barriers in extremely hot and humid rooms, for example, in Russian baths.
Double-sided tape is used as follows:
- First, the material is unwound and glued to the edge of the lower joining sheet with the release paper facing up.
- Then the next sheet of vapor barrier tape is laid out and secured with the required amount of overlap.
- After this, the layer of anti-adhesive paper is removed from the top side of the tape and, with light pressing and smoothing, both layers of the vapor barrier film are securely fastened together.
If you follow all the technological nuances of installing vapor barrier materials, using only high-quality products, you can significantly extend the effective life of the building’s structural elements - floors, walls, ceilings, roofing and the building as a whole.
Remember that your costs for installing a high-quality vapor barrier layer in a residential building will be disproportionately less than the costs of repair work due to the premature loss of insulation, load-bearing wooden structures and interior finishing materials. Therefore, insignificant savings on vapor barrier during construction of a building can result in significant losses in the future.
For more information about the technology of laying and fastening vapor barriers for a warm roof with your own hands, watch the video.
- Date: 09/27/2015 Rating: 19
Currently, vapor barrier is one of the components of any construction. First of all, we are talking about roof vapor barrier.
The fact is that there is moisture in any room. The water itself isn't that scary. The most destructive effect on roofing materials is caused by condensation that forms on the inner surface of the roof in hot weather.
Scheme of vapor barrier of walls from the inside.
Laying a vapor barrier on the roof means protecting all building and finishing materials from the harmful effects of moisture. This is especially true for private houses and cottages, where in most cases mineral wool is used as insulation.
Condensation can penetrate its structure, destroying it and significantly reducing its service life. Below you will find instructions on how to install a roof vapor barrier. This is where it is worth fighting condensation.
Standards
It is possible to carry out high-quality roof waterproofing only when the materials used meet the following standards.
Their main property should be immunity to water, as well as water resistance. It will be good if such materials are also excellent in terms of thermal insulation - this will make it possible to save on insulation. An important feature of waterproofing materials will be their high elasticity, since rigid materials are difficult to use when covering roofs, especially when it comes to some complex shaped options. When creating waterproofing for certain categories of roofs, it is necessary to select materials that have excellent vapor permeability. This parameter will be extremely important when there is a living space under the roof of the building - a room or, say, an attic. No less important aspect than the above will be the strength of waterproofing materials
Everything that will be used for waterproofing must have the ability to withstand physical stress and be as impervious to physical damage as possible. Some fragile or not very strong materials simply cannot be used, since even the slightest disturbance in the structure of this or that material can cause water to begin to get inside and destroy the material, and cold will begin to get inside the building.
- Some people, in the hope of saving money, simply trim the roof with good material. They mistakenly believe that its strength is sufficient to protect the building from almost all negative natural factors. They are right that such material can protect the building from low temperatures, scorching sun or wind. But water will easily penetrate into holes and cracks, destroying this coating inside and provoking corrosion with fungus. It is precisely because of the fight against the phenomenon mentioned above that it should be understood that it is impossible to do without roof waterproofing.
- And for the material to be suitable, you should know about standards such as vapor permeability, especially if we are talking about an insulated roof. This property allows water to escape from the insulating layer under the roof, from where it will simply erode. If the vapor permeability of the material is low, then water will collect in the material, transforming into condensate, and will simply begin to destroy it, as a result of which the insulation will ultimately lose all its useful properties and characteristics. If we talk specifically about materials with high vapor permeability, then they can be called a superdiffusion membrane, which is usually placed directly on the insulating layer, which makes it possible not to make any intermediate frame. If the roof is not insulated, then it can be waterproofed with a material that has low vapor-permeable characteristics.
- Another important point is water resistance, which was also mentioned above. It is expressed in maintaining contact with water for as long as possible. When finishing a flat roof, it is necessary that the water-repellent surface be high, because water tends to linger on a roof of this type. If the roof is pitched, then this indicator will be no less important due to the fact that the roofing material often has so-called sagging or depressions, which is why water can linger there. If we take it according to the standard, the waterproofing layer must withstand a pressure of one and a half meters of water column. As a temporary roof, you can use a membrane with a water column of four meters.
- If you decide to use a waterproofing film as a temporary roof, then it must still have excellent characteristics in terms of withstanding the effects of solar radiation.
- And the last important parameter will be mechanical strength. It’s just that during the process of laying materials on the roof, some elements may disrupt the film integrity. Where deformations and breaks occur, leaks may appear. The integrity parameter is measured in units of weight per square meter. A film with a value of 100 grams per 1 square meter will be reliable.