Insulating the floor in a private house with your own hands is a completely affordable task, and it can be solved without involving professional builders. The main thing is to decide on the choice of thermal insulation material and the technology for carrying out insulation work. This will largely depend on the design of the floor.
Do-it-yourself floor insulation in a private house
It is necessary to insulate the floor in any case, treating this task with the utmost responsibility. Without this, you will never be able to create comfortable living conditions in your home, even if you spend huge amounts of money on operating the most advanced heating system and other climate control equipment. Bet thermal insulation is money down the drain!
The publication will discuss materials used for thermal insulation, various insulation technologies, depending on the design of the floors.
How to insulate the floor in an old house, including without removing the covering
In old, but still reliable houses, cold floors are often found. There are many options for its designs, but each can be turned into insulated, and even heated. Warm floors are always a welcome feature in the house, and it’s not difficult to make it yourself. Let's look at the most typical options.
Without removing old floors - how to insulate
Not everyone wants to do the serious work of tearing out old boardwalk and then putting it back in place. To insulate an old floor without removing the flooring, there are two options:
Both options are good if there are prerequisites for them. Let's look at it in more detail below...
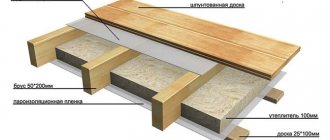
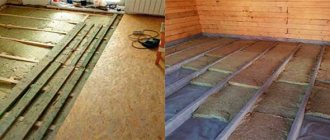
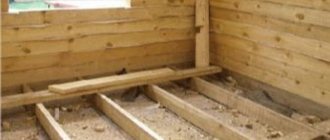
Typical insulation of an old wooden floor - remove the flooring and place the insulation between the joists
We have a typical ventilated underground and wooden joists. The laid insulation layer must be ventilated from the street, with the exception of samples that are not saturated with water. Therefore, the vapor barrier membrane is located on the room side. Leaky insulation on the side of the ventilation stream (underfloor) must be protected by a windproof membrane so that its layer is not blown through.
But with appropriate protective measures, you can also use any insulation - polystyrene foam, self-leveling penoizol (recommended), vermiculite, ecowool, expanded clay (if the layer is thick), leaves and straw with lime...
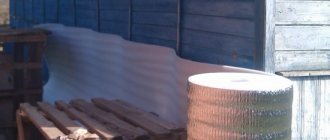
We fill the low underground with ash and expanded clay
Often, old floors were made directly along a shallow trench, only 30–50 cm, slightly more than the height of the log itself. A popular insulation option in this case is to fill the low subfloor with ash and expanded clay, as well as close vents and cracks, and prevent air from blowing through the insulation. A layer of ash-slag from coal, 40 cm thick, even moistened from the ground, gives an excellent thermal insulation effect, comparable to expanded polystyrene foam 7 - 10 cm thick.
On top, the logs with backfill are insulated with a vapor-resistant membrane and covered with wooden flooring.
We insulate with soil - we insulate the foundation on the sides
The soil directly under the house can also serve as a heat insulator - yes, yes, just cold, cold earth... You just need to ensure that there is no ventilation of the subfloor, fill the space between the joists with soil, stone, or preferably expanded clay or slag if possible, and put a vapor barrier membrane on top, and then ordinary flooring.
Now the top layer of soil under the house with a thickness of 0.7 - 1.0 meters will have an increased temperature and serve as an excellent thermal insulation layer.
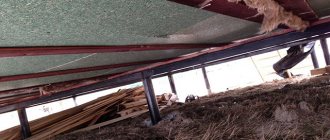
We insulate the old floor without tearing the coating - we use polyurethane foam
If it is possible to more or less freely reach the coating from below, then you can use sprayed polyurethane foam, with a layer thickness of only 7 - 10 cm. Let us recall that this heat insulator has the lowest thermal conductivity coefficient, about 0.03. But the possibility of creation must be agreed in advance with the specialists who will do the spraying. Polyurethane foam is a vapor barrier, forms a continuous layer, holds the structure together, no additional use is required here.
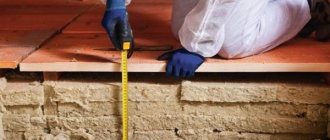
We measure the height - is it possible to insulate over the old flooring?
A comfortable height in the house is 2.4 m, perhaps 2.2 meters if the residents are not tall and are willing to put up with a low ceiling. Therefore, it is not possible to lay a layer of insulation and coating 12–15 cm thick everywhere. Additional obstacles:
Thus, having completed the necessary measurements, you can come to a conclusion about how best to insulate the floors in the house, whether it is possible to lay layers on top of the existing flooring...
We insulate over the flooring
On the old boardwalk we put a vapor barrier with a screw on the wall, then a couple of layers of extruded polystyrene foam, with a total thickness of 10 - 12 cm (thermal conductivity coefficient - 0.033), then a separating polyethylene film, and a damper tape along the walls. We lay a prefabricated dry screed - two layers of gypsum fiber, laid with overlapping seams and leaving thermal gaps between the sheets of 2 mm, and fastened with screws at 30 cm intervals.
Making a heated screed
Only a thin prefabricated screed can be placed on top of old wooden floors - approximately 50 kg per square meter. A thick 8 cm reinforced concrete screed is unlikely to be suitable here - only on floors on the ground, or on joists installed on intermediate supports. For a thin screed, it is most correct to use a profiled heat insulator and metal heat distributors. Here, extruded polystyrene foam is already needed for economic reasons from 12 cm, and preferably 15 cm.
Hydraulics can often be made into short circuits - up to 30 m; in this case, the temperature in the circuits can be adjusted with a simple adjustment valve, by limiting the amount of coolant, without installing mixing units.
You can also install heat distribution plates on a wooden counter-lattice, laid staggered, on an already well-insulated underground - how to do it...
Source
How to insulate the underground without removing the finishing boards?
After wintering for the first time in a new house, we discovered that the floors were very cold. An examination of the underground showed that apart from the finishing boards, there was nothing else there. That is, logs lie at a distance of about 1.5 m from the ground, and finished floor boards are nailed to them. I don’t really want to rip out the flooring of the whole house - then I’ll have to do cosmetic repairs, but I don’t have the money for that. Tell me, is it possible to somehow insulate the floor below? You can only get there through a hatch measuring 1 m / 1.3 m. It is necessary that the materials “go through” and it is possible to work with them in a limited space.
In your situation, tearing down the floor is absolutely not necessary. It is quite possible to insulate it from below. The work ahead, however, is quite unpleasant.
Assembling the sheathing
First, we fasten the beam under the window sill, leaving a gap of 1-1.5 cm at the top. We cut the beam 1.5-2 cm shorter than the length of the parapet, place the beam against the wall and drill holes with a diameter of 8 mm with a hammer drill for dowel nails in increments of 50-70 cm.
We fasten the lower beam in the same way, retreating from the floor by 1-2 cm.
After we have secured the upper and lower beams, we proceed to fastening the cross beams using the same method. The distance between the transverse bars should be 60 cm. If the balcony is often exposed to wind loads, reduce the step of fastening the transverse bars to 40 cm.
Every 2.5 meters, two beams are attached in a row (see the picture below!) This is done so that we can then attach a sheet of drywall to them!
After all the cross bars are secured, we move on to the side walls of the balcony. How to understand which walls to insulate and which not? Everything is very simple, if the wall is load-bearing, it does not need to be insulated. But to achieve an ideal result, you will have to insulate both side walls, the ceiling and the floor. The wall adjacent to the room is usually not insulated. That's what we'll do!
Method No. 1
The first method involves the use of any mineral wool insulation. It is better if it is in slabs rather than in rolls. But if you really need a completely budget option, you can use the latter.
The width of the slab or roll should be several centimeters greater than the distance between the joists. This is necessary so that the insulation “sits” tightly. In terms of thickness, it is better to take a material 30-50 mm thinner, lag. So that there is an air cushion between it and the finished floor. You can use thin insulation in several layers. Then you need to lay it with an overlap - so that the joint of one layer overlaps the sheet of the second.
With a very small budget, you can do without boards - ropes will suffice.
Which penoplex to choose
Penoplex slabs are produced in different thicknesses, densities and thermal conductivities. Each type of material has its own marking and is used for its intended purpose. The softest type of penoplex brand 31C. It is designed to insulate surfaces that will not be subject to strong mechanical stress. It is recommended to be used for installation on ceilings and walls.
It is better to put penoplex grade 35 on the floor, since it is endowed with increased density and does not deform under the weight of furniture; you can walk on it freely without leaving dents. You can pour a cement screed on it or install a “warm floor” system.
The thickness of the slabs varies from 20 to 100 mm. The 20 mm thick material has smooth edges, while thicker sheets are available with protrusions on the edges. Through these protrusions, the sheets are tightly connected to each other, so that cold bridges do not form. This connection system eliminates the need for additional sealing of seams and does not require gluing of joints.
Penoplex sheets 50 mm thick are suitable for insulating walls and ceilings. It makes no sense to buy thicker material, since it will “steal” the useful area of the balcony, while the efficiency of insulation will not increase much. On the floor, the thickness of the sheets is selected based on how many centimeters it can be raised. In any case, it is necessary to carry out calculations so that, taking into account the screed and flooring, the floor height does not rise above the threshold.
Method No. 2
The second method of insulating such a floor will cost you a little more, but it is much easier to implement.
In this case, EPS - extruded polystyrene foam - is used as insulation.
Simply cut pieces of the required size, insert them between the joists, and blow out the joints with polyurethane foam. This material can also be laid in several layers with overlaps.
EPS is not afraid of moisture, which means there is no need to make a vapor barrier. You can attach it with self-tapping screws directly to the finished floor boards.
Source
How to insulate an old floor in a private house - instructions for insulating an old floor
It is no exaggeration to say that interior flooring is the most used surface in the home. Children and animals spend most of their time there. To prevent diseases, in particular colds, you need to think about how to insulate the old floor in a private house. In addition, it will also help reduce heating costs.
Determine the initial conditions
Cold air always accumulates from below, and warm air rises upward, therefore, no matter how much you heat the house, if the floor remains cold, then it is almost impossible to achieve complete comfort. Before starting installation work, you need to analyze several points:
There may be a concrete screed under the floor
. The answers to these questions will determine whether the old coating can be used or whether it must be dismantled with the need for additional disinfection and isolation measures.
Choosing a method of insulation
Until now, a large number of varieties of insulation materials have been developed. To apply them best in a specific setting, it is important to become familiar with their strengths and weaknesses.
Expanded clay can be used as insulation.
One of the insulation methods that has been used for quite a long time and does not lose its popularity is the use of expanded clay. It is made from natural ingredients, and the manufacturing process involves firing a clay base. This material wins according to the following parameters:
The disadvantages include:
Foam plastic
The next item on the list of materials that can be used for insulation purposes is polystyrene foam. Its strengths include:
If you choose polystyrene foam, you need to consider:
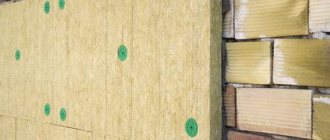
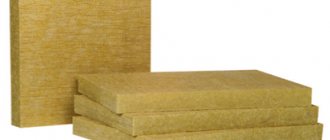
Mineral wool
Many people often have a choice between this material and mineral wool. To make it, broken glass, quartz, rock or slag can be used. If we talk about positive qualities, then these are:
Some of the sad moments include:
Penoplex
Penoplex is very similar in its characteristics to polystyrene foam. Has even greater thermal insulation. Can be used in any weather conditions. Also loved by rodents and afraid of high temperatures (if directly exposed). In some cases, insulation can be done using gypsum fiber. It is used in conjunction with dry screed. Filling cavities with polyurethane foam can be considered as a method. Under certain conditions, this can be done without removing the old floor.
Vermiculite
Vermiculite is an excellent, durable material that is resistant to moisture, but its cost is quite high, so not everyone can afford it for floor insulation.
The ideal solution would be a combination of passive insulation with active underfloor heating. For the latter, a large number of types are available today, which include water-based and electric-based options.
Antiseptic for wood
In addition to calculating the amount of basic material and the necessary work, asking questions at the beginning helped determine whether additional components would be needed:
To purchase the correct amount of material, you first need to calculate the area of the room. To do this, the length is multiplied by the width. The resulting number will be our basis. For insulation, the thickness of the beams can be neglected, since it still needs to be taken with a small margin. The quadrature of the hydro- and vapor barrier will also be equal to the area; an overlap will need to be added to the final value, which should be 10-15 cm.
When purchasing components for a heated floor, you can subtract the space that will be occupied by furniture.
Insulation with polyurethane foam
If you are sure that the condition of the underground space is close to good. For example, under a wooden base there is a concrete screed that can serve for many years, and the logs themselves lie on a cement base, then the work can be carried out without large-scale dismantling.
Filling the underground space with ecowool
Another option, with a good foundation under the floor, is to tear off all the boards, cover the entire area with a vapor barrier and lay insulation on top in the niches. If the wooden covering is in perfect condition, and it is possible to raise the floor by 10 cm, then you can use the dry screed method. To implement it, the entire area is covered with a vapor barrier. A sheathing made of wooden beams is installed, and expanded clay or other filler is poured into the space. The base for the finished floor is laid on top and the final finishing is performed.
What are thermal insulation boards attached to?
The choice of method for attaching EPS mats depends on the coating itself on which installation is taking place, as well as the operating conditions of the balcony. For fixing to concrete, stone and brick walls use:
- Mastics. For gluing to a bitumen-polymer composition, a special gun is required. The mastic is applied to the edges and center of the slab, then pressed to the surface. Within an hour, the penoplex can still be moved.
- Cement mixtures. The dry powder is diluted with water according to the instructions on the package and infused for 2 hours. After this, apply the mixture onto the panel with a notched trowel and press it against the base for several minutes.
- Glue. Special adhesive compositions may contain cement in their formula. The adhesive is applied to the EPS board in spots, stripes or in a continuous layer. After this, the penoplex is pressed to the surface. The adhesive method requires additional fixation with dowels.
- Adhesive foam. A special polyurethane foam binder ensures good adhesion of the balcony wall to the penoplex. The foam is distributed along the edge and center of the slab. Press the product onto the base for 20 minutes.
- Liquid Nails. This fixative is used in small areas, since over a large area the cost of glue increases significantly. The product is applied pointwise: along the perimeter and in the middle. Penoplex is pressed to the surface for one minute.
- Disc dowels. Mechanical fasteners are used simultaneously with glue. The hole for the dowel creates a passage for cold air, so the cap should not rise above the surface of the slab.
- Self-tapping screws. This type of fixation is used if there is a wooden base. Before tightening the screw, place a washer under the head.