- Calculation of heating mats and infrared film
- Heating cable calculation
- Calculation of UNIMAT core mat
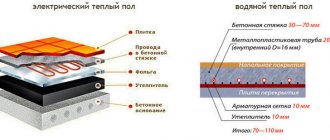
Electric underfloor heating is represented by various types of systems: thin heating mat, heating cable, rod carbon mat, infrared film, each of which has its own range of characteristics and areas of application.
Price for heating mats under tiles from RUB 2,019.
The price for a heating cable in a screed starts from RUB 1,557.
Price for film IR heated floor from 430 rubles.
Price for rod-based infrared floor heating starts from RUB 3,158.
Proper selection and calculation of underfloor heating will ensure the most efficient functioning of the heating system with the lowest energy costs.
To make an accurate selection and calculation of a heated floor yourself, use the formulas described below or contact the specialists of the Warm Floor chain of stores in your city.
The choice of heated floors is based on the following data:
- The required degree of heating in a room or building. Electric underfloor heating can be used as a comfortable heating of the floor surface, as well as as the only source of heat in the apartment.
- The type of flooring used in the room. Each coating has different thermal conductivity and thermal sensitivity, which must be compatible with the heating system.
- Type of installation – cement screed (at the stage of major repairs); warm floor under tiles or dry installation under laminate (for cosmetic repairs).
- The total area of the room in which the heated floor will be installed, and the area not occupied by furniture.
Heating mat IQWATT from RUB 3,319.
IQWATT heating cable from RUB 3,076.
Film flooring CALEO from RUB 1,339.
UNIMAT rod floor from RUB 2,398.
Heating mat DEVI from RUB 4,261.
DEVI heating cable from RUB 4,307.
The first step to creating the optimal temperature using a “warm floor” system is to determine the required degree of heating: will comfortable heating of the floor surface be enough for you (the so-called “additional heating”) or is it necessary to compensate for the lack of central heating using a warm floor (main heating) . The answer to this question will determine the level of power that the “warm floor” system should have. For comfortable heating it is 100-150 W/m2; for main heating – 160-200 W/m2; for cold unheated rooms (balconies and loggias) – 200-250 W/m2.
It is important that the required power is compatible with the selected floor covering, the manufacturers of which, as a rule, indicate permissible temperature thresholds. Thus, for laminate and linoleum, the optimal power is 100-130 W/m2, the floor surface temperature should be in the range of 26-28 ° C. Therefore, these coatings are recommended to be used with heated floors only for additional heating. In most cases, KEEPLY infrared film is used for such coatings. Alternative options are Devidry thermomat (manufactured by DEVI) and TVK-130 LP (THERMO).
For our customers, the service of selecting and calculating underfloor heating is free!
The cost of analogues of Keeply BASIC film heated floors is about 325-350 rubles. per linear meter. This is 650-700 rubles. per square meter.
At the same time, the thermal film itself is only heating elements, and not a “warm floor” system ready for installation.
In addition to the heating film, it is necessary to purchase components for installation - terminals or grommets, bitumen insulation, electrical wires. Read more…
Tiles and porcelain tiles are suitable for both main and additional heating, i.e. compatible with high powers – 150-220 W/m2. Manufacturers DEVI, THERMO, WARMSTAD and IQWATT offer heating mats that are widely used as heated floors under tiles and porcelain stoneware.
To select a heated floor, it is important to consider the condition of the base surface on which the system will be mounted:
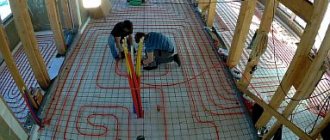
- For major repairs, it is recommended to install cable systems (model Warmstad WSS from WARMSTAD (Russia); Deviflex 18T from the manufacturer DEVI (Denmark); heating cable SVK-20 from THERMO (Sweden)), mounted under a cement screed with a height of 3-5 cm. Such heated floors are compatible with absolutely any floor covering. The system is turned on after the screed has dried, after 30 days.
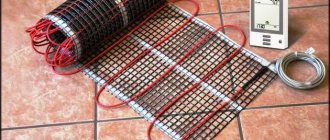
- In the case where the screed is already equipped, heating mats, such as IQ Floor mat from IQWATT or infrared rod-heated floor UNIMAT, are suitable. Thin mats are installed in a thin layer of leveling soil (1-1.5 cm thick), and UNIMAT thermomats are placed under tile adhesive (2-3 cm).
- Another option for an equipped screed is dry installation, which allows you to maintain the height of the room. Infrared films KEEPLY, CALEO or VIOLET are designed for this purpose and can be turned on immediately after installation.
Pay attention to the location of the object in which the heated floor will be installed. It is worth considering factors such as the presence of heated rooms below and above or a cold foundation (soil). In case of high heat losses, it is necessary to place heat-insulating material under the heating system.
Most “warm floor” systems are installed in that part of the room where there are no large objects or equipment (bed, closet, refrigerator), that is, in free space. This is necessary to prevent the system from “locking up” and causing further overheating. If you are not sure that the furniture will always be in one place, then you need to choose a warm floor with a self-regulating function - the UNIMAT rod mat. This property allows the system to independently adapt to its environment, reducing or increasing the power level as needed and thereby saving energy.
The calculation of a warm floor is carried out in three different ways, depending on the type of heating system.
Calculation of heating mats and infrared film
When choosing the required set of heating mat, infrared film (KEEPLY, CALEO, VIOLET FLOOR), the following formula is used:
Stotal — Szan. = S;
where: Stotal. – area of the room; Szan. – area occupied (locked) by furniture; S – area of the required set.
Calculation example:
The area of the children's room is 12 m2, of which 5 m2 are occupied by furniture. According to the formula:
12 m2 – 5 m2 = 7 m2
To heat this room, you should choose a heated floor with an area of 7 m2.
In the case of a thermomat, it is prohibited to shorten or extend it, so the area of the installed heated floor is rounded down. Thermal films KEEPLY, CALEO and VIOLET FLOOR can be cut, which makes it possible to connect individual strips of underfloor heating and combine different sets of this brand. For example, on 9 m2 an infrared film of 5 and 4 m2, or 4, 3 and 2 m2 can be installed. And also one large set can be used in several rooms. It all depends on the configuration of the room and the desired layout of the heated floor.
By submitting this form, I accept the terms of processing and use of personal data.
What can affect heat transfer
How well the floor heating will work is influenced not only by the power of the heating elements, but also by how well the entire “pie” is designed and made, and how well the materials are selected.
Coating
First of all, heat transfer is affected by the coating that is placed on top of the heating elements. For example, if a resistive or self-regulating cable, mats made from it, or an infrared rod floor are used for heating, most often they are poured into a screed. In this case, special mixtures for heated floors are used. Another option is to add additives to a standard cement-sand mortar that increase the thermal conductivity of concrete. The second option is cheaper, but you will have to look for information about the necessary additives. But you can save money.
The covering of a heated floor largely determines how comfortable it will be to use.
Then ceramic tiles are laid on the screed - in the bathroom, hallway, kitchen. In living rooms, laminate, linoleum, and carpet are more often used.
Regardless of what kind of flooring you plan to purchase, you should use only those materials that are intended for installation on heated floors. They have increased thermal conductivity and can withstand prolonged heating. So the increased price is justified, and the heating will be more efficient.
The worst choice of finishing covering for a heated floor is carpet. Even a special one, it conducts heat worse than all others. In order to heat it to an acceptable 28-29°C, you have to raise the temperature of the heating elements 4-5°C more than with other types of finishing.
The best choice is ceramic tiles or porcelain stoneware. They have good thermal conductivity, but they also have a high heat capacity - it takes a long time for them to warm up. Laying tiles and heated floors requires a special adhesive.
When using heating cables (any) or rod-based underfloor heating, the installation technology is the same. First, the screed is poured, the concrete gains strength over 28 days, then the tiles are laid. When using heating cable mats, the process changes, and significantly: the tiles can be laid directly on top of the mats on the required layer of adhesive. In this case, the glue consumption is large (the minimum layer of tiles + glue is 3 cm), but the time required is much less.
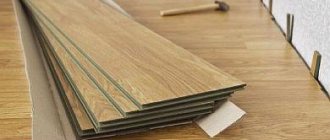
It is better to use film heated floors under laminate flooring.
Film heated floors can be made without screed. It is placed under the laminate. Only a special underlay (for heated floors) is spread on top of the film and the laminate can be laid. Under linoleum or the same carpet, they make a rigid base - they lay sheets of plywood, chipboard or OSB, and the finishing coating is laid on them. Such an installation of an electric heated floor - without a screed - is only possible if there is radiator heating. Everything is installed quickly, but the heating is ineffective - great heat transfer cannot be achieved by any means.
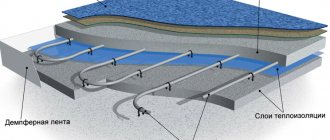
Thermal insulation
The better the insulation of the floor under electric heaters, the less electricity will be required to maintain normal temperatures. If the floor was already sufficiently insulated during construction, insulation may not be installed. Although any system - whether you are laying a cable or film floor - indicates the need to use a heat-insulating substrate. They are different in different systems, but their presence is desirable. Then, when calculating an electric heated floor using average statistical data, you can take the required power at the lower edge or even a little lower. And this means money saved both during installation and during operation (less heat is spent on non-target heating).
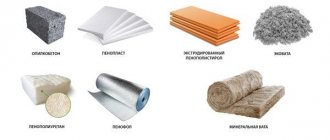
A little about thermal insulation materials that are recommended for use when installing heated floors. The most optimal is extruded polystyrene foam (EPS). It has sufficient density and strength to withstand the pressure of the screed and everything that will be on it. The second option is high-density sprayed thermal insulation. The method is even better, but also even more expensive. The density required for the screed is high, 60-80 kg/cube, and such sprayed thermal insulation costs even more than EPS. True, it has the best characteristics for today (thermal conductivity is almost like that of air 0.2-0.3 depending on the manufacturer).
Standard diagram of an electric heated floor with heating cables or mats
When laying electric heated floors, it is often recommended to use thermal insulation with a foil surface. This is argued by the fact that the foil reflects heat rays into the room. This is how it works, but with an air gap between the heater and the foil (at least 3 cm). There is no and cannot be any air gaps in the heated floor. So laying this material is just a waste of money and time. There is another argument against laying a layer of foil under a warm floor. The foil in concrete disintegrates into dust after a few weeks and becomes completely useless. They cannot even redistribute heat more evenly in this state.
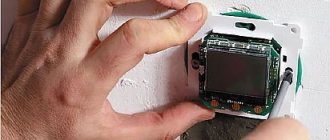
Thermostats and sensors
The electric floor heating circuit requires the presence of a thermostat and a temperature sensor. Their presence is not necessary - you can manually turn the heaters on and off. But only together with these devices will the system work normally, for a long time, provide the required level of comfort, use electricity rationally, and avoid overheating. The presence or absence of a thermostat with a sensor does not affect the calculation of an electric heated floor in any way, but it has a very strong effect on the service life. As has already been said, the vast majority of heating elements are afraid of overheating, and it is very difficult to avoid it with manual control. A couple of times you don’t have time to turn it off in time, the cables/film/mats will melt.
Heating cable calculation
To determine the required power of the heating cable, the following formula is applicable:
Rreb. * Free = P;
where: Rreb. – required power for heating the room (comfort heating: 100-150 W/m2; main heating: 160-200 W/m2; for cold unheated rooms – 200-250 W/m2); Free – free area from furniture (calculated by the formula: Stotal - Szal); P – heating cable power.
Calculation example:
To heat a kitchen with a total area of 10 m2, of which 4 m2 is occupied by furniture, a power of 160 W is usually required. Thus, the required power of the thermal cable will be:
160 W * (10 m2 - 4 m2) = 960 W
The power of the heating cable should be as close as possible (increasingly) to the required one. Therefore, for this kitchen, a 1020 W heating cable (SVK-20 heating cable) is recommended, if we talk about the THERMO model line. Installation of a heated floor will be carried out by calculating the area of the room and the installation step.
Electric heated floors: installation instructions
Cable floor installation
Insulation is laid on the leveled and cleaned surface of the base, gluing the joining seams with tape. Pour an intermediate thin screed (2–3 cm) onto the reinforcing layer.
After allowing the screed to gain the necessary strength, approximately 2-5 days, a mounting tape is attached to it.
The cable is mounted on the tape in accordance with a pre-designed layout plan. Laying begins from the point where the wires are connected to the thermostat, maintaining the calculated step with a permissible error of ±10 mm.
On a note
As a rule, the manufacturer's instructions indicate the minimum bending radius of the cable and the minimum distance between turns. These instructions must be strictly followed.
The temperature sensor is placed in a corrugated tube, which is placed between two turns of cable and tightly closed on one side with a plug.
After installation is completed, the system must be tested, and only after that the second main layer of screed (3–10 cm) is poured under the floor covering.
On a note
Before pouring the main screed, it is recommended to draw a diagram obtained after installation and mark on it the locations of the couplings, sensor, dimensions, pitch, etc.
You can start using the system no earlier than 28 days.
Thermal heating equipment
Installation work is carried out in accordance with the layout diagram, which should indicate the location of the main components of the system.
- I punch grooves on the floor and in the wall for the temperature sensor, wires and thermostat.
- After cleaning the base surface, lay the corrugated pipe with the sensor and lead the wires into the installation box.
- At this stage, it is necessary to measure the ohmic resistance, after which they begin laying out the mats.
- A layer of tile adhesive is carefully applied to them using a spatula.
- The connection is made through a thermostat.
© 2022 prestigpol.ru
Calculation of UNIMAT rod mat
The UNIMAT infrared rod mat has a self-regulating function, so it is not afraid of being blocked by furniture and the area of the set should be equal to the area of the room.
For convenient control and economical use of heated floors (up to 35%), a thermostat is designed. There are mechanical (manually controlled) and programmable thermostats with functions of saving settings, modes to reduce energy costs, etc.
Our stores offer a wide selection of multifunctional thermostats for heating systems from European manufacturers, the most popular among them are:
- TI 200 and TI 950, THERMO;
- 320 and UTH-130, CALEO;
- from DEVI – Devireg Touch.
Design
An important element of the “electric floor” system is the thermostat and temperature sensor, which perform the control function. For residential premises, the simplest version of the thermostat is often used, which has control over the floor heating mode. The temperature sensor is placed in a corrugated tube placed between the sections and securely hidden in the screed.
For more powerful systems, from 1 kW/m2, you can use a thermostat equipped with a programming function. It has programming modes for a specific warm-up temperature for a day and a week. As a rule, this allows you to save more than 30% of energy.
The thermostat is mounted on the wall within the electrical switch - this makes it more convenient to use. Although there are models available that are installed in the electrical panel of an apartment.
Each sensor model is designed for certain parameters of this value. If exceeded, the device may fail or operate incorrectly.
Advice
If the heating area is large, then it can be divided into several zones. Often in such cases, the warm floor electric exon is divided into two or more independent systems. To minimize costs, you can install in each of them a thermostat from the same company Ekson-Mex, designed for a power of 3.6 kW.
To install electric floors you also need:
- mounting tape, with which the heating sections are fixed to the floor;
- a corrugated tube that performs two functions at once: protecting the sensor and facilitating access to it in case of testing or replacement;
- thermal insulation, which increases efficiency and profitability, as it limits heat loss. For rooms on the ground floor, it is recommended to install insulation from 5–10 cm thick foil-coated solid foam slabs; for those located above, cork or penofol is sufficient, of course, if the room above and below the floor is heated.
Thermoreg TI 200 thermostat
| Manufacturer: | Thermo |
| Model: | TI 200 |
| View: | electronic thermostat |
| Power: | 3600 W |
| Installation type: | recessed |
for comparison
old price 3,544 rub.
RUB 3,190
Product added to cart
| Photo | Name | Price per piece | Quantity | Price |
| Thermoreg TI 200 thermostat | RUB 3,190 | < 1 > | 3,190 3,190 rub. |
There are 0 items in the cart worth 0 rub.
Go to cart
Buy
Availability
Types of thermomats
Twin-core heating plate
There are several varieties of counterfeit materials, and when purchasing, you need to know exactly which one is suitable for a particular room. If you are faced with a choice of which heating equipment to purchase - single-core or double-core, you first need to study the characteristics of each:
- single-core heating plates. In this category of substrate materials, the wires consist of a single core. The base can be metals: brass, galvanized, nichrome and others. It is due to them that resistance occurs with subsequent heating. During operation, an electromagnetic field appears, which is partially neutralized by the protective aluminum film. Used outdoors or in industrial buildings;
- twin-core heating plates. Thanks to two conductors, the heating power is higher than conventional ones. Increased power consumption due to two cables, but easier installation. The electromagnetic field is dampened by wires, radiation is minimized. Suitable for bathrooms and living rooms.
Thermomats are an excellent analogue of classic floor insulation and are ideal for water-based coatings. Installing this type of heating is a good solution that combines quality and durability. And even a person with no experience can figure out the installation.
- Related Posts
- How to install a water heated floor with your own hands?
- What are the characteristics of Caleo underfloor heating?
- What underlay to use for heated floors?
- What are the advantages of a heated metal-plastic floor?
- How to lay a heated floor in a bathroom under tiles?
- How to install electric heated floors under tiles?
Thermostat Caleo UTH-130
| Manufacturer: | Caleo |
| View: | mechanical thermostat |
| Power: | 4000 W |
| Installation type: | overhead |
for comparison
RUB 3,664
Product added to cart
| Photo | Name | Price per piece | Quantity | Price |
| Thermostat Caleo UTH-130 | RUB 3,664 | < 1 > | RUB 3,664 3,664 |
There are 0 items in the cart worth 0 rub.
Go to cart
Buy
Availability
Optimization of dimensions for water floor screed
Let's consider what the minimum acceptable and optimal screed layer should be. In each specific case, the thickness of the screed for water heated floors varies depending on the final finish of the floor. There are two universal sizes:
- For ceramic tiles, taking into account the diameter of the pipes, a minimum of 5 cm for domestic premises, for industrial premises it can reach up to 20 cm;
- For laminate up to 30 mm, due to the low thermal conductivity of the material.
Knowledge of the SNiP standard on static and maximum permissible load, depending on the general purpose of the room, will help you achieve the optimal screed size. The average static load on the interfloor floor, based on sq. meter of cement floor with water pipes is close to 90 kg. The final size of the screed is set from the top level of the tubes; in practice, 1 to 3 cm should be added to the minimum size. This is the optimal size without heat loss.
Laying tiles
A qualified craftsman can immediately begin laying tiles after installing the heated floor, having first checked the resistance of the thermomats. It is recommended for a beginner to first fill the laid system with tile adhesive. This must be done to avoid damage to the floor surface when laying tiles on mats. Choose an adhesive based on epoxy resin, as it tolerates high temperatures well.
Glue for pouring thin-cable thermomats is diluted to the consistency of sour cream and thickly applied to the laid fiberglass mesh. This is done in such a way as not to leave voids or air gaps. The thickness of the resulting adhesive coating for tiles should be less than 2.5-5 mm. After this, you just have to wait for the adhesive solution to dry, and then start laying the tiles. Thanks to these simple steps, your home will be warm in winter.
Correct temperature
To achieve maximum comfort levels, we recommend maintaining the following floor surface temperatures:
- Linoleum 26-28 °C
- Ceramic tiles/concrete floor 26-28 °C
- Laminate 23-27 °C
The maximum floor temperature can be limited by a thermostat.
If you do not know the maximum permissible surface temperature for your flooring material, please contact the manufacturer.
Important! Wood is a good thermal insulation material.
Maximum limits
There are no standards for filling screed to the maximum. Technologically, it can be arranged to a height of up to 10-15 cm. If you make the layer larger, then it will not bring any effectiveness. All work done will be meaningless. But such a screed can only be performed in exceptional cases. Such situations may include the following:
- If the layer being installed acts not only as a fill for the screed, but also as the foundation of the building.
- Devices for pouring concrete floors in rooms with significant loads (garage).
- Installation of screeds on problematic soils, which is more suitable for private houses.
If the floor bases have significant differences in height, then some performers decide to fill as much as possible in order to bring everything to a horizontal position. But there is no practicality in this. It is best to first backfill with dry materials (expanded clay), and then pour the solution. Such actions will save time on work, as well as money on materials. True, it is best to do all this before installing a water heated floor. The heating main requires a flat surface to distribute heat evenly across the entire subfloor in the room. If there are large protrusions above the surface, they can be completely knocked down using a hammer or other equipment.
A large amount of poured concrete will be wasted. If we have a room of 10 square meters, and the screed layer is only 100 mm, then at least a cubic meter of concrete will be needed, and this is an unjustified cost.
With a thick screed over a water-heated floor, other difficulties may arise:
- Long period of surface heating.
- The efficiency of the system will decrease.
- The cost of heating the room will increase.
This all suggests that you should choose the optimal screed thickness for a warm water floor so that all the characteristics of the system are manifested and well preserved throughout the entire service life.
Scheme development
Before installing the heating system, it is necessary to develop a plan diagram on paper. It separates buffer zones with massive furniture, household appliances, heating radiators and pipes. Heating systems cannot be installed under furniture or household appliances, as this creates an additional load on the cable (due to the inability of heat to escape upward, the cable overheats).
The result is an irregular polygon inscribed in the rectangle of the room. The diagram shows the outline of the future electric floor, the power supply and the location of the thermostat on the wall (at a height of about a meter). You should also step back from the walls up to 20 cm and calculate that the distance between the turns of the cable is at least 10 cm. The markings are transferred from the paper drawing to the prepared floor surface. A properly designed circuit will reduce costs when purchasing a heating system and protect the cable from overheating.
Laying cables or thermomats
Before you begin installing a cable heated floor, you need to measure the cable resistance. The cable is laid in a snake pattern at a calculated pitch (at least 10 cm) using a special fastening tape. Sometimes a reinforcing mesh is installed, to which the cable is attached using plastic clamps. To strengthen the cable snake, you can use mounting strips with holes. You need to retreat up to 20 cm from the walls.
When laying a single-core wire, you need to guide its end to the initial installation location without crossing other turns. In a two-core cable, one wire serves as the heat source, the second one closes the circuit, so a connecting coupling is made at the end of the cable. The cable is installed after preparing the surface, laying thermal insulation (if necessary, waterproofing) and a small layer of concrete screed. Sometimes the cable is laid directly into a concrete screed. The heating surface circuit is assembled perpendicular to the wall on which the thermostat is located.
Approximate calculation of the cost of materials
When calculating the approximate cost of a heated floor, you can proceed from the following prices:
- insulation per m2 - 600 rubles;
- temperature sensor - from 100 rub. and higher;
- non-programmed thermostat model - 600 rubles;
- software thermostat - 3200 rub.
If we take mats priced at 2,000 rubles as a basis, then the total cost of a floor with an area of 5 square meters will be approximately 14,000 rubles.
By choosing a “warm floor” heating system based on infrared or electric thin mats, you will solve several problems at once - effective heating of the floor covering, ensuring a comfortable atmosphere in your home and creating an individual interior.
Best answers
Stas Shabanov:
Lots of nuances! You need to know where you are going to lay the mats, the thickness of the screed, the information about the mats, power, quadrature
ip:
In my opinion, an electric heated floor is a waste of money in vain. The degree of reliability of such a system is much lower than water floors, and they cannot be repaired (((Moreover, local overheating from moved furniture can already cause a reduction in resource, which does not happen in water systems... And Thermophysics is the same for any floor. If it is the second floor of a residential building, then let the ceiling on the first floor receive some of the heat, it’s not a problem at all. And if there is a cold basement below or, in general, a drafty subfloor, then you need to insulate the floors even without heating)))
Guy from the Future...:
Mats, unlike molded heating cables, have a significantly smaller thickness... And due to their small thickness, their use is relevant when it is not possible to make a screed of significant thickness.. That is, by their very design they do not imply a certain significant layer of screed on top. Because of this, the mats are used directly on the surface of the base, and the finishing coating, for example, tiles, is glued directly onto the mats. Because of this, even without insulation on the substrate, the mats warm the floor surface well. (due to almost direct contact with the finishing material of the floor) ... Otherwise, about the insulation on the floor, as such, is said in the answer above ...
WARM FLOOR branded store chain:
Thin mats cannot be laid over heat-reflecting insulation, as the adhesive will not adhere to the concrete. Cable and mats are different systems and the installation diagram is different, despite the fact that both systems are cable.
I’m not sure about cracking of the screed under the tiles; we’ve never heard of this before.
Those who say that concrete will not warm up through and through are right. Due to design features and the laws of physics, heating mats in a layer of tile adhesive will heat both the concrete below and the tiles above. And if the cable in the screed needs to warm up the screed itself first, and the screed will already heat the floor covering (tiles and others), then the mats only need to heat the tiles + glue. It should be noted that the floor temperature sensor is installed in the tile and the degree of heating is adjusted according to the tile. And since the tile heats up much faster than the screed under the mats, and especially the concrete slab, it will not be possible to warm the neighbors below.
booster of boosters:
A
anon unknown:
try this liquid insulation. Excellent quality nano34
artem TULISOV:
I have thermal insulation. When I wanted to make it, I searched for a long time for a good company, and this company nano34 made it for me.
Alex59:
You know there are a lot of different little things in this matter! When I was planning to make a heated floor last year, I was advised to contact here s.caleo, the guys came and measured everything, the next day the floors were already ready, so there’s no need for you to rack your brains, ask for help. GOOD LUCK
How to calculate a water circuit
First you need to create a room heating project, determine the coating material and the temperature of the coolant (about 55 °C). To control the temperature distribution, two thermometers are installed - at the inlet and at the outlet of the coolants. A difference in readings of 5 - 10 °C indicates correct operation. Thus, the temperature of the main floor area with a properly operating heating system should not exceed 29 °C. And in bathrooms and border areas it is 35 and 33 °C, respectively.
Pipe laying
For proper installation of pipes, the following laying methods are used: snake (regular, corner or double) and snail. It will be more effective to combine several methods. For example, lay the border zone in the shape of a snake, and the central zone in a snail shape. The latter is more suitable for voluminous rooms without geometric changes, and for complex ones a snake is used.
The pipes are laid in increments calculated in the project. The laying step for boundary zones is 10 cm, and for the main ones it can vary from 15 to 30 cm, but not more than 30 cm, this is due to the sensitivity of the temperature difference on the floor area.
Next, it is necessary to take into account the following point: the smaller the laying step, the longer the length of the pipes used. You can calculate how many meters of pipe it will take per square meter of floor using the formula:
To calculate the length of pipes by area, the formula is used:
L=S/N,
where , S is the area of the insulated floor (m2), N is the laying step, L is, respectively, the required pipe length.
In practice, in the calculation of the area, you need to add a coefficient of 1.1 - the length reserve for turns, and it is also worth adding the length of the sections to the collector.
Maximum contour length
The length of the loop is directly proportional to the hydraulic resistance and pressure loss in the circuit, which are determined by the diameter of the line. It has been established that when the pressure decreases by 20 kPa (0.2 bar) from the worker, it leads to a locked loop effect. As a result, circulation of coolant through the pipes will become impossible.
In practice, the optimal length of one loop will be:
- a pipe with a diameter of 16 mm will produce a contour of no more than 100 m;
- with a diameter of 20 mm, the maximum loop length will be up to 125 m;
The permissible minimum length of the circuit can be any, but it is worth remembering that to simplify pump balancing, loops should be cut of approximately the same length.
Pump power
An important element of the system is the pump. To select it, you need to calculate how much heat removal from each square meter is obtained in accordance with the project, then you need to multiply this value by the number of square meters in the room, and we get the total value.
The power of the pump is determined by the ability to pump a volume of coolant through itself in a certain time. Now it remains to compare the total value with the power of the installed pump.