Many experts call which floor insulation to choose a mandatory procedure. The need for this is not only caused by the desire to protect people from the feeling of discomfort that occurs due to contact with the cold surface of the floor covering.
The reason is much more significant, and it lies in the plane of the basic laws of physics, or more precisely, the ability of temperature differences to harm the main elements of the floor structure, lead to deformation of the floor covering, promote the formation of condensation, etc.
Basic requirements for insulation
Floors in an apartment or in public buildings must be moisture-resistant, fireproof, environmentally friendly and harmless to human health.
These requirements apply to all elements of the floor structure, including the thermal insulation layer, the characteristics of which directly depend on the characteristics of the selected insulation.
In addition to the listed requirements, we pay attention to the ability of thermal insulation materials to provide us with the opportunity to comply with the floor laying technology.
Simply put, floor insulation should be comfortable and easy to install; it should form an even horizontal plane that does not require additional effort to level it.
Floor insulation using polystyrene foam
Expanded polystyrene is considered one of the most popular insulation materials. We often come across a misconception, the essence of which boils down to the identification of polystyrene foam and polystyrene foam, but in fact, these materials have a lot of distinctive features.
In particular, we are talking about the difference in production technology, as a result of which micropores are formed in polystyrene foam, while in expanded polystyrene we note the unity of the structure.
Advantages of expanded polystyrene
Expanded polystyrene does not crumble, does not break so easily when bent, has less permeability, has greater density and weight, and is also able to withstand, albeit not the greatest, mechanical loads.
The insulation under consideration has excellent thermal insulation properties, exceeding those of expanded clay concrete by 25 times. This material is not afraid of moisture and solvents, and if we are talking about its modified version, marked on the packaging with the letter “C”.
Then we can talk about high fire safety, because such material belongs to the category of self-extinguishing. Expanded polystyrene can be used in any room, even for insulating the floors of balconies and loggias, as well as to insulate floors in the kitchen and bathroom.
In addition, polystyrene foam boards have sound-absorbing properties. It is also worth noting that expanded polystyrene is produced in the form of lightweight slabs with a regular geometric shape.
So it is very easy to use, including when installing a floating screed, when it is simply enough to fill it with concrete. This material is very suitable for filling the gaps between joists in a wooden floor structure.
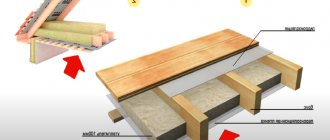
Performing thermal insulation along joists
This method is reminiscent of insulating a wooden base and differs only in that in this case you need to independently make and install logs from beams on a concrete floor. To work you will need:
- timber with a section of 50x100 mm;
- ready-made bitumen mixture;
- insulation;
- plywood or chipboard sheets;
- self-tapping screws;
- screwdriver;
- wide brush;
- roulette and level.
The timber must be selected from dense wood, smooth, dry, without visible defects. It is recommended to treat it with an antiseptic primer - this will extend the life of the tree. Instead of bitumen mixture, you can use plastic film and tape to insulate the joints.
They start by cleaning the base from old screed and debris, then carefully level the surface. Now, using a brush, spread the waterproofing mixture over the concrete. The walls are also coated with mastic to a height of 3-5 cm around the perimeter of the room.
After waterproofing is completed, the beams are laid: the first beam is placed on the edge close to the wall, the next one is parallel to the first at a distance of 70-90 cm, and so on until the opposite wall. The thinner the logs, the smaller the distance between them should be.
After waterproofing is completed, the beams are laid
Using a level, you should check the position of the beams relative to the horizontal so that the finished floor does not have a slope. To securely fix the logs, you need to use anchors, but if the beams rest tightly against the walls, you can do without fasteners. Heat-insulating material is laid between the logs, and plywood or chipboard with a thickness of 10 mm or more is laid on top.
Thermal insulating material is laid between the joists
To avoid deformation of the coating, it is recommended to retreat 15 mm from the walls. It is better to lay the rough coating in 2 layers so that the joints of the lower sheets are completely covered by the top sheet. Both layers are attached to the joists with self-tapping screws. After this, you can lay linoleum, lay laminate or parquet.
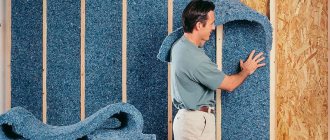
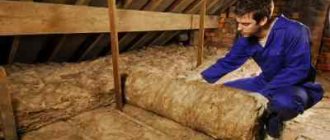
Insulation option using mineral wool and glass wool
For a long period of time, floor insulation materials such as mineral (stone) wool and glass wool have been particularly popular among specialists. But they are not the same material.
Comparative characteristics
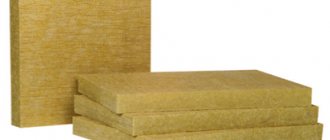
Mineral wool
Compound. Gabro basalt, dolomite rocks, marls, binders (synthetic, bitumen, composite), plasticizing additives. Scope of application: Facades, roofs, partitions, basements, pipelines.
Advantages. Not subject to temperature and mechanical deformation, hydrophobic and environmentally friendly product. Provides heat and sound insulation. Fireproof.
Flaws. Cannot be compressed without damaging the fibers. On the market. "Ragos", "Beltep", "TechnoNikol", "Rocklight".
Glass wool
Compound. Cullet, soda, sand, limestone, borax, dolomite. Scope of application: Facades, roofs, partitions, floors. In the form of a loose inflatable material, it is used to insulate non-loaded, hard-to-reach structural elements.
Advantages. Increased strength and elasticity, vibration resistance, softness and elasticity.
Flaws. Hygroscopicity. The need for precautions when styling to avoid side effects from exposure to fibers (tooth, cough). On the market: “Isover”, “Knauf”, “Ursa”, “RockWool”.
Advantages and disadvantages of these insulation materials
The popularity of these materials is caused, first of all, by the very good price-quality ratio, or more precisely, by the thermal insulation characteristics that these materials have.
In addition, they are very easy to install, which is especially important when arranging an underground space. In comparison with the polystyrene foam noted above, these materials have one undoubted advantage - the ability to transmit steam and effectively remove condensate.
At the same time, structures made from these materials are heavier, they have greater thermal conductivity, and the cost of mineral wool and glass wool is higher than expanded polystyrene.
We note that the thermal conductivity of mineral wool is slightly inferior to expanded polystyrene, and is superior, in terms of its ability to retain heat, to many other materials.
However, mineral wool and glass wool have undeniable disadvantages.
Firstly, claims may arise regarding the environmental safety of the production and use of these materials. The degree to which they release substances dangerous to the human body is low, but this nuance still exists.
Secondly, over time, glass wool wears out and forms dust, which can enter the room. Therefore, this insulation must be carefully insulated, and if we are talking about the floor structure, then it is very important to make a special ventilation gap that allows dust to be removed not into the room, but outside.
Cork floor insulation
According to many experts, the best insulation for floors is cork fiber (agglomerate). It is ideal for insulating linoleum and other flooring materials; it is quite easy to handle and lightweight. But this thermal insulation material cannot be called ideal for one reason that is very significant for many - high cost.
The price for 1 m of such material with a thickness of 1 mm is on average 1.2 Euro. By the way, it can be used not only as insulation for floors, but also as an independent floor covering. True, for this the cork agglomerate must be polished and varnished.
Briefly about the main thing
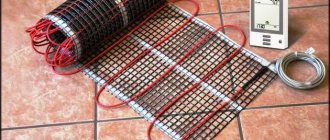
Insulation for a warm water floor should be selected very carefully. It should not let in the cold and allow warm air to escape. The purpose of the underlay under the water floor is to distribute heat evenly throughout the room. An excellent option for underlay would be mats for heated floors. They come in different types, and accordingly, their characteristics are not the same.
It is important to select mats based on the characteristics of the room. Thin materials are not suitable for basements: they can only be used as enhanced heating. Expanded polystyrene with “bobs” is best suited, because it is easiest to place a heated floor heating system in it. The main thing is to take a responsible approach to the selection and installation of the material, then the warm floor will last for many years and will properly warm the house.
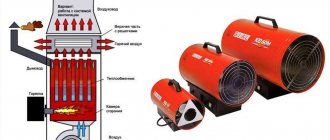
Practical penoizol
Urea-formaldehyde foam, known to many as Penoizol, has technical characteristics similar to polystyrene foam, which we cited just above. The main difference between these materials is that penoizol has an initially liquid consistency.
Allowing you to literally pour this material into hard-to-reach places, where it subsequently hardens. Thanks to this, penoizol eliminates almost all air voids through which heat can escape. Just remember that penoizol should be poured at a temperature of at least +5°C.
Another difference between penoizol and expanded polystyrene is the inability of the former to return to a liquid state because If a fire occurs, this material will not melt and will not release styrene monomer, which is hazardous to human health.
True, penoizols that are of poor quality can emit equally dangerous formaldehydes, and this nuance must be taken into account when choosing this material.
In addition, to decorate the floor with this material you will need special tools, which are available only to professional finishing teams. It is also worth noting the fact that the service life of this insulation can exceed 80 years.
Economical materials for floor insulation
Of course, one cannot fail to mention materials such as expanded clay, ecowool and sawdust insulation. They are often used, and all thanks to their availability and low price. However, these insulation materials have many disadvantages.
Expanded clay has a high thermal conductivity index, relative to the materials presented above, which means it is necessary to increase the thickness of the thermal insulation layer. This is especially important when carrying out floor leveling work.
At the same time, we are not talking about the lightest material, which means that the supporting structure will have to be strengthened. When we talk about floor construction, this is not always acceptable.
Ecowool is a good floor insulation material in terms of thermal insulation characteristics, however, it is very susceptible to moisture. So, laying such insulation will require the creation of an additional waterproofing layer, and ecowool can only be used in those rooms where the relative air humidity does not exceed normal limits.
As for sawdust insulation, this is, as they say, a thing of the past. Yes, sawdust is easy to use and can be used to fill almost any air void under the floor. But sawdust ignites very quickly and burns well, and also requires special treatment with antiseptics and fire retardants. That is why the insulation materials listed in this section are used less and less.
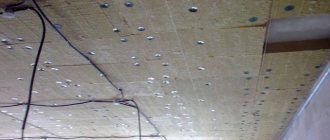
Functions of construction mats
Expanded polystyrene for underfloor heating ensures the proper functioning of the heating structure. To do this, it is important to provide a good base for the warm water floor. Mats help distribute heat over the entire surface and retain it even after the energy supply for the functioning of the heated floor is stopped.
Also, such mats provide complete insulation from cold air. Thus, during cold weather, cold will not penetrate into a room with a warm water floor. Condensation does not form if such a substrate is present. Accordingly, there is no mold on the walls either.
Material structure Source allelectrics.ru
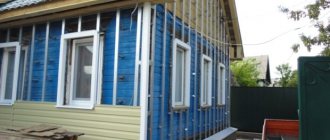
Foil insulation for floors
Foil-based floor insulation (Penofol) has recently been in great demand, due to the ability of this material to retain heat in the house and prevent noise from entering the premises from the outside.
This is a two-layer material in which polyethylene foam is used as the base, and the top layer is created from polished aluminum-based foil or metallized polypropylene film.
The principle of operation of such insulation is quite simple. By installing it as the top layer inside the room, you can ensure that heat will be reflected from the foil and remain inside the room, due to which the efficiency of the thermal insulation system can be increased by up to 70%.
Method of thermal insulation of a wooden base
Insulation of a wooden base consists of filling the space between the joists with insulating material. During the work you will need the following materials:
- insulation;
- polypropylene film;
- scotch;
- sheets of plywood or boards.
The amount of insulation is calculated so that the material tightly fills the space between the beams, and the vapor barrier film must be taken with a reserve, because its edges must extend to the walls along the entire perimeter of the room. In addition, if mineral wool is used, the film should be laid on top and bottom of the insulation. For installation you need to prepare the following tools:
- nail puller;
- hammer;
- building level;
- roulette;
- scissors or sharp knife;
- construction stapler;
- screwdriver
Dismantling the old coating
Work begins by dismantling the old coating. Using a nail puller, the boards are removed and the space between the joists is cleared of debris and dust.
Dismantling the old coating
It is necessary to check all the joists for strength, otherwise the new coating may bend.
Waterproofing
If the beams are in perfect order, you can begin laying waterproofing. The film should completely cover the base and extend onto the walls by about 5 cm. If a whole piece is not enough, the film is overlapped by 15 cm, and then the joints are sealed with tape. Do not stretch the film too much, otherwise it will tear during installation of the insulation. For convenience, the edges of the film are secured to the walls with a stapler.
The film should completely cover the base and extend onto the walls by about 5 cm
Thermal insulation
The next step is laying insulating material. The foam is cut with a knife into pieces of the required width and placed tightly between the beams. If mineral wool is used, the width of the pieces should be 2-3 cm greater than the distance between the logs, then the insulation will fill the space as tightly as possible. Expanded clay or shavings are poured onto the film and leveled so that the layer thickness does not exceed 20 cm. After this, the surface is checked with a level and protruding parts are removed.
The next step is laying insulating material
Installation of the second layer of waterproofing and subfloor
The final stage is laying the second layer of waterproofing and subfloor. The film is laid overlapping in the same way, the seams are taped. For the subfloor, you can use thick plywood, boards, and chipboard. The material is first treated with a deep penetration primer mixture and dried. Fasten the base with self-tapping screws or nails to the joists, being careful not to damage the insulation.
The final stage is laying the second layer of waterproofing and subfloor
Insulation using a “warm” floor
An alternative to creating a thermal insulation layer in the floor structure can be the use of a “warm” floor system. This option is effective because... it allows you to not depend on the thermal conductivity and other technical characteristics of insulation, and also significantly reduces the installation process of the floor structure.
However, not always, or rather, not all types of “warm” floors have such a quality as practicality. If we are talking about a water or electrical system, then there is no need to talk about the simplification and speed of the process of installing floor coverings.
Because simultaneously with the systems under consideration, it is necessary to install many of their individual elements. And if these elements or the system itself break down, the entire floor structure has to be dismantled.
Much more practical are infrared “warm” floors, which do not require screeding, installation of pipes and other measures. It is enough just to spread a special film, connect it to an energy source, and the “warm” floor is ready for use.
At the same time, if necessary, you can easily move this system from one room to another; to do this, just run the cord from the heated floors into the cable channel of the floor plinth.
Thermal insulation of concrete base
There are several ways to insulate a concrete floor: screed over the insulation, along joists, laying flooring with low thermal conductivity, or spraying polyurethane foam. For thermal insulation under the screed you need to prepare:
- insulation;
- vapor barrier film;
- scotch;
- metal mesh with cells 50x50 mm;
- cement mortar.
The first step is to dismantle the floor and remove the old screed.
The first step is to dismantle the floor and remove the old screed
Next, the surface needs to be well leveled and cleaned of debris and dust.
Deep recesses are filled with solution and left until completely dry.
The prepared surface is covered with a vapor barrier film, leaving allowances of 3-5 cm on the walls. Existing joints must be taped with tape.
Next, lay the insulation so that there are no gaps or cracks, after which a layer of waterproofing is laid again. If expanded polystyrene or polystyrene is used, the presence of a second layer of film is not necessary.
Now you need to lay a metal mesh and secure it around the perimeter of the room so that it does not move when pouring the solution. This mesh is necessary to strengthen the screed.
The next stage is mixing the solution and pouring the base
The next stage is mixing the solution and pouring the base. The ratio of the components of the solution depends on the brand of cement; Most often, cement grades 500, 400 and 300 are used for screeding. To obtain a mortar of grade 200, which is best suited for these purposes, you need to mix sand with cement in a ratio of 3:1, 2:1 or 1:1. The higher the grade of cement, the more sand is required. The finished mixture should have a homogeneous creamy consistency. The base must be poured at one time so that the entire surface dries evenly. The thickness of the screed should not be less than 5 cm, otherwise after drying the surface will not withstand the load and will begin to crumble.
After 2 weeks, the screed can be primed and any floor covering can be laid.