What kind of bathhouse it should be depends mainly on the stove in it. According to tradition, a Russian bathhouse should have a brick stove, which replaced the more ancient stone one. And many owners of baths under construction or built a long time ago are trying to install one of these - after all, this is a thing that has been tested for centuries. But how to assess the scale of the effort, time and finances associated with the construction of a brick stove for a bathhouse? We want to help you - read and decide whether you can handle it yourself or still look for a professional, or is it easier to abandon this idea in favor of a brick-lined metal stove, which, if handled skillfully, can produce the same conditions as a brick one ?
Types of stones
The distribution of warm air and steam inside the steam room occurs due to the stove heater. As a rule, from 1 to 5 kg of stones per 1 m3 are laid inside a brick sauna heater.
Important criteria that determine the choice of stones are:
- heat capacity, that is, the ability to accumulate and release heat into the air;
- melting point - or the threshold to which stones can heat up - it is desirable that this indicator be as high as possible;
- weight – it is preferable that it be high;
- strength - it is important that when heated, the stones do not become brittle and do not crumble or crack.
Basically, the types of stones chosen for the heater are basalt, quartzite, granite, diabase or jadeite (more details: “How to lay stones in a sauna stove correctly, which stones are best to use”). Each of them meets the requirements to a greater or lesser extent.
Materials that should never be used for the heater:
- marble;
- shell rock and dolomite due to the presence of magnesium and calcium carbonates;
- limestone - when sharply cooled with water, it can release gas;
- silicon rocks - tend to crumble and there is a risk of getting burned;
- ores containing asbestos, sodium or sulfur;
- sedimentary rocks.
A number of professionals use cast iron for laying the heater, which meets all the criteria for the operation of the stove.
What types of wood-burning stoves for baths are there: comparison
Wood heating appliances do an excellent job of heating large and small rooms. You can make such a stove from refractory bricks or thick-walled metal sheets and cast iron. Brick kilns are capital structures with heavy weight that require a solid foundation. Metal models are more compact and do not take up much space. Let's compare these two types.
| Brick oven | Metal oven |
| pros | |
| Retains heat for a long time thanks to the large number of heated stones. | It will cost less than brick. |
| Creates a gentle heat that does not burn the skin and mucous membranes, and deeply warms the body. | Can be mounted in any corner of the steam room and does not require much space. |
| When using high-quality bricks, it will last for more than one generation of house residents. | Heats up the steam room quickly – in a couple of hours. |
| Simple and safe to use. | Saves fuel. |
| Minuses | |
| Long kindling – up to 5 hours. | Cools down quickly without adding fuel. |
| Takes up quite a lot of space in the steam room. | The cabinet becomes very hot and may cause burns or thermal shock. |
| In terms of the cost of the material and the cost of laying it from a professional craftsman, it is more expensive than its metal counterpart. | It may burst due to a sudden change in temperature (do not splash cold water). |
| Needs a reinforced foundation. | Over time it burns out and requires replacement. |
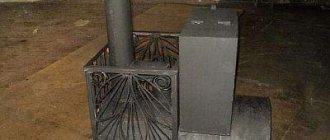
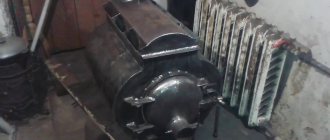
Owners of home baths are increasingly choosing a combined version of the stove: the inside is welded from metal, the outside is lined with refractory bricks. This tandem allows you to use all the strengths of stone and metal without the risk of burns and with significant fuel savings.
Homemade stoves made of metal and brick are not as expensive as purely brick ones and are quite easy to install
Brick characteristics
Before you build a stove in a brick bath, you should clarify what kind of material should be used. It is preferable to use refractory ceramic bricks without cavities.
The requirements for refractory bricks for a kiln are as follows:
- Firing quality - insufficiently fired material produces a dull sound when tapped, and conversely, ringing sounds mean that the firing was carried out correctly.
- Clear geometry - rectangular shape, without cracks, chips or defects.
- Tendency to cracking - do not use slotted or sand-lime bricks.
After making sure that the material is chosen correctly, you can begin building the furnace.
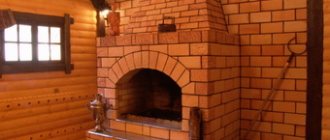
Fireplace in a bathhouse: what is it and why is it needed?
Well, it’s quite easy to imagine a bathhouse and a fireplace separately. Together, they mean that a stove designed to heat a steam room and create the conditions of your favorite type of bath can, among other things, also be a decoration. To do this, it is enough to abandon the solid metal door to the firebox and replace it with glass.
Video on topic
This is how it might look with a metal stove and a firebox with a fireplace door placed in the rest room, you get a fireplace in a bathhouse:
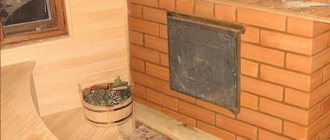
As for such a door, it is a metal frame into which a single or double glazing unit with special heat-resistant glass is inserted. The frame can be made of either steel or cast iron. If desired, you can supplement it with forged elements.
However, you should not consider a sauna fireplace stove solely as a decorative element. The practical use of a transparent door is the ability to visually control the combustion process.
In addition, the door limits convection from the side of the firebox, preventing heat from escaping with air currents. At the same time, it prevents sparks from entering the room, which increases fire safety. Along with sparks, smoke and soot cannot penetrate.
As an option, you can consider having two heaters in the bathhouse at the same time - a stove in the steam room and a separate fireplace in the relaxation room. This is cost-effective for large baths.
Mortar for laying a brick oven
The best adhesion between bricks will be provided by a solution made from natural components, namely clay. Of course, it is optimal if the mortar is made from the same raw materials as the brick, since in this case their coefficient of expansion when heated will be the same, and as a result the oven will last much longer. However, as a rule, it is not possible to order the clay that is part of the brick.
In order for the construction of a brick oven to be sufficiently strong and durable, you should pay attention to the thickness of the seam - preferably, it should be as small as possible. Of course, too little mortar will simply not allow the brick to set. The standards provide for a maximum joint thickness of 5 mm, and if you can make it thinner, the brickwork will be much stronger.
Sand for preparing the solution must be selected according to the following parameters:
- sand added to the solution must be thoroughly sifted;
- the size of sand granules should not exceed 1 mm, and in the absence of such, as a last resort, it is allowed to use larger material, with a grain size of 1.5 mm;
- the sand must be clean, without silt or other impurities, and of uniform color.
Stamps
In addition to the variety of building materials, you need to pay attention to their brands. The main characteristics are the brand in terms of density and frost resistance.
The density grade shows the strength of the material. If the stove is located in a house or in a bathhouse, a brick with a density grade of 200-250 is suitable. The above indicator is completely unnecessary, since then kindling will take too much time.
Frost resistance must be taken into account when constructing a chimney, as well as if you are building an outdoor barbecue oven. The frost resistance grade shows how the stone absorbs and releases moisture. For pipes and street buildings, you need to choose the most frost-resistant brands.
The most common manufacturers
There are many factories producing bricks in Russia and neighboring countries. The most common types for laying stoves are:
"Borovichi". Produced at the plant of the same name in Nizhny Novgorod. Frost resistance is high, density 250.
"Vitebsk workshop". Produced in Belarus. Density 200, but frost resistance is very low. They can be used to line stoves indoors; such stone is not suitable for pipes.
“Chamotte.” It is produced by various enterprises, for example, the Belokamensky plant in Ukraine, the Sukholozhsky plant in Perm. It is recommended to use in the construction of those parts of the furnace that directly touch the flame.
Preparing clay for mortar
To understand how to properly build a stove in a bathhouse, it is worth dwelling on the process of preparing clay for masonry mortar. First of all, the clay layer needs to be crushed and placed in a container, filled with water. In the process of mixing this mass, all lumps must be broken. Next, the wet clay must be filled with water so as to completely cover it and left for a day to infuse. After this, the solution is filtered, and all lumps are ground.
After several grindings, the clay mass acquires a paste-like consistency. At this point you can start adding fine river sand. Moreover, the greater the proportion of sand, the less greasy the solution will be.
It is very important to choose the right proportions of the components, since a solution that is too thin simply will not set properly, and over time the oven will begin to fall apart, while a solution that is too fat, on the contrary, will begin to crack and will also destroy the brickwork.
Peculiarities
Nothing gives such pleasant warmth, a comfortable atmosphere, and easy breathing as being in a sauna with a brick stove.
In order for a self-built stove to turn out at the proper level, you must strictly follow all instructions. Even with little construction skills, you can make an excellent furnace for a bathhouse. First of all, you need to decide which stove option is more suitable for a particular room.
Let's consider options for heating a brick stove for a bath:
- In black. Such stoves have been especially popular in villages for many years. The peculiarity of this design is that there is no chimney, so there will be plenty of steam and aroma in the room. The disadvantage of this option is that you need to wait until the fuel burns out completely.
- On gray. This option is more economical. The stove has a chimney, so the room warms up faster. Like the previous option, there is a drawback: you need to wait until the wood is completely burned.
- On white. This option can be called the most worthy, since when used in the room there will be no traces of soot, and the room will remain warm for a long time. But it takes a lot of time to warm up such a stove, which is not always convenient for use.
- With a stove. This option for a bath can be considered the most successful. The design consists of a tank, which is installed on a plate made of cast iron and bath stones. The tank is closed on 3 sides by a brick wall, due to which the water temperature remains high for a long time. More often, the tank is installed on top of the firebox, and stones are laid above the chimney, but sometimes both the tank and the stones can be placed in a different order.
The heater will not leave steam lovers indifferent. This design consists of a combustion chamber over which stones are placed.
Thanks to the thickness of the brick and massive stones, the room will remain warm for a long time. After the procedure is completed, the room is ventilated, water is poured onto the stones to remove soot. After cleaning, the room is ready for new procedures.
A sauna stove can vary in size, but most often you can find options with a base size of 890*1020 mm, which corresponds to a laying of 3.5*4 bricks, or with a size of 1020*1290 mm (laying 4*5 bricks). The standard height of the stove can be 168 or 210 cm, not taking into account the height of the chimney pipe.
The choice of oven type should be individual. When choosing, you should study various materials, watch photos and videos, study projects and then make the final choice.
How to set the fat content of a clay mixture
In order to determine the degree of fat content of clay, you can resort to one of the simple methods available to beginners in the construction business. And since precise digital values are used, they can be considered quite reliable.
For the dough, you need to take 500 g of clay, mix it with water and knead it by hand until you obtain a homogeneous mass without lumps that does not stick to your hands.
Note that the correct clay solution should be of medium fat content.
Method 1
You need to take a little mixture and roll it into a ball the size of a small apple. They place it on a flat surface and begin to slowly press it down with a plank until cracks begin to appear.
The quality of the solution can be judged by the size of the cracks:
- if the ball falls apart completely without cracks, then the clay is non-greasy;
- the appearance of a crack on the ball half its diameter indicates that the solution is too greasy;
- if the ball is cracked by only 0.2 diameters, then the solution is best suited for masonry.
Method 2
Two balls are formed from the clay mixture, one of which is rolled into a layer. These two blanks are placed in a dark place for 4-5 days to dry. If defects or cracks appear on the workpieces, it means the solution is too greasy. But if they remain in their original condition and are not damaged, then such clay can be safely used. You can also throw the ball from a small height - if it doesn’t break, it means the solution is good.
Is it worth putting underlayment?
Of course, you can put laminate directly on linoleum without a backing - no one will blame you for this. But the next repair will have to be done in the next year or two, since the laminate simply won’t last longer without a backing and will fail.
It is the substrate that plays the role of a damper layer and dampens vibration from walking, protects the bottom layer of the laminate from damage and moisture. In addition, this is an additional layer of heat and sound insulation. Due to its texture, linoleum does not have such properties, so it is not suitable as a substrate.
It is better to remove the linoleum before laying the laminate, but do not abandon the substrate.
Which position should I choose?
For laminate, options with a thickness of 2–4 mm are usually used, but since linoleum is already a fairly strong base, you can choose the thinnest substrate from those presented. There are several materials available on the market.
| Cork | Excellent sound insulation qualities, retains heat well, does not rot even with prolonged use, unattractive to insects |
| Expanded polystyrene | Good heat and sound insulation qualities, lower cost |
| Polyethylene foam | High resistance to moisture, does not deform even when in contact with chemicals |
| Needles | Naturalness and good density, which can withstand heavy loads and does not deteriorate |
| Foil | Excellent thermal insulation, works on the principle of a thermos - does not let in cold, does not release heat |
| Polyethylene | A thin backing, which is just suitable for laying on linoleum, protects against moisture penetration |
The technical characteristics of all these types of substrate are excellent for installing laminate flooring.
Novice craftsmen and simple amateurs claim that when laying laminate flooring on linoleum, you can do without a backing. This is not so, the material must be there. If you do not lay the underlay, the laminate on top of the linoleum will clap with every step, which causes discomfort.
Bath stove laying technology
Not every builder knows how to build a stove in a bathhouse with his own hands, because this process requires not only skills, but also knowledge of the intricacies.
Before putting the stove in the bathhouse, you need to carry out a number of preliminary works:
- The finished poured foundation for the stove must be protected with a layer of waterproofing.
- The bottom rows of bricks are laid on a mixture of cement and sand.
- A metal plate is placed at the location where the door is installed for fire safety purposes.
- You need to start laying each next row from the corner.
- Before using bricks, they need to be soaked briefly in water - at least 20 seconds. Then the solution can easily penetrate into all the pores of the material.
The process technology itself, how to fold a sauna stove, looks like this:
- The clay mixture is applied in small portions and leveled.
- After soaking, the brick is lowered onto a layer of mortar.
- The surface of the brick is lightly tapped, lowered to the required depth and achieving a seam thickness of no more than 5 mm.
- Excess solution is removed with a spatula.
- A new portion of mortar is laid out nearby, leveled and the end part of the adjacent brick is covered.
- Further masonry is carried out in a similar way.
It should be remembered that the bricks in the masonry must be positioned with a 50% offset so that it is strong and does not crack. In addition, the chipped side of the brick should not be directed into the oven so that it does not deform when heated.
Preparatory work
Regardless of which method of constructing the furnace you choose - building from brick or covering a metal device with brick, you will first need to make preparations: properly arrange the installation site and select the materials necessary for the work.
Preparing the site
A brick structure usually has quite an impressive weight, so any technology for laying a brick oven necessarily includes the construction of a stone or brick foundation. This is also done to ensure better fire safety. The dimensions of the foundation should usually exceed the length and width of the future masonry by 10-15 cm.
You can build a suitable foundation in one of the following ways:
- A solid foundation implies the construction of a pedestal on which the rest of the structure will be supported. This work is carried out in several stages:
- Construction of a stone “pillow” in the ground - the base of the foundation. To do this, a hole up to 25–30 cm deep is dug in the ground, which is filled with crushed stone and waste bricks, and then filled with a solution prepared from grade 300 cement mixed with sand in a 1:2 ratio.
- The cabinet itself is laid on top of a well-dried base in 2 layers of brick.
- A columnar foundation means the construction of several columns made of brick or the installation of ready-made ones made of concrete:
- After marking the places where the posts will stand, you need to dig holes for them 40-50 cm deep.
- The holes are first filled with river sand to about ¼ of the depth, and then, similarly to what was described above, they are filled with crushed stone below ground level at about 8-10 cm and filled with cement mortar.
- Brick columns are laid out while constantly checking their position with the level. When installing concrete pillars, their bases are concreted.
- A concrete slab, channel or brick platform is installed on top when there are no empty spaces between the pillars.
IMPORTANT! When building a cabinet or pillars for the base of the stove, do not forget about waterproofing both the “sole” of the structure, which directly touches the ground, and the places where the main brickwork begins
Foundation for the stove
Selection of materials
To lay a brick stove, use simple or special stove bricks, which can be:
- Ceramic;
- Silicate;
- Full-bodied clay;
- Fireproof (or “fireclay”).
Ceramic and silicate options are usually used for cladding, and for lining a metal stove with bricks, building a firebox, chimneys and pipes - solid clay, which heats up well, can withstand temperature changes from low to very high, is strong and moisture-resistant.
ATTENTION! If you are going to use coal or gas as fuel, the combustion temperature of which is slightly higher than that of firewood, then it is better to use refractory bricks for the firebox. It is created from fireproof fireclay clay and can withstand up to 1500-1800 0 C
You can also use one that has already been used. In this case, it must be especially carefully cleaned of the remnants of the old solution.
Installation of grate bars
When using fireclay bricks, only fireclay clay is used. Between the bricks you need to leave 5 mm gaps, since it will expand when heated. The place for the cast iron grate must be provided with a small gap, since cast iron also expands when heated.
Note that the grate or any other cast iron elements are laid without mortar so that they can be easily replaced.
A door made of metal or cast iron must be secured with bricks during the laying process, and also additionally covered with asbestos. A single-wall partition is built as a chimney. A sandwich pipe with insulation is installed inside.
Let's sum it up
So, which brick is better for the stove? To build a high-quality stove, you need to choose the right brick. It should be:
- Full-bodied.
- High Quality.
- Refractory.
- Density grade 200 – 250.
- Possess high frost resistance.
- Comply with GOST.
One final piece of advice: always buy enough bricks to avoid a situation where there is not enough building materials. It is not recommended to purchase additional bricks later, since stones from different batches may differ in color and quality.
Watch the video: “Which brick to choose”
How to dry the oven
The oven can be used intensively only after it has completely dried. To do this, open all windows and doors in the room to allow air to enter. After 4 days, you can heat the stove with small wood chips, but not longer than 15 minutes. Several approaches per day are allowed. If there is condensation, the oven has not dried out yet.
Thus, if you follow the instructions and tips, laying a brick oven yourself is not so difficult. In addition, you can always find high-quality materials with good characteristics on sale. But you will save significantly on professional services, and the bathhouse will always delight you with warmth.
Lighting in residential areas
General lighting fixtures are always used in bathrooms. In some cases, it is possible to add lamps that provide local illumination, such as mirrors.
In the corridor (hallway), the layout in most cases does not provide for natural light - there are no windows. Therefore, we have to limit ourselves to artificial light. To create a comfortable environment, lamps with a wide angle of light dispersion are used.
The kitchen is a workplace. In addition to general lighting, it uses spotlights for the convenience of food preparation - above the sink and cutting tables.
The living room in all houses combines many functions: here they relax, meet guests, work, play sports, eat, etc. Therefore, an important aspect is the use of all possible types of lamps to create complete lighting in the room.
The bedroom is a place where people relax from the daily activities. Soft and warm light is used to illuminate the bedrooms. Often lamps in the bedroom have a built-in power control function.
Step-by-step instruction
Forming the base
In order for a brick-lined sauna stove to be strong and reliable, it is important to lay the foundation correctly. The strip foundation is considered the easiest to assemble and install. To equip it, the wooden floor elements in the house are first dismantled, after which a trench is dug, the bottom of which is covered with a sand-crushed stone mixture
Everything is compacted well and watered. The next stage is concreting the foundation. For the strength and reliability of the structure, it is recommended to additionally lay a reinforcing mesh into the foundation before pouring it. The solution is then left to dry. Until the base is completely dry, further work is not recommended.
To equip it, the wooden floor elements in the house are first dismantled, after which a trench is dug, the bottom of which is covered with a sand-crushed stone mixture. Everything is compacted well and watered. The next stage is concreting the foundation. For the strength and reliability of the structure, it is recommended to additionally lay a reinforcing mesh into the foundation before pouring it. The solution is then left to dry. Until the base is completely dry, further work is not recommended.
Preparation
Before constructing the protective apron, it is recommended to soak the lining brick for 12 hours. To do this, the required amount of material is separated, cleaned if necessary and placed in cold water. This event is necessary to ensure that the blocks do not absorb moisture from the solution during the formation of the order.
How to prepare brick mortar?
The installation of a metal furnace will be reliable if a cement-clay mixture is used as a masonry mortar. Both components are taken in equal proportions and diluted with water to obtain a creamy consistency. To mix the solution well and obtain a homogeneous mass, it is recommended to use a construction mixer. After mixing, you need to let the masonry mixture thicken, and then proceed directly to the masonry.
Bricklaying
In order for the apron to be reliable, it is important to correctly calculate the permissible distance between the brick wall and the iron body, because if the gap is small, the masonry will quickly crack and you will have to redo everything all over again. On average, it will take up to 15 orders to form a screen. It is recommended to divide the work into 2 stages: on the first day, form half of the rows, then leave the structure to dry until the morning
Then the rest of the masonry is done, the optimal row thickness is half a brick. The ordering scheme is presented in the table:
It is recommended to divide the work into 2 stages: on the first day, form half of the rows, then leave the structure to dry until the morning. Then the rest of the masonry is done, the optimal row thickness is half a brick. The ordering scheme is presented in the table:
| Row | Description of work |
| 1 | The perimeter is completely laid with bricks, the row is started from the corner, with strict observance of evenness of laying |
| 2 | The wall is built up, reinforcement is carried out, air gaps are formed |
| 3 | Posted as 1st |
| 4—5 | A portal is formed for the firebox door and ash pan, |
| 6—8 | A metal corner is placed above the base of the portal |
| 9 | Can be stacked randomly |
Depending on personal preferences, you can arrange the arrangement with an arch at the level of the stove where the coals are located. This way the smoldering embers will be visible and you can admire them for a long time. You can also complete the arrangement by installing a round pipe in the bathhouse through which the smoke will come out. In none of the selected options, the step-by-step instructions for forming the order do not change.
11e848e1d3edc9508581e7ba9670a865.jpe
b93bf8b1cfe8d748c9f00f0289d65ea6.jpe ca0a0831eef5a22c9c2b40b8d044df0d.jpe 4ee5b7901e5b4f12fd8d62f5442bdc66.jpe
First heating
When the brick finish dries, and this lasts on average up to 2 weeks, it is important to put the device into operation correctly. To do this, 2-3 test fires are performed, during which a minimum of firewood is used. This will prevent excessive heating and cracking of the structure.
In this way it will be possible to safely dry wet areas, thanks to which the stove will serve reliably and for a long time.
This will prevent excessive heating and cracking of the structure. In this way, it will be possible to safely dry wet areas, thanks to which the stove will serve reliably and for a long time.