Place of radiators in the heating system
The use of radiators in heating residential premises plays a key role today.
Not all residential properties, especially apartments in multi-storey buildings, can be converted to underfloor heating. Therefore, the main work of heating internal living spaces is performed by radiators or the good old batteries that are familiar to us. Radiators transfer thermal energy from the coolant to the surrounding space. Heat transfer is carried out due to the large heating surface of the heating device. Modern models have a number of technical improvements, thanks to which it has become possible to connect in a variety of options and with any wiring diagram.
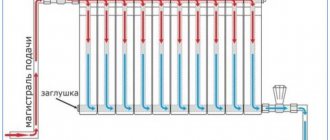
in old cast iron and steel batteries there was only one upper and one lower pipe, through which hot water is supplied and the return is released.
In modern models, in addition to the main supply and outlet pipes, there are built-in air vents. This design of batteries radically changed the quality of functionality of the heating system. If there are air pockets in heating devices, it is enough to open the drain valve and bleed the air.
In many ways, thanks to modern models of heating batteries, it has become possible to choose the most convenient connection scheme and install heating devices in those areas of the living room in which they are most effective. The quality of operation of the heating water circuit depends on correctly installed piping. The process is necessary if you are using a pipeline made from polypropylene pipes.
Important! If there are metal risers, the piping is made from other consumables. It can be metal copper pipes or metal-plastic
The use of polypropylene pipes in this case is strictly prohibited.
The reason for the incompatibility of metal pipes with polypropylene products is the presence of a threaded connection. Considering the fact that propylene pipes have a high coefficient of thermal expansion, when hot coolant is supplied, the threaded connection will lose its tightness and stability. Therefore, if you want to connect a heating radiator made of polypropylene pipes, try to use fittings, adapters and couplings made from similar materials.
the difference in diameters of pipes made of different materials should be taken into account
Coolant flow diagram
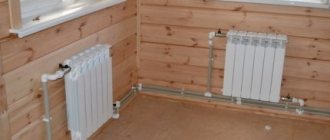
To begin with, we note that the bottom connection in centralized heating systems of city apartments is practically not used due to a number of reasons, among which a significant role is played by the impossibility of promptly carrying out repair work with hidden wiring inside the floors. Therefore, we will be interested in the features of the distribution of coolant in batteries that are installed in private homes. Most often these are steel or aluminum radiators.
Coolant movement when the battery is connected to the bottom
Convection and radiation
As you know, heat from a battery can be transferred mainly in two ways (we will not take into account simple thermal conductivity here):
- Convection. This is the directional movement of heated air from bottom to top, determined by the laws of physics. The fact is that cold air is denser and heavier than warm air, so it is always at the bottom. When it comes into contact with a heat source, it heats up, becomes lighter and rushes higher, and the vacated space is occupied by new layers of cold air masses;
- Radiation. Heat is transferred from the heated surface to the surrounding space using electromagnetic waves. For example, a stone stove or an oil radiator heats.
Almost all modern radiators, both steel and bimetallic and aluminum, distribute heat in both ways, and the relative proportions of convection and radiation are different for each battery.
Heat Spread
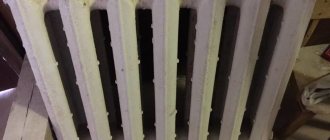
In radiators with a bottom connection, the heated coolant enters and is discharged through the lower inlets. Therefore, the bottom surface of the housing is well heated due to the passage of hot liquid. What happens at the top of the battery?
Another possible bottom connection option
You can often come across the statement that uneven heating of the surface (warm below, cold above) is an inevitable price to pay when using this connection scheme for the opportunity to hide communications and save on the length of pipes.
In fact, modern radiators have a high degree of convective heating:
- Aluminum - 50-60% (depending on the degree of ribbing of the inner surface);
- Steel – 60%;
By comparison, cast iron radiators provide only 20% of their heat transfer through convection.
Thus, high-quality modern batteries with a bottom connection can provide the most uniform heating of the surface due to convective heat exchange. Let us remember that convection is the directed movement of warm air from bottom to top. If the radiator has good convective properties, then due to intensive heating of the lower part at a good coolant flow rate, the rising air will actively heat the upper half, ensuring effective heat transfer to the entire surface.
Let's summarize. Radiators with bottom connections will be the optimal solution for heating your own home under the following conditions:
- Good convective properties (aluminum batteries must have additional ribs inside the sections, and steel batteries must have the maximum number of U-shaped plates between the panels);
- The maximum possible coolant flow rate;
- Possibility of access to pipes if necessary for repairs or system maintenance.
You can see the features of various types of connecting radiators to the heating system in the video below:
Radiator connection diagrams
How well the radiators will heat depends on how the coolant is supplied to them. There are more and less effective options.
Radiators with bottom connection
All heating radiators have two types of connection - side and bottom. There can be no discrepancies with the bottom connection. There are only two pipes - inlet and outlet. Accordingly, coolant is supplied to the radiator on one side and removed from the other.
Bottom connection of heating radiators for single-pipe and two-pipe heating systems
Specifically, where to connect the supply and where the return is connected is written in the installation instructions, which must be available.
Heating radiators with side connection
With a lateral connection, there are many more options: here the supply and return pipelines can be connected into two pipes, respectively, there are four options.
Option #1. Diagonal connection
This connection of heating radiators is considered the most effective, it is taken as a standard and this is how manufacturers test their heating devices and the data in the thermal power passport for such a connection. All other connection types transfer heat less efficiently.
Diagonal diagram for connecting heating radiators with a two-pipe and one-pipe system
This is because when the batteries are connected diagonally, the hot coolant is supplied to the upper inlet on one side, passes through the entire radiator and exits from the opposite, lower side.
Option #2. Unilateral
As the name implies, pipelines are connected on one side - supply from above, return from below. This option is convenient when the riser runs on the side of the heating device, which often happens in apartments, because this type of connection usually predominates. When the coolant is supplied from below, this scheme is used infrequently - it is not very convenient to position the pipes.
Lateral connection for two-pipe and one-pipe systems
With this connection of radiators, the heating efficiency is only slightly lower - by 2%. But this is only if there are few sections in the radiators - no more than 10. With a longer battery, its farthest edge will not heat up well or will remain cold at all. In panel radiators, to solve the problem, flow extenders are installed - tubes that bring the coolant a little further than the middle. The same devices can be installed in aluminum or bimetallic radiators, thereby improving heat transfer.
Option #3. Bottom or saddle connection
Of all the options, saddle connections for heating radiators are the least effective. Losses are approximately 12-14%. But this option is the most inconspicuous - pipes are usually laid on the floor or under it, and this method is the most optimal from an aesthetic point of view. And so that losses do not affect the temperature in the room, you can take a radiator a little more powerful than required.
Saddle connection of heating radiators
In systems with natural circulation, this type of connection should not be made, but if there is a pump, it works well. In some cases, it’s not even worse than the side one. It’s just that at a certain speed of movement of the coolant, vortex flows arise, the entire surface heats up, and heat transfer increases. These phenomena have not yet been fully studied, therefore it is not yet possible to predict the behavior of the coolant.
What radiators are suitable
Manufacturers produce batteries for bottom connections with outlet and inlet pipes at the bottom.
Universal models have 4 gaps for lines, so they fit in any way. Heating pipes are installed at two entrances, the rest are hidden with plugs. It is allowed to connect radiators using the bottom method under the side insert. You will need a special installation kit to attach the pipes to, into, or under the floor. Fixation is carried out from below on brackets. The element should be slightly inclined towards the reverse movement of the coolant. In this way, air pockets are quickly removed from the system.
Heating in the house
At the first stage, you should decide on the types of radiators and options for their connection, since buildings should be prepared in advance for the selected type of heating. A modern space heating system includes several components.
These include:
Do-it-yourself polypropylene heating wiring without a soldering iron
You can find different versions of them in large quantities in our markets.
General instructions for installing batteries look like this:
- First select a place to place them;
- bring pipes to them;
- connect them together;
- perform a test run, and if everything is in order, turn on the heating at full power.
How to install heating radiators with polypropylene pipes with a jumper for quick shutdown
Pros and cons of technology
The connection method is chosen to ensure uniform heating of the radiators
The optimal option for using a unit for connecting a heating radiator with a bottom type of connection is a two-pipe system. Communications eliminate heat losses and have several advantages:
- uniform heating of the top and bottom of the batteries;
- ease of serial connection of pipes;
- high-quality heating of rooms, which allows only the two-pipe method to be implemented;
- masking radiator elements in the floor or walls;
- quick dismantling and replacement of elements;
- possibility of installing pipelines made of polypropylene, copper, PEX, bimetal, aluminum, steel.
The disadvantages of the lower supply include the need to equip each battery with air vents and the impossibility of installing it if there is a circulation pump.
Tying polypropylene pipes instructions
Radiator piping can be done using a variety of pipes, but experts recommend using polypropylene pipes. Ball valves for piping are also purchased in polypropylene; they can be straight or angular; this option is the simplest and most inexpensive. Brass fittings are more expensive, and their installation is more difficult.
Polypropylene strapping is done as follows:
- the coupling with a union nut is inserted into the multiflex, which easily connects to any outlet;
- The pipes themselves are attached to the walls at a convenient height; they should not fit tightly to the surface; it is better to leave a gap of 2-3 cm. The pipes are secured using special brackets, which are fixed to the wall with nails or self-tapping screws.
Polypropylene piping to radiators can also be carried out when laying pipes in the wall, in which case they come to the surface only at the connection points.
Radiator piping can be done using a variety of pipes, but experts recommend using polypropylene pipes.
Battery fasteners can be very different, most often it is a pin connection that is fixed to the wall surface. Corner brackets can also be used, which also allow radiators to be suspended at the required height. For panel batteries, fasteners are supplied included; for sectional batteries, they must be purchased separately. Typically, two brackets or pins are sufficient for one section.
The taps are connected as follows:
- the tap is disassembled, the fitting and union nut are screwed into the radiator;
- Use a special wrench to tighten the nut tightly.
As you can see, this process is extremely simple. To perform such work, you only need to purchase a special plumbing wrench for American women, without which it is unlikely that you will be able to simply install a faucet.
To install batteries and tie them, the following materials and tools are required:
- a set of special keys;
- seals for threaded connections;
- tow and thread paste;
- threads for carving.
Features of connecting radiators
Heating installation has some features:
- It is necessary to maintain a distance of 100 mm from the radiator to the window sill. If the gap between the batteries and the bottom of the window sill is different, then the heat flow is disrupted and the effect of the heating system will be low.
- The distance from the floor surface to the battery should be 120-150 mm, otherwise a sharp temperature change will occur.
- In order for the heat transfer of the equipment to be correct, the distance from the wall must be at least 20 mm.
At the same time, we take into account that the installation and efficiency of heating radiators is greatly influenced by the installation method: under an open window sill the efficiency of the heating system is maximum - 96-97%, in an open niche - up to 93%, in a partially closed form - 88-93 %, completely closed - 75-80%.
The heating radiator can be installed using a variety of methods; its piping is done with metal, polyethylene, polypropylene pipes
During installation, it is important to correctly position not only the pipes, but also the batteries themselves, and make the connection in accordance with all recommendations and standards. In this case, the heating system will work very efficiently and will not require repair work.
Share a useful article:
Basic installation requirements
First, let's figure out what tools are needed to install heating radiators with bottom connections. Here they are:
- tube in the shape of the letter “G”;
- mounting level;
- multiflex;
- FUM tape;
- thermal insulation;
- pipe cutter;
- appropriate number of nuts.
Important! It is recommended to carry out the lower eyeliner at the initial stages of repair work in a residential area. This can be explained quite simply: the pipeline in this case is laid in the wall or floor
Therefore, you should think about this even before pouring the concrete screed.
In most cases, batteries are equipped with their own mounting kits or assemblies that allow you to fix the devices on the walls.
Step 1. The distance between the radiator and the floor should not be less than 15 centimeters, and between it and the wall - 2 centimeters.
Step 2. First, the radiator is placed on a special stand, and a building level is placed on top of it.
Step 3. When the device is level, it is necessary to drive in the fasteners, but only taking into account the number of sections. If, for example, there are only five such sections, then two fastenings will be enough, but if there are seven or more, then another, third fastening may be needed.
Step 4. Holes for fasteners are made, the heating radiator is installed.
It is also worth adding that in the lower connection method, the L-shaped tubes are necessarily strengthened and filled with polyurethane foam. But this should be done only after the installation is completed and the heating system has been pressure tested.
And now - some more practical installation tips
It is important that the supply and return pipes are not mixed up, but to do this it will be enough to simply read the corresponding factory markings. Although if both tubes must be connected on the same side, then special vigilance should be exercised
The fact is that if you connect them incorrectly, the performance of the device can decrease by 50-60% (a more accurate figure depends on the characteristics of the specific model).
We advise you to familiarize yourself with how to properly change a heating radiator. more details
Any current model includes a thermostatic insert; through it the temperature in the device is adjusted. But the presence of such an insert also affected the cost (about 1/10 more expensive than other models).
Types of heating systems
The amount of heat that the heating radiator will emit depends not least on the type of heating system and the selected type of connection. To choose the best option, you must first understand what kind of heating systems there are and how they differ.
Monotube
A single-pipe heating system is the most economical option in terms of installation costs. Therefore, this type of wiring is preferred in multi-storey buildings, although in private buildings such a system is far from uncommon. With this scheme, the radiators are connected to the main line in series and the coolant first passes through one heating outlet, then enters the input of the second, and so on. The output of the last radiator is connected to the input of the heating boiler or to the riser in high-rise buildings.
Example of a one-pipe system
The disadvantage of this wiring method is the impossibility of adjusting the heat transfer of radiators. By installing a regulator on any of the radiators, you will regulate the rest of the system. The second significant drawback is the different coolant temperatures on different radiators. Those that are closer to the boiler heat up very well, those that are further away become increasingly colder. This is a consequence of the serial connection of heating radiators.
Two-pipe wiring
A two-pipe heating system is distinguished by the fact that it has two pipelines - supply and return. Each radiator is connected to both, that is, it turns out that all radiators are connected to the system in parallel. This is good because the coolant of the same temperature enters the input of each of them. The second positive point is that you can install a thermostat on each of the radiators and use it to change the amount of heat it emits.
The disadvantage of such a system is that the number of pipes when laying out the system is almost twice as large. But the system can be easily balanced.
Heating system options
An autonomous heating system (in a private house, small cottage) allows you to choose from two possible options for installing a heating system.
This:
- Single-circuit (single-pipe) - classic, which has been used for a long time and everywhere.
- Double-circuit (two-pipe) - more efficient in operation, with the ability to regulate heat transfer.
Single-circuit heating system
The radiator is connected to polypropylene pipes in a single-circuit system in series.
Schematically, a device of this type is simple:
- A pipe coming from the boiler (supply) is connected to the upper inlet of the radiator.
- The cooled coolant outlet (return) is connected to the lower one.
Supply and return are carried out through one pipe. In a one-story building, this is a horizontal pipe around the perimeter of the system. In apartment buildings this is a vertical riser pipe.
The subtlety of installing a single-circuit system is that you need to install a bypass here.
A bypass is a pipe (jumper) built between the supply and return with a valve or check valve. A bypass is necessary to autonomously disconnect one battery from the circuit while the system is running (for example, for repairs).
Dual circuit system
With a dual-circuit system, the batteries are installed in parallel. The coolant is injected from the outlet from the main supply pipe. The return occurs according to the same scheme, through a second (separate) pipe. A separate input for each radiator eliminates the need for additional parts in the form of a bypass. A shut-off valve (valve) is installed on the inlet, which shuts off the supply in case of need.
A double-circuit heating system is approximately 10% more efficient in heat transfer and is considered more modern.
To attach the battery to the wall, you will need brackets or special hooks. For light radiators, 2 supports are sufficient. The number of brackets for heavy batteries is calculated from the need for 1 mount for three sections.
What kind of piping can be made from polypropylene pipes
The piping for a home heating system can be very different. The thing is that the consumer is always trying to reduce the amount of consumables, while simultaneously trying to install radiators in all heated rooms.
It should be said right away that these are relics of the past. Unlike expensive metal pipes, polypropylene consumables are much cheaper and easier to install. therefore, it is not worth saving on the length of the pipeline. Choose the type of harness that will bring maximum benefit in your case. The only reasons that may influence the choice of type of harness are the following factors:
- what heating circuit is used (one-pipe system or two-pipe);
- what type of radiator connection you have chosen (diagonal, side or bottom).
As a rule, when using any heating scheme: single-pipe or two-pipe, you can use any type of heating radiator connection.
According to experts, pipeline laying must minimize the number of bends. A smooth highway remains resistant to hydrodynamic loads. The number of zones in which air can accumulate will be reduced in the pipeline.
There are specific features for piping a single-circuit and double-circuit heating system using polypropylene pipes.
- Typically, such a system uses a series connection of radiators;
- A bypass is always installed in front of the battery, connecting the supply pipe and return pipe. During normal operation of the heating system, the bypass is not activated. When carrying out maintenance work or in the event of an emergency, the water supply to the radiator is stopped. The coolant circulates freely through the bypass.
- Both parallel and serial connections of batteries are used;
- Both radiator hoses are connected to different pipes. The upper one is connected to the supply pipe, the lower pipe is connected to the return pipe. Typically, radiators are connected in parallel in two pipe systems, so installing bypasses is not required.
Tying polypropylene pipes with radiators is done in two ways: soldering and using fittings. Radiators are installed and connected using a soldering iron and American-style plumbing wrenches.
Selection of heating devices by type and power
If you have not yet purchased batteries, then before installation you need to select heating radiators from 4 varieties available for sale:
- Sectional aluminum. They are made from a light alloy - silumin (aluminum + silicon) in the form of ribbed sections, painted with a heat-resistant polymer composition.
- Bimetallic heaters are made in two types - sectional and monolithic, although outwardly the finished batteries look the same. Construction: a frame made of steel pipes is embedded inside each silumin section.
- Cast iron heating devices - designer and Soviet-style - are only available in sections.
- Steel radiators are welded from stamped metal (panel) or made by casting (tubular).
Note. In addition to the heaters shown in the photo, there are copper and baseboard convectors. They are rarely used in water systems.
Select the type of heating devices according to two criteria: price and appearance that matches the interior of the rooms. One caveat: for the autonomous heating system of a private house, any batteries are suitable, and for an apartment with centralized heating - radiators that can withstand a pressure of 12 bar. How to choose heaters is described in detail in a separate instruction.
The heat dissipation of batteries and registers is specified in the manufacturer's technical documentation. According to current standards, the power of radiator sections is indicated when the temperature difference between the coolant and room air is 70 °C.
For example, the room temperature is 20 degrees, the water in the pipes is 90 °C, then the section will give off approximately 180 W of heat. Since the coolant rarely heats up to 80-90 °C, the actual heat transfer will be much lower. Hence the conclusion: take radiators with a margin of 80-100%. Simplified methods for calculating power are described in our material and in the video:
Almost all types of batteries are offered in 2 versions - with side or bottom connection. Here the choice depends on the method of laying the pipes and the arrangement of the connections. This means that before installation you need to consider the question...
Advantages and disadvantages of single-pipe and two-pipe heating systems
The main difference between the two heating schemes is that the two-pipe connection system is more efficient in operation due to the parallel arrangement of two pipes, one of which supplies the heated coolant to the radiator, and the other removes the cooled liquid.
The single-pipe system circuit is a sequential type wiring, due to which the first connected radiator receives the maximum amount of thermal energy, and each subsequent one heats up less and less.
However, efficiency is an important, but not the only criterion that you need to rely on when deciding to choose one scheme or another. Let's consider all the pros and cons of both options.
Single pipe heating system
- ease of design and installation;
- savings in materials due to the installation of only one line;
- natural circulation of coolant, possible due to high pressure.
- complex calculation of thermal and hydraulic parameters of the network;
- the difficulty of eliminating errors made during design;
- all network elements are interdependent; if one section of the network malfunctions, the entire circuit stops working;
- the number of radiators on one riser is limited;
- it is impossible to regulate the flow of coolant into a separate battery;
- high heat loss coefficient.
Two-pipe heating system
- possibility of installing a thermostat on each radiator;
- independence of operation of network elements;
- the ability to insert additional batteries into an already assembled line;
- ease of eliminating errors made at the design stage;
- to increase the volume of coolant in heating devices, there is no need to add additional sections;
- no restrictions on the length of the contour;
- coolant with the required temperature is supplied throughout the entire pipeline ring, regardless of the heating parameters.
- complex connection diagram compared to a single-pipe;
- higher consumption of materials;
- installation requires a lot of time and labor.
Thus, a two-pipe heating system is preferable in all respects. Why do the owners of apartments and houses refuse it in favor of a single-pipe scheme? Most likely, this is due to the high cost of installation and the high consumption of materials required to lay two highways at once. However, one should take into account the fact that a two-pipe system involves the use of pipes of a smaller diameter, which are cheaper, so the total cost of installing a two-pipe option will not be much more than a single-pipe one.
Owners of apartments in new buildings are lucky: in new buildings, unlike residential buildings of Soviet construction, a more efficient two-pipe heating system is increasingly used.
Heating boiler installation
Heating boiler piping
Step 1: Choose a location. The boiler must be located as close as possible to the existing water supply system, and problems with the chimney must be resolved. Fix the boiler on the wall or install it on the floor, keeping it horizontal. When installing the chimney, follow basic fire safety rules.
Step 2. If the heating system is open, you need to make an expansion tank with a drain. This can be an ordinary metal square container of about ten liters. It is connected to the boiler at the hot water outlet, and the tank should be located above the boiler and radiators.
Open expansion tank for heating
The system has forced water circulation, so there is no point in placing the tank very high. The tank must have a constantly open drain pipe to drain excess water during heating and prevent the formation of a vacuum while the coolant cools. A closed type expander is mounted in the same way.
Video - Connecting a membrane expansion tank to polypropylene
Step 3. Installation of the security unit. It is installed only for closed-type heating systems in an accessible place, in most cases next to the boiler. The control and safety unit consists of a pressure gauge (shows the actual pressure in the system), an air release valve and a safety valve. The safety valve is automatically activated when the maximum permissible pressure values are exceeded.
Video – Security Group
Step 4. Install the pump.
The pumps are sold together with the boilers; in all modern gas and electric boilers they are mounted in the housing; no additional actions are required. If the model being installed does not have a built-in pump or you have a solid fuel boiler, you will have to purchase it separately. Installed in any convenient place at the inlet of cold water from the heating system to the boiler.
Video - Installing a GRUNDFOS circulation pump in a heating system
Step 5. Filter installation. There are nuances here. The fact is that many heating boilers have two hot water circuits, one is used for heating, and the second is used for domestic needs: showering, washing dishes. If water is taken from the boiler frequently, then the likelihood of various mechanical impurities entering the boiler increases; it is recommended to install a filter. If the boiler operates only for heating, then it is not necessary to install a filter, water is not taken from the system anywhere, and no impurities will enter it. There is an option - water at the dacha is supplied by floating pumps from wells. In this case, a filter must be installed when installing the pumps. If this is not done, install a filter at the water inlet to the boiler.
There is an axiom in mechanics - the more different equipment is installed, the more vulnerable the system is, and the likelihood that some device will fail increases. Experienced engineers try to install only critical machinery and equipment, leaving everything else unused. This also applies to the filter - there are no such anywhere else or the probability of impurities getting in tends to zero - there is no need to install filters. These are extra connections, extra casings and filling, and each connection can leak. Keep this rule in mind when installing any systems.
Filter for heating system
Practical advice. All existing filters (except for very expensive ones with molecular filters, so-called osmosis-type filters) purify water only from mechanical impurities. This is good, but they don’t happen in pipeline water anyway. The boiler is afraid of deposits of calcium salts on the walls - heat transfer is significantly reduced and efficiency decreases. To prevent such phenomena, we recommend using ordinary liquid Calgon (used during washing). Pour it into a closed heating system during filling at the rate of approximately 1 liter per 100 liters of water - problems with calcium will be solved.
Choosing a location and method of installing a radiator
Options for connecting heating radiators depend on the general heating scheme in the house, the design features of heating devices and the method of laying pipes. The following methods of connecting heating radiators are common:
- Lateral (unilateral). The inlet and outlet pipes are connected on one side, with the supply located at the top. The standard method for multi-storey buildings, when the supply is made from a riser pipe. In terms of efficiency, this method is not inferior to the diagonal one.
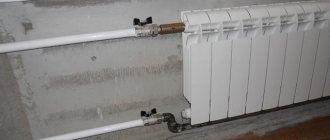
- Lower. In this way, bimetallic radiators with a bottom connection or a steel radiator with a bottom connection are connected. The supply and return pipes are supplied from below on the left or right side of the device and are connected through the lower radiator connection unit with union nuts and shut-off valves. The union nut is screwed onto the lower radiator pipe. The advantage of this method is that the main pipes are hidden in the floor, and heating radiators with bottom connections fit harmoniously into the interior and can be installed in narrow niches.
- Diagonal. The coolant enters through the upper inlet, and the return is connected from the opposite side to the lower outlet. The optimal type of connection ensures uniform heating of the entire battery area. In this way, correctly connect a heating battery whose length exceeds 1 meter. Heat loss does not exceed 2%.
- Saddle. The supply and return are connected to the lower holes located on opposite sides. It is used primarily in single-pipe systems when no other method is possible. Heat loss as a result of poor coolant circulation in the upper part of the device reaches 15%.
https://youtube.com/watch?v=olrD9qxCAhM
WATCH THE VIDEO
When choosing a location for installation, several factors are taken into account to ensure the correct operation of heating devices. Installation is carried out in places least protected from the penetration of cold air, under window openings. It is recommended to install a battery under each window. The minimum distance from the wall is 3-5 cm, from the floor and window sill - 10-15 cm. With smaller gaps, convection worsens and the battery power drops.
Typical mistakes when choosing an installation location:
- The place for installing control valves has not been taken into account.
- A small distance to the floor and window sill prevents full air circulation, as a result of which heat transfer is reduced and the room is not heated to the set temperature.
- Instead of several batteries located under each window and creating a thermal curtain, one long radiator is chosen.
- Installation of decorative grilles and panels that prevent the normal spread of heat.
Coolant circulation methods
Coolant circulation through pipelines occurs naturally or forcedly. The natural (gravity) method does not involve the use of additional equipment. The coolant moves due to changes in the characteristics of the liquid as a result of heating. The hot coolant entering the battery, cooling, acquires greater density and mass, after which it sinks down, and a hotter coolant takes its place. Cold water from the return flow flows by gravity into the boiler and displaces the already heated liquid. For normal operation, the pipeline is installed at a slope of at least 0.5 cm per linear meter.
Scheme of coolant circulation in the system using pumping equipment
For forced supply of coolant, the installation of one or more circulation pumps is required. The pump is installed on the return pipe in front of the boiler. The heating operation in this case depends on electrical power, but has significant advantages:
- The use of small diameter pipes is allowed.
- The line can be installed in any position, vertically or horizontally.
- Requires less coolant volume.
What does it take for batteries to work efficiently?
An efficient heating system can save money on fuel costs. Therefore, when designing it, you should make informed decisions. After all, sometimes the advice of a neighbor in the country or a friend who recommends a system like his is not at all suitable.
It happens that there is no time to deal with these issues yourself. In this case, it is better to turn to professionals who have been working in this field for at least 5 years and have grateful reviews.
Image gallery Photo from Step 1: Regardless of the type of heating device, its installation includes a number of similar steps. First, mark the wall and install brackets for the radiator. Step 2: Before attaching the radiator, you need to check that it is installed correctly using a building level. If necessary, it is better to move the bracket before connecting Step 3: If there are no complaints about the location of the heating device, its branch pipe is connected to the supply pipe Step 4: Then a connection is made to the pipe that removes the cooled coolant from the radiator to the heating boiler Marking the wall and installing brackets Checking the location before mounting Connection radiator to the supply pipeConnecting the radiator to the return pipe
When deciding to install new batteries or replace heating radiators yourself, you need to take into account that their efficiency is directly affected by the following indicators:
size and thermal power of heating devices; their location in the room; connection method.
The choice of heating devices amazes the imagination of the inexperienced consumer. Among the offers are wall-mounted radiators made of various materials, floor and baseboard convectors. They all have different shapes, sizes, heat transfer levels, and connection types. These characteristics must be taken into account when installing heating devices into the system.
For each room, the number of radiators and their size will be different. It all depends on the area of the room, the level of insulation of the external walls of the building, the connection diagram, the thermal power indicated by the manufacturer in the product passport.
The location of the batteries is under the window, between windows located at a fairly long distance from each other, along a blank wall or in the corner of the room, in the hallway, pantry, bathroom, in the entrances of apartment buildings.
It is recommended to install a heat-reflecting screen between the wall and the heating device. You can make it yourself using one of the heat-reflecting materials - penofol, isospan or another foil analogue.
You should also adhere to the following basic rules for installing a battery under a window:
all radiators in one room are located on the same level; convector fins in a vertical position; the center of the heating equipment coincides with the center of the window or is 2 cm to the right (to the left); the length of the battery is at least 75% of the length of the window itself; the distance to the window sill is at least 5 cm, to the floor - no less than 6 cm. The optimal distance is 10-12 cm.
The level of heat transfer from devices and heat loss depends on the correct connection of radiators to the heating system in the house.
It happens that the owner of a home is guided by the advice of a friend, but the result is not at all as expected. Everything is done like his, but the batteries don’t want to heat up.
This means that the selected connection diagram was not suitable specifically for this house, the area of the premises, the thermal power of the heating devices were not taken into account, or annoying mistakes were made during installation.
Video instruction with advice from a specialist
Hello! I have the following problems with heat: 1) In the corner apartment in the children's room there are two supply and return pipes. The supply pipe is fiery and the return pipe is several times colder. The radiators are connected to the return line, is this correct or not? Can I connect radiators in addition to the supply and run them along a cold street wall? 2) There is no radiator or pipe in the toilet at all, although the wall is also cold (outdoor). 3) In the bedroom there is only a pipe (return) with a radiator battery connected to it, and through the wall in our kitchen there is a supply. Is it possible to somehow combine two rooms and install them in two rooms with a supply pipe?
In our 9-story building, the heating system is built like this: one supply pipe goes from bottom to top. Radiators are connected to it on all floors in parallel with jumpers. The coolant enters the radiator from below, and the upper outlet from the radiator is connected to the same pipe. Only part of the radiator warms up. How to properly connect a radiator so that it warms up completely?
Good afternoon. The nine-story building has a two-pipe heating system in every room. In one room, the heating supply pipe runs upstairs past all the radiators. Accordingly, all the radiators from the ninth floor are connected to the return line, and my battery on the second floor is generally almost cold. Tell me whether this connection is natural, or is it just a mistake made by the mechanics?
Hello! Please tell me how correct your data is in determining an effective method for connecting a radiator? And what sources can you refer to to obtain the above data? Thanks in advance everyone!
Embed the valve into the jumper (which is not entirely legal if there are valves on the radiator) or reconnect the radiator in a diagonal pattern. On propylene it is simple and fast, compact and quite aesthetically pleasing. The top insert (outlet) is transferred instead of the top plug opposite. Do not forget that the thread direction of the plugs is mutually opposite.
Obviously, you have a single-pipe heating system in your house, in which some rooms are connected to the pressure line, and other rooms are on the return line. This is a moronic Soviet system - the return water is already cooled and cannot heat the room. But you may be fined for installing additional batteries, because... such alteration of the project is not permitted
Single-pipe circuit with jumper (apartment version)
This option is slightly better than the previous one, since the goal is to heat all the radiators in the apartments, along the riser, evenly.
By reducing the resistance created by the radiators with such a jumper, the coolant passes through the entire riser, partially entering (mixing) into the radiator, thereby heating all floors evenly.
The main thing here is to make sure that none of the residents put a tap on the lintel (and close it), otherwise this whole “undertaking” of the engineers with the lintel will be covered with a “copper basin”. In some houses, knowing about such cases, they simply reduce the diameter of the lintel.
The tap on the jumper is needed in case of an accident or repair - if the radiator “leaks” (breaks), it is removed for replacement. Then the jumper serves as a bypass between the apartments so that the flow of coolant stops.
Selection of materials
The popularity that polypropylene pipes have gained. associated with a number of their positive qualities:
- Their price is significantly lower than their metal counterparts.
- High durability due to the fact that the plastic does not rust, and there is practically no sediment deposited on it.
- Does not need painting.
However, it should be taken into account that not all types of polypropylene pipes are suitable for heating systems. The fact is that they must have a reinforcing layer that prevents significant thermal expansion of the pipeline.
Reinforced polypropylene pipe
Moreover, it is desirable that the reinforcement layer be aluminum, since fiberglass reinforcement leads to saturation of the coolant with oxygen. This in turn causes rusting of the metal surfaces of boilers and other heating supply elements. Pipes that have aluminum reinforcement and are suitable for heat supply systems are marked PN25.
Note! When choosing pipes, you should pay attention to the uniformity of their wall thickness. To do this you need to look at their cut
As for the diameter, the optimal parameter is 25 mm.
In this case, it is also necessary to purchase fittings, which include:
Single-pipe and two-pipe radiator connection diagram
How to install correctly
Now about how to hang the radiator. It is very desirable that the wall behind the radiator is level - this makes it easier to work. Mark the middle of the opening on the wall, draw a horizontal line 10-12 cm below the window sill line. This is the line along which the top edge of the heating device is leveled. The brackets must be installed so that the top edge coincides with the drawn line, that is, it is horizontal. This arrangement is suitable for heating systems with forced circulation (with a pump) or for apartments. For systems with natural circulation, a slight slope is made - 1-1.5% - along the flow of the coolant. You can’t do more - there will be stagnation.
Correct installation of heating radiators
Wall mount
This must be taken into account when installing hooks or brackets for heating radiators. Hooks are installed like dowels - a hole of a suitable diameter is drilled in the wall, a plastic dowel is installed in it, and the hook is screwed into it. The distance from the wall to the heating device is easily adjusted by screwing in and unscrewing the hook body.
Hooks for cast iron batteries are thicker. This is a fastener for aluminum and bimetallic
When installing hooks under heating radiators, keep in mind that the main load falls on the upper fasteners. The lower one serves only to fix it in a given position relative to the wall and is installed 1-1.5 cm lower than the lower collector. Otherwise, you simply will not be able to hang the radiator.
One type of brackets
When installing the brackets, they are applied to the wall in the place where they will be mounted. To do this, first attach the battery to the installation location, see where the bracket “fits,” and mark the location on the wall. After placing the battery, you can attach the bracket to the wall and mark the location of the fasteners on it. In these places, holes are drilled, dowels are inserted, and the bracket is screwed. Having installed all the fasteners, hang the heating device on them.
Floor fixing
Not all walls can support even lightweight aluminum batteries. If the walls are made of lightweight concrete or covered with plasterboard, floor installation is required. Some types of cast iron and steel radiators come directly with legs, but not everyone is satisfied with their appearance or characteristics.
Legs for installing aluminum and bimetallic radiators on the floor
Floor installation of heating radiators made of aluminum and bimetallic is possible. There are special brackets for them. They are attached to the floor, then the heating device is installed, and the lower collector is secured with an arc to the installed legs. Similar legs are available with adjustable height and some with a fixed height. The method of fastening to the floor is standard - with nails or dowels, depending on the material.
Where to put radiators
Traditionally, heating radiators are placed under windows, and this is no accident. The rising flow of warm air cuts off the cold air that comes from the windows. In addition, warm air heats the glass, preventing condensation from forming on it. Only for this it is necessary that the radiator occupies at least 70% of the width of the window opening. This is the only way the window will not fog up. Therefore, when choosing the power of radiators, select it so that the width of the entire heating battery is not less than the specified value.
How to place a radiator under a window
In addition, it is necessary to correctly select the height of the radiator and the location for its placement under the window. It must be placed so that the distance to the floor is around 8-12 cm. If you lower it lower, it will be inconvenient to clean, if you raise it higher, your feet will be cold. The distance to the window sill is also regulated - it should be 10-12 cm. In this case, warm air will freely go around the obstacle - the window sill - and rise along the window glass.
And the last distance that must be maintained when connecting heating radiators is the distance to the wall. It should be 3-5 cm. In this case, rising currents of warm air will rise along the back wall of the radiator, and the rate of heating the room will improve.
How to determine?
The density can be found out upon purchase by examining the sheet markings. The manufacturer always indicates this characteristic of polycarbonate in the labeling. To correctly select the material of the required density, you can ask the seller to calculate not only the number of sheets, but also this characteristic for a particular design.
High-quality and durable cellular polycarbonate, designed for a long service life, belongs to the middle and luxury price segment. Sheets with a maximum density of 0.82 g/m³, the thickness of which is measured in millimeters, cannot cost less than 1000 rubles.
It is very difficult for an inexperienced person to visually distinguish between sheets of different densities. Therefore, you should always turn to the services of trusted manufacturers who sell their products in a wide range. Such companies will help you choose the right optimal density of cellular or monolithic polycarbonate, which is measured in standard indicators (grams per cubic millimeter).
We connect the heating radiator to polypropylene pipes
In the private sector, in old housing stock and in new buildings, work is currently underway to re-equip heating systems. Old heating equipment, steel and cast iron heating radiators are replaced with new devices. Modern industry produces bimetallic, steel heating devices with improved parameters and characteristics. Accordingly, in parallel, the old steel pipelines through which the coolant circulates are being replaced with new consumables. Today, polypropylene pipes are taking the lead in creating a heating circuit.
Accordingly, in view of such a large-scale modernization of heating systems, reasonable questions arise. How is a polypropylene water circuit installed at home? What does it look like to connect a heating system radiator to polypropylene reinforced pipes. Let's look in detail and consider what it means to connect polypropylene consumables to heating sources in detail.
Features and basic rules for storing honey in honeycombs
Honey in combs is a special delicacy that can also be stored in the apartment. This healthy and nutritious product needs special attention due to the fact that it contains beeswax. The conditions for storing honeycomb should be the same as for liquid consistency.
Pre-sterilized jars are best suited for storing honeycombs. Cut the honeycomb into pieces of such a size that they can fit freely into the opening of the jar. Cover the top of the jar tightly with a lid. Under such conditions, cells can remain for no more than one year.
In order to increase the shelf life, you should fill the honeycombs with liquid fresh honey, and then seal them with melted wax. After this, seal the jar with a lid. Under such conditions, soda can be stored for more than 10 years.
What else do you need to know
Side connecting holes (also called inlets, pipes and manifolds) can have different diameters. The most common:
- G1” – one inch (2.54 cm);
- G3/4” - three quarters of an inch (1.91 cm);
- G1/2” – half an inch (1.27 cm).
This is important to know when choosing shut-off and control valves: you need to know whether it will be possible to connect the device to the radiator directly or whether adapters will be required. When connecting sectional radiators of any type, you cannot do without adapters (footers): here in some collectors the thread is left-handed, and in others - right-handed
Therefore, special installation kits are produced for sectional radiators with side connections. They are available for different diameters of collectors and supply pipes. Their configuration varies, but most often there are seven elements: four adapter fittings, a Mayevsky valve (air vent) with a key and a plug (for an unused manifold)
When connecting sectional radiators of any type, you cannot do without adapters (footers): here in some collectors the thread is left-handed, and in others - right-handed. Therefore, special installation kits are produced for sectional radiators with side connections. They are available for different diameters of collectors and supply pipes. Their configuration varies, but most often there are seven elements: four adapter fittings, a Mayevsky valve (air vent) with a key and a plug (for an unused manifold).
https://youtube.com/watch?v=nnQz2VA7C_M
With a bottom connection, all you need is a radiator connection unit, which is also called “multiflex”. Two shut-off ball valves are built inside it, which serve to cut off the coolant. If necessary, simply turn the miniature taps and the radiator is turned off: it can be removed.
He can be:
- straight - pipes are supplied from below;
- corner - pipes come out of the wall.
When choosing it, it is important to know the distance between the centers of the pipes (center distance). This value is indicated in the technical data and is usually 80 or 50 mm. There is a set of adapters for any type of pipes for the bottom connection of radiators
For more information about these fittings, watch the video.
There is a set of adapters for any type of pipes for the bottom connection of radiators. For more information about these fittings, watch the video.
https://youtube.com/watch?v=otVXrHAX2EE
Pros and cons of connecting batteries in series
Pros of serial connection:
- low cost of consumables;
- All types of radiators can be used;
- if necessary, pipeline;
- heating devices cover the entire perimeter of the room;
- easy installation;
- small amount of consumable material.
Minuses:
- complex process design;
- high heat loss coefficient: due to the characteristic elongation of such a line, the coolant cools towards the end;
- in the absence of a circulation pump, stagnation of the liquid moving through the radiators occurs and a decrease in the efficiency of the system as a whole;
- in the absence of thermostats on batteries, there is a lack of control over the heat supply.
Reinforcement elements and consumables
Installation of batteries, to which the pipelines are connected from below, is not difficult. However, the process is carried out using special fittings. Its type is selected for the installed radiators.
Bottom connection of the heating battery with polypropylene or other pipelines involves the use of a set of adapters. They are selected according to the material of the connected pipes. Typically solder sleeves and press fittings are used. If polypropylene pipes are connected, it is recommended to use “American” threads.
Completed lower piping of the heating device using a set of fittings and adapters Source remontnik.ru
On a note! Adjustment fittings are rarely installed under heating equipment. It is usually located on the manifold.
If a lateral pipe supply is made from below, a control and thermostatic valve is installed on the heater. Installation of fittings is carried out using threads.
On a note! When installing any room heating device, 2 shut-off valves are installed. They allow you to turn off and remove heating equipment without stopping the operation of the heating circuit of the house.
When installing the battery, radiator plugs and air vents are also used, which are often Mayevsky taps. To seal threaded connections, tow is usually used together with a special paste.
Manual air vent - Mayevsky tap Source eurobion.info
Using radiators with bottom connections
This method is not only the most effective, but also the most aesthetically acceptable. The advantages of this connection include:
- possibility of installing a flow direction adapter;
Flow direction adapter
- no need to purchase a suitable thermostat - it is already on the radiator;
- the fact that both pipes from the battery go into the wall or floor.
Piping in the wall
However, there are also disadvantages, including:
- the need to install an air vent on each radiator;
- the need for constant use of a circulation pump;
- less uniform heating, lower efficiency;
- impossibility of use for gravity heating systems.
You need to bleed the air from the battery
Features of the diagonal connection scheme
If you also wondered why a diagonal connection is the most effective, then you should consider this option in more detail.
If we take into account the process where hot air or water is involved, then the action will occur according to one physical law, which involves the rise of warm masses upward, while the cold ones sink downwards
To ensure uniform heat distribution throughout the volume of the radiator, the coolant should be distributed throughout the battery. As mentioned above, lateral connection in city apartments acts as the main circuit. After all, forced circulation under high pressure is used there. The diameter of the incoming and outgoing pipes is only 20 mm. Through them, water enters the battery under high pressure, which allows the device to be filled evenly and quickly.
If we are talking about private housing construction, where the circulation is natural, the filling of radiators occurs under the influence of the above-mentioned physical law. That is why hot streams penetrate through the upper pipe, pushing cold water through the lower outlet on the opposite side. The two pipes are located diagonally when viewing the device. This is where the name of the connection comes from. The coolant fills the battery gradually, releasing heat to the entire volume. It is necessary to take into account not only the law of heat transfer, but also the physical law. That is why this scheme is the most effective.
Piping to the room heater
Currently, the best piping options are polypropylene and cross-linked polyethylene pipes. They are reliable and have an attractive appearance. Experts do not recommend using steel pipelines for wiring the heating system.
Pipes connected to the battery from below are often laid under the floor covering or even along the ceiling of the floor below. For this installation method, steel pipelines are not the best option. The optimal solution, proven in practice, is tying heating radiators with polypropylene. A good solution is also to use copper and PEX piping for heating distribution.
Polypropylene pipe for heating system Source vyborexperta.ru
The use of insulation on pipes also has its own characteristics:
- the absence of thermal insulation protection will provide additional heating of the room;
- the presence of thermal insulation will reduce heat loss - this is an important nuance if the pipelines are laid in the suspended ceiling of the floor below;
- the thermal insulation layer replaces the damping material when heating is installed in the screed - the insulation compensates for the thermal expansion of the polymer, which allows the plastic to expand in any direction without negative consequences.
Thermally insulated heating pipes laid in a screed Source odstroy.ru
Before installing pipelines, be sure to determine the exact location of the heating devices. Their horizontal displacement is unacceptable, unlike height. The reason for this is the lack of a swivel fitting above the floor covering.
Usually only small straight sections of piping are above the surface. They are connected to the heater taps. The exception is batteries that are tied from below using knots that provide lower side connection to the pipes. This option assumes that the pipeline outlets are located at a distance of approximately 120 mm from the fittings.
Features of installing radiators with bottom connections
The installation process is determined by which scheme is chosen. So, the pipeline can be laid:
- in the wall;
- in the floor;
- between the radiator and the floor.
On a note! The efficiency of the heating system does not depend on the location of the pipes - they are hidden for aesthetic reasons.
The connection is made using special fittings.
First, radiators are installed, having previously calculated their number for each room, after which pipes are supplied to them.
If you follow the advice from this article, you will not encounter any difficulties.
What and where should I finally use it?
Let's summarize. If you live in central cities and you do not have problems with energy, gas, electricity and others, we recommend using a two-pipe system, with counter movement, circular movement and forced circulation. Because then we save on the diameter of the pipes and the volume of coolant. Accordingly, the less water is needed, the less energy is required to heat it.
If you have problems with energy resources or emergency situations often arise, then you should consider connection diagrams for gravity-type heating radiators with natural circulation. Just in case, you can also embed a pump there, only it is embedded around the pipe so that it does not interfere with the main passage. For the time when you have electricity, you will drive it with a pump, because the speed increases, the radiators are all at a uniform temperature. The efficiency of the pump increases by 30-50%. When there is no electricity, this system will continue to work for you. You already know which radiators you have chosen, their number and size. Accordingly, you can now calculate what is needed in order to connect them. Let me remind you that in the first case, large, large diameters are needed; large valves can be used. And of course, in this case it is difficult to regulate the temperature. Of course there are options, we will definitely consider them in a more detailed review.
Dual-circuit battery wiring
A two-pipe heating system differs from a single-pipe heating system by dividing it into two pipes - supply and return of coolant. It ensures uniform heating of all rooms. This type of wiring is used in most new houses.
Principle of operation
In a two-pipe scheme, water from the boiler flows to the radiators through the supply pipe (main).
Near each radiator, the supply line has a connecting inlet pipe through which the coolant enters the battery. The supply line ends near the last radiator.
In addition to the inlet pipe, each radiator has an outlet pipe. He connects it to the return pipe. The return line starts from the first battery and ends at the entrance to the boiler.
Thus, heated water enters the radiators evenly and at the same temperature. From each radiator, water is discharged into the return pipe, where it is collected and supplied to the boiler for subsequent heating. Thanks to this movement of the coolant, all rooms in the room are heated equally.
What is the difference
A two-pipe heating system includes elements of a single-pipe system and additional devices. In addition to the boiler, radiators, supply and return water collection pipes (the so-called return), the two-pipe circuit also includes a circulation pump.
The large length of the lines, the presence of corners and turns in the supply pipes complicate the movement of the coolant. Therefore, its forced circulation by an electric pump is necessary.
Photo 1. Circulation pump model 32-40, voltage 220 Volts, China.
Also, in a two-pipe scheme there are more taps that regulate the water supply and its quantity. Such a tap is installed in front of each radiator - at the inlet and outlet.
Classification by location
In a horizontal two-pipe system, pipes connect the radiators horizontally. This scheme works for heating a one-story house or one floor of a multi-story cottage.
In a vertical two-pipe system, pipes connect radiators located one above the other in one “riser”. However, there are differences from the single-pipe vertical scheme. Here, thanks to the presence of a supply and return pipe, vertical heating can use batteries of any width - multi-section ones (since the supply and return risers can be removed from each other). Therefore, the efficiency of two-pipe vertical heating is higher.
Reference! It is desirable that batteries of rooms located one above the other have the same number of sections. This makes it easier to lay a vertical return pipe.
Bottom and top harness: which is more effective?
The term “lower” and “upper” piping refers to the method of connecting batteries to the heating system. With the lower piping, the incoming water enters the battery through the lower pipe.
If it also comes out of the radiator at the bottom, then the efficiency of the radiator will be reduced by 20-22%.
If the outlet pipe is located at the top, the efficiency of the radiator will be reduced by 10-15%. In any case, with lower water supply to the batteries, the heating efficiency decreases.
With the top piping (supply), the incoming pipe is connected to the radiator in the upper part. In this case, the movement of the coolant is organized more efficiently, the battery will work at 97-100% (97% - if the inlet and outlet pipes are located on one side of the radiator, and 100% - if the inlet pipe is on one side from above, and the outlet pipe is on the other side from below ).
Advantages and disadvantages
Advantages:
- Suitable for organizing heating of large private houses, in which case a circulation pump must be installed into the system.
- Heats all rooms on the floor or in the riser evenly.
Flaws:
- It is more expensive than a single-pipe system, since it requires twice as many materials - pipes between the boiler and radiators, as well as connecting devices, taps, and valves.
- The electric circulation pump makes the operation of the system dependent on the availability of electricity.
Important! An increase in the number of pipes and the amount of coolant in the system leads to an increase in hydrodynamic resistance and does not allow water to move by gravity. Forced circulation and a running circulation pump are required
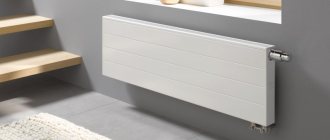
Types of panel radiators
Such batteries are:
- hygienic;
- smooth;
- profile.
Dimensions of steel panel radiators of various types.
The first two types are intended for hospitals, schools and kindergartens. The most popular manufacturers of such models are Purmo and Kermi.
Steel panel radiators PURMO COMPACT
As for profile batteries, they are made of sheet steel and coated on the outside with a special powder coating. They are also coated with neutral anti-corrosion varnish, and therefore can last for many years. Note that such radiators can be of any color.
Bimetallic heating radiators
Tubular steel batteries are better than panel ones, because they can be turned over on either side (in this case, panel models are purchased with a specific connection). The coolant in tubular models is supplied directly to the outer section, which is very good if you need to replace old batteries with new ones.
Steel tubular radiator