What is electric heated floor
Using underfloor heating is one of the popular types of heating. It allows you not to take up space for placing heating devices. At the same time, the quality of heating improves: a warm floor is able to heat the room evenly over the entire area.
Laying tiles
Electrical devices of this kind are divided into two types:
- convection;
- those that use infrared radiation.
Convection devices involve the use of special heating cables. During operation, they transfer heat to objects they come into contact with. Sometimes such cables are made as part of heating mats.
Infrared heating coating is a special film with infrared elements applied to it. During operation, infrared radiation is generated, warming up the objects it hits.
Floor covering with tile adhesive
Covering the floor with tile adhesive Installation of this design is quite simple. In this case, the film is laid on a reflective coating. The floor is then covered with a final finish. There is no need to use a concrete screed or similar layer.
Prevention
Complication of mycotic eczema
Mycotic eczema is a chronic disease and tends to recur regularly. How long the remission will last depends on the patient himself, on how well he follows preventive measures. Eczema can be complicated by a long course and rashes all over the body, and wounds on the skin often become infected, suppuration appears, and in advanced cases, sepsis develops.
Prevention of relapses of mycotic eczema lies in the correct lifestyle. The patient needs to eat a balanced diet, excluding the consumption of allergenic foods, exercise regularly, harden and strengthen the body’s immunity in every possible way.
It is also very important to monitor the condition of the skin, immediately treat wounds and treat any rashes on the integument. Avoid exposure to household chemicals; all manipulations must be carried out with gloves.
It is necessary to maintain personal hygiene, regularly wash your hands and the whole body.
Advantages and disadvantages of electric flooring in the house
Advantages of installing electric floors:
- The use of electricity makes it possible to conveniently change the degree of heating.
- When such a floor operates in the lower part of the room, uniform heating occurs over the entire area. One consequence of this is the absence of air currents from top to bottom or in horizontal directions. There is no accumulation or movement of dust and dirt particles.
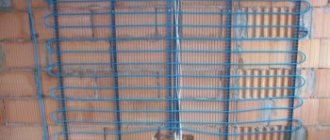
Cable laying for heated floors
Cable laying for heated floors
- High level of security. The parts of the device are securely hidden, which eliminates the possibility of accidental burns or electric shock.
- This heating system works efficiently. Since there is convenient adjustment, you can set the optimal degree of heating depending on the specific situation.
- The installation of such heating devices can be done without professional skills. Simple installation allows almost any owner to install the system themselves.
These floors have a long service life.
Benefits of use
Resistive cables
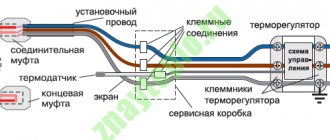
Such heating elements are produced in single- and double-core versions. They are connected to the network using special couplings. The principle of operation of these cables, regardless of the number of cores, is similar: heat begins to be released when current passes through them.
However, there is a difference - this is the connection method. In single-core elements, the current passes through one conductor and in order to make the circuit closed, both ends of the coil must be connected to the power supply.
The installation process is as follows:
- The adapter coupling is attached at the connection point (this is prohibited from doing near the thermostat).
- The cable is unwound and laid so that its other end, located near the coupling, is placed in the installation box.
When both couplings are connected, a closed loop is obtained and the wiring is completely ready for use. In this case, the couplings are on the floor and are filled with screed.
Connecting a resistive two-core cable is simpler, since one end is connected and a plug is placed on the other. To make the circuit closed, there is a second current-carrying core.
The design of both types of cables has much in common: one or two insulated cores, to give greater rigidity, a metal protective braiding against damage, and on top everything is covered with an outer insulating layer. In some products, the cores may be drainage, which serve to reduce the efficiency of electromagnetic radiation.
The price of two-core products is higher, but it is still in great demand for two reasons:
- It is easier to lay the cable, since the second end is not connected to the thermostat;
- electromagnetic fields of lower intensity are formed.
But both types of resistive conductors have a big drawback, which is the constant amount of thermal energy released. If heat is not removed for any reason, overheating occurs. This ends with a breakdown of the floor heating system.
Therefore, the resistive cable is not laid under furniture and make sure that there are no voids in the screed. The fact is that air has low thermal conductivity and in the area where the bubble appears, heat begins to be removed at a low speed, and this leads to an increase in the temperature of the cores, which fail.
Is it possible to make a warm floor using a heating cable under the tiles?
This option for heated floors is not only acceptable, but is also considered one of the most effective. The tile has high thermal conductivity. In addition, if you lay such a warm floor, you can install it in a layer of adhesive under the tiles without using a screed or other similar methods.
You may be interested in Description of the RJ-45 cable
Installation of heating cable
Comparison of heater types
Both types of resistive cable include a heating core that is protected by a sheath. Wire or foil can be used as insulation. The only difference between these cables is that the first has one heating core, and the second has two. The main difference between the wires is the material from which they are made.
Don't forget to calculate the cable length
As a rule, brass, nichrome and copper are used as materials. Each of these metals has different properties and has different electrical resistance values.
When deciding which cable is best to choose, it is worth considering not only the level of its electrical resistance, but also parameters such as the total length and the recommended distance between the heating elements of the wire. This data will allow you to ensure the most suitable floor heating.
The permissible distance between heating elements is determined and indicated on the product box by the manufacturer. At best, doing anything on your own in this matter can render the entire floor system unusable. As a rule, manufacturers regulate the pitch to be no higher than 12 centimeters. Heating wires are sold in a certain length, which requires proper calculations. At the mounting stage, it will no longer be possible to add or remove any part.
Another significant parameter that requires special attention when choosing a cable is the number of heating cores.
Types of electric floors
There are different types of electric floor heating. To understand their strengths and weaknesses, each of the options used in practice will be discussed in detail below.
Types of electric floors
Cable heated floor
The following options for this floor are usually used:
- wire;
- single-core;
- two-core.
Warm wire floor
In the first case, heating is carried out using special wires with a small cross-section. They won't get as hot as high-power cables, but they can be placed tightly together. In practice, it is enough to install 5 cm between extraneous wires. To install such a floor there is no need to use a concrete screed.
Because the wires are packed tightly, the laminate can be directly applied to them, and any suitable coating can be applied over it. When laying the tiles, the wires will actually be located in the adhesive layer. In this case, it is recommended to place a substrate under the wire, then you should expect more uniform heating.
Single core design
The cable includes several parts:
Solid wire
- A conductor through which current flows, creating heat.
- Insulating layer.
- Braid, which is an additional layer of protection.
- External waterproofing shell.
- Outer protective sheath of the cable.
The braid can be used as grounding. More expensive cables have additional grounding. Laying should be done in such a way that both ends of the cable end up next to each other.
Method of laying a single-core cable floor
Using a two-core cable
In this case, the device will be more complex:
Twin-core cable design
- Two cable cores.
- Each wire has insulation.
- In both cases, a reinforcing layer is used.
- Then a water-repellent screen is installed.
- Outer protective shell.
- The grounding runs inside next to the two conductors.
Important! Such a cable can have one or two grounding connections. During installation there is no need to connect both ends to the same power source. The other end can be connected to the mains.
Method of laying a two-core cable floor
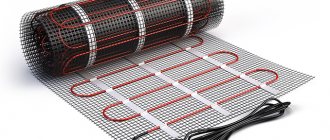
Thermomat
This option can be considered during installation as relatively simple. It is laid not only in a cement screed, but also in tile adhesive. Such mats actually consist of a plastic mesh and a cable laid over it. They can be either single-core or double-core. The more common is the first of these options.
Laying the thermomat
Typically the thickness of the substrate does not exceed 10 mm. The cables in such mats are installed at a distance of 12 cm. One of the ways to install thermomats is to install them in the adhesive on which the tiles are laid. To make it convenient to place the mats in the room, they are made 50-60 cm wide. The length can vary within a wide range: from 1.5 to 30 m.
During installation, thermomats are cut into shorter pieces. It is possible to connect them using special adapters. For this purpose, you can also use soldering or twisting of wires.
Infrared floors
They are placed on top of the rough covering. Such mats are actually a special film on which conductive carbon elements are applied. As soon as the structure is connected to electrical power, these elements will heat the room.
Film floor construction
If the room has a complex configuration, then such a film will need to be cut into several pieces in order to properly install the heated floor. Carbon elements belonging to different pieces are connected using special detachable connections or using soldering.
You may be interested in this Features of duralight
This floor consists of the following elements:
- The topmost layer is a polyethylene protective film.
- Copper strips are installed along the edges.
- Beneath them there are high-temperature absorbers.
- Next is the silver stripe.
- The substrate on which the working layer is installed.
- The working layer that carries out heating.
There are varieties with a continuous carbon heating layer, two silver and two copper strips.
It is possible to use an infrared floor option with carbon rods.
Infrared rod floor
In this case, two parallel cables are provided, between which a large number of rods are located. Their diameter does not exceed 1 cm. Such a floor can be laid in a layer of glue under the tiles. The width of the mats is 60-90 cm, and the length can reach 30 m. If necessary, they are cut into shorter sections. Parts of the heated floor can be connected using adapters or using soldering.
Installation of thermostat and sensors
The controller, which regulates temperature indicators, is installed in a specially designated place. The cable connecting the thermostat and the system elements must be placed in a corrugation. The corrugation is located in the pipe. It must be carried out to the temperature sensor. It should be mounted at a distance of 30 cm from the wall. If this condition is not met, temperature measurement will be complicated.
The corrugation is laid in such a way that no kinks are formed. They happen especially often near the baseboard. The edge that abuts the system should be sealed with sealant. This will prevent concrete mixture from getting into it.
In addition, a temperature sensor is placed in the corrugation. This improves the maintainability of the device.
How to choose the right cable for underfloor heating
If you plan to install tiled heated floors in your apartment, then you need to choose the option that suits best.
Heating mat control
The following must be taken into account:
- Type of flooring.
- Is underfloor heating the only source of heating? If it plays an additional role, then its power can be selected within additional limits. When a warm floor in an apartment is the only source of heat, it is important to choose models that have the most significant power.
- What electrical power must be provided for high-quality floor operation? This is taken into account when paying for electricity and when working with powerful electrical appliances.
- Manufacturer of the product. The quality and reliability of operation, the availability of a warranty, and the characteristics of a warm electric floor depend on this.
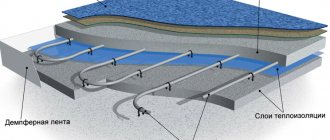
Thermal insulation
At this stage, it is necessary to decide on the choice of insulation for the heated floor. This will determine when to start thermal insulation - before preparing the base or after it. The thickness of the insulation is selected according to the state of the ceiling between floors.
Thick thermal insulation is installed over the basement. It should be installed if there is soil under the floor. For such thermal insulation, you should choose expanded polystyrene or polystyrene foam. It is better to install thick thermal insulation before leveling the floor.
A thin layer of thermal insulation is mounted on the prepared surface. Penofol is laid so that the reflective surface faces upward. Using such a substrate will allow you to direct heat into the room.
The insulation material should be laid at a certain distance from the wall. For example, in the case of expanded polystyrene, this figure will be 10 cm. When using polystyrene foam, it will have a thickness of 5 cm. At the junction of the wall with the insulation, a damper tape should be glued.
Instructions for laying a heated floor with a heating cable under the tiles with your own hands
Before starting work, you need to make sure that the floor surface is level, it must be cleared of debris and leveled. For this, cement mortar is usually used.
Important! It is necessary to determine the highest point of the floor in the room and, focusing on it, create a flat surface. In this case, it is recommended to check the quality of work with a level.
To ensure high-quality adhesion, the surface is primed. If there are cracks, they are sealed with a cement mixture.
Warm floors are easy to install
Choosing a floor project
Before making electric heated floors under tiles with your own hands, you need to choose the most convenient option. In this case, it is necessary to take into account the features of various designs. Particular attention is paid to what heating power the structure should have. It must be taken into account that there should be neither too much nor too little heat.
Thermal insulation
A thermal insulation layer must be placed on the leveled floor. Warm floors will be installed on it.
Important! This stage of work is necessary to ensure that the heat from heating does not escape through the floor downwards, but gets into the apartment.
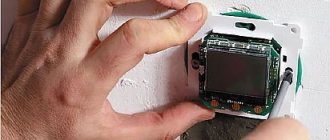
Installation of thermostats and sensors
The first step is to correctly install the electronic thermostat. To do this, make a socket box on the wall. Its standard diameter is 73 mm. Electrical wiring must be connected to it.
Several types of thermostats
Down from the socket box, a groove with a cross section of 20 by 20 mm is made in the wall. The power wire for the warm electric floor will pass through it. This groove is first made with a grinder, and the inside is processed with a hammer drill. It is also necessary to make a groove of this cross-section in the floor; it will be used to place the sensor.
You might be interested in Description KGN cable
Corrugated tube with temperature sensor
You need to install a temperature sensor. It is placed in a narrow corrugated tube and laid horizontally, at an equal distance between adjacent cables, parallel to them. The wires from the sensor are led out to the wall of the room.
The installation height of the thermostat should not be less than 30 cm from the floor. If work is carried out in a room where there is a lot of moisture (for example, in a bathroom), then the regulator must be taken outside. Furniture in the room should not interfere with access to the heat regulator.
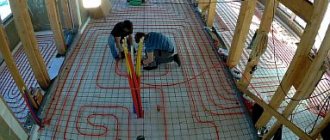
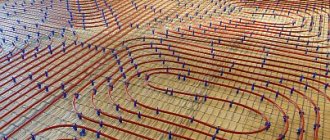
Cable management
When laying cables, you need to consider what type of construction needs to be used. They can be in the form of wires, single- or double-core cables or thermomats. For each of them there are cable laying rules.
Most often, a single-core cable is used for this; it is laid in a snake pattern so that it covers the area of the entire room. Both ends of the cable should go to the thermostat. Before installation, it is recommended to draw a diagram in accordance with which the work will be carried out.
Checking the quality of connections using a multimeter
Before installing the screed, it is necessary to carry out a test run and make sure that everything works correctly.
If a thermomat is used, it is simply rolled out over the surface. If required, cut into pieces and connect the wires on them.
It is convenient to mount the cable on metal strips with special holders.
In some areas of the apartment, installing heated floors is impractical. This usually refers to areas where heavy furniture will be placed. When laying the floor, it is recommended to bypass these places.
Cabling
Filling the screed
The cement screed will secure the cable. To install it, make a solution, pour in the finished heated floor structure and ensure that the surface of the screed is even. It is usually used for those options when single-core or double-core cables are used. It is not used when laying thermomats or wires.
Important! When installing the screed, you need to remember that the cement mixture dries completely after 28 days.
Laying tiles
First, a preliminary layout of the tiles is carried out as they will subsequently stand. Then put the solution and level it with a spatula. It is important that the tiles are laid in even rows. To do this, you need to carefully lay the solution and level it with a spatula. When installing tiles, you need to monitor the correctness of the installation and correct its position if necessary. It is important that the floor covering is level.
Installation of heated floors
Preparing the base
The cable must be laid on a completely flat surface. It needs to be dusted off. As you can see, the floor preparation work includes cleaning the surface if there are protrusions and thorough dust removal.
It is better if a primer is applied to the floor. If there are large differences in floor height, a screed should be installed. If there is little time for construction, a self-leveling floor should be installed.
When installing the cable on the boardwalk, most of the heat will be wasted. At the same time, the wall is being chipped for the cables going to the thermostat.
Advice! When installing an electric heated floor system in a renovated room, you should lay the wires in cable ducts.
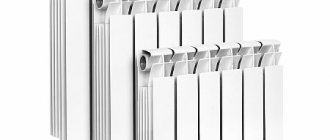
What is the cost of electric heated floor
Approximate prices for various types of heated floors from well-known manufacturers:
- Warmstad WSM thermomat with a power of 100 W, occupies an area of 0.65 sq. m. Costs 1665 rub.*
- Warm floor CLIMATIQ with a power of 50 W, an area of 0.5 sq. m. Its price is 1550 rubles.
- Heating cable IQ Watt Floor cable 7.5 m long. Heating area is 1.0 sq. m. The cost is 2608 rubles.
By choosing a suitable cable heated floor design and installing it, the apartment owner will receive a convenient and reliable means of heating the apartment. It is important to know how to choose the right brand and how the installation process occurs.
*Prices shown are current as of December 2022.
Features of installing a rod infrared floor
This type of heated floor consists of rods that are connected to each other by flexible wires. When current is passed through the rods, they generate heat. This type of heating can self-regulate the temperature, so it can be used without a thermostat.
The main disadvantages of an infrared rod floor: high cost and difficulty connecting to the electrical network.
Installation sequence of the rod infrared floor:
- creating a laying scheme;
- preparation of the base;
- laying thermal insulation;
- preparing the location for the sensor;
- laying out the strips and connecting the cable according to the drawn up diagram;
- fixing the strips to the base using mounting tape;
- installation of a thermostat;
- connecting the sensor and cable to the thermostat;
- connecting the thermostat to the network;
- system testing;
- pouring screed;
- laying tiles.
For such a floor, the best finishing coating is ceramic tiles; it is laid in a screed , the thickness of which should be more than 2-3 centimeters.
It is impossible to turn on the rods to speed up the hardening process of the screed, as this can lead to burnout of the heating elements due to the fact that they are in dampness and to cracking of the screed, which will reduce the efficiency of the heated floor.