A dacha is a place where you can relax from the noisy city and enjoy clean air. Although the dacha is not used for permanent residence, nevertheless, every owner wants it to be comfortable and cozy. It is better to think about the comfort of a dacha already at the stage of its construction. Or renovation work is being carried out.
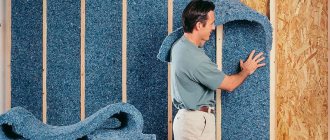
The reasons for heat loss can be different. Heat usually escapes through surfaces that are poorly insulated. Consequently, not only the external part of the country house needs thermal insulation, but also the internal one. Therefore, in this article we will talk about insulating the internal walls of a country house. Which insulation to choose? How to directly insulate the inside of a house? Let's answer these questions.
Parameters when choosing a material
Before choosing one or another insulation material, you need to pay attention to the following parameters:
- Thermal conductivity level. The best option is a low level of thermal conductivity. Therefore, with a low thermal conductivity, the optimal temperature inside the room is maintained.
- Level of resistance to low temperatures. If the country house is not heated during the winter season, the temperature in it can drop below zero. This can lead to deformation of many types of insulation.
- Simplicity in the installation process. Owners of summer cottages usually want to arrange it themselves. Therefore, the heat insulator should be installed with your own hands without any problems.
- Price. Of course, quality is important, but still few people spend a lot of money on insulating a house for temporary residence.
These factors are fundamental when choosing insulation material.
When can you start insulating a building?
There is a basic rule in construction - it is necessary to begin finishing work on buildings after the house has completely settled. This may take about a year. Moreover, shrinkage occurs not only in wooden houses, but also in brick, monolithic frame buildings, etc.
Installation of thermal insulation is preferably carried out in dry weather - the house is well dried beforehand. The house should already have a roof, external waterproofing of the foundation, ventilation, windows, doors.
All work on finishing a log house begins only after it has settled
You should not start work either in frost or heat - you must wait until the temperature reaches above zero of 5-25°C. The optimal time to start finishing the facade is late spring or early autumn.
Making a greenhouse with your own hands from a profile pipe and polycarbonate: a complete description of the process, drawings with dimensions, watering and heating (Photo & Video)
Tips for choosing
Let's look at just two tips:
- The material from which your country house is built is the most important factor. You need to pay attention to it. For example, for houses built of wood, a thermal insulator is needed that has excellent air permeability. For houses built of brick, this criterion is not particularly important.
- The level of moisture resistance is also the most important parameter that you should pay attention to when choosing insulation for the internal walls of a country house. Ask yourself: will my home be heated during the winter season? This factor determines whether condensation will form due to the large temperature difference (indoors and outdoors). Condensation can cause the thermal insulation layer to become wet; it will deform in a short period and lose its technical characteristics.
But this problem can be easily eliminated if you use a specially designed vapor barrier film, which will protect the heat insulator from the harmful effects of moisture.
What building products exist for thermal insulation of walls from the inside?
Course of action
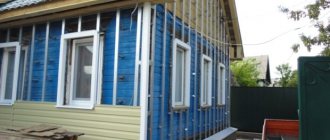
So, how to properly insulate a wooden house from the outside:
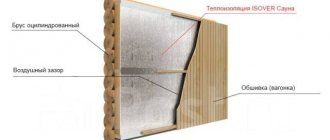
We will treat the wall of the house with an antiseptic (be it a village house made of logs or a timber house). Take special care of the ends of the logs, as these are the first to begin to rot. Choose a dry and hot day for antiseptic treatment. After the treatment is completed, let the walls dry for 2 days. Using a regular stapler, attach a waterproofing film with vapor-permeable properties to the cleaned and treated walls. This film has a different surface on each side: glossy and porous. The first should be attached to the insulation, and the second to the wall. The joints of the film should overlap and should be securely secured with tape. Nail the sheathing made using bars onto the film. The bars must have a thickness equal to the thickness of the insulating material. The width of the sheathing step should be less than the width of the slab of material, by 4 centimeters. Thus, by laying it at random, you will ensure the strength of the structure. Now is the time to lay the insulation, doing it more tightly so that there is no heat loss from the wooden house. There are a lot of videos on the Internet about insulating a wooden house from the outside, but you can do it even if you have never seen this process. If the mat is too wide, trim it with a knife. It turned out too loose - you will have to add cladding in the form of a batten. Finally, secure the finished structure with anchor nails. Many people like this solution of insulating an old house with several layers of insulation. In this case, each subsequent layer should be positioned in such a way as to not have common seams. The joints of the lower layers should not be visible under the joints of the upper ones
It is very important to protect yourself with special gloves and a respirator when working with mineral and stone wool. Do not neglect this safety rule! The next stage of insulating the walls outside in a wooden house: another film is attached to the insulation - a hydro-windproof membrane, it is attached to brackets, and its protective side should face outward. The joints, as in the previous case, must be overlapped, and to fasten them together, everything must be well taped with masking tape. Next, it’s up to the ventilated frame; this gap is ensured using the same bars as in the case of the sheathing
They are screwed to the lower structure with self-tapping screws. As a result, there should be at least 5 cm between the insulation, covered with wind protection, and the decorative layer. If we are insulating completely uneven walls, then we additionally use perforated hangers, which make it possible to set the distance to the frame. If the finishing of a wooden wall is planned with metal siding or corrugated sheeting, then it is possible to use a plasterboard profile instead of a block. The final stage for external walls is external finishing. This can be vinyl siding, block house, metal profile or another type at your request. For each such cladding, the manufacturer indicates the process technology, which must be followed. Make sure that the insulation of your wooden house under the siding or other sheathing is done without gaps.
The joints, as in the previous case, must be overlapped, and to fasten them together, everything must be well taped with masking tape. Next, it’s up to the ventilated frame; this gap is ensured using the same bars as in the case of the sheathing. They are screwed to the lower structure with self-tapping screws. As a result, there should be at least 5 cm between the insulation, covered with wind protection, and the decorative layer. If we are insulating completely uneven walls, then we additionally use perforated hangers, which make it possible to set the distance to the frame. If the finishing of a wooden wall is planned with metal siding or corrugated sheeting, then it is possible to use a plasterboard profile instead of a block. The final stage for external walls is external finishing. This can be vinyl siding, block house, metal profile or another type at your request. For each such cladding, the manufacturer indicates the process technology, which must be followed. Make sure that the insulation of your wooden house under the siding or other sheathing is done without gaps.
For comprehensive insulation of a wooden structure, as additional protection, insulate the base and foundation of the house, the ceiling, and insulation of the interfloor ceiling will also be required. For thermal insulation of a wooden house from below, penoplex or polystyrene, polyurethane foam are used.
Now you know how to insulate the walls of your village house. Do you know what a modern ventilated façade is? Do you know how to insulate the rubble, if we are talking about the basement of the house?
Selection of thermal insulation material
Let's consider the most popular insulation products in detail.
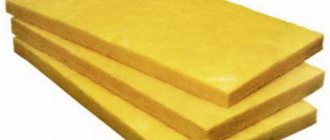
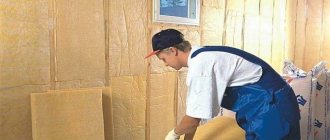
Use of mineral wool
Mineral wool is an inorganic fiber made from porphyrite. This thermal insulation product can only be used under one condition. If the surface of the walls is additionally sheathed with plasterboard or wood, then the use of mineral wool is permitted.
This insulation product is best suited for structures made of wood or frame. Let's look at the main pros and cons of mineral wool.
The main advantages of this heat insulator:
- Mineral wool has a high level of resistance to sudden temperature changes. In addition to thermal insulation characteristics, this material has excellent sound insulation properties.
- The next plus is elasticity. Thanks to the previous factor (resistance to sudden temperature changes), mineral wool does not change in shape and does not change its structure.
- Another advantage is durability.
- This product is not flammable. You don't have to worry about safety. Mineral wool is not subject to ignition.
- For installation you do not need to have any specific knowledge or skills.
There are also disadvantages:
- Mineral wool is brittle - this is one of the parameters that complicates the installation process.
- Hygroscopicity. This product perfectly absorbs moisture. Because of this, the technical characteristics of mineral wool will deteriorate.
- Price. Mineral wool costs quite a lot of money compared to other thermal insulation materials.
Mounting instructions:
- First, it is necessary to seal all cracks and surface defects. Apply polyurethane foam.
- Use nails or screws as fastening materials. Some people attach it with glue.
- The slabs are laid from bottom to top.
Application of ecowool
This material is the most environmentally friendly. Ecowool contains recycled cellulose. This product is applied by spraying.
Let's consider the advantages:
- Excellent breathability.
- Although ecowool, like mineral wool, perfectly absorbs moisture, it dries in a short period of time. At the same time, its thermal insulation properties do not change.
- Ecowool also contains specially designed additives that make the material resistant to fire.
The downside is that ecowool itself is quite expensive , but you still need to spend extra money on the equipment that is necessary to apply it to the surface. To carry out installation you must have certain knowledge and experience.
Ecowool is an excellent insulation material for walls inside walls in a country house.
Ecowool is installed using three methods:
- dry method;
- wet method;
- wet-adhesive.
The wet method is the most commonly used. This includes the use of an adhesive - lignin. Ecowool, which is already moistened, can stick to the surface of the walls without problems. This method is used for thermal insulation of walls made of brick. First you need to make a sheathing from wooden blocks. After which the insulation material is applied using specially designed equipment.
Might be interesting
Thermal insulation
Insulating the ceiling in a bathhouse - methods, materials, useful...
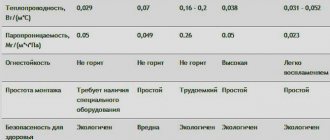
Thermal insulation
Tables of comparative characteristics of thermal insulation…
Thermal insulation
Why polyurethane foam insulation is the best...
Thermal insulation
Self-adhesive thermal insulation: how to choose and apply?
Use of expanded polystyrene
This product is very popular among dacha owners. Expanded polystyrene has an average cost in the construction market.
Expanded polystyrene has all the necessary advantages:
- excellent strength;
- moisture resistance;
- ease of installation.
This is all that is needed to insulate the walls from the inside of the house.
Disadvantages of polystyrene foam:
- low level of breathability;
- poor adhesion to the facing surface;
- Not exactly an environmentally friendly material.
Expanded polystyrene is great for country cottages.
First, before starting the installation procedure, it is necessary to prepare the surface. That is, you need to apply plaster. Then the walls need to be washed to remove dirt. Next, a primer is applied, which has deep penetration.
Installation begins with the application of glue. You will have ten minutes to lay the polystyrene foam board. Reduce the distance between slabs. If any gaps remain, they must be filled with parts of polystyrene foam. After installation of the slabs, the reinforcing mesh is laid. Fastening is done using plaster. The layer is five millimeters. After drying, you need to apply the final coat.
Application of foam plastic
Polystyrene foam is the cheapest insulation product on the construction market. Polystyrene foam has a high level of moisture resistance and a low level of thermal conductivity.
Main advantages:
- Polyfoam is not afraid of fungus, mold and rot.
- Due to its low weight, polystyrene foam can be installed without problems.
- Strength. The product can withstand compression and bending.
Minuses:
- The product may become deformed from impacts.
- Poor airtightness.
- Material may release toxins when ignited.
It is best to insulate walls that are built of brick with polystyrene foam. Foam is not used for wooden houses.
Installation is carried out like expanded polystyrene.
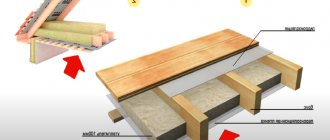
Insulation of a wooden floor in a country house
A significant portion of the internal heat of a room can escape through the floor, especially if there is a basement. Therefore, effective thermal insulation of a dacha will also require internal thermal insulation of this structural element.
- The most effective will be insulation with floor removal, which is carried out according to the following scheme:
- A plank beating is nailed to the floor joists, which will form a flat base surface. OSB boards will be the best alternative to regular wood.
- Then a layer of waterproofing material is laid, which can be used as ordinary polyethylene film.
- The next layer is formed from insulation. The best choice in this case would be porous materials that provide good natural ventilation.
- The final stage is the installation of the second plank, which will serve as a subfloor. In this case, there should be a distance of 5-10 mm between the edge of the roll and the wall, necessary for natural ventilation. Later it can be covered with a plinth.
When choosing heat-insulating materials for internal floor insulation, you need to choose those that can withstand heavy physical loads. In particular, it can be polyurethane foam, polystyrene foam and expanded clay.
Unlike walls, the floor is best insulated both from the outside and from the inside, so it is highly recommended to insulate the external base of the dacha.
Tips for installing a heat insulator
Let's look at three tips:
- When insulating the walls of a country house from the inside, you need to know that the inner layer of heat insulation will take up useful space. Therefore, it is best to insulate small country houses from the outside.
- During installation, it is also necessary to take care of creating a ventilation gap, which should be located between the heat insulator and the decorative finish. What is the purpose of the ventilation gap? It is necessary so that the thermal insulation cake of the walls can be ventilated and the condensation can evaporate better.
- When carrying out a vapor barrier, be sure to use a specially designed film, which will protect the heat insulator from getting wet and freezing. It will protect the heat insulator from losing its original technical characteristics.
This anti-condensation film can be used for vapor barrier and waterproofing not only walls, but roofs.
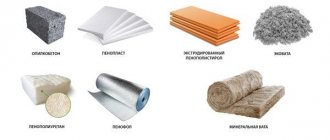
Types of insulation
They produce various types of insulators, which stand out for their performance characteristics.
Mineral wool
This category of insulating materials is made on the basis of mineral substances and is divided into the following types:
- slag wool - made from metallurgical waste;
- glass wool - produced from waste from glass production;
- stone wool - created on the basis of rocks such as limestone, dolomite, diabase, basalt.
Mineral wool is produced in mats and rolls and is used as a heat and sound insulator when arranging walls, floors, and floor slabs.
Features of mineral wool:
- low thermal conductivity coefficient;
- high rates of heat and noise insulation;
- resistance to high temperatures;
- resistance to microbiological threats;
- zero flammability, ability to resist the spread of fires.
Mineral wool - insulation for a country house The disadvantages of mineral wool include vapor permeability and reduced service life when exposed to moisture, so it is necessary to use it in combination with a waterproofing layer.
Expanded polystyrene foam
Foam plastic - expanded polystyrene foam - is on the list of undisputed leaders in the market of thermal insulation materials. The product is ideal for insulating the outside of a country house, especially if work is planned on a limited budget.
Features of expanded polystyrene foam:
- low thermal conductivity;
- light weight – loads on supporting structures are eliminated;
- low hygroscopicity;
- frost resistance;
- biological inertia;
- low flammability, self-extinguishing ability.
Foamed polystyrene foam attracts rodents, which easily gnaw through it, making passages. Also among the disadvantages are the reaction to chemicals and UV rays. However, polystyrene foam is always used together with a finishing coating that protects the insulation from aggressive environmental influences.
Expanded clay
Loose insulation with a porous structure is produced by foaming fusible clay and shale with inclusions in the form of sawdust, peat and solar oil, followed by firing at high temperatures.
Features of expanded clay:
- high fire resistance;
- excellent sound and heat insulation properties;
- absolute environmental friendliness;
- availability;
- high resistance to pathogenic microflora;
- resistance to chemical compounds.
Expanded clay granules can easily fill a cavity of any size. The material is actively used in the construction of floor systems, insulation of floor slabs and wall structures.
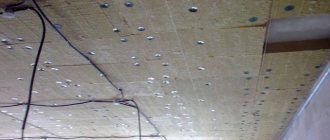
Liquid penoizol
Foam insulation - modified polystyrene foam - has high adhesion and is used to fill voids in ceilings, walls, and various horizontal and vertical surfaces.
Features of the use of liquid penoizol:
- the heat insulator is prepared directly on the construction site using a special installation;
- the composition is sprayed under pressure onto the surface to be treated;
- For sealing joints and air gaps, they offer liquid penoizol in cylinders.
Thermal insulation with liquid foam insulation provides for the solidity of the layer, the absence of cold bridges.
Fiberboard
Fibreboards are produced from wood waste by gluing fibers with natural resin compounds under high temperatures and pressure. The material is in demand as an inexpensive solution for internal thermal insulation of the walls of a country house. Fiberboard slabs are mounted using a metal frame or wooden sheathing.
Other materials
When arranging thermal insulation for a country house, a number of traditional and innovative construction resources are in demand:
- penofol - foamed polyethylene with a foil coating is produced in rolls;
- jute fabric - the insulator is simply and quickly laid on the walls using a stapler;
- insulation made of flax fiber - produced in slabs, has antiseptic properties;
- ecowool - consists of cellulose with the addition of antiseptics and fire retardants, sprayed with special equipment.
Penofol - insulation for a country house. Polyurethane foam insulation also deserves attention. The air-foam mass is applied using a special installation, the coating is monolithic and durable with high heat, sound, and waterproofing abilities.
Wall insulation process
Thermal insulation of walls is the most important work because they occupy the largest area, and the highest heat transfer comes from them.
Before installing the heat insulator, it is necessary to prepare the surface:
- It must be cleaned of dirt and dust.
- Then treat the walls from the inside; this can be done using specially designed mixtures and aerosols. Thanks to this treatment, you can protect the wooden surface from pests. An excellent aerosol is Raptor for bedbugs (a professional product). This product is intended for removing bedbugs. The substance has a quick effect. The aerosol begins to act after a quarter of an hour. After using the aerosol, the room must be ventilated. You can also use dichlorvos instead of “bedbug raptor”.
- Next you need to caulk all the cracks using dry tow.
Jute fabric is excellent as a heat insulator for the walls of a country house.
Its installation is easy; this is done using a construction stapler . It must be placed on a beam and secured using this construction tool. After the walls are erected, the canvas will be compacted.
Jute fabric does not rot. Moths “do not attack” this insulation material. Jute fabric has a low level of thermal conductivity due to the fact that it has a structure in the form of capillaries. This material is absolutely environmentally friendly. Mold or mildew will not form on it.
For the process of insulating the walls of a country house, it is better not to use products such as wool, batting, and so on. Because these improvised products perfectly absorb moisture, which has a detrimental effect on heat retention. After a certain period of time, the material will become rotten. Wool also attracts moths.
Do-it-yourself insulation of walls from the inside using polystyrene foam
The installation technique with polystyrene foam is quite simple, and if done correctly, it can provide reliable thermal insulation in the house.
Insulation with expanded polystyrene occurs in several stages:
- if the walls are made of round logs, then they need to be trimmed;
- between the lathing slats, panels of material are placed in a tight fit;
- the slabs can be additionally secured with foam blades;
- eliminate possible gaps using polyurethane foam.
Next, a vapor barrier is attached to the sheathing slats.
Insulation with polystyrene foam
Bottom line
Let's summarize. When choosing a particular insulation material, it is necessary to take into account its technical characteristics, such as the level of thermal conductivity, ease of installation, and level of resistance to sudden temperature changes.
You need to pay attention not only to the technical characteristics of the thermal insulation product; the material from which the house is built plays a vital role. For many, cost is not the last parameter to which you should pay attention.
If you choose a high-quality heat insulator, and the installation is carried out in compliance with all the rules, you will be able to achieve unique comfort and coziness in your country house.
Installation technology
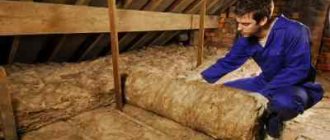
The technology for installing roll insulation is slightly different from slabs. They begin to insulate the walls or floor initially. The walls are mainly made of slabs, as is the straight ceiling. Therefore, often, floors and pitched ceilings-walls are suitable for insulation and installation. When insulating the floor, it is worth looking at what type of insulation is available.
Insulation in foil is mainly used, but sometimes rolls of insulation are covered with ordinary heat-insulating foil or metal film. The insulation should extend 1 cm away from the walls. This is due to the fact that when temperature changes, the material contracts and expands. The lack of free space in metallized or foil insulation leads to its deformation and damage over time.
Ceiling (pitched) insulation is attached between the rafters, cutting out a little more in order to insert it better between the boards. They are inserted strictly from bottom to top to avoid voids. After installation, the surfaces are clamped with main profiles or boards for application of additional (for example, vapor barrier) materials on top. The work is carried out especially carefully.
Problems
This method has a number of disadvantages. It is for this reason that the method has many opponents. Insulating walls from the inside can cause the following problems:
- The walls are not protected from the cold. The supporting structure of the building continues to be in contact with the outside air. This can lead to its gradual destruction. Cracks will begin to appear on the surface. This measure not only does not protect the outer wall from the cold, but also takes away some of the heat from it, because before insulation, part of the heat from the room heated the wall, but now this flow is blocked.
- Condensation. It forms on a cold surface upon contact with warm air. Heating engineers call the place where condensation forms the dew point. The main task of thermal insulation is to move the dew point outside the wall. Insulation “from the inside” ensures that the dew point shifts to the boundary between the wall and the insulation. This process is hidden, so home owners do not notice it. But humidity will be an excellent condition for the proliferation of various microorganisms.
- Reducing the area of premises. Modern types of insulation have good efficiency. But science has not yet come up with such a good material that its thickness is minimal. To insulate a house from the room side, you will need 5 to 10 cm of insulation. This eats up the area quite a lot. This is not so noticeable to the eye, but if you calculate the losses for the entire building, the figure turns out to be significant.
With internal insulation, the dew point shifts to the boundary between the wall and the insulation.
Therefore, before deciding on internal insulation of the walls of the house, we recommend that you carefully think about the listed problems. In this case, ignorance does not exempt from responsibility, since the result of inattention will make itself felt in the first years of operation.
Padding
Applying a layer of primer will reduce the degree of vapor permeability of the walls, strengthen the surface and increase the degree of adhesion to the adhesive composition. In addition, such treatment will prevent the development of fungus.
For priming, deep penetration compounds should be chosen. For wood processing, it is better to choose alkyd mixtures. Acrylic primer is universal and can be used for all types of surfaces. Epoxy compounds are used only for treating concrete and brick walls.
The primer is applied twice. The second layer is applied only after the first has dried. Smooth walls can be primed with a roller. If there are a large number of dents and chips, it is better to use a regular brush, the bristles of which can penetrate even the smallest crevices.
Priming walls with a roller
Laying a vapor barrier film
Before installing the insulation, a foil material that reflects heat or a thick polyethylene film is fixed to the wall. They are secured to wooden blocks or profiles using staples, tape or mounting adhesive. The foil material is laid on the shiny side
outward to the room.
All joints are taped with construction tape. In places where they adjoin building structures and pipes, they are additionally treated with liquid sealant and secured with a stapler.
Finishing with foil insulation
The film or foil material is laid overlapping, and the joints of the fabric should fall on the frame posts. A small overlap is made on the adjacent walls, windows, ceiling and floor.
The real state of affairs
The reality is that not in all cases it is possible to carry out work according to the textbook. In some cases, it is impossible to insulate a house from the outside:
- The building is an architectural monument. The façade must be left untouched.
- The upper floors of a brick house in the absence of the ability to work at high heights.
- The distance between the houses is too small, which does not allow work to insulate them from the outside.
Let's consider actions in a situation where insulation from the outside of the building is impossible. How to insulate the walls of a brick house from the inside with your own hands?
The main problem that residents of the house will face is condensation in undesirable places with all that it entails. To protect yourself from this trouble, you need to hermetically insulate the walls with insulation from the rest of the room.
There are two ways to do this task yourself:
- When choosing insulation, you should give preference to a material with very low permeability to water vapor. Common options include penofol and extruded polystyrene foam. The side with the foam foil and the compacted surface of the polystyrene foam should face the inside of the room. Only in this way will it be possible to avoid the absorption of steam by the insulation.
- If mineral or basalt insulation is used, they can be protected using a vapor barrier. However, sealing should be carried out with special care: no possibility of steam contact with the insulation or wall should be left. The film is attached with an overlap, and the seam is taped.
Conclusion
Thermal insulation inside walls is not the most popular way to reduce heat loss in a room. Reduced area, the need for more careful calculations to determine the “dew point” and other disadvantages force owners of apartments and private houses to choose external insulation. Moreover, installing insulation outside minimizes the risk of dampness in the premises.
At the same time, if insulation on the façade side fails (the appearance of the house is disrupted, there are expansion joints at the insulation site), the internal placement of heat-insulating materials can also be made more effective. If you use special technologies and take measures to prevent the appearance of dampness on the walls, the effect will be no worse than that of external thermal protection.
Reasons for carrying out work from the inside
The only argument in favor of internal insulation is:
- a ban by local authorities on work related to changing the facade of buildings (architectural monuments, buildings on central streets, etc.);
- there is an expansion joint located outside;
- a wall separates the room from an elevator shaft or other technical room where there is no access for installing insulation;
- internal insulation is provided for in the house construction project.
If there are no options to avoid indoor insulation, then it is necessary to take seriously the organization of work, from the selection of thermal insulation composites to installation technology.