- December 14, 2019
- Floor
- Lyudmila Storozhenko
Electric underfloor heating systems are popular. They save energy and create comfort and coziness in your home. It is pleasant to walk on such a floor. It is important to note that operating the system is not difficult.
There are many options for underfloor heating. The choice of system depends on a number of factors. In this article we will look at which heated floor is best to choose for linoleum.
Features of electrical systems
The easiest way to install the electrical system is under the linoleum. There are also water heated floors. They are mounted in a thick layer of screed, so the best covering for such systems is tile, as it has high heat transfer.
Linoleum is a thin polymer material. It is installed both in private houses and apartments. During the renovation process, homeowners are wondering which heated floor to choose for linoleum. There are several system options that are suitable in this case.
A heated floor powered by electricity consumes 120-180 W/m² at full power. When using a thermostat, this figure decreases. Moreover, such systems can be used to create both autonomous and additional heating. In the first option, there are no other heating devices in the room. The room is heated exclusively with underfloor heating. In this case, it is necessary to cover at least 70% of the room area with the heating system.
Additional heating assumes that there are other heaters operating in the room. In this case, the heated floor is installed only in certain areas, for example, near the bed, next to an armchair, sofa, or dining table.
Choosing linoleum
Most users choose linoleum based on appearance. It’s hard to argue with this, since the appearance of the coating is very important; it largely determines the style and overall quality of the room’s design.
However, to install it on a warm floor, you need to choose the right type of linoleum. There are three categories of material:
domestic
semi-commercial
commercial
All types of linoleum are divided into two groups:
- homogeneous material . This is a single-layer linoleum, representing a homogeneous fabric;
- heterogeneous linoleum. It is a multilayer material consisting of a base, a substrate, a base layer, and an outer coating.
Homogeneous linoleum is thinner than heterogeneous. In addition, it has high thermal conductivity, which is of great importance for working with heated floors.
Experts recommend choosing homogeneous linoleum, since multilayer materials are too dependent on temperature conditions and can begin to delaminate.
In addition, there are varieties made from natural materials or polymers (PVC). Natural linoleum is called marmoleum; only original components of natural origin are involved in its production:
- jute base;
- resin;
- wood flour;
- limestone;
- linseed oil.
Artificial linoleum is made from PVC with the addition of plasticizers and various compensators (for example, to protect against thermal expansion or changes in the linear dimensions of the canvas).
There are other varieties:
alkyd or glyphthalic linoleum
nitrocellulose, or colloxin. Thin material without base. It has high performance qualities, but is highly flammable;
rubber linoleum (Relin). Double layer material. Does not tolerate heat well and is used mainly in public or office spaces.
Not all types of linoleum are suitable for laying on a warm floor. Experts recommend choosing homogeneous (baseless) linoleum with a thickness of 2-3 mm. At the same time, marmoleum is considered one of the best options, although it has a jute base.
In addition, it is necessary to choose specialized brands of linoleum. They must have a base with antistatic treatment. In addition, the material must maintain working properties when heated and not dry out, crack or change color. Linoleum, designed to work in conjunction with electric types of heated floors, has a special marking on the reverse side - a heated floor icon (snake with arrows). If there is no such designation, the buyer risks soon having significant problems with the floor covering.
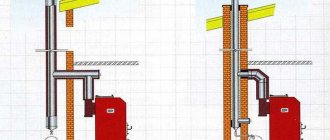
Heating cable
When considering which warm floor is best to choose for linoleum, it is worth paying attention to a number of features of its installation. If you are planning to do major renovations indoors, you may prefer a heating cable. It is mounted in a screed. The floor level in the room will rise by 7 cm or more.
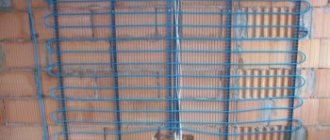
This option is suitable for owners of their own houses and apartments with high ceilings. First, thermal insulation (expanded polystyrene) is laid on the prepared rough base. A reinforcing mesh and guides for the heating cable are laid out on top. The wire is then mounted on these guides. The laying step is 10-15 cm.
The wire is covered with a tie on top. Its thickness is at least 3 cm. If the pitch of the turns is wide, the screed should be even thicker. It is unacceptable for there to be air bubbles in it. When the screed dries (at least 3 weeks must pass), linoleum is laid on it.
Nuances of design and calculations
Let us analyze the calculation procedure using a specific example of the installation of a Caleo brand film system produced for laying linoleum. Let us take into account that this type of coating is used mainly in the arrangement of bathrooms, corridors, kitchens of multi-storey and low-rise buildings, stairwells of private buildings reserved for winter gardens and other similar premises.
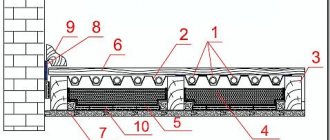
Standard arrangement of layers in a pie
A heated floor linoleum floor will include five required layers, these are:
- Thermal reflective substrate. It is recommended to use materials such as Izolon or Infralex. It is allowed to use thermal insulation with a polypropylene or lavsan metallized outer shell. It is prohibited to lay materials with a base made of aluminum foil under the IR floor.
- Infrared film floor. The system includes longitudinal panels with a carbon striped coating, at least one temperature sensor and a thermostat. The panels of the film system are connected to the power source in parallel using the terminals and wires provided in the factory kit.
- Polyethylene. Placed on top of the heating system after it has been assembled and tested. Plays the role of waterproofing infrared electric floors. Maximum thickness 2 mm.
- Protective hard layer. Made from plywood, hardboard or similar material. Required for installing heated floors with a flexible finish.
- Linoleum. Only brands that are compatible with electric floor heating are suitable.
When designing, it is necessary to take into account that the direct infrared-type film heated floor is not placed under furniture without legs or with low legs. It is unwise to heat objects that do not require heat supply, but are capable of consuming an impressive amount of it.
But an insulating substrate and a rigid layer are placed over all areas of the room in order to maintain a single height level of the floor. Waterproofing, despite its insignificant thickness, is laid in the same way over the entire area to prevent water from penetrating into the electrical system during wet cleaning.
Drawing up a laying diagram
For competent design, it is necessary to draw up a plan or an elementary diagram with scaled real dimensions. A hand-written project will help you correctly calculate the footage of thermal film and related consumables.
The panels of the heating system, waterproofing and heat-reflecting substrate are attached to each other with single- or double-sided tape.
In addition to these nuances, design must take into account the following:
- IR thermal film can only be cut along the lines designated by the manufacturer. Cutting at an angle and forming shaped panels is not allowed.
- Laying is done in parallel strips. It is not allowed to overlap one panel with another.
- A gap of at least 3 cm should be left between low-standing furniture and the film floor. An equal gap should be left between the edge of the panels and the walls: it will ensure heat removal in case of overheating.
- It is recommended to lay the cut strips of thermal film with a side overlap so that there is a gap of at least 1 cm between the copper bars of adjacent panels. This arrangement will ensure uniform heating of the floor.
- The heating system panels should have the maximum possible length in order to minimize the number of connection points.
- The connection points must be located on the side of the wall on which the thermostat will be installed. Thanks to this, the footage of wires required for connection will be significantly reduced.
- The laying of wires must be thought out so that the main array of them is located under the baseboard.
Heating mat
When installing an electric heated floor under linoleum, you can consider another option. This system is called a heating mat. It is a polymer mesh on which the heating wire is laid out. It is thin, so it does not require installation of a screed. Heating mats are laid in tile adhesive, the thickness of which is at least 7 mm.
If the installation is carried out on the second and subsequent floors, the insulation does not need to be laid on the base of the subfloor. Heat loss in this case will be minimal. If the heated floor is installed in a private house or on the first floor of a high-rise building, thermal insulation must be installed. A layer of screed at least 3 cm thick is poured on top. When it dries, the mat is installed.
A thin heating wire is more suitable for installing tiles. When laying it under linoleum, you will have to perform a number of additional works. The cost of repairs in this case will be high. Such a system has been in operation for 40-50 years.
Heating mats for linoleum
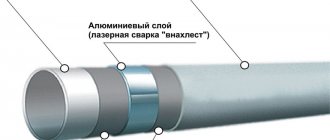
TP designs of this type are used only for additional heating. The design is reminiscent of heating cable heating technology, with the addition of a protective shell. The conductor is attached to a non-metallic mesh. The top is covered with a protective layer of rubber and PVC fibers.
Heating cable mat from a 220 V mains voltage.
Heat is transferred to the floor material through the aluminum shell. Advantages
this method TP:
- easy installation that does not require skilled hands;
- simple calculation of the required amount of material;
- high heating rate of decorative material;
- automatic process control.
The downside is the relatively high price.
As with the heating cable method, the working conductor comes in two types: single- and double-core. The latter type is more often used for residential premises. Can be laid on any flat surface (including wood). For a single-core element, concrete preparation is required.
It is important that the interfloor covering is warm. That is, adjacent to another warm room. If this is a cold base of a basement, balcony, loggia, it is necessary to insulate it and prepare it for laying the TP - make a cement-sand screed. This work is easy to do with your own hands. TP made from heating mats is installed in the following sequence:
- Drill a hole in the wall of the required diameter for a junction box and a corrugated tube for leads from the system to the thermostat.
- Prepare the surface: remove dust, prime.
- Spread foil-type thermal insulation. Connect the edges with aluminum tape.
- Lay the heating system strips according to the preliminary plan.
- Make a fine in the monolithic base according to the markings. Lay a corrugation for the temperature sensor.
- Place the sensor into the corrugation. Seal the fine with mortar.
- Connect the mats to cold conductors. Lead their ends through the pipe to the junction box.
- Place waterproofing made of polyethylene film with the edges on the wall.
- Measure the resistance of the mats (instructions are included with the purchase). Check the operation of the circuit.
- Pour a cement-sand mortar screed with a thickness of at least 30 mm.
- After complete drying, lay the material.
Pouring a heating cable with concrete
If you do not immediately get a smooth surface of the screed, it can be leveled using a thin layer of self-leveling floors.
The device of the tape with a two-core conductor is made in the same way. Sometimes it is proposed to lay sheets of plywood or OSB over the heating system. This method involves rigid fastening of the flooring. When fixing with self-tapping screws, screws or dowel nails (depending on the material of the subfloor), the heating element can be damaged.
With the heating method with a two-core conductor, the connection to the external network occurs at one end of the cable. A coupling is put on the far end as a plug.
Layout diagram for a two-core heating cable
Video will help you do the job correctly and quickly.
The execution algorithm is suitable for laying any material. Installation of heating mat
Thin heating wire
If you need to install a heated floor under linoleum on a wooden subfloor, you can choose a thin heating wire. It has a thickness of 3 mm, unfolds like a snake in increments of 7-10 cm. This installation is called dry. It does not involve the use of tile adhesive or screed.
The wire is laid out in grooves specially prepared for it. They are cut out of plywood or a special board is purchased for mounting the system. When the thin wire is laid in the grooves, it is covered with a sheet of plywood.
The peculiarity of linoleum is that it is a soft material. If you mount it directly on the wire, bumps will appear in these places. The wire will be subjected to increased mechanical stress and will quickly fail. Therefore, it must be covered with a layer of plywood. Its thickness should not be more than 1 cm. Electric heated floors under linoleum on a wooden floor can be installed using this method. This is economically beneficial, since the operation of the structure does not cause difficulties.
What do experts recommend?
“Warm floor”, or heated floor, is an alternative method of heating a room. One of the advantages is the uniform distribution of warm air.
For those who decide to apply the method in their home, the question arises about choosing a floor covering. Many experts stop their eyes on ceramic tiles or laminate.
The issue of combining “warm floors” and linoleum also finds many supporters. Among the “advantages” are cost-effectiveness, ease of installation and dismantling, and a large selection of materials.
Not just any linoleum is suitable for heated floors - you need to purchase special models that are suitable for such a system
When they talk about the “cons,” they mention harm to health, fragility, and rapid deformation of linoleum when heated. To avoid such problems, when purchasing flooring you need to focus on the markings. It points to special additives that reduce ductility and increase the rigidity of the material.
Thus, the question about the possibility of laying linoleum on a “warm floor” can be answered positively. However, it is necessary to first study all the pitfalls when choosing a material and its installation.
Infrared heated floor
Experts agree that this option is one of the best when laying a heating system under linoleum. The system looks like a film, inside of which a special conductive paste is laminated.
It is advantageous to install infrared heated floors under linoleum for a number of reasons. This is the thinnest system. It does not need to be filled with screed and can be installed in literally 30-60 minutes. This is one of the most inexpensive types of electric heated floors. Its only drawback is its shorter service life. As a rule, it does not exceed 30 years.
The system heats the floor surface and interior items. The air in the room remains pleasantly cool. This is the main difference between the film and the heating wire. Since the thickness of the finishing material is small, tile adhesive and screed are not used. The surface heats up quickly. Literally in half an hour the system reaches the set temperature.
Properties
Let's consider the distinctive features of linoleum in comparison with other types of floor coverings.
Performance characteristics:
- ease of installation and dismantling;
- practicality in care and operation;
- wear resistance;
- water-repellent properties;
- resistance to dirt and stains;
- the presence of species that do not deform when exposed to high temperatures;
- good compatibility with other building materials;
- wide selection of products according to price indicators;
- linoleum made from natural materials has antistatic properties, low flammability, and resistance to acids and alkalis.
Linoleum has many advantages - it has a wide range of products and is resistant to moisture, temperature changes, and chemicals.
The list of positive properties is supplemented by minuses.
Among the shortcomings, experts note:
- instability to low temperatures;
- color change;
- erasure;
- exposure to mold and microorganisms;
- unpleasant smell of PVC linoleum.
A wide selection of products allows you to determine the ratio of price and quality of finishing materials.
If the linoleum is of poor quality, over time it may fade and wear out.
Start of film installation
Installation of heated floors under linoleum has a number of features. Manufacturers supply systems with instructions that must be read before starting work. In addition, you need to buy a thermostat. As a rule, these devices have a remote sensor that must be placed next to the heating system.
Film heated floors must be laid on a laminate base. It is best to choose hard materials, since linoleum is elastic and soft. You can use a cork backing. It will play the role of additional insulation.
In addition, massive protective elements are provided at the junction of the film and the wires. They need to be deepened into the lining material. They must not be allowed to rise above the level of the film. The linoleum in this area will quickly wear out.
How to test the functionality of floor heating
Testing the system
Set the heating setting on the thermostat to 20–25°C, wait a few minutes. Check by hand whether all installed film heaters are warming up. Turn off the power completely, check the heating of the wiring connections. They must be at the same temperature as the film. If it is significantly higher, then the contacts are unreliable. It is necessary to check them, be sure to find and eliminate the cause of excessive heating.
Connection
The film must be cut based on the size and configuration of the room. Heating systems are not installed under furniture. The film is supplied in rolls, the width of which is standard and is 50 cm. Manufacturers provide the ability to cut it in the right places to make pieces of the heating film of the required size. Some make a dotted line along which a cut can be made at a distance of 50 cm, others - 10 cm.
Having cut pieces of the appropriate length, you need to connect the power wires to them. There are contacts on both sides of the film. These are silver strips to which metal terminals are connected. The clamps must pierce the contacts to create a proper connection.
When the terminals are connected, a wire is connected to them. Usually all the necessary components are sold as a kit. Many manufacturers supply additional parts separately.
Installation of film floor pie
Let's assume that after design and calculations we have purchased a set of infrared floors with the most suitable width and the missing components of the cake in the required quantities. It remains to figure out in what sequence and how to correctly lay the infrared film floor under the finishing linoleum.
Laying the substrate and heating system
The first step is to lay a heat-reflecting substrate, the strips of which are glued together into a single sheet with tape. In large rooms with an area of more than 20 m3, it is recommended to connect the substrate with double-sided adhesive tape in order to prevent its movement relative to the subfloor. Instead of double-sided tape, fixing with a construction stapler is suitable.
Next, we proceed to the stage of constructing the film floor:
- We cut out the thermal film according to the instructions of our own project.
- We try on the “pattern” for the future installation site. If necessary, we trim, slightly change the width of the side indentation and the gap between the walls and the heating system.
- Having decided on the position of the individual panels, we proceed to assembling the heated floor.
- We lay the underfloor heating panels strictly with the copper busbar facing down.
- We isolate the exposed contacts of the panels from the edge opposite to the connection side. We simply seal the cutting areas of the silver and copper busbar with bitumen tape so that contact with the external environment of both metal strips is completely excluded.
- We install the contact clamps on the current-supplying strip of thermal film. To do this, we slightly peel off the polymer shell in order to insert one side of the clamp under it, and place its second side on top of the copper busbar.
- After checking the correct installation, firmly fix the clamp with pliers.
- In accordance with the described diagram, we equip all contacts of the film floor with clamps on the side connected to the thermostat.
- We connect the strips with wires so that phases are connected to phases and zeros to zeros. For this purpose, the package includes wires of two different colors. We remove the insulation from the connected ends of the wire and insert them two or one at a time according to the design diagram into the clamp.
- We isolate the connection points secured with pliers with two pieces of bitumen tape on both sides.
- We connect the circuit to the thermostat.
- In a convenient place, install the temperature sensor with its convex side down and connect it to the thermostat. We cover it from below with bitumen tape. The system sensor under the linoleum must be positioned so that movement on it is eliminated or is the least intense.
The infrared floor heating system has been assembled; the final work remains on arranging the circuit and laying the finishing material.
The final stages of installing an infrared floor
To ensure that individual parts of the system do not stand out under the coating and are not subject to unwanted mechanical stress, they should be “sunk” in the insulating substrate. To do this, we cut out “windows” and “trenches” in the heat-reflecting layer under all convex parts: temperature sensor, contact clamps and wire routes.
Next, we test the operation of the film floor by connecting power to it. For a control check, set the thermostat to + 30º C. We check the operation of each contact and the safety of the insulated points with an indicator screwdriver or similar device. After making sure that the infrared system is functioning normally, we cover it with polyethylene and lay down a hard protective layer.
If necessary, a hard layer assembled from plywood, gypsum fiber board, hardboard, etc. We fasten it to the rough base with self-tapping screws so that the fixation points pass through the transparent edge of the film floor. It is more convenient to work with material that has a joining chamfer along the edge.
Don't forget that the infrared system needs to “breathe”. Therefore, along the perimeter of the hard flooring there should be a gap of 1-2 cm, which, after installing the finishing coating, is covered with a plinth.
To the constructed and secured rigid base we glue double-sided construction tape, used in laying linoleum, and lay the finishing coating itself.
Contact insulation
In the process of installing a film heated floor under linoleum, it is necessary to perform high-quality insulation of the contacts. This is necessary for the safe operation of the structure, as well as its effective functioning. When the wire clamps are connected to the contacts, they must be properly insulated.
For this purpose, the installation kit includes special gaskets. They are made from bitumen mixture. They cover the contacts by placing squares on top of the terminals. Then the paper on which the insulating material was applied is removed. This creates high-quality insulation.
Bitumen mastic does not allow water and dirt to pass to the contacts. This allows them to remain in working condition for a long time. To further protect the contacts from mechanical damage, they are covered with plastic covers. They are also included in the kit. The thickness of the protective caps can be up to 5 mm. Therefore, under them, recesses of the appropriate shape are cut out in the lining.
Disadvantages and possibilities for their elimination
- Electricity costs
Although the floor consumes a relatively small amount of energy, its constant operation affects the meters. To reduce energy costs, you should control the temperature, prevent overheating, and set it to light warm-up when leaving for a long time.
- Trouble with power supply
A regular outlet will not work to supply electricity. Installation of a separate power line with increased power is required, as well as installation of a machine in the panel.
Thermostat sensor
Having decided which heated floor is best to choose for linoleum, you should pay attention to the installation of a thermostat. It controls the heating level. Without it, the system will consume more electricity.
The remote sensor is mounted in the floor next to the film. You don’t have to put it in a corrugated pipe if the system is installed dry. An appropriate recess is made in the lining so that the sensor does not protrude above the floor surface.
Verification tests
The penultimate stage before installing linoleum is checking the entire system. We set the required temperature on the thermostat, and then take the pause required to warm up. After this, we completely turn off the power and check all the elements of the heated floors - they should be warm. We touch the contact clamps in the same way. If they are overheated, this means there is no normal electrical contact. The clamps must be properly tightened so that overheating does not lead to dire consequences.
Installation of a thermostat
For this device, a recess is made in the wall. The thermostat is installed next to the outlet. A round hole is drilled for it, as for a regular switch. On the reverse side of the thermostat there are several terminals (the number depends on the model).
Two of them are intended for connecting a remote sensor. Two more are needed to connect the wires to the infrared film. There are also terminals for connecting the phase and neutral of the network. Some models also have a seventh terminal. It is intended for grounding connection.
How to put it with your own hands?
The heated floor system has long become familiar to a wide range of people with different incomes. It has been present in modern living space in the house, in the attic or on the balcony for quite a long time, which made it possible to evaluate the device from different angles, understand its principles and independently master the installation method. And on how to do everything quickly and avoid mistakes, you should follow the step-by-step instructions that have already been proven in practice.
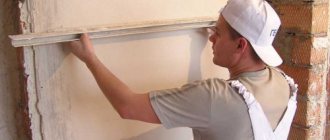
Preparation
To begin with, you need to remove all the furniture from the room in which you plan to install a heated floor, and then dismantle the old floor: remove the covering, clean the subfloor from dust, sand rough irregularities. If necessary, you can make a screed. You need to determine the wall where the temperature controller will be installed.
It is advisable to provide the heated floor with separate wiring to avoid short circuits throughout the entire apartment in case of problems. When the preparatory work is completed, you can begin the practical side of the issue of installing a heated floor.
What will you need?
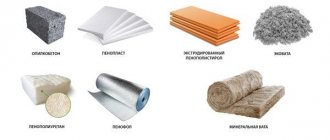
To perform the installation of a heated floor, you will need to use the following equipment and auxiliary materials:
- selected type of electrical system (cable or IR tape mat);
- reflective material;
- substrate (if necessary);
- waterproofing film;
- protective mesh;
- temperature sensor and control unit;
- floor screed materials;
- sheets of plywood (if necessary);
- selected type of linoleum;
- hot welding cord;
- mounting stapler with paper clips;
- building level and pencil.
Installation
As stated earlier, an electric floor heating system consists of several layers, each of which performs an important function. First, the heat insulator is laid. Depending on what floor the room is on, you can choose a heat insulator of the appropriate thickness.
If the material does not have a reflective layer (for example, preference is given to natural cork insulation), then a metallized backing should be placed on top of it. It will ensure that heat is retained in the space under the floor and will prevent its leakage. The substrate is chosen from either lavsan fiber or aluminum (the second option is somewhat more expensive and is not always necessary).
Next comes the installation of the heating system itself. Electrical cables or infrared tapes are placed along the floor surface at the same distance from each other, having previously determined the pitch. Depending on what type of system is chosen, it is secured in an accessible way: cables are used with clamps, and heating tapes are glued to the substrate. After installation of the system is completed, the wire for the thermostat is routed to the selected wall.
Completion of installation
Having connected the thermostat, an RCD must be installed in the system. Check performance with a multimeter. The resistance is indicated on the packaging. If everything is fine, lay linoleum. It is secured with a plinth around the perimeter of the room. If desired, you can eventually remove the floor covering (carpet) and lay it in another room.
We hope the information provided in the article will help you decide which heated floor is best to choose for linoleum. If you install the system correctly, it will be effective, durable, and will easily create a cozy atmosphere in your home.
Recommendations for laying linoleum
Linoleum is not laminate. You can't put it directly on film. You need a flat, solid base. To do this, you need to put a flooring made of plywood, OSB, fiberboard or flat slate on the film. You cannot attach it to the base of the floor through a film - there is a high probability of getting into live strips. Linoleum is laid on them. The technology is simple:
Attention: if the flooring has a seam, a waterproofing film made of polyethylene must be laid under the flooring. For a single piece, waterproofing is not necessary.
- a roll of linoleum for a warm floor is brought into the room and rolled out. It is cut to length and width with a margin of 10 cm (it has the unusual property of increasing in size in the cold);
- Leave it rolled out for 2-3 days - it should level out. You can speed up the process by turning on the “warm floor”;
- The floor covering is laid for further use. Experts recommend attaching it to the flooring with glue or double-sided tape. According to the editors of the StroyGuru website, the glue is more reliable - the flooring adheres to the flooring more tightly and does not heat up as much. For a felt base, “Gumilax” is suitable, for material without a backing - “Bustilat”;
Trimming linoleum near walls.
- When laying two strips, the seam at the bottom is glued with tape so that there is a tight fit, and then everything is glued. The glue is spread on both the flooring and the coating;
- Along the perimeter, the linoleum is secured with skirting boards.