Installing a water heater will provide owners of country houses with hot water and will increase the comfort of apartments from the old housing stock such as Khrushchev-era buildings and small-family dormitories. The tireless unit will diligently prepare and supply water to the taps so that the owners can enjoy the benefits of civilization.
This will happen if the diagrams for connecting the water heater to the water supply were followed exactly, don’t you agree? You will find complete answers to a wide range of questions that arise before installing water heaters and in the process of connecting them to the communication network on our website.
Reliable information will be useful to independent craftsmen who want to carry out the installation themselves. It is also necessary for customers of plumbing services to check the quality of the work.
The article describes in detail the types of water heaters, indicates their design differences, and indicates the specifics of the connection. Valuable tips are provided to ensure perfect operation of the equipment after installation. The information content of the proposed material is perfectly complemented by photographs and video recommendations.
Types of household water heaters
Features of connecting household heaters are directly related to the types of devices, their technical parameters, and overall dimensions.
Traditionally, two types of heaters are used in household practice:
- Cumulative.
- Flow-through.
Both types of boiler systems differ from each other in heating technology.
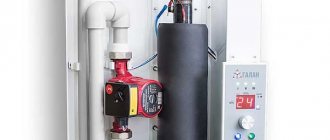
A storage type device equipped with an electric heater (TEN). Such equipment is most often used in the domestic sphere. Can be mounted directly in the bathroom if overall dimensions allow
With storage heaters, cold water is collected in a container, heated and then discharged for tapping.
With flow-through units, heating is carried out directly during the flow of cold water in contact with the heater, without collecting liquid in a storage tank.
Household consumers mainly use storage boiler systems. A comparative review of both types of water heaters is given in this article.
Technical device of the storage boiler
A storage-type water heating system, boilers, in a simplified schematic form is a container equipped with electric heating elements or liquid heat exchangers. The storage vessel has pipe lines for cold water supply and hot water outlet.
A more powerful and voluminous design is an indirect heating installation. It is clear that the source of heating energy in this case is water coming from the heating system. However, if desired, it is possible to connect electric heating
The designs of indirect heating boilers are additionally equipped with a working coolant area and heating connection lines.
Any modern system, regardless of its design features, is equipped with automation, thanks to which the water heating temperature and the operation of the system as a whole are regulated.
Structural design of heating devices
There are designs of storage boilers designed for installation vertically (wall-mounted) and horizontally (floor-mounted). Of course, each individual case of using certain boilers has its own installation features.
So, if it is planned to install a water heating device on a wall, a preliminary calculation of the load and comparison of the results obtained with the design parameters of the wall of the room on which the device is to be mounted is necessary.
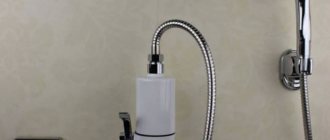
Instantaneous water heaters have been rapidly gaining popularity lately. Users are attracted by their small dimensions and the possibility of simplified, easy installation. Really convenient devices for low water consumption needs
Installing equipment without load calculations threatens to result in a fatal installation error, when a filled boiler can simply collapse along with the flimsy partition on which it was mounted.
According to the equipment instructions, the load must be calculated taking into account four times the weight of the boiler system.
Therefore, if the structure of the supporting wall is frankly weak, the water heater circuit must be supplemented not only with connection lines to the water supply and coolant, but also with reinforced racks - through fasteners.
Horizontal boiler installation used for local hot water supply. Electric heating is also provided here and in this installation option an expansion tank is installed, which is the right solution
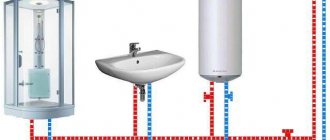
In classic connection diagrams for wall-mounted boilers, the water supply/discharge pipes of heating devices are marked with the appropriate color - blue/red.
Security
To connect powerful models of storage-type water heaters to the electrical network, craftsmen use a reinforced cable with three cores, which is laid directly from the distribution board. Installation of a double circuit breaker or RCD and grounding are required.
Connection to the electrical network Source otopleniesam.ru
Installation diagrams and solutions
You can connect a heating device to the centralized supply in one of two ways: through a security group or directly.
A security group consists of a collection of the following elements:
- shut-off valve;
- Check Valve;
- safety valve;
- expansion vessel.
Option number 1 . The presence of a safety group is traditionally used in indirect heating boiler installations, as well as when the pressure of the centralized system is higher than the limit parameter of the boiler operating pressure.
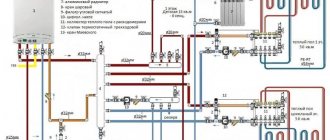
Classic scheme of indirect heating equipment. Two safety groups are used: 1 – boiler safety group; 2 – expansion vessel; 3 – boiler tank safety group; 6 – heating circulation pump; 7 – boiler circulation pump (+)
Option number 2 . Direct connection is usually applicable to small-capacity equipment with a flow-through operating principle. Direct connection is also allowed in conditions of lower and stable pressures of the centralized water supply. In any case, the installation diagram involves the installation of shut-off valves.
In order to be able to maintain and repair water heating equipment, it is equipped with shut-off valves at the inlet and outlet of the system (+)
Conclusion
Summarizing all of the above, we can say that with proper connection and compliance with operating rules, the boiler will serve for a long time. It is important to note that if you are not completely confident in your abilities, it is better to turn to specialists for help. If you are confident in yourself and are going to connect the boiler yourself, then carefully monitor what you are doing and keep common mistakes in mind so as not to accidentally make them. To avoid mistakes at a very early stage, try to take all measurements with maximum accuracy.
Criteria for error-free installation of equipment
Among the main installation points that you should pay attention to in order not to make mistakes are the correspondence of the diameters of the pipelines in relation to the inlet fittings, as well as the cross-section of the cable supplying the electric heater of the boiler.
The diameter of the supply pipes must ensure free flow of water along the inlet/outlet lines. Therefore, a larger diameter of hoses with a transition to the size of the fittings is still acceptable, but a cross-section of pipelines that is smaller than the inlet pipes of the boiler seems to be a gross mistake.
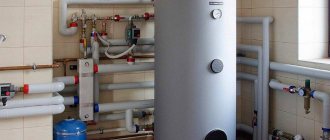
A clear example of equipping an electric heating boiler installation with all the necessary fittings. It should also be noted here that the insulation of all incoming and outgoing lines was performed with high quality (flawlessly)
The cross-section of the power cable shows a similar picture. It is not prohibited to use a cable with a larger cross-section, but it is strictly prohibited to use a cable with a smaller cross-section.
True, a cable with a larger cross-section than the norm creates difficulties when laying in channels and takes up more free space. Here it seems logical to precisely select the wire cross-section depending on the load current.
The power socket is usually mounted directly next to the device. The installation height of the socket from the floor level is not less than 1.5 m. Household boilers are designed for power supply with single-phase alternating current 220-250 W. The current load is usually at least 10 A.
Connecting the boiler system according to the electrical diagram. This connection option can be considered made without error. The wire cross-section corresponds to that specified in the documentation, the grounding circuit is present
The exact value is determined by the performance of the heater and is indicated in the technical documentation. It is for the specified current value that the circuit breaker must be selected.
For example, for flow-through heaters, the following current cut-off standards for automatic machines are relevant (table):
| Boiler power (flow circuit), kW | Circuit breaker current, A |
| 3,5 | 20 |
| 5,5 | 25 |
| 6,5 | 30 |
As a rule, all required connection parameters are specified in the instructions for the boiler. The user manual explains exactly all aspects of installation. Therefore, it is recommended that you carefully study the documents included with the device before installation.
Selection Basics
When choosing an autonomous source for heating water, these indicators should be taken into account:
- Tank volume (taking into account the number of people living in the apartment).
- Device power consumption.
- Internal coating of the tank (it is recommended to pay attention to magnesium or anode rods , which are protected from corrosion and scale).
- Dimensions and other features of the unit.
Find out more information about choosing a boiler for an apartment here.
Some features of the water supply scheme
Connecting a storage boiler . Cold water is supplied to the boiler system through a pipeline that is connected directly to the centralized supply riser.
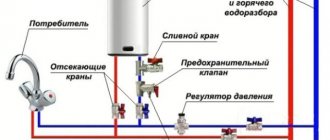
In this case, a number of components necessary for the normal functioning of the equipment are installed on the cold water line:
- Stopcock.
- Filter (not always).
- Safety valve.
- Drain tap.
The indicated circuit elements are installed in the area between the cold water supply pipe and the boiler in the marked sequence.
The line for the outlet of heated liquid is also equipped with a shut-off valve by default. However, this requirement is not mandatory and if a tap is not installed at the DHW outlet, a serious mistake is not seen in this.
All water heater connection diagrams have common features. The cold water supply point is located at the bottom; filters and a reducer must be installed in front of it to reduce the flow pressure (+)
Connecting an instantaneous water heater . Compared to a storage boiler, the work is carried out according to a simplified scheme. Here it is enough to install only one shut-off valve in front of the cold water inlet fitting.
But the installation of a shut-off valve at the DHW outlet of a flow-through heater is considered by many manufacturers to be a gross installation error.
You should also take into account: if the source of cold water supply for an instantaneous water heater is a well, a well, a water tower, etc., it is recommended to turn on a coarse filter in series with the tap (after the tap).
Often, an installation error with connecting the filter or refusal to install it leads to loss of the manufacturer’s warranty.
How to “crash” into a cold water supply pipe?
One of the main tasks is to cut a tee into a cold pipe. There are different options for solving this issue - it all depends on the material of the pipe itself and its location.
Metal pipe
The most labor-intensive case is perhaps one that will require special skills and tools. We will not consider the issue of welding work - this approach is practically not used in apartment conditions.
- Option one is when it is possible to cut the pipe and cut the required ½-inch thread at both ends. In this case, it will be possible to install the tee through a regular plumbing fitting, or pack it using special couplings with union nuts - “American ones”.
- The second option is when the location of the pipe excludes the possibility of using a thread cutting tool (die with a holder).
In this case, you will have to use a special repair and installation clip with a tap, which is often called a “vampire” among plumbers. This is a cast iron or brass collapsible structure with a rubber gasket inside and a tee perpendicular outlet and a transition to internal or external thread. This is what the Vampire repair and installation clip looks like
And this is the installation diagram
The pipe is thoroughly cleaned of old paint and rust. Then, in the right place on the pipe with previously blocked water, a radial hole is drilled with a diameter corresponding to the hole on the coupling. A hole that is too large will negatively affect the strength characteristics of the pipe. Too small and it will quickly become overgrown with dirt. When marking the center of the hole, be sure to take into account the further direction of laying the line to the boiler.
The coupling is put on through a rubber gasket and tightly tightened with standard bolts. Now from its threaded part you can continue laying any type of pipe.
Metal-plastic pipe
Tee for metal plastic
The simplest option is perhaps the one that requires only wrenches and a cutter. In the right place, the pipe is cut taking into account the length of the tee. Then the tee itself is installed on the standard compression fittings, with an outlet on an external or internal thread, or with the same fitting outlet if it is planned to continue to conduct metal plastic.
Polypropylene pipe
This requires a special approach. To weld a tee using a special soldering iron, a certain “spreading” of pipe sections is required for simultaneous coaxial heating. You can, of course, go the route of installing a “vampire”, but it’s still not worth the risk. It is better to cut out a section of the pipeline, and then solder the removable structure with a tee and transitions to “American” couplings. It may be a little more expensive, but the reliability of the insert will be guaranteed.
The same is done when inserting a pipe with hot water, if it is planned to connect it to the internal residential hot water supply network.
Common mistakes in installing water heaters
The rules for installing such equipment provide for the use of insulation on cold water/hot water supply pipelines. In this case, the technical requirements for installation determine the minimum possible size of insulation thickness - 20 mm.
The level of thermal conductivity of the insulating material must be at least – 0.035 W/m2.
An example of insulating a heater system where obvious errors are noted. It is necessary to insulate not only the pipes, but also the operating components installed on the pipeline section. This is easy to do with modern insulating materials.
When installing water heaters, they often violate the connection diagram of the home unit to the water supply, using thin insulating material, or not using insulation at all.
As a result, when full operation of the device begins, significant losses of thermal energy are noted. These losses are reflected in the heating time, which increases significantly.
Improper or missing insulation is the main cause of condensation on the cold water line. This state of the system reduces the level of user comfort and contributes to the formation of an unsanitary environment inside the premises where the equipment is located.
A common mistake is to install a boiler without an expansion vessel. The scheme, which provides for the introduction of an expansion vessel, is relevant specifically for storage-type water heaters.
Thanks to the expansion vessel, it is possible to compensate for the increase in pressure caused by the increase in the volume of water in the boiler storage tank.
Installed expansion tank in the indirect heating system. In fact, the installation of the expansion vessel was carried out with an error. This element of the system must be located above the line of the top cover of the boiler. In addition, there is no pipe insulation
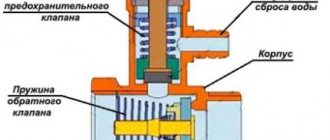
As a rule, the installation of storage type heaters is limited to the inclusion of a safety valve in the cold water main section. This kind of replacement of the expansion tank with a safety valve is acceptable, but, from the point of view of proper installation, this is a technical error.
In fact, on storage boilers you should always install an expansion vessel along with a check valve.
List of other installation errors:
- the electrical cable is laid on sharp metal edges or on high-temperature surfaces;
- the order of connecting the main lines does not correspond to the order indicated on the diagram;
- the level of installation of the water heater relative to the horizontal and vertical is violated;
- there is no grounding circuit for the water heating device;
- the parameters of the electrical network to which the equipment is connected do not meet the passport requirements;
- installation is carried out in a room where there is no water supply and drainage system.
Any, even insignificant, error in installing water heating equipment can play a fatal role after the device starts operating.
We invite you to familiarize yourself with detailed instructions for installing a storage and instantaneous water heater:
- Do-it-yourself storage water heater installation: step-by-step guide + technical standards
- Do-it-yourself instantaneous water heater installation: step-by-step instructions
Connecting the storage heater
When installing a storage water heater, the technician must use a non-return safety valve, which ensures the correct functioning of the device and reduces the risk of unforeseen situations.
Mounted safety valve Source hi.decorexpro.com
Preparation
The boiler must be close to the water supply points. In this location, heat will not be lost.
For direct installation, you must strictly follow the instructions. It would be a good idea to have a physically strong person who can help by holding the heavy water heater suspended.
Although you can handle the boiler yourself, before refusing help with installation, you should remember that the weight of a boiler with a volume of about 100 liters is 30 kg, and the water heater is completely empty at this moment.
Required items:
- Pencil,
- Roulette,
- Hammer.
- You will also need pliers or an adjustable wrench and a bubble level.
After viewing the instructions, you must leave markings on the wall. It is needed to accurately drill holes after some time.
- When applying markings, you should look at the distance from the highest point of the device to the ceiling, because it should be at least 5-7 cm. The gap is needed in order to hang the boiler on a hook. Checking the markup is required.
- If an empty boiler weighs about 30 kg, then a device filled with water weighs even more. Therefore, it is extremely important when installing a water heater with your own hands to make a reliable fastening. Typically, manufacturers indicate what hooks should be used to install different water heaters.
- Due to their enormous weight, boilers with a volume of more than 80 liters are installed only on load-bearing walls. If this unit has a smaller volume, then it can be installed on partitions.
After all the fastening hooks have been tightened, you should check the “horizon” using a level.
If the boiler is installed smoothly, you can achieve job satisfaction. Also, the even location of the water heater will improve the employee’s karma.
Required Tools
Any installation begins with the preparation of tools. If it is fully equipped, then the work will be done quickly and efficiently.
To install the boiler you will need:
- a drill with an impact mechanism or a hammer drill plus a set of drills for concrete;
- screwdriver;
- a grinder if the water supply is made of metal pipes, or a pipe cutter if it is made of plastic;
- a pair of gas wrenches or adjustable wrenches;
- building level;
- pliers.
Additionally, you may need a tool for installing pipe connections:
- for steel water supply: welding machine and set of dies for threading;
- for polypropylene: a heater for welding pipeline parts (it is called a soldering iron or iron);
- for metal-plastic: press pliers, if you plan to use press fittings, as well as calibration to align the end of the pipe before installing the fitting.
In addition to tools, you will need sealing material to seal the threaded connections between the pipeline elements. For this, experienced craftsmen use tow or plumbing flax in combination with Unipak paste, but a beginner will find it easier to work with FUM tape or a special flax thread such as “Tanget Unilock”.
General information
Installing a water heater is quite easy, so you can do it yourself. Having installed the boiler yourself, you can say with confidence that not only your head works, but also your hands.
The main task of a water heater is to heat water. They are divided into several types based on their design:
- 1. Electric
- 1.1 Full-size (have a volume from 80 to 200 l);
- 1.2 Boilers of small volume, not exceeding 50 l;
- 1.3 Flow models that heat water in real time.
- 2. Gas
About signs of comfortable living
The presence of hot water in the house is one of the main signs of comfortable housing.
In apartment buildings, the hot water supply is often centralized. Water is heated separately in the boiler room and supplied to all apartments.
However, now such a water supply is economically ineffective, and also has many disadvantages in the form of a possible shutdown of the hot water supply during pipeline breaks or maintenance work in the boiler room.
Owners of private houses do not have access to such a supply of warm water, so they have to solve the supply problem themselves.
The solution is to use an autonomous hot water supply. A water heater is installed in the house, which provides heating.
This method of providing hot water is becoming so popular that apartment owners often abandon the centralized supply in favor of an autonomous one.
Water heaters provide homes with hot water in the right quantity, it is available at any time, and it is cost-effective.
