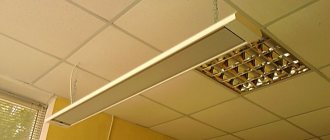
Of the wide variety of additional heating, many prefer IR panels, because they are easy to use and quickly warm up the room. In addition, using the built-in thermostat, you can quickly set the required temperature. You can entrust the installation of infrared heaters to professionals or do it yourself, which will significantly save money.
Infrared heater - a heating device that emits heat through infrared radiation
Peculiarities
Infrared heaters have a rather interesting operating principle. They heat not the air itself, but objects located around them due to infrared radiation. As a result, they become warm, releasing part of the thermal energy into the atmosphere - the room becomes warm and comfortable. Let's look at the main features of IR heaters:
The most striking drawback of these heaters is the high electricity consumption, which is typical for any, even the most economical electrical appliance.
- Correct heat distribution. If you install traditional radiators indoors, it will be cool near the floors and hot near the ceilings. In the case of IR heaters, the floors will be warm, since they will be heated by IR radiation;
- When installed correctly, they do not cause harm to human health - if this equipment is installed correctly in its normal place, then it will not have a negative effect on the body (in particular, there will be no headaches);
- Fast heating of rooms - they warm up noticeably faster than traditional radiators;
- Almost complete silence - only gas appliances make noise (and even then they are practically inaudible);
- Can work in rooms with high humidity levels;
- Available for use in outdoor conditions, creating a comfortable environment in open areas;
- No negative impact on the environment.
Installing an IR heater in a living room will create a warm atmosphere in which it is pleasant not only to relax, but also to work.
Comparison with other types of heating equipment
Competing heating devices (batteries, convectors, heat fans, oil radiators) are aimed primarily at heating the air. Only then does the warm air partially transfer heat to surrounding objects and people.
This method has a number of disadvantages:
- As a result of heating the environment, “air stratification” occurs. In this case, warm air accumulates at the top of the room, and cold air at the bottom. This disadvantage is especially noticeable if tiles are used as flooring.
- Mixing warm and cold air form convection currents, creating drafts in the room.
- Heating of the room is extremely slow.
On all of the above points, infrared heaters beat their competitors.
Does it make sense to get involved with infrared heaters?
There are approximately the same number of fans and ardent critics of heating residential premises using infrared radiation installations. It is worth recognizing that, despite the fierce criticism of fans of water heating, the idea of using electric infrared heaters is becoming increasingly popular.
Radiant electric heaters have their own rather interesting advantages:
- Versatility. The infrared heater can be installed on any surface, at any angle, without restrictions on height and method of fastening;
- Locality of heating. An infrared emitter allows you to organize heating of part of the room, even if it is not possible to limit the loss of warm air;
- Easy to install. It is enough to correctly lay the electrical wiring to the places where the heaters are installed, connect the input to the house and a meter designed for increased power consumption of electricity;
- Low inertia of infrared heaters. Heating of the room stops 10 minutes after the electric heater is turned off;
- Possibility of smooth adjustment and precise dosage of room heating.
For your information! Due to the very small thermal inertia of infrared heaters, the air temperature in the room can be adjusted with an accuracy of half a degree; it is enough to install digital or even mechanical thermostats.
Of course, similar options for maintaining the air temperature in a house or apartment at a given level can be implemented using heated floors or electric convectors, but in both cases, good results can only be achieved in closed rooms, when there are no drafts or passage rooms.
Practice once again proves that the use of radiant devices makes it possible to heat a room no less efficiently than when using convectors or water and oil radiators
In this case, it is important to choose the right scheme and method of installing an infrared heater
Conventional electric water-oil heaters and radiators, regardless of the installation scheme, heat the air by convection:
- Most of the heat-transfer surface is covered with a casing or screen to improve, according to the developers, the flow of air to the spirals or tubular sections;
- In some designs, convection electric heaters simply unsuccessfully copy the shape of cast-iron central heating radiators;
- Such heater designs are designed for installation in window sill niches, where warm air mixes with the flow of cold air from the ventilation valve and spreads well throughout the room. In all other cases, the efficiency and economy of air heaters is significantly lower than that of infrared heaters.
Important! There are quite a few comparison tests that measure heating performance, but the most reliable data shows a difference between infrared heaters and convectors by almost 18%. In addition, infrared heaters are practically insensitive to the position of the housing, whereas for a convector, manufacturers require installation only in a vertical position, with an inclination angle of at least 4-7 o
In addition, infrared heaters are practically insensitive to the position of the housing, whereas for a convector, manufacturers require installation only in a vertical position, with an inclination angle of at least 4-7 degrees.
Low temperature infrared heaters
The most frequently criticized disadvantage of an infrared heater is related to the high temperature of the radiating surface. Most often, a spiral or ceramic panel heats up to 300-500 o C, which can cause drying of the air in the room.
Relatively recently, so-called cold or low-temperature heaters began to be used for heating. New infrared heaters look like ordinary square facing slabs measuring 60 cm or 50 cm. The smooth heating surface is made of polymer ceramics; on the reverse side there may be a protective grille or a plastic panel covering the heating element.
Such heaters heat up to a temperature of 90-95 o C, so even with prolonged contact with fabric, curtains or furniture there is no damage. Installation of such an infrared heater can be done almost anywhere, but preferably no closer than 40-50 cm to open parts of the body, you can use the advice in the video:
The most important thing is that the room heating efficiency of such a heater is approximately 20-25% higher than in comparison with vaunted convectors and oil radiators.
Warm ceiling
- The main advantage of a warm ceiling
- Lack of a warm ceiling
- Installation of a warm ceiling
The main advantage of a warm ceiling
So, the most important argument in favor of using infrared heating is precisely the low power of this type of heating compared to other heating systems.
For example, the power of a water heated floor system averages 50-80 W per square meter. And the power of films for ceiling heating devices, declared by the manufacturer, is 15 W. This is certainly great. But it's not that simple.
To mount a heating film on the ceiling, it is necessary to mount the lathing, mount heat-insulating mats, mount a reflector layer, and only then mount the heating film.
At the same time, you need to understand that heat loss from your home or premises should be minimal. Otherwise, energy consumption when using a warm ceiling will be comparable to traditional heating systems.
This is of course cheaper than a device, for example, a concrete warm water floor system. But the quality is the only plus.
Lack of a warm ceiling
If you have warm water floors, then they can be heated with any boiler. For example, electric, gas, diesel, solid fuel, heat pump, solar collector and so on.
But infrared heating film works only on electrical energy. Thus, if the electricity is turned off, you will be left without heating.
According to the heating principle, warm ceilings and warm floors are the same. Both of these systems operate in the long-wave infrared heating range.
Therefore, I would not consider warm ceilings as the main heating. As an alternative please. For example, you turn on warm ceilings during the day while you are at work. And at night, turn on the stove or turn on another boiler.
It is also convenient to use ceiling heating in the off-season to maintain a comfortable temperature in the house without turning on the main heating.
Installation of a warm ceiling
When installing a heating film on the ceiling, it is necessary to pay attention to the quality of the connection between the supply cable and the film and the reliable insulation of this connection, since water leakage from the roof or upper apartments cannot be ruled out. And if the connection is poorly insulated, you may get an electric shock or a fire may occur due to a short circuit with water. And if the connection is poorly insulated, you may get an electric shock or a fire may occur due to a short circuit with water.
And if the connection is poorly insulated, you may get an electric shock or a fire may occur due to a short circuit with water.
The next rule when installing a warm ceiling is the permissible installation of a finished ceiling at a distance of no more than 100 mm from the heating film.
In this case, the thickness of the finished ceiling materials should not exceed 20 mm.
In addition to all of the above, the heating film for installing a warm ceiling differs from the film for installing a warm floor.
The film for a warm ceiling is equipped with additional reflective elements, which in turn allow the installation of warm ceilings with a height of no more than 4 meters.
To summarize the above, it is advisable to use warm ceilings in well-insulated buildings and premises as alternative heating or in the off-season.
It is also convenient to use warm ceilings with an uninterrupted supply of electrical energy. Although today no one will give guarantees for uninterrupted supply.
And to provide basic heating, you can use radiator heating systems, heated floors or any other system.
If you have questions about the installation of underfloor heating systems, then follow the links and you will receive comprehensive answers on the installation of water or electric underfloor heating. published econet.ru
If you have any questions on this topic, ask them to the experts and readers of our project here.
How to regulate loads?
Figure 3. Design of an infrared lamp heater.
The load regulation process is automated. It allows you to control the load on gas thermostats. This is a very important point and it is recommended to choose this installation option. The fact is that, provided that the room has sufficiently high-quality thermal insulation, the thermostat will need to work no more than 20 minutes per hour to maintain the temperature at the required level. And this allows you to reduce the load by 3 or more times, which is quite an important factor. It is advisable to choose this option. The main material for such a connection is the box in which the wires are laid. If you are going to install hidden wiring in the wall, you will also need corrugation.
To connect infrared heaters, wires with a cross section of 1.5-2.5 are used. The specific value depends on the load level on the thermostat. Experts recommend connecting a common machine before starting installation. When working, do not forget to follow safety precautions.
If you have chosen a gas infrared heater, do not forget about the specific operation of this equipment. The thermostat has its own characteristics, so when installing the device you must follow all the important rules. You can see the diagram of an infrared lamp heater in the following image: Fig. 3.
Infrared heaters have the ability to create an atmosphere of comfort, spending the very minimum of your labor and money. Being at the same time compact, safe and, most importantly, efficient, they are used for heating various rooms. Installation of infrared heaters is not an abstruse or highly complex process; even a novice master can do it. So, you can look at the models of infrared ceiling heaters on mklimata.ru - this review will look at the subtleties of installing it yourself.
IR heating has the following advantages:
- Allows you to save money, especially in the form of additional heat
- They don’t “eat up” oxygen
- Absolutely safe for human health when used correctly
- When using the ceiling option, they do not take up space in the house and are inaccessible to children
- When switched on, they do not make noise and additionally illuminate the room.
- Built-in thermostats on many models maintain the desired air temperature
- By turning off the IR heater, the heat collected in the room from objects heated by the device remains for some time.
- They are resistant to moisture and can be installed in a convenient place - a bathtub, terrace or gazebo.
The disadvantage is the relatively high price of this type of heating.
Warranty service
The service center will not work with equipment that has been damaged as a result of improper use or violations of safety rules.
Don’t forget that trying to fix the heater yourself will also not lead to anything good. Of course, you can fix some problems without “opening” the equipment. For example, if the device does not heat well, we advise you to check the network voltage, as well as the temperature value set on the thermostat. The cause of the malfunction may be a broken thermostat or problems with the power line.
The warranty service itself consists of repairing equipment or replacing defective parts. Defects obtained in production are recognized only by specialists during an examination. To ensure that your heater does not experience any breakdowns or malfunctions, trust installation, installation and maintenance to professionals.
Source
Place and method of connecting the thermostat
As you can see, there is nothing complicated in the connection diagram of the temperature controller: connect the power wire and power to the IR heater to it.
Connecting a thermostat to an infrared heater can be done in a variety of ways. For example, a thermostat can be placed directly in the wall - on one side the electrical network is connected to it, and on the other side the heaters themselves are connected (in the example, “Peony” ceiling infrared heaters are used). Temperature sensors can be built-in or remote. Thanks to remote sensors, more accurate control of room temperature is achieved. They are also used to perform multi-zone monitoring.
The connection diagram of the thermostat to the infrared heater is simple: network - regulator itself - heater. The most ordinary ceiling chandeliers are connected in the same way, only instead of a switch we use a temperature controller. Multichannel regulators have several outputs - one for each heater or group of devices.
What is the secret of popularity?
Manufacturers declare the following advantages of infrared heaters:
- high efficiency and cost-effectiveness;
- absence of rotating parts and noise;
- a gentle warmth is generated that does not cause a deterioration in a person’s well-being;
- simple installation and connection.
As a rule, these are general phrases; something similar can be found in descriptions of oil radiators or wall-mounted convectors. They do not answer the question: why are devices so attractive to users in real life? It turns out that everything is simple, the operation of a ceiling infrared heater, like a wall-mounted one, is possible in non-insulated buildings, in drafts and even on the street. The main thing is to be within the range of infrared radiation.
A device that emits infrared waves will create a zone of comfortable heat in front of it, leaving the rest of the room unattended. It will warm up after a few hours from heated objects. But the fact remains: in a room where 1 kW of heat is needed for heating, people install a 500 W infrared heater so that the radiant heat is distributed as widely as possible. This creates the illusion of good heating, although in reality the temperature in the room remains dog-like; the laws of physics cannot be fooled.
The devices also have other disadvantages. For example, the design of an infrared heater in a suspended design implies a wasteful consumption of about 10% of the heat accumulating under the ceiling. This is a convective transfer of energy from the heated body of the device to the surrounding air, which remains there, under the ceiling. Various objects interfere with the operation of wall heaters; carbon and halogen heaters are annoying with their bright light, and micathermic heaters are expensive.
Working while people are away
If you choose an infrared heater correctly, then thanks to its performance characteristics it will allow you to efficiently heat the desired areas in the room and provide the opportunity to save significantly. But if you intend to leave the IR heater on while leaving on business, it is best to choose products with a metal plate for radiation
Attention: Quartz heaters should not be left running unattended for a long period of time.
This is due to the fact that quartz models of IR heaters have a spiral in the lamp, which heats up to a temperature of more than 500 degrees and can cause a fire. If a metal plate is installed in the heaters, then its heating temperature does not exceed 200 degrees. If there is a device to protect against overheating, they can be left on without fear.
When connecting IR heaters, external thermostats, fuses and differential devices should be used as protection equipment. Only if they are available can you guarantee that connecting the heater will be safe.
This is interesting: How to warm up concrete in winter?
Popular models
In PLEN film heaters, the role of the emitter is played by a screen made of reflective foil (aluminum), which is heated by a resistive element (metal thread) connected to the electrical network. The length of the emitted infrared waves is 9.4 microns. The temperature of the heating element is 40 - 50 degrees, which makes PLEN heaters absolutely safe for people and pets.
Film heater PLEN
The heating element and aluminum foil in PLEN IR heaters are separated from each other by lavsan (the domestic name for polyester) film. The entire structure is enclosed in a shell of the same material. The total thickness of all five layers of the PLEN heater ranges from 1 to 1.5 mm.
The maximum installation height of PLEN heaters on the ceiling is 3 – 3.5 m.
Infrared radiation in heaters of this brand is generated by a thin carbon fiber enclosed in a polymer shell. Peony heaters are low-temperature; depending on the settings on the thermostat, they can heat up to temperatures from 30 to 110 degrees. The maximum power of one heater is 500 W.
Power cord and thermostat with thermostat are included.
The service life declared by the manufacturer is 25 years.
Zebra film heaters are produced on the same production base as PLEN, but using more advanced technologies and materials. Thanks to this, we were able to achieve some improvements:
— the protection class has been increased to IP44 (for PLEN it is IP20), which made it possible to use IR heaters in rooms with high humidity;
— a third grounding wire has been added to the Zebra heater connection diagram;
— a series of “Multivoltage” heaters have been developed, capable of operating under voltage drops of up to 150 V.
Film heater installed on the ceiling
Features of infrared heaters
The infrared heater can be attached to a wooden surface
Infrared heaters are a unique opportunity to make life comfortable in summer cottages, apartments, and private houses. Today, such devices are also in great demand in offices and other similar institutions where a regulating thermal system is needed.
Can an infrared heater be used as a single heating system? A very interesting question that can definitely be answered in the affirmative. This type of heating is perfectly suitable both for the main heating system and as an addition. The difference will be expressed solely in the calculated power.
This type of heating has a number of advantages:
- It does not require huge expenditures of either money or labor to install powerful structures.
- Characterized by silent operation and automation.
- Guarantees safety and environmental cleanliness.
- Provides the possibility of zone heating. At the same time, it can maintain different temperatures in two different zones.
The device can be installed for zone heating
The infrared heater is easy to install, attach and use. It begins to perform its functions as quickly as possible, providing a high level of comfort in its area of operation. A huge advantage of using this type of heating is a small percentage reduction in moisture in the room. That is, there is no problem of dry air.
To get the maximum benefit from using such a useful installation, its installation should be carried out correctly.
This is interesting: Types of heated floors - overview of features and main advantages
Where is it used?
Infrared heaters are widely used today. Depending on the characteristics, functionality and options, they are used to solve the following problems:
- For organizing main and auxiliary heating;
- When arranging spot heating of certain areas indoors;
- For the purpose of heating a specific area in an open space - a playground, an outdoor cafe and others;
- For mass and outdoor events that are held outdoors and indoors;
- When carrying out construction work in winter.
In addition to the areas discussed, infrared heaters are great for apartments, cottages, houses, garages, heating chicken coops and greenhouses.
Required tools and materials
In order to quickly and easily install an infrared heater on the ceiling, you will need the following tools:
- Drill or screwdriver (drill holes for fastenings).
- Pliers (for shortening wires).
- Indicator screwdriver (determine phase and zero).
- Metal detector (optional, used to search for wiring and metal objects in the wall, so as not to accidentally hit these objects when drilling holes. You can make your own metal detector from improvised means.
- A simple pencil and a construction tape (mark the mounting points on the wall).
- Demountable electrical plug.
- Three-core copper cable, cross-section 2.5 mm2.
- Wall mounts (purchased as needed, as only ceiling brackets are included in the kit).
Having collected all the necessary list of materials and tools, you can proceed to mounting and connecting the heater..
Where and how to install an IR heater?
The location of the infrared heater depends on its type and heating plan. It can be installed on the ceiling, on the wall, with or without a slope.
Safety precautions
Remember that installing IR heaters is working with electricity
Therefore, it is important to maintain maximum caution and follow safety rules:
- Never install the heater near fire hazards.
- Electrical wiring must be laid on a non-combustible base.
- The fastening elements must not touch the heating element.
- Do not install devices with a power of more than 800 watts for a residential building or apartment.
- Do not connect the heater to the network until installation is complete.
To use the heater more efficiently in your home, place it near materials that have high heat absorption rates, such as wood, carpets, and stone walls. U
You should not install the heater near reflective surfaces, this will reduce the efficiency of the device.
The mounting surface must be strong enough, as some heaters can weigh up to 28 kg, although many, of course, are lighter.
Location and height from the floor
Room Recommended location Bedroom Area above the head of the bed so that at least ⅔ of the bed is exposed to IR radiation. Kitchen It is recommended to install the heater so that its rays are directed towards the window, the place where cold air flows from the street into the room. Bathroom On the ceiling, if this is the only source of heat in the room, or opposite a small area where people most often visit, if the IR heater is considered as an additional source of heat. Hallway On the ceiling, pointing down to the floor. It stays warm and dries very quickly. The same goes for shoes - they also dry quickly and remain warm.
However, it is important to clean it so as not to dry it out, thereby spoiling it.
Next Post
This is interesting: How to properly install a hob in a countertop: lay out point by point
Working instructions
The film must be attached according to the following scheme:
- An initial plan is drawn up, which marks exactly where the film will be located. If you plan to use it as the main heating, then the coverage area should be about 70 percent of the total.
- The power is calculated, based on which it is determined whether the existing wiring is able to withstand the current that will be achieved when starting the IR equipment.
- A 5-millimeter layer of thermal insulation material with an additional reflective layer is fixed on the ceiling. The insulation is fixed using screws or dowels; the joints are additionally reinforced with tape.
- The required quantities of film are prepared. It must be remembered that the material can be cut only along special lines, observing the minimum permissible cut length, depending on the manufacturer.
- The wires are connected to the copper bars of the material. When the required contact density is achieved, it is isolated and fixed.
- Based on calculations of current strength, wires are prepared whose cross-sectional area exceeds one and a half millimeters. The strips are connected in parallel; it is important to remember that the total power of all IR elements connected to the temperature controller should not exceed its own power. If a large load is expected, a separate wiring with a safety switch is formed.
- The heating elements are fixed on the heat-insulating layer, while it is necessary to avoid contact between adjacent strips, the formation of air cavities and loss of tightness, which can provoke corrosion of conductive elements.
- The reliability of the fastenings is checked, a test run is carried out, including at full power, in order to promptly find and eliminate possible weak points.
- The final decorative finishing is carried out using the previously selected material.
[my_custom_ad_shortcode5]
How to install an infrared heater yourself
Infrared panels are gaining more and more popularity every year. They are easy to use and provide quick heating of the room, and the built-in thermostat allows you to set the desired heating temperature in a few clicks. Moreover, installing infrared heaters yourself is quick and easy if you follow the instructions. Other advantages of this equipment include:
- long service life;
- noiselessness;
- safety;
- spot heating;
- Possibility of use in open space.
It is not surprising that many people are interested in installing infrared heaters themselves. This process does not require special skills and takes from 25 minutes to an hour and a half.
Preparation
In order for the installation of an infrared heater to go as expected, you must have the following tools:
If necessary, more complex equipment can be used. For example, if you are interested in installing several infrared heaters with your own hands, it is best to use a pyrometer for calculations. It will allow you to determine the warmest and coldest places in the room. Based on the information received, you will select the optimal location for each device.
Safety precautions
There is a set of measures that will prevent accidents both during installation and during operation:
- Do not install IR panels near flammable or explosive objects;
Electrical cables must be laid on a non-combustible base;
The fastener should not touch the heating element;
The height at which the panel should hang is 2.5-3.5 meters;
For a house or apartment, devices with a power of no more than 800 watts are purchased.
The device must not be turned on until installation is complete. The device must have an appropriate degree of protection if the panel is installed in a bathhouse or sauna. If all these rules are followed, the installation of an infrared heater will be quick and easy.
Installation recommendations
When installing infrared heaters with your own hands, the distance between the ceiling and the body must be at least 3 millimeters. In country houses, the panels are taken outside to heat the external space, for example, a summer kitchen. In such cases, to increase efficiency, it is necessary to place thermal insulation material or foil under the housing.
To make the installation of an infrared heater as simple as possible, it is better to place the panel with the connector facing the wall. Most models have self-clamping contacts. The delivery package includes elements for attaching the device to the ceiling.
The installation process includes the following steps:
- remove the device from the packaging and place it on any flat surface with the heating plate down;
- mark the installation location and make several holes;
- screw in the screw rings;
- hang the chains, adjusting the height (if necessary).
As you can see, installing infrared heaters with your own hands is not a particularly difficult process. The panels can also be mounted on the wall, but the heating effect will be significantly less.
Installation of different models of IR heaters:
Network connection
The device is connected to a thermostat, which will maintain the desired temperature. This is done through three terminals: “ground”, “phase” and “zero”. Accordingly, the supply cable must be three-core. As an option, you can use PVA 3x1.5.
The ends of the cable are connected to the terminals. The polarity is indicated on the ends of the wires. After the device is installed and connected, it is advisable to wipe the panel with an alcohol solution before turning it on.
Connecting multiple devices
If you are interested in installing infrared heaters with your own hands in large rooms, then you need to take into account that you will need several devices. To ensure coordinated operation, all panels are connected to one thermostat. This will allow you to effectively regulate the temperature throughout the facility.
Installation rules
Many homeowners have found themselves in a situation where batteries interfere with the placement of large household items in a room. Installing an infrared heater on the ceiling will avoid this problem.
This device does not attract too much attention, but at the same time allows you to achieve uniform heating of the space in the room
Installation of heaters is carried out together with laying of thermal insulation and finishing work. As a result, the equipment is virtually invisible.
The installation will be correct only if the following conditions are met:
- a safe distance is maintained from the emitter to interior items, walls, electrical sockets, switches and people;
- During installation, special brackets, hooks and dowels are used;
- Ceiling materials are heat resistant.
Effective mounting is an important requirement for proper installation of infrared equipment. Individual heaters are mounted on suspensions
In this case, the cover is removed from the device, and the suspensions are directed into the grooves. After this, the cover is returned back, and the equipment is put in its place.
To ensure proper installation work, you must connect the grounded electrical cable to the terminal block. Before connecting the equipment, you need to apply alcohol to it, and only after the surface has dried, connect the device to the network. Next, the heater must work non-stop for a couple of hours (to evaporate the lubricant from the manufacturer).
Connection security
Safety when using infrared heaters, as well as any other electrical appliances, should always come first.
One winding of the transformer captures the input current, and the second the output. If the slightest imbalance occurs, the core moves and opens the power relay.
The differential protection also includes fuses, which are necessary to protect the infrared heater from overloads.
In order for such protection to work effectively, grounding is required. This is necessary to avoid the return of electric current. Grounding in its characteristics is in many ways similar to a zero drive, but unlike it, it allows the current to escape without entering the protector. Grounding should have minimal resistance. The thickness of the resistance must allow the passage of leakage current of any magnitude. Knowing how to connect an IR heater taking into account all safety standards, you can protect yourself from unpleasant consequences.
Varieties
They are divided into two categories - electric and gas appliances. The first ones operate from a household electrical network and are equipped with electric emitters. They are characterized by extreme structural simplicity, which ensures their compactness. However, this comes at the cost of high energy consumption.
Gas IR heaters operate from liquefied gas. Their main advantage is autonomy - they do not require access to the power grid to operate. They are in little demand at home; most often they are used for heating open street areas and industrial buildings. Some models operate using built-in miniature gas cartridges.
Example of power calculation
Before you begin the process of installing infrared heaters, perform calculations of all rooms in the house. The following values will be used as an example:
- corridor – 5 m²;
- kitchen and living room – 20 m²;
- two bedrooms of 10 m² each;
- storage room – 3 m²;
- bathroom – 5 m².
Figure 2. Connection diagram for IR ceiling heater.
The total area is about 53 m². It is necessary to select a number of infrared heaters that would be sufficient to heat all these rooms. The connection diagram must include all places where installation needs to be done. Determine the total number of infrared heaters based on their power.
In this example, 2 1000 W heaters will be needed to heat the kitchen and living room. Each of them will heat 10 m². In each bedroom you will need to install 1 thermostat - a 1000 W device. To heat the corridor, storage room and bathroom, devices with a power of 500 W will be sufficient. As a result, the total power will be about 5.5 kW. The system connection diagram is as follows: Fig. 2.
Heaters must be installed at a certain height. As a rule, this value fluctuates between 220-350 cm. The heater cannot be installed at a height of less than 50 cm from a person’s head. It is not advisable to connect them where a person is constantly present. For example, it is recommended to exclude installation through the living room or kitchen. To prevent the head from being exposed to infrared radiation, the heater can be moved slightly to the side.
It is important to maintain distances between infrared heaters and surfaces
Main process
Hanging the case
First you need to determine the installation location of the infrared heater in the house (or apartment). As we said above, the housing can be placed both on the ceiling and on the walls, depending on the individual preferences of the owners.
The first thing you need to do is mark out the mounting locations yourself. To do this, use a tape measure to measure the same distance from the ceiling to the selected area. It is also recommended to use a building level, with which you can level the brackets in a horizontal plane.
After marking, proceed to drilling. If the ceiling (or wall) is made of wood, drill holes with a drill. If you have to deal with concrete, you cannot do without a hammer drill. You need to drive dowels into the created holes and screw in the brackets, after which you can install the infrared heater in its place.
Please note that the design of the unit varies. Some products have guides that are fixed into brackets. A simpler option is chains attached to the ceiling (special holders attach to them)
Also on the market you can see infrared heaters on a leg, which are simply placed on the floor
A simpler option is chains attached to the ceiling (special holders attach to them). Also on the market you can see infrared heaters on a leg, which are simply placed on the floor.
Electric installation work
As we said at the beginning, the process of connecting an infrared heater to the network will be carried out using a temperature controller.
First you need to connect the contacts of the collapsible electrical plug to the thermostat terminal blocks, which are installed in the product body. Each “socket” has its own designation: N – zero, L – phase. It should be noted that there are at least two of both zero and phase terminals (from the network to the regulator and from the regulator to the heater). Everything is quite simple - you strip the wires, insert them into the seats until they click (or tighten the screws). Be sure to follow the color coding of the wires so that the connection is correct.
For your attention here are the correct connection diagrams:
As you can see, connecting an infrared heater through a thermostat is quite simple, the main thing is not to mix up the wires and tightly tighten them in the terminal blocks.
A very important nuance is the correct choice of location of the regulator. You should not install the product next to a heater, because in this case, the incoming warm air will negatively affect the accuracy of the measurements. It is best to place the device in a more distant area, at a height of one and a half meters above the floor.
Also note that you need to install the controller in the coldest room, otherwise the heating problem will not be completely solved. As for the number of infrared devices served by one temperature controller, it all depends on the power of the heaters. Typically, one 3 kW controller is used for several products, with a total power of no more than 2.5 kW (so that there is a reserve of at least 15%)
Typically, one 3 kW controller is used for several products, with a total power of no more than 2.5 kW (so that there is a reserve of at least 15%).
You can read more about connecting a thermostat to an IR heater in our separate article, which provides several installation diagrams!
So that you can clearly see the entire connection process with your own hands, we provide these lessons for viewing:
Video instructions: connecting an infrared heater with your own hands
How to connect a temperature controller