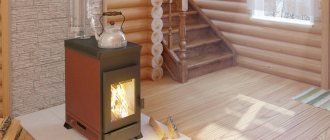
For most vehicle owners, a garage is more than just a place for storing, repairing and servicing them. Here you can retire, relax, indulge in your hobbies and simply spend leisure time with friends. It is uncomfortable to do this in the cold, and temperature changes have a negative effect on the room with all its contents. The solution to the problem of frost, dampness and condensation is to install a stove in the garage. This procedure is simple, but requires taking into account many small but important nuances.
Features and principle of operation of a potbelly stove
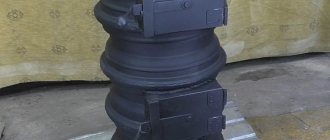
A wood-burning potbelly stove of simple design can be made from metal sheets or disks.
Autonomous mobile stoves (potbelly stoves) have a long history and a wide range of applications. Despite the development of technology and the invention of new efficient and compact heating devices, they do not lose their relevance. Working on almost all types of fuel, the stoves do not depend on the availability of electricity, water, gas, time of year and weather conditions. Despite the low efficiency (up to 0.7), the products are often the only means of heating small rooms, both within a populated area and in completely deserted areas.
A traditional potbelly stove for a garage has the following device:
- frame;
- the combustion chamber;
- ash pan;
- chimney.
The operating principle of the products is simple. Solid fuel is loaded into the firebox and set on fire. Combustion is maintained by fresh air entering through the ash pan and grates. The ash falls into the ash pan, the smoke comes out into the chimney, the walls of the housing and the chimney emit heat and heat the room. During the operation, new portions of fuel are added, the ash is removed from the tray and placed in a waste container.
Fuel selection
The size of the potbelly stove can be very different, but the mechanism of operation is similar for all. The combustion material is placed in the firebox.
The cheapest option is to heat the room with wood:
- In the firebox of a potbelly stove, logs are placed in a cage or in rows.
- Then wood chips or paper are placed in the very bottom row to light the logs.
- The door is closed and the intensity of combustion is controlled by blowing.
- Wood fuel smolders for several hours, so the room warms up completely and for a long time.
When installing some models of potbelly stoves, the use of waste oil as fuel is allowed.
Pros and cons of using potbelly stoves for heating
The stove will require a chimney.
The decision to put a potbelly stove in the garage is made by car enthusiasts quite often, and there are numerous justifications for this:
- complete autonomy, independence from internal and external conditions;
- quite decent heat transfer in relation to the fuel consumed;
- rapid heating of the housing, and therefore the room;
- no need for complex installation - only a flat base and a hole for the pipe;
- no permit required;
- possibility of improvement for mining and gas burner.
The heater also has disadvantages:
- simple and even unpresentable appearance;
- low efficiency due to the loss of half of the thermal energy literally into the pipe;
- you need a high chimney to ensure good draft;
- the need for frequent cleaning of the housing and pipes;
- requires frequent loading of fuel;
- risk of carbon monoxide poisoning.
With the right approach to installation and operation, almost all problems can be completely or partially solved.
Chimney maintenance
Despite the apparent simplicity and unpretentiousness of the design, the chimney for a potbelly stove will need periodic attention. First of all, this will have to be manifested in regular inspection of the pipes for the appearance of rust, signs of burnout or cracks.
The presence of any of these defects should be a signal to immediately replace the damaged section of the chimney. Left unattended, it will sooner or later turn into a source of danger for the residents of the house. In the best case, smoke will leak through the cracks; in the worst case, a burnt-out pipeline may simply collapse.
It is equally important to take care of the internal surface of the chimney, on which soot and ash will invariably accumulate during operation. The presence of a thick layer of soot can have several negative consequences:
- Craving decreases.
- Normal smoke removal is impaired.
- The chimney structure becomes heavier.
Accumulated soot can be removed using special chemical compounds that are applied to the firewood. Their components are completely harmless to human health, but for soot they are a truly formidable weapon.
Ordinary aspen firewood has almost the same effect. It is desirable that the aspen smolder little by little and not burn out quickly.
In structures equipped with additional elements, it will be enough to just cover the vent.
But traditional cleaning methods (metal brush, core, brush, high temperatures) will not work here, since thin iron may simply not withstand it.
Preparatory work
After choosing a finished product or drawing up a homemade project, you should decide on the installation location and prepare it. It is advisable to install it near the far wall in the corner or in the middle. This way, the generated heat will not escape through the door, but will be reflected from the walls and fill the room.
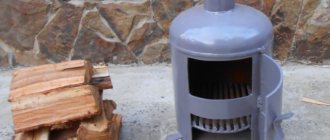
Potbelly stove from a gas cylinder
The following points should be taken into account:
- If the floor is earthen, it is necessary to make a separate foundation for the hearth. You will need to lay a steel sheet on a wooden or polymer base.
- In the lower part of the building opposite from the stove, you need to make an vent. It is needed to ensure good draft and oxygen flow into the firebox.
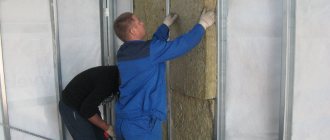
- It is necessary to retreat from the wall by 50-60 cm - this will reduce heat loss. If they are made of flammable material, iron or asbestos lining will be required.
- Consider in advance where the pipe will pass through the supporting structures. The best option is to exit through the wall at two 45-degree angles.
- Provide an umbrella on the chimney. This detail will save you from snow, debris, birds and strong gusts of wind getting into it.
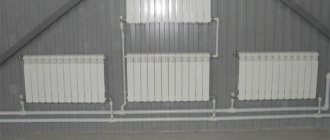
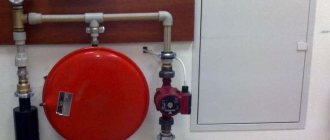
In addition, options such as a heat exchanger, water circuit and external radiators can be developed.
Calculation of basic parameters
Heater parameters are calculated based on criteria such as the size of the garage, the availability of free space and the climatic conditions of the region. One of the points is to determine the height and diameter of the chimney. A cross section of 100-150 mm is considered optimal. To minimize the amount of carbon deposits, it is better to overpay, but install porcelain or coaxial pipes.
How is a garage cooled?
Galileo's square-cube law is used in thermal mechanics. It states that the heat transfer surface increases in proportion to the square of the size of this surface, and the heat-producing volume varies in proportion to the cube.
This means that the energy for heating will decrease as the surface area increases. It follows from this that you need a powerful stove with high heat output to compensate for heat loss and heat the air in the garage to the desired temperature.
Required materials and tools
To make a stove, you will need experience with a welding machine.
To assemble a garage potbelly stove with your own hands, you will need the following devices:
- grinder with cutting and grinding disc;
- welding machine;
- roulette;
- level;
- drill;
- screwdrivers;
- spanners;
- perforator;
- hammer;
- ladder.
The following materials are needed:
- old gas cylinder;
- sheet metal 3-5 mm;
- iron handles;
- fittings;
- iron pipes;
- clamps;
- bolts and nuts.
To ensure safety precautions, you should prepare a robe, a protective mask and goggles, a gauze bandage or a respirator.
Step-by-step instruction
A stove made from a metal barrel.
The standard sequence for assembling a potbelly stove:
- Drawing up diagrams, calculations, purchasing building materials, preparing tools.
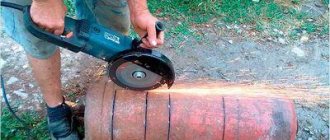
- Cleaning the body blank. The remaining propane is released from the old gas cylinder. The lid is twisted and the inside of the container is washed several times with soapy water.
- Cutting a hole for the firebox. It is done at a height of at least 15 cm from the bottom. Such clearance is necessary for the free movement of the ash pan. You can immediately cut an opening for a drawer for ash.
- Manufacturing or purchasing factory-made grate bars. The gratings are made with your own hands from reinforcement or sawn and welded strips of cast iron.
- Welding to the support body. They should be 10-15 cm high. The metal should be strong and thick so that reliable seams can be applied to it with electrodes No. 3-4.
- Welding supports for grate bars. The best option is a corner of 20x20 mm. The distance between the shelves should be taken 3-4 mm larger than the width of the grate - for its thermal expansion during strong heating.
- Making an ash pan, a door and a poker.
- Screwing the door to the body. Inserting the ash drawer into the opening.
- Assembly and removal of the chimney to the street.
Finally, a control fire is carried out. If there are smoke leaks, clamps and asbestos cord are applied to these places.
Popular manufacturers
The modern market provides its products for heating a garage with a wood-burning stove. Popular models are:
- Buleryans of the “Klondike” series (cost from 10,000 to 60,000 rubles).
- Long-burning stoves with a cooking surface “Tulinka” and “Thermal” (their price ranges from 7,000 to 15,000 rubles).
Thermal
Tulinka - Long-term combustion installations with a water circuit “Aqua-Siberia” (cost from 30,000 to 60,000 rubles).
- Potbelly stoves and bulerians of the “Vesuvius” type (price from 3,000 rubles and above).
- Heating and cooking stoves “Zharstal”, for example the Teplushka-200 model (their cost starts from 5,300 rubles).
- Ermak long-burning stoves, their prices are similar to the Zharstal stove models. Model example: Stoker.
- Heating consoles for garages, summer houses and cottages “Teplodar” (their price ranges from 7,000 to 20,000 rubles). Model: T-100.
Safe installation of the heating device
For safety, the stove is installed on a foundation or metal sheets.
When installing and operating the stove, the following safety precautions must be observed:
- install protective screens made of sheet iron under the fireplace and on nearby objects;
- insulate the passage through the wall with non-flammable compounds - clay, brick, asbestos;
- do not make right angles on the chimney, avoid horizontal sections of more than 200 cm;
- It is prohibited to melt fuel with explosive substances - alcohol, acetone, gasoline;
- keep fuel no closer than 100 cm from the operating firebox.
If possible, do not leave the potbelly stove unattended.
Treatment of wood against fire
Additional means of protecting wooden structures located in the immediate vicinity of an iron stove are fire-retardant impregnations and mastics. Beams, load-bearing structures, floors and walls adjacent to the furnace are subjected to this treatment. Mastic has a higher level of fire protection, and the impregnation is almost colorless.
Fire retardant treatment can be carried out by both representatives of the Ministry of Emergency Situations and the owners of a wooden house. In the latter case, before starting to operate the stove, it will be necessary to obtain a certificate from the inspector of the Ministry of Emergency Situations about the compliance of its installation with the requirements of the safety regulations.
All leading European and Russian manufacturers of solid fuel stoves describe in detail the rules for installing equipment and fire safety requirements in their technical documentation.
Operating rules
Once a year it is necessary to clean the chimney.
Theoretically, you can light the stove with anything that burns. But the best option is firewood, which can often be collected for free in sufficient quantities.
The following rocks burn with minimal fuel release:
- birch;
- cherry;
- acacia;
- apricot;
- willow;
- aspen;
- oak.
It is recommended to avoid conifers such as spruce, pine and larch. When they burn, creosote is formed on the walls of the chimney, which can ignite under high heat.
Cleaning must be carried out in the firebox and chimney. This should be done monthly for constant use, and every 20 fires for periodic use. The best option is a plastic, copper or brass brush. You need to start cleaning from the top, gradually moving down as the lumen becomes clearer. If complications arise with the mechanical option, the carbon deposits can be burned off with potato peelings or aspen firewood. It’s even easier to use specialized household chemicals.
Do-it-yourself wood-burning garage oven: safety rules
A self-made potbelly stove for a garage must first of all be safe. When using it, the following rules must be observed:
- the floor and walls around the stove must be made of refractory material : tiles, iron, plaster, brick. It is permissible to cover the walls with special plasterboard;
- flammable objects or substances near the stove
- the stove can only be built from proven quality materials;
- the garage must be equipped with a ventilation .
A DIY garage wood stove Therefore, ventilation of a garage equipped with a potbelly stove is extremely important for two reasons:
- if there is a lack of oxygen, the fire in the stove will go out or burn weakly;
- Excess carbon dioxide indoors can cause poisoning or death.
To remove combustion products from the garage, it is necessary to install a chimney , but if problems arise in the pipe, ventilation will prevent the garage from catching fire or poisoning the people in it.
The necessary access to fresh air can be ensured by leaving a small (up to 5 cm) gap under the gate or by making several ventilation holes under the roof.
Do-it-yourself wood-burning stove for the garage:
Selecting a location
It is best to install a potbelly stove in the corner of the wall opposite the gate. The heat emanating from the far corner will warm the room and remain in the garage even when the door is opened. The distance from the wall to the stove can be about 0.5 m if the walls are made of brick, iron or any non-combustible material. With wooden walls, it is better to move the stove 1 m and cover the walls with bricks, tiles or cover them with a steel apron.
IMPORTANT: The minimum distance from a homemade stove for heating a garage to a car and any objects that can burn is 2-2.5 m .
Reducing this distance increases the likelihood of fire and poses a threat to the paintwork of the car. An iron sheet is placed underneath the stove or the floor surface is cemented within a radius of 1-1.5 m. Thanks to this, coals that accidentally fall out of the stove or flying sparks will cool down without causing a fire in the garage.
Brick walls lined on the sides and end of the stove increase safety and increase the heat transfer The slowly cooling brick will maintain the temperature in the garage for several hours after the furnace has finished firing.
brick a square or rectangular stove yourself Incorrectly covering a cylindrical potbelly stove with stone can lead to a reduction in heat transfer to the room and rapid burning of the metal walls of the stove. increase the heat transfer of a furnace made from part of a pipe by welding metal ribs to its sides.
The dimensions of the potbelly stove for the garage are:
- height 50 cm (body 30 cm and legs 20 cm);
- width 30 cm;
- length 50 cm.
When making a potbelly stove from a metal pipe, the diameter of the latter must be at least 30 cm. For any stove shape, the minimum metal thickness is 5 mm.
Do-it-yourself wood-burning stove in the garage - drawings:
Fuel reserve
Firewood is the most popular fuel for garage stoves. They allow you to quickly warm up a room and are inexpensive (or you can prepare them yourself, i.e. get them for free).
For a potbelly stove , well-dried (preferably aged for more than a year) firewood, sawn 25 cm long and stored in a ventilated place protected from precipitation, is suitable. A shed is ideal for storing firewood , but you can also store it under a canopy. When choosing fuel , it is worth considering that different wood produces different amounts of heat:
- pine, spruce and larch burn out quickly and provide little heat;
- oak, birch, acacia, pear, apple, cherry and maple have greater density, burn slower and give more heat.
In addition, when burning coniferous trees, a lot of soot , which settles on the chimney and creates a fire hazard. Burning birch is no less dangerous - the released tar mixes with soot and settles in the pipes and on the walls of the firebox.
The most dangerous fire method is burning coniferous or birch wood in smoldering mode. Resins and tar settle on the pipes and impregnate the brick; it is impossible to clean them off mechanically.
It is advisable to stock up on firewood a year or two before use. Delivery can be ordered online or through advertisements in local newspapers. But you can stock up on firewood for free:
- in forest areas, obtain permission to cut down trees in a certain area (you will need to collect documents and spend time visiting authorities);
- collect dry trees and large branches fallen by the wind in groves, forest belts and courtyards;
- go to the nearest sawmill , where wood waste is burned or allowed to be picked up by those who wish (you may need a small remuneration for workers);
- find an area where furniture factories are cutting down forests - branches, tops and root parts of trees remain in place, which can be cut down and taken away.