Installing plastic windows and insulating the floor on the balcony allows you to fully use the room in winter. For insulation, mineral and synthetic materials are used, placed under board flooring.
After laying the protective layer on the balcony, you can grow plants all year round or set up a recreation area or a small workshop.
Insulated loggia.
Insulation materials
To reduce heat losses, 2 types of insulating materials are used:
- reflective (for example, roll insulators with an external foil coating that returns heat flow to the room);
- preventing, forming a layer with reduced thermal conductivity (for example, foam or expanded clay).
Criterias of choice
When selecting material, take into account:
- thermal conductivity - when the thermal insulation coefficient drops, the protection of the room from cooling improves;
- vapor permeability, which determines the level of humidity - with a reduced parameter, installation of waterproofing and regular ventilation of the balcony is required;
- ease of installation and service life of the protective coating;
- price (the criterion is secondary, since the volume of insulation for a standard balcony does not exceed 0.3-0.5 m³).
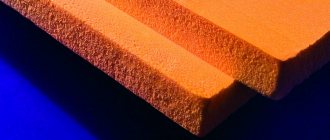
Penoplex
The material is based on foamed and compacted polystyrene foam, has a high density and is resistant to water and chemicals (with the exception of organic solvents).
The sheets have projections and grooves for joining into a monolithic slab, preventing the formation of cooling bridges.
For flooring, foam plastic with a thickness of 20 to 150 mm is used, intended for foundations or facades of houses. The disadvantage of the material is the increased price (for example, sheets 80 mm thick will cost 4.9 thousand rubles per 1 m³).
Penoplex for floor insulation.
Styrofoam
Sheet foam plastic has a reduced thermal conductivity coefficient and does not allow water vapor to pass through, and is destroyed under the influence of organic solvents.
It is not recommended to store the material under sunlight, which negatively affects the performance.
Additional additives have been introduced into construction foam to help reduce flammability and self-extinguishing when exposed to open fire. The material has a service life of 5-7 years and has low resistance to rodents, which bore passages inside the sheets.
Polystyrene foam on the balcony floor.
Expanded clay
Bulk material with a high thermal conductivity coefficient; protection requires a layer up to 200 mm thick, which leads to the rise of the floor covering.
It is allowed to fill expanded clay with a concrete solution that forms a screed (subject to the strength of the concrete slab). The material has good vapor permeability and makes it possible to create a combined type of thermal insulation (for example, after backfilling with gravel, fiber-reinforced gypsum slabs are laid on top).
Expanded clay for the balcony floor.
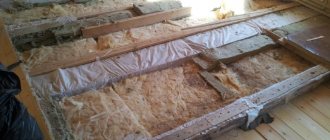
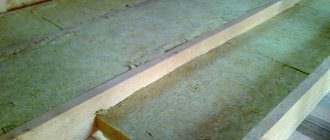
Mineral wool
Mineral wool is supplied in the form of sheets and rolls. The cut pieces are placed between wooden guides. The material is fireproof, but actively absorbs water with loss of initial characteristics.
Cotton wool contains glass, so installation work is carried out using protective equipment. During operation, the material begins to crumble, releasing fine dust.
There is basalt wool that does not contain glass and is characterized by an increased service life and a reduced thermal conductivity coefficient.
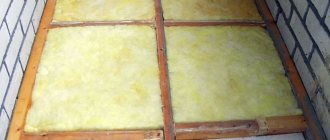
Mineral wool is laid in a wooden frame.
Tips for installing Penoplex
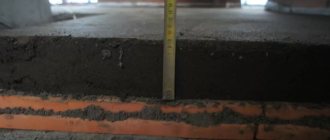
- If installation of insulation in two layers is required, then the slabs are arranged in a checkerboard pattern;
- recommended screed thickness is at least 4 cm;
- if the screed is reinforced, then the distance from the insulation to the reinforced fabric should be at least 1-1.5 cm.
Using Penoplex, you will reduce heat loss in the room, a significant part of which occurs on the floor.
And with a “warm floor” system, the material will not allow the loss of precious heat, heating the ceiling to the neighbor below.
Installation of Penoplex is easy, and the result will please you for many years.
Source: floordigest.ru/ustroystvo-montazh/uteplenie/uteplenie-pola-penopleksom.html
Balcony vapor barrier
After installing the sheathing (regardless of the method of assembly and fastening) and filling the voids with thermal insulation, it is necessary to lay a layer of film to prevent saturation of the protective layer with water vapor.
The material is rolled out over the surface and secured to the crossbars with staples for a construction stapler. The edges of the panels should overlap each other by 100-150 mm. Boards or plywood are placed on top of the insulation under linoleum or another type of finish.
Performing a vapor barrier on the balcony.
Required tools and materials
The minimum set for work includes:
- thermal insulation material (the volume depends on the area of the balcony and the thickness of the layer, it is recommended to buy with a margin of 5-7%);
- material for vapor barrier (used when laying soft insulation);
- waterproofing;
- primer with antibacterial additives;
- wooden beam of rectangular or square cross-section (volume and dimensions depend on the dimensions of the balcony and the thickness of the layer of insulating materials);
- fastenings for the frame (special supports or studs);
- mounting foam and application gun;
- screws for fixing the frame supports to the concrete base;
- screws and angles for additional connection of timber;
- masking tape for gluing connection lines of insulation sheets;
- sheets of plywood or particle board to cover the base;
- material for finishing (linoleum, laminated or piece parquet or tongue and groove board).
To install thermal insulation on a balcony, you need the following tools:
- hammer drill and drill for drilling concrete;
- an angle grinder and a set of discs for concrete;
- electric drill or cordless screwdriver;
- hacksaw or jigsaw for cutting workpieces;
- hydraulic level;
- drawing and measuring tools.
One of the necessary tools.
Collector system
The collector is a distribution unit consisting of two combs with a pump. It supplies hot water through pipes and regulates the entire system. The installation is carried out in a special collector cabinet. If possible, then into a hollowed-out niche on the balcony. It is recommended to place the cabinet in a place where the supply and return pipes can easily enter.
Collectors are:
- Electronic. Specially programmed for a specific temperature in the system.
- Mechanical. The temperature is controlled manually.
Boiler selection
Before purchasing a boiler, you should calculate the power. It must cope with the system load and have additional power reserves. Therefore, the boiler power should be equal to the power of the underfloor heating plus 10-15%.
When carrying out any additional work, in order not to drain liquid from the system, the boilers have shut-off valves.
Preparing for insulation
At the preparation stage it is necessary:
- Clean the room of furniture and remnants of old flooring.
- Assess the condition of the base and then remove the loosened cement.
- Restore the screed and ensure waterproofing of the future insulated floor.
Assessing the condition of the balcony slab
The apartment owner can visually assess the condition of the balcony slab and remove the layer of loose coating using an electric or manual tool.
If damage to the edges or deep cracks is detected, then it is necessary to carry out an examination of the base by a specialized organization. Operating a balcony with a damaged slab is not allowed; additional load leads to the collapse of the base and injury to people.
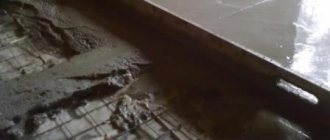
Carrying out repair work
Algorithm for preparing the base:
- Clean the cracks from loose cement and dust.
- Apply a layer of primer to ensure improved adhesion of finishing materials.
- Fill the gaps between the slabs with foam and install an insulation bead.
- Deepen small cracks with an abrasive tool, then clean off dust and fill with soil. If the faults are long, then it is necessary to cut transverse grooves for laying reinforcing elements (for example, galvanized screws or pieces of steel reinforcement).
- Seal the cracks with a cement composition that is resistant to temperature changes.
- If there are potholes on the surface, then it is necessary to install beacons at a level and fill the floor with cement mortar. Further work can be carried out after 10-15 days (after the moisture has evaporated).
Sealing cracks in the floor.
Surface waterproofing
To protect the insulator from condensation, sheets of roofing felt are used, which are laid with an overlap. The joints are sealed with bitumen mastic and the material is heated with a blowtorch.
Refusal of waterproofing leads to accelerated rotting of wooden logs and destruction of thermal insulation. When using synthetic roll insulation material with a metal backing, moisture protection is not required.
Waterproofing the floor.
Common mistakes
Insulating walls from the inside is a very important technological process that has no room for error.
If the insulation was carried out incorrectly, then condensation will form on the walls of the loggia (the so-called “crying walls” effect). This is explained quite simply: upon contact with a cold wall, warm air condenses. If too much moisture accumulates, the thermal insulation material will begin to lose its properties, and fungus will appear on the surface, gradually destroying the structure.
If the loggia periodically leaks, then all seams between the panels should be carefully sealed.
Instructions for insulating the floor on a balcony with lathing
Before starting the manufacture of the sheathing you must:
- Correctly and accurately determine the height of the flooring relative to the horizontal level in the adjacent room (the balcony should be located 20-30 mm lower). When determining the cross-section of the beam, it is necessary to take into account the thickness of the finishing coating (for example, tongue-and-groove boards or plywood with a layer of laminate).
- Check the slope of the balcony slab with a hydraulic level, which will allow you to clarify the method of fastening the wooden sheathing.
- Carry out a preliminary calculation of construction and finishing materials (taking into account a reserve of up to 10% in case of defects). When arranging the sheathing, it is recommended to place longitudinal beams along the load-bearing wall of the house and near the external partition of the balcony, and then mount the beam in the center. The number of cross ties depends on the length of the room and the width of the insulation used. When installing the timber, a gap from the partitions is maintained within 50-70 mm, which should be kept in mind when calculating the required amount of building materials.
- Impregnate wooden blanks with antibacterial primer and dry naturally (do not expose the material to direct sunlight).
- Mark the axes of symmetry of the longitudinal and transverse beams on the floor and walls of the balcony.
Installation of wooden sheathing at level.
Use of U-shaped parts
The sequence of actions when assembling the sheathing on the racks:
- Install metal brackets on the floor in accordance with the markings (support spacing is at least 500 mm) and attach to the base with anchor screws or dowels. The supports must have sufficient strength and not sag under the weight of the sheathing and additional load on the floor. A separate bracket must be provided for each crossbar.
- Remove debris and dust from the floor surface, and then lay thermal insulation material (for example, mineral wool), in which windows for supports must first be cut.
- Attach the wooden sheathing blanks with screws or bolts, checking the position with a building level.
- Install cross braces that are secured to the longitudinal beams with metal angles and screws.
- Fill the resulting voids in the sheathing cells with thermal insulation.
Installing the sheathing on the U-shaped rack.
Using studs
Sequencing:
- Install metal or plastic bushings into the drilled holes.
- Screw in the studs with special nuts, and then put the sheathing parts on the bolts. It is necessary to provide a niche in the beam for the hidden installation of a fixing element.
- Adjust the position of the frame horizontally using the previously installed nuts with an extended reference plane.
- Secure the frame with the top nuts, and then cut off the excess stud with an abrasive tool.
The correct assembly algorithm allows you to obtain a durable sheathing that can withstand increased loads.
Installing the frame on studs.
Board construction
If the balcony or loggia has a horizontal screed with a flat surface, then you can install a frame around the perimeter of the slab (at a distance of 50 mm from the walls).
To make the frame, use a pine board 30-40 mm thick. The structure is secured to the floor surface with steel angles and anchor bolts.
Then the lintels and central beam are installed, and the cells are filled with cotton wool or synthetic material. The resulting cracks are treated with polyurethane foam, eliminating the formation of cold bridges.
Fastening and assembling the frame to the floor.
Lathing made of bars
In rooms with a flat floor, you can assemble a sheathing from timber; longitudinal beams are attached to vertical surfaces with anchor bolts.
The internal elements are connected to the frame and to each other with angles and screws, the sheathing is additionally secured to the floor with polyurethane foam or liquid nails. The technology is not suitable for balconies with an uneven base, since it is difficult to set the position of each element.
Installing the frame on a flat floor.
Construction of two layers of timber
If it is necessary to raise the floor to a height of more than 200 mm, then use double lathing assembly technology:
- Lay the bottom row of beams and secure with screws or U-shaped angles.
- Fill the cells with thermal insulation material.
- Install the top row of sheathing, positioning the pieces at a 90° angle to the elements below.
- Connect the layers of sheathing with plates and screws.
- Lay the top row of thermal insulation.
Final work
When all the rough, dirty work has been completed, the waterproofing and insulation have been laid, the cherished moment comes: installation of the finishing coating. Upon completion of laying the floor, there is a feeling that several details are missing for the integrity of the picture:
- baseboards;
- rugs;
- paints on a wooden (concrete) floor.
This additional amount of work may not be performed, but without it the coating will not be complete.
If the floor is wooden, then lovers of everything natural, to emphasize the structure of the wood, presentability and additional protection, use alkyd varnish for exterior woodwork. It would be good if it has antiseptic properties and resistance to ultraviolet rays and moisture. The varnish can be either glossy or matte, with the latter looking more impressive.
Painted floor
It is enough to perform a simple procedure for painting a wooden or concrete surface using alkyd, oil-based or polyurethane paints. This procedure is as simple as possible, the main thing is the right paint. It is recommended to remove the old layer first, because... On old paint, new paint will not last long: peeling and bumpiness may occur. This will ruin the entire appearance of the finish and you will have to resort to drastic measures.
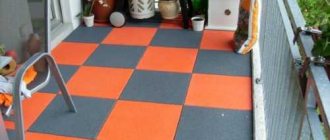
In search of interesting color solutions, you can paint both wooden and concrete floors with special paints: polyurethane, oil or acrylic paints for exterior use. You can use carpet as an additional insulating coating on top of tile floors and wood coverings.
A special anti-slip mat, or even several if the balcony area allows, acts as a decorative element and prevents falls on slippery tiles. They can be made in different sizes with different patterns, abstractions, 3D effect, transparent and even glowing in the dark. For cold floors, heated mats powered by batteries would be an interesting functional solution. Textile floor products will add coziness and homely warmth to a loggia or balcony.
Instructions for insulating the floor on a balcony without sheathing
To insulate the floor on a balcony using dry insulation without installing a wooden frame, you must:
- Prepare and clean the base from dust, and then lay a layer of thick plastic film extending onto the vertical planes. Individual strips must be laid with edges overlapping by 150-200 mm, and then connected with tape.
- Attach the material to the surface of the walls with adhesive 2-sided tape that compensates for temperature deformations of the film.
- Install metal beacons on the side surfaces, setting the position of the elements according to the level.
- Fill in expanded clay and level the surface with a rule that must be moved along the beacons.
- Lay gypsum panels equipped with connecting locks on top of the expanded clay. To increase strength, the joints should be coated with a special mastic.
- Install a finishing covering (for example, tongue and groove boards or sheets of waterproof plywood).
We lay the panels on expanded clay.
Choosing the type of insulation
The building materials market is very huge and diverse; choosing high-quality insulation is sometimes very difficult. Knowing what exactly you need to pay attention to will help make the task easier:
- Technical condition - reliability, integrity and strength
- Climatic features – dampness, condensation
- Characteristics of the balcony floor - solid monolithic slab and angle of inclination
- Is there a need to raise the floor or use a decorative covering?
The key operational parameter is the heat transfer coefficient, and for any heat insulator - the lower its value, the better the material.
| Thermal insulator | Heat transfer coefficient (W/m×K°) |
| Ecowool | 0,037~0,046 |
| Minvata | 0,046~0,08 |
| Expanded polystyrene and polystyrene foam | 0,030~0,040 |
| Glass wool | 0,034~0,06 |
| Expanded clay concrete | ~ 0,31 |
| Expanded clay | ~ 0,16 |
| Polyethylene (penoflex) | 0,131~0,037 |
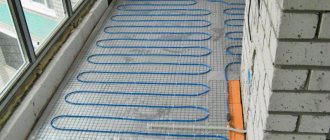
Installation of heated floors on the balcony
If the balcony already has waterproofing and screed, the owner can install electric heating of the surface:
- Cut the workpieces and place the sheathing of their timber with a cross-section of 50x50 mm on the floor surface. The elements must be laid in increments of 500 mm; if the room has a complex configuration (for example, a bend), then additional beams should be provided.
- Lay longitudinal logs on top, located at a distance of 50-60 mm from the vertical surfaces.
- Connect the elements with screws, and then drill holes through the beams and flooring (there should be 2 attachment points on each cross beam).
- Insert anchors into the holes and tighten the sheathing to the balcony floor.
- Place pre-cut foam sheets into the cells and fill the cracks with polyurethane foam.
- Wait until the foam hardens and cut off the excess with a knife.
- Lay a layer of plywood 20 mm thick on top and secure with screws in increments of 150-180 mm (the screw heads should be recessed into the surface to a depth of 1 mm).
- Lay down metal-coated backing and secure edges with 2-sided tape.
- Lay infrared film heaters on top and lay cables with a temperature sensor.
- Connect the wiring to the control unit, which is mounted in an accessible place.
- Lay a layer of film to protect the heaters from moisture and secure the finishing coating.
Warm floor on the balcony with infrared film heaters.
Finishing the floor
After installing the sheathing and filling the cells with heat-insulating material, it is necessary to install the finishing:
- tongue and groove boards followed by impregnation with special liquids or installation of carpeting;
- parquet boards that do not require further processing;
- elastic coating;
- ceramic or stone tiles;
- laminated or piece parquet.
Laying the finishing coating.
Laying wooden floorboards
To install decorative trim you need:
- Select the laying direction, which determines the size of the floorboards and the amount of material.
- Cut the pieces and lay them tightly on the base, attach each floorboard with nails or countersunk screws.
- Install decorative wall trim and attach skirting boards to cover gaps around the perimeter of the floor and improve thermal insulation.
Wooden floorboards on the balcony.
Why is thermal insulation necessary?
When thinking about the functionality of a balcony room, you need to understand that finishing work will clearly not be enough to turn it into a full-fledged room. Even high-quality glazing will not save the situation. It is necessary to close the space from the street, but this is very little. Temperature changes will leave no chance for new design and will make staying on the balcony as uncomfortable as possible.
Therefore, the first thing to do after glazing is effective thermal insulation. It will be required for all surfaces: ceiling, walls and floor. This is the only way to prevent heat leakage and, accordingly, make the heating devices operate more efficiently.
If the room will not be heated, the use of insulating materials will significantly smooth out temperature changes and make its use more comfortable.
Instagram balkony_vkazani
The latter option is especially relevant for areas with warm winters, where sub-zero temperatures are rare. But in any case, high-quality thermal insulation will be necessary.
- Balconies and loggias
How to insulate a balcony from the inside with your own hands: a detailed guide