Although the potbelly stove has a history of more than a century, it has not ceased to be a very popular heating device for small rooms.
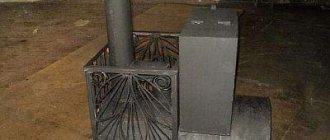
Potbelly stove from a gas cylinder
Such a stove is made not only from solid sheets of metal, but also from various metal objects that can withstand the heat from an intense flame - it could be a barrel, a flask, a pipe or an old gas cylinder.
It is especially popular among avid motorists who, even in winter, cannot refuse improvements to their car, spending all their free time in garages. The gas cylinder has an ideal shape, it’s practically a potbelly stove, you just need to improve it slightly: cut off the excess, drill the necessary holes and add a few pipes! Let's take a closer look at how to make a potbelly stove from a cylinder?
A potbelly stove made from a gas cylinder can have a vertical or horizontal arrangement. Some craftsmen even make such stoves from two cylinders, placing one of them in a vertical position on top of the other, which is oriented horizontally.
Video: homemade wood-burning stove made from two cylinders
However, there are many models, and after considering different ones, you can choose the one that seems more convenient to use and acceptable in ease of execution.
Naturally, to make a potbelly stove from a cylinder you will need some tools and materials, as well as certain skills in working with them.
What do you need to prepare?
From the tools you need to collect:
- welding machine (200A);
- grinder – “grinder”, preferably with discs with a diameter of at least 180 mm;
- electrodes;
- circles for grinding and cutting metal;
- hammer cleaning slag from welding;
- a brush with metal bristles;
- folding meter, tape measure, chalk or marker for marking;
- drill and drill bits of the required diameters;
- chisel, regular hammer and pliers.
From materials , in addition to one or two gas cylinders, you must purchase:
- a sheet of metal, at least three millimeters thick - it is useful for constructing a hob and ash pan;
- ready-made cast iron doors, or you can also make them yourself from a metal sheet or a piece of metal cut from a cylinder;
- chimney pipe;
- corner or thick reinforcement - they will be needed for the manufacture of legs and grate. The latter can be purchased ready-made (from cast iron) or constructed using holes drilled in the bottom of the cylinder.
It should be noted here that both a standard gas cylinder and a small cylinder are suitable for the manufacture of such a stove.
As mentioned above, a cylinder stove can be vertical or horizontal. You can choose the one you need based on the amount of space allocated for installing the potbelly stove and the ease of its operation.
Preparing the balloon
Proper preparation of the cylinder is a very important step before starting work, especially if the potbelly stove is made from a container that recently contained gas. Residual gas may remain inside, and when cutting, which is accompanied by sparks, the cylinder may explode.
- Therefore, you first need to unscrew the valve located on top of the cylinder and clear the passage for the remaining gas to escape - this procedure will take some time. It is better to leave the container open overnight in the open air or in a well-ventilated non-residential area, or even better - fill it with water to the very top.
- Next, the container is turned over and the resulting condensate is drained. It has a very unpleasant odor, so this process should also not be carried out in a room where people live.
The washed container no longer poses any risk of explosion when working with it, and you can safely begin the cutting process.
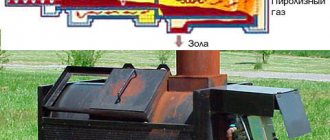
Pyrolysis unit
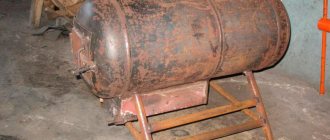
This heater is a 24 liter gas cylinder design. It serves as a combustion chamber, and the role of a heat exchanger is played by five pipes with a diameter of 57 mm and a length of 40 cm. The cylinder is installed horizontally, and the pipes are welded to it vertically.
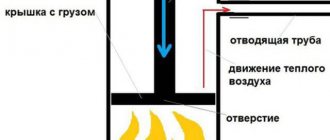
A second combustion chamber is installed on top of the heat exchanger, which is connected to the chimney. In addition, a small air supply tube is built into the chamber .
When the stove burns, primary heat transfer occurs in the heat exchanger, that is, in the pipes. Read more: making a chimney for a potbelly stove.
Through them, combustion products enter the second chamber, mix with air from the tube and burn out, also giving off heat to the surrounding air.
The power of such a heater is about 5 kW, which allows you to raise the temperature to +20°C in a room of 30 m² within an hour.
With such indicators, a potbelly stove is suitable for heating a private garage. Sometimes the furnace power is increased using a 50 liter gas cylinder.
Vertical stove made from a gas cylinder
Take a regular unnecessary gas cylinder
- When making this model, the cylinder is installed in its usual position, the neck is completely freed, then markings are made using a tape measure and a marker.
Possible marking option for a vertical potbelly stove
- Next, using a grinder (or using a gas or plasma cutter), holes are cut for the firebox and vent.
Cutting openings for doors
- The next step is to install a grate between the combustion chamber and the ash pan. Since this element of the required shape and size is difficult to find, it is made from reinforcement. It is cut into pieces of the required size and welded to a pre-marked place.
The grate can be made from reinforcement
- Next, the doors are installed—cut pieces of metal are perfect for making them. They are installed on hinges welded to the cylinder body.
- It is necessary to install latches or latches on the doors - they must securely hold the doors during combustion.
- At the top of the cylinder, if desired, you can arrange a small cooking surface. It is always useful for making coffee or tea or frying eggs. This panel is made of metal sheet.
A surface like this just begs for a hot water tank.
- The photo shows a version of the preparatory base not just for a hob, but for installing a container on top for heating water, made like a samovar. The pipe coming out of the firebox will pass through a container of water, heating it.
- All seams used to weld any parts of the stove must be sealed.
- The chimney pipe can be installed in the top of the stove or in the side wall. The chimney is discharged from the room through the wall of the building or the roof.
This arrangement of the gas cylinder helps to save space, as the stove turns out to be compact and neat. It is especially suitable for a garage or a small room in the country.
Features of operating a mobile stove
Before lighting the stove, the blower valve is fully opened, after which scraps of paper or cardboard are placed in the firebox. Firewood is laid on top of them in a “hut” or “well”. After igniting the fuel, the combustion door should be slammed shut. As soon as a stable flame appears in the chamber, close the blower damper. By adjusting it, you increase the operating time of the heating device from one load and set the desired temperature. As it burns, add 3-4 logs to the working chamber.
If pizza or flatbreads will be baked in the oven, then a ceramic tray is placed on the roasting pan. After ignition, the wood is given the opportunity to burn thoroughly. Since smoke will enter the baking chamber during cooking, use only hard wood. For cooking, it is best to prepare a supply of “noble” fruit wood from cherries, plums, apricots, pears, etc. In this case, you will be able to obtain baked goods with an incomparable aroma. And, on the contrary, you should not use pine, laminated timber and various waste wood building materials for these purposes, since the substances released during their combustion can be hazardous to health.
There is nothing tastier than pizza baked “smoky” in an oven you built yourself.
The temperature in the mobile oven can be adjusted in two ways. The first is the reduction in air flow through the blower described above. The second is a change in heating carried out by rotating the furnace hood relative to the opening for the exit of flammable gases. The closer the chimney is to it, the more heat will go into the chimney. Heating is controlled using a thermometer. For baking, a temperature of 200 to 260 degrees will be sufficient.
The simplicity and accessibility of the design described above allows you to build a stove with your own hands, spending one day on it. This unit is well suited for heating utility rooms and cooking food at the same time. Be sure to take advantage of the opportunity to make such a stove. It will be enough to take her out into the wild once and cook meat or smoky pizza for friends to ensure her reputation as a skillful host and unsurpassed cook for many years to come.
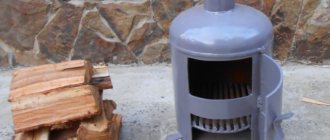
Horizontal potbelly stove
Horizontal potbelly stove from a cylinder
- Another version of a stove made from a cylinder, which is placed horizontally, also has its advantage - you can install a large hob on it, which will be able to not only warm tea, but also cook lunch.
- In order for the structure of the potbelly stove to stand steadily, a reliable stand is welded for it from a corner, and after completion of the work, the finished stove is secured to it using spot welding.
- Work on the cylinder also begins with markings, after which a square hole is cut for installing the door and a round one for installing a chimney pipe. You may have to work with a round hole if you don't have a cutter. The “grinder” is not an assistant here, so first, drill holes around the circumference, then work with a chisel and hammer, and then final finishing with a file.
- Holes are drilled in the bottom of the future furnace, which will play the role of a grate, and under it a box is welded from a sheet of metal into which the ash will be poured.
In the role of a grate - rows of drilled holes
- The same chamber will be a blower, so an adjustable door is installed on it so that the air flow can be reduced or increased to establish the desired draft.
You can make the door yourself...
- You can make the door for this stove yourself by scalding a part cut out of a cylinder, or you can install a ready-made cast iron part that already has a frame. The second option will be easier to install, and it is already equipped with a latch to securely close the firebox.
...or buy ready-made ones in the store
- After installing the door, the potbelly stove is fixed on the stand or legs of the required height are welded to it.
- Then a pipe is welded onto which the chimney pipe will be installed. It can also be discharged through a wall or roof.
Types of heaters
A simple potbelly stove made from a gas cylinder is not economical, so more complex designs are created from which long-burning heaters are made. Although assembly is somewhat more complicated, this equipment is more efficient, economical and has higher heat dissipation. Such heaters include:
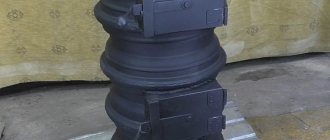
- a three-pass stove made of two propane cylinders;
- pyrolysis heater with heat exchanger and secondary chamber;
- top burning stove.
These structures are assembled according to a pre-drawn drawing to prevent mistakes. In these designs, the burning time of one portion of firewood increases significantly, and the efficiency reaches 80%.
Will a small bottle suffice?
You can also work with a small balloon. It is made according to the same plan as a horizontal stove.
- But in this version, instead of drilled holes in the bottom of the stove, a cast iron grate is installed. A window of the required size was cut out for it.
Installation of a cast iron grate
- The blower in combination with the grate is welded as follows.
Ash pan made from a piece of channel
- Next, the legs are welded onto the ash pan box, the structure is turned over and the chimney pipe is installed on top and secured by welding.
- After completing work on the potbelly stove, it is installed in a permanent place and the chimney is taken out into the street.
Preparatory work
Before you start building a furnace, you need to carefully plan all stages of the work. In particular, you need to prepare a gas cylinder and select a place to install the heating device. As for the technology, using the step-by-step instructions presented below you can avoid mistakes and carry out installation in the shortest possible time.
How to empty a cylinder of gas residues
You cannot start cutting a propane or methane cylinder without preparation, since even a small amount of gas, condensate or its vapor in combination with atmospheric oxygen is an explosive mixture. The slightest spark is enough for an explosion to occur. You can make the container completely safe using the method presented below.
- Open the valve and release the gas from the container.
- Using an adjustable wrench or a gas wrench, remove the tap.
- Turn the can over and drain the remaining gasoline.
- Place the container vertically and fill it with water through the top opening. In this case, all flammable components will be displaced by the liquid.
- After drying the cylinder in the open air, you can begin any plumbing work, including welding and burning old paint with a blowtorch.
Which location is suitable for installing the stove?
Even though we are looking at a mobile structure, most of the time it will be used to heat a garage, shed or workshop. To ensure that the operation of the heating device does not lead to unpleasant consequences, when choosing a location, they are guided by the current provisions of SNiP, sanitary and fire safety standards.
- The floor under the stove is constructed using non-combustible materials - fireclay bricks, cement-sand screed, asbestos fiber board or metal sheet.
- It is prohibited to install heating devices near storage areas for fuels, lubricants and other flammable materials and substances.
- When installing the stove, be sure to take into account the configuration of the chimney. The places where it passes through the roof must be protected with heat-insulating non-combustible materials.
- It is prohibited to install furnaces of this type under shelves, in places where attachments are close, etc.
- It is necessary to consider how the air flow into the room will be carried out. We should not forget that open-flame stoves consume a lot of oxygen.
- If the body of the heating device is located close to the flammable surfaces of the walls of the room, the latter are protected with heat-insulating shields.
When choosing a location for installing the stove, be sure to take into account the configuration of the chimney. Since most of the heat in direct combustion stoves is emitted into the chimney, they try to place it indoors, equipping it with a long horizontal or inclined section
It’s just important not to overdo it with its length and number of turns, since the traction force, and therefore the thermal power of the heating device, depends on this
Video: How to make a super wood-burning stove from a used cylinder
The proposed options are only a small part of what was invented by folk craftsmen. Look how the craftsman combined brickwork and a gas cylinder in one potbelly stove:
If you have an understanding of working with the tools described above and all the necessary materials, you can try to make this convenient and sometimes irreplaceable stove yourself. By making it yourself, you can save quite a large amount, and also make an already unnecessary gas cylinder function. The most important thing is to approach this work responsibly and do it slowly, checking every action.
Features of operation of a pyrolysis furnace
The main difference between pyrolysis furnaces is the ability to use a wide variety of fuels. In solid fuel stoves, it is possible to burn not only traditional flammable substances, but also rubber, plastic and other materials that are strictly not recommended for burning conventional stoves.
This feature is associated with complete decomposition of the fuel and secondary combustion of the resulting gases in a separate chamber. After this, only carbon dioxide and water vapor remain in the smoke emissions. No harmful emissions into the atmosphere occur during pyrolysis.
But when using such fuel at the ignition stage, a persistent smell of burnt rubber remains in the room. Therefore, such heating units must be installed outside residential premises.
Advantages and disadvantages
The positive aspects of homemade stoves include:
- excellent thermal conductivity (provided by the thick metal walls of the cylinder);
- convenient dimensions (can be made to fit your garage);
- ease of manufacture and maintenance;
- availability of consumables and fuel.
Among the few disadvantages, one can highlight only the ability to use a limited number of types of fuel (wood, coal, fuel briquettes), and with a vertical design, there is also the need to adjust the size of the logs to the length of the firebox.
How to properly make a chimney
To ensure maximum stability in the operation of a stove structure made from a cylinder, it is imperative to arrange high-quality draft.
To achieve this goal, the cut of the stove chimney pipe must be installed at a certain height. This is slightly higher than the edge of the mounted grate. When connecting a gas chimney to the side, it is necessary to ensure that the length of the strictly horizontal section is approximately 400 mm. At the very bottom of the vertically located part, it is worth organizing high-quality removal of accumulated moisture, as the drawings show.
- At the same time, it is recommended to use certain measures regarding the removal of incoming heat from the chimney part. There are two methods for carrying out this process:
- A horizontal section is being installed at a slight inclination of 35 degrees. Immediately after this, the channel turns upward and leads out. A completed or purchased heat exchanger of a special samovar category is installed on the chimney element; The pipe, which leaves the furnace at a special angle and then passes through the rooms, will be able to transfer warm air. Thanks to this, overall efficiency indicators become higher, while at the same time fuel consumption is seriously reduced.
A heating system based on water fuel will provide the opportunity to install about 2 or 3 radiators in a country house or garage and provide them with heat. Such a device is characterized by simplicity in the manufacturing process, that is, a special water jacket is made in the chimney section, which has two high-quality pipes.
The circulation process present in the water circuit, which is mounted on the body of the stove chimney from a cylinder, will have to be adjusted in a forced manner. A household circulation pump is ideal for this purpose.
With grates or without?
In the simplest version, no grates are provided. If the cylinder is small or stands horizontally, then selecting a part inside is problematic. In this case, the design of a potbelly stove made from a cylinder is quite simple: the body is placed on legs, one door, and a pipe for connecting the chimney is welded in the upper part. All. The whole stove.
The internal structure of a potbelly stove made from a horizontally located cylinder is quite simple: only a door for loading fuel/unloading burnt coals and an exit for the chimney
The photo above shows examples of such simple ovens. In order to improve heat transfer, metal strips are welded to the outside of the body. In the upper part, in addition to the smoke pipe, there is another outlet - a lid is installed on it, and this outlet is used as a stove for cooking food and heating tea.
If you still want to make grates in a potbelly stove from a horizontally installed cylinder, you will have to weld a tray for collecting ash from below. Below there is a drawing and photo of the practical implementation.
Bottom line
A homemade stove based on gas cylinders is an inexpensive and high-quality heating unit that will last for many years. Of course, the efficiency level of such a stove is not the highest, but welding experts are working to improve it.
A potbelly stove based on cylinders, when properly welded and designed, copes with its task much better than other heaters running on electricity or gas. What type of stoves do you think is the most effective? Share your opinion in the comments!
Sources
- https://gidpopechkam.ru/pechki/burzhujka-iz-gazovogo-ballona.html
- https://cotlix.com/kak-sdelat-burzhujku-dlitelnogo-goreniya-iz-gazovogo-balona
- https://teplowood.ru/burzhujka-iz-gazovogo-ballona.html
- https://oboiman.ru/ingeneer/burzujka-iz-gazovogo-ballona-svoimi-rukami-instruktaz-po-izgotovleniu.html
- https://stroy-podskazka.ru/postrojki/garazh/pech-iz-gazovogo-ballona/
- https://sdelairukami.ru/pech-iz-gazovogo-ballona-luchshij-variant-dlya-garazha-i-masterskoj/
- https://kachestvolife.club/otoplenie/kak-sdelat-piroliznuyu-burzhuyku-iz-gazovogo-ballona-2-luchshih-sposoba
- https://dekoriko.ru/postrojki/garazh/pech-iz-gazovogo-ballona/
- https://vdome.club/bez-rubriki/pech-v-garazh-iz-gazovogo-ballona-kak-sdelat-svoimi-rukami.html
- https://VseProGarazh.ru/kommunikatsii/otoplenie/pech-dlya-garazha-iz-gazovogo-ballona/