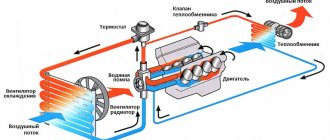
If a car radiator fails, not every driver can immediately replace this part. Its cost often reaches tens of thousands of rubles, and the wait for delivery drags on for months. Soldering cooling radiators helps to postpone replacement for a while. The leak elimination method is chosen taking into account the properties of the material from which the part is made.
Reasons for soldering the radiator
First of all, it is worth checking the entire pipe system for integrity. Very often, it is mechanical damage to the tubes or tank collectors due to a traffic accident that is the cause of antifreeze leakage.
Also, do not forget about the possible thermal overheating of the joints, which led to their destruction, resulting in a leak. The same reason may occur if the cooling system was operating without liquid.
If the cooling system is already old and suddenly leaks, the most likely cause may be corrosion. Please note that it may not be noticeable at first glance, as it may be located inside the system. In this case, you will still have to completely disassemble the system.
Classification of cooling systems
There are several types of engine cooling systems:
The air system uses the flow of outside air to operate. Used in motorized vehicles with low power engines.
In a liquid system, a heated engine is cooled with a special coolant. Most modern car engines are equipped with such a cooling system.
The combined system combines the operation of liquid and air systems. Used to operate high-power power plants. Widely used at energy sector enterprises.
Finding a Radiator Leak
If a spot suddenly appears where the car is parked, it means the cooling system has leaked. In order to quickly and easily determine the cause, it is recommended to follow an easy inspection rule.
- Initially, you need to make sure that there is no external damage as such. Before removing the radiator, you need to carefully inspect all pipes and tanks for mechanical damage.
- Perhaps during movement the system touched some protrusion, which caused a crack to form. At this stage it is also worth checking the heat exchanger of the interior heating system.
- Next, if no external signs of failure were found, you need to prepare to dismantle the entire cooling system. To do this, you must first drain all the liquid from the system.
After dismantling the radiator, it must be carefully inspected. Particular attention should be paid to the lighting; it must be good in order to be able to examine the part in detail.
If the hole could not be found, you must first close all the tubes using plugs, thus sealing the radiator. Then place it in clean, clear water. Bubbles that appear in a chain will accurately indicate the location of the leak; this is the easiest way to diagnose.
Flux for the most durable seam
To obtain the most durable protective seam at the site of damage to the radiator, a special flux called flux is used. It can also be obtained at home. To prepare flux, you will need the following substances in the following proportions:
- potassium chloride – 56%;
- lithium chloride – 23%;
- cryolite – 10%;
- coarse table salt – 7%;
- sodium sulfate – 4%.
The ingredients are finely chopped and mixed. This melt must be stored in a hermetically sealed glass container in a dark place.
Diagnosis of material type
After a crack through which fluid is leaking is identified, you need to find out what material the radiator itself is made of. This is necessary in order to choose the optimal method of soldering the damage, thus repairing the part.
Modern models can be made of aluminum or copper; there are also models made of plastic, but much less common.
- You can distinguish the material quite simply based on its shade. The thing is that copper will have a red-brown tint.
- While aluminum will have a gray color. The plastic part has a black or dark tint.
- As a rule, radiators are not painted, so you should rely on this method.
- If the radiator is painted, it is necessary to remove a small amount of paint from the inside to diagnose the type of material used.
Copper can easily be soldered in a garage or even at home, because working with this material is much easier. But working with aluminum is much more difficult, this is due to its physical and chemical properties, which must be taken into account.
It makes no sense to solder a plastic part, because the plastic is unreliable; if there is a crack, it can be covered, but it is recommended to install a new part.
Soldering iron is half the success
In most cases, to solder a radiator you need a massive soldering iron with a power of at least 100 W. But a damaged tube can be soldered with a regular 60-watt one. Much depends on how efficiently the soldering iron transfers its temperature to the part. This, in turn, is due to the correct tinning of the tip, the presence of a sufficient amount of solder at the point of contact of the tip with the part, and the angle at which you hold the soldering iron relative to the surface being repaired.
In addition to electric ones, soldering irons heated over an open fire are also used. There is no fundamental difference in their use, except that during the soldering process it is necessary to additionally control the heating and cooling of the working part of the tool.
DIY radiator repair (step by step)
In order to repair a broken radiator, you will need the following list of tools.
- Electric soldering iron, high power, or you can use a gas torch
- Solder of the right type
- Flux paste
- Abrasive paper
- Pliers
- Solvent
- Rags
First you need to prepare the product for the upcoming work. For this purpose, it is thoroughly cleaned of external contaminants, dust, various fragments and sawdust. Next you need to degrease it, for this purpose you need to use a solvent. Degreasing is necessary in order for soldering to be carried out efficiently.
The entire system must be thoroughly dried, possibly using compressed air through one of the pipes.
The leak area must be carefully cleaned using abrasive paper (sandpaper) so that it is smooth and even with the rest of the surface of the part.
After this, you need to apply a flux compound to the soldering area and give it a little time to dry.
After this, solder is applied to the crack, using a high-power electric soldering iron or a gas torch, it is necessary to melt it so that it completely closes the crack and penetrates inside, thus completely closing the defect.
If it doesn’t work the first time, you need to repeat the procedure again, starting with applying the flux paste.
Using Cold Welding
This method of soldering an engine cooling radiator does not involve heating. The hole is sealed with a special substance that covers the damage. Repairs are performed as follows:
- Prepare the part. To do this, the surface is cleaned of dust and degreased. A rag is moistened with alcohol and the radiator is gently wiped with it. You can’t apply any force; the metal will be damaged even more.
- Prepare the adhesive composition. It is selected according to the type of metal. Cold welding is a thick mixture that must be evenly distributed over the defect. Careful application improves the quality of the seam. Wait for the composition to dry and inspect the soldered radiator.
We recommend reading: How to solder polypropylene pipes
The difficulty of soldering an aluminum radiator
The difficulty lies in the physical and chemical properties of this material. The thing is that when heated, an oxide layer forms on the surface.
It will not be possible to properly apply solder on top of it, thus repairing the part. Initially, you need to get rid of this layer, and then increase the fluidity of the solder itself by heating it more strongly.
After this, it is necessary to prevent the re-occurrence of the oxide layer. It will not be possible to carry out all these stages in a garage or at home, because the part requires mechanical, professional processing using special equipment.
You should also pay special attention to flux compounds and solder. They need to be selected with great care, because the quality of the final soldering depends on them.
After the repair process is completed, the tightness of the system must be checked in the same way as is used to diagnose and detect cracks in the part.
Preparing gumboil
Soldering a cooling radiator with your own hands is only possible if you have high-quality flux. You will have to prepare it yourself. And it’s better to do this just before you start soldering. So, pour 2 parts of ordinary rosin and 1 part of iron filings into a fireproof container. Sawdust can be made using a file with fine notches, processing any iron workpiece that comes to hand. Heat the resulting mixture over a fire, stir and let cool. That's basically it. Flux for aluminum is ready.
Photo instructions on how to solder a radiator
Safety precautions
| The electric soldering iron must have intact cord insulation and a working plug. During operation, make sure that the cord does not touch the tool or heated parts. |
| Hold the soldering iron by the handle only. You cannot determine its heating by touch - just hold your hand at some distance from the sting. |
| Vapors from heated solder and fluxes are harmful to health. Work should be carried out in a ventilated area or in the fresh air. |
| Please note that the solder takes a long time to cool down on a heated part, so after removing the soldering iron, do not rush to immediately touch the seam with your hands. |
Application of glue
Only two-component adhesive mixtures are suitable for repairing a plastic radiator. They cope well with situations where the crack in the radiator is large enough or it is not possible to connect the parts of the case due to a lack of small fragments. If a small crack is being repaired, simply mix the glue components and apply it to the crack in two layers.
In some cases, a crack appears in a hard-to-reach place. In this case, the sealant is applied along the entire length of the radiator Source Chebo.pro
Repair work
If aluminum batteries were installed correctly and were operated in compliance with all required technical conditions, then their period of operation may significantly exceed the ten-year warranty stated by the manufacturer. In this case, repair work will not involve large labor costs, even if it is necessary to add additional sections.
Manipulations of a repair nature will in this case consist of shutting off the shut-off valves and riser, from which the coolant must first be drained.
To drain this media, place a container under the bottom connection valve. Then the bottom tap is unscrewed to release the remaining water from the battery or, in the case of using such a coolant, antifreeze. After this, the upper valve is unscrewed and the radiator is removed from its place.
If an aluminum heater does not produce heat, then the root of the problem should be sought by bleeding air from the heating system. After this, you need to wait until the batteries warm up enough, and if this does not happen, you will have to dismantle the radiator and check it for clogging.
Aluminum radiators, consisting of sections, contain a relatively small volume of coolant. By filling the previously removed battery with water, you can determine whether or not the amount of water corresponds to that indicated in the technical passport. If a discrepancy is detected, it is necessary not to repair the radiator, but to flush it. To do this, it is necessary to pass a stream of water under high pressure through the removed battery until the water clears.
In some situations, the only way to bring batteries into working condition is to completely replace damaged sections or add them. If there is a side connection, then such manipulation will not cause much trouble, but in the case of a bottom or diagonal connection, you will have to, depending on the situation, either increase the pipe or, conversely, reduce its length.
Disassembling the dismantled battery into separate sections begins with unscrewing the nipples. To do this, the right nipple should be rotated with a wrench to the left - along the left thread. Accordingly, the left nipple must be turned to the right, since it has a right-hand thread. Carrying out this manipulation requires great care, because the nipple may well “stick” to the battery and you can break the thread with a careless movement. As a result, you will have to throw away 2 sections together.
In a similar way, the nipples on the remaining sections are unscrewed one by one. After dismantling all sections, they are cleaned. The assembly of the structure is carried out in the reverse order.
During the repair, it is necessary to check the condition of the threaded connections for all battery sections and inspect them for chips. Both nipples should be unscrewed and tightened several times in order to achieve sufficient ease during their further installation in place.
If the areas where the sections are joined are covered with dye, then it should be sanded down to the aluminum of the battery. Otherwise, after a while the paint will crack, the coolant will be underneath its layer and microcracks will appear on the surface of the structure.
The next section is screwed on from the reverse side of the nipple, continuously maintaining a tight fit of each element until the entire structure is assembled.
When tightening nipples, never use force to avoid stripping the threads. If a leak of an aluminum heating radiator occurs during the heating season, you should be wary of the hot coolant so as not to get burned from it.
