Author: Yuriy Fedorovich Kolesnikov, thermal power engineer
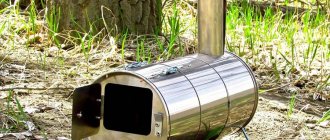
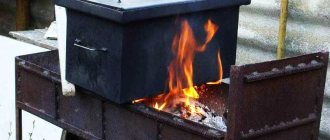
A stove made from car wheel disks can heat a room up to 15-16 square meters. m, heating a bathhouse or becoming an inexpensive, effective cooking device, which is what this article is actually about. Its main advantage is the availability of high-quality material - thick, resistant and durable steel. Boiler steel in sheets and profiles is expensive, and ordinary structural steel in a furnace structure quickly burns out.
The additional advantage of a disk oven can be seen through experience. Take two pieces of metal of approximately the same size and weight: one from simple steel, and the other cut from a wheel rim, and heat it up stronger, at least in the kitchen on gas. The first one will immediately give off the smell of hot iron, and the second one can be heated to orange (about 900 degrees), without feeling anything unpleasant in the air. A furnace made from wheel rims practically does not dry out the air and does not emit harmful fumes into the atmosphere, because the rims for the wheels are made of special steels that are resistant to corrosion. They are, of course, not standardized for heat resistance, but the reserve of resistance that is built into them is quite enough for a wood-coal stove.
Features, advantages and disadvantages of a homemade potbelly stove
Before assembling the stove, you need to understand the basic requirements that apply to such products. Firstly, the minimum height of the firebox must be at least 45 cm (and if you burn with raw wood and waste, then 65-70 cm or more), the number of elements is selected based on this. Secondly, to make cleaning easier, it is best to make an ash pan at the bottom. In general, the design is not very different from a standard potbelly stove, which is why such options are popular and in demand. The main advantages are:
- The cost of making a potbelly stove for a garage with your own hands from car wheels is one of the lowest. Basic parts can be found for free or at minimal cost, as old and warped parts that cannot be used on the machine will do.
- Long service life. To make the discs, thick steel is used, which will ensure the durability of the potbelly stove. It won't burn out in a few years.
- The material is resistant to temperature changes. The steel alloy can withstand numerous heats without damage and does not deform over time.
- Good heat transfer - due to the properties of steel, the efficiency of the stove is at least 80%. At the same time, the room heats up very quickly, since the material gives off heat well.
- You can make a potbelly stove of any size. The number of connected disks is selected according to the situation; there are no restrictions.
Important!
Only stamped steel discs are suitable for manufacturing.
This variety also has disadvantages that must be taken into account before making a decision:
- It is necessary to clean the chimney and the internal walls of the structure from soot at least once every 2 months. If this is not done, the efficiency of the system is greatly reduced and the consumption of firewood for heating the room increases.
- Steel heats up very quickly and gives off heat well, but it also cools down in a short time. Therefore, it is possible to properly heat the space only with constant burning of wood in the firebox.
- To ensure normal traction, the pipe height must be 2 m or more.
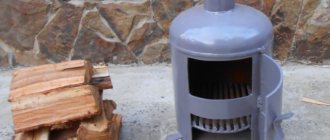
In general, a potbelly stove of this type is almost as good as ready-made solutions. The main thing is to do it correctly and weld the elements well so that there are no gaps. It is also very important to install a good chimney, since if there is insufficient draft, the efficiency of the system is much lower.
Installation
Installation
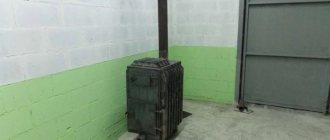
The use of potbelly stoves made at home, as well as any other heating installations, requires strict adherence to safety precautions. Initially, you should select a place to install the stove. This unit, as practice shows, is best installed in a corner, namely near the walls opposite in location to the garage door.
It is better to surround the stove with brick walls on all sides. Thus, the possibility of touching a hot stove will be eliminated, and the heat generated from its firebox will also be accumulated. Thus, you will increase the efficiency of the device several times.
f46f2eb57f2cae157dad7402bb861497.jpe
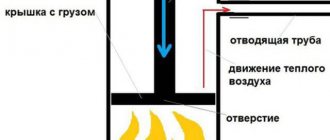
Increasing furnace efficiency
If the walls of the garage are made of wood, then there must be a certain distance between them and the stove, namely at least 100 cm. In addition, in order to avoid fire in the building, the walls near the potbelly stove should be lined with asbestos sheets/bricks or other fireproof materials.
As a base for a potbelly stove, you can use a steel sheet with a thickness of 1–2 cm. Another option is to pour a concrete screed. Thanks to these actions, you can prevent the spread of fire if coals/sparks, etc. suddenly fall out of the firebox.
To use a potbelly stove in a garage, you must first provide it with high-quality fresh air ventilation. Fresh air must be supplied here in sufficient volume to ensure normal combustion of the fire. A small gap between the ground and the garage door can serve as ventilation. Otherwise, you will have to make a special channel for the timely flow of air into the garage, which is not very profitable from an economic point of view.
Potbelly stove with burner
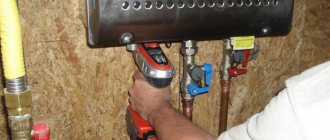
If you equip your potbelly stove with a water tank, the stove can be used to heat it. By installing burners on it, you will also have the opportunity to heat food.
The entire process of making a potbelly stove will take no more than 2 hours, and you can enjoy the results of your labor for several seasons.
What tools and materials are needed to make a potbelly stove?
To get an idea of what the end result should look like, the easiest way is to look at photos of potbelly stoves made from car rims on the Internet. They can be arranged in different ways; depending on the chosen design, the list of materials varies. But usually you need the following kit:
- Several steel rims from cars, vans or small trucks. It is not worth using elements from large machines, as they weigh a lot, which complicates the work.
- Sheet steel with a thickness of 5 mm or more. Quantity – enough for at least the bottom and the top. You can pre-cut blanks according to the outer diameter of the wheel rims.
- Metal corner. It is best to use fairly massive elements with thick shelves.
- Thick-walled pipe. The steel must be 5 mm thick or more so that the chimney does not burn out and lasts a long time.
- Reinforcement with a diameter of 20-24 mm. The grate bars will be made from it. You can also adapt a finished cast iron element, giving it a suitable shape.
- Bolts and plates may be required for fastening. If you need to paint individual parts, you should buy heat-resistant paint.
Important!
It is worth purchasing hinges of the appropriate size in advance to secure the doors.
You also need to collect a certain list of tools, without which it will not be possible to carry out the work. Since you need to use welding equipment to make a potbelly stove, take care of protective equipment in advance and wear a special welder’s suit or clothing made from natural, non-flammable materials. You will need the following:
- Welding machine and electrodes of suitable thickness. You can rent equipment to save money.
- Angle grinder. Immediately purchase several cutting and cleaning discs for it. You may also need a wire brush to remove deposits and rust from the metal.
- Drill and set of drills of different diameters. Measuring devices - marker, tape measure, square, etc.
- Hammer, metal brush, vice, etc. – It’s better to have everything you might need at hand.
The work is best done outdoors - under a canopy or even just near the garage if the weather is good. You can make a potbelly stove from old disks with your own hands and indoors, if it is well ventilated and lit.
Step-by-step algorithm
The first thing you need for construction is a pair of classic stamped car wheels made of durable metal. The sizes of the disks should be selected to suit your cauldron; option 13 may be suitable, or maybe 15, although a very large design is not needed.
Two stamped white discs
On one of the disks we mark a cutting line, exactly above the round holes, and cut off this circle using a welding machine.
Mark the cutting line
The cut circle will work perfectly as a lid on which you can put pots or a kettle, so don’t rush to throw it away.
The part is cut out
On the second disk, you need to weld the main central hole, which will require a small piece of thick metal.
Preparing the welding machine
We carry out welding work
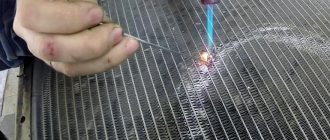
Then the two disks are placed on top of each other and, using the same welding machine, they are connected into a single structure.
Circular welding process
Welding from all sides
This creates an impressive seam that firmly connects the two discs. To make it more presentable, you can modify it with a grinder, cutting off strongly protruding elements and grinding the edges.
Weld seam
In order for the structure to stand stably at the required level, you will need legs. The legs can be tightly welded to the grill if you are preparing a summer cottage, or you can make the structure detachable. In the second case, the device will be mobile; it can be easily carried in the trunk of a car and, if necessary, assembled. Small pieces of a profile larger in cross-section than the legs themselves can act as fastenings for the legs. These three parts should be welded to the grill on three sides (in this case, a tripod is made).
Leg parts
There is no need for precise calculations here; it is enough to roughly estimate equal distances and weld the necessary parts to the bottom of the grill made of disks at the same angle.
Leg clamps are welded
We also cut out the legs from metal, in particular we use a rectangular profile.
The legs themselves, cut from the profile
It is worth trying on the legs by inserting them into the prepared grooves. If they enter with difficulty, you should process the edges of the parts with a grinder, and then hammer them into the grooves with a hammer.
Legs installed
Next, mark the door that will open directly into the firebox and cut it along the line.
Marking the location of the door
At the next stage, you will have to use your imagination and engineering skills to create a decent hinge for the door. For example, you can make it from one bolt. It is necessary to cut off the cap from it, then select two nuts that are screwed onto it. One nut should be welded to the door, and the second to the wall of the grill. By screwing the bolt onto the threads of both nuts, you get a convenient loop. You can weld any piece of metal of suitable size as a handle.
The door is cut out
You can make two loops using the same bolts, here all the work is done at the discretion of the master.
Loop manufacturing option
To make it easier to transport the grill, you should weld lugs to it on both sides, or at least on one side. Such improvised handles will allow you to comfortably carry the barbecue without fear of getting dirty with soot, soot or dirt.
We weld the handles
For a more uniform smoke output, you can make four even cuts along the diameter of the disk. At this point, work with the hearth to form its shape is completed.
Making cuts from the top
To remove paint from car rims, you should burn the resulting grill on all sides. For final processing, you can use a brush or sandpaper.
Removing paint using improvised means
Then, using heat-resistant paint, you need to paint the structure in a suitable color. Black looks very harmonious.
Paint it black
As you can see, making a grill for a cauldron is quite simple; there are no special tricks here. A simple and convenient design will allow you to install a cauldron and cook pilaf, and if desired, you can make a shish kebab on it using skewers of suitable length.
Ready product
In this simple and uncomplicated way, we create excellent conditions for outdoor recreation, which is accompanied by cooking delicious and healthy food.
How to make a potbelly stove from car rims with your own hands for the garage
If you have everything you need at hand, you can get to work. It is important to follow simple recommendations and do everything in a certain order. Therefore, for simplicity, the instructions are divided into several stages.
Housing assembly
First, clean the discs from dirt and corrosion. If possible, remove the paint so that it does not burn or emit an unpleasant odor at first. Usually the structure is made of four elements, this is enough to create a firebox of the required height. Do the work like this:
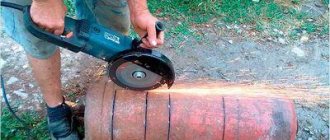
- Cut out the inside of the discs to create a cavity inside. Work carefully, you must remove all excess, but do not damage the outer walls. It is best to do this with a gas cutter; it turns out quickly and accurately.
- If the elements for the bottom and top have not been prepared in advance, make them from sheet metal. Next, stack the disks on top of each other, make sure that they fit together evenly; if there are uneven edges, you can straighten them with a hammer. Also, be sure to clean the surfaces to be welded; they should be free of paint and traces of corrosion.
- First, carefully scald all the connected disks around the perimeter. Try not to miss a single section so that you get a continuous, strong seam that will withstand numerous heat without problems.
- Next, weld the bottom and top to form a sealed housing, which will serve as a stove in the future.
When welding, it is best to first grab the elements in several places. Once you have ensured that the joint is smooth, you can weld the joint along its entire length. At the end of the work, you need to let the parts cool completely.
How to make legs and doors
Since the surface of the disks is uneven, it is best to buy ready-made doors or weld them in advance from corners and sheet steel. There are no special requirements, the main thing is to make the elements of the appropriate size. It is important that the hinges are strong and the latches are simple so that the doors can be opened and closed easily. The work is carried out like this:
- To begin, make a small vent door at the bottom. With its help, you can regulate the air supply, and ash is also removed from there as it accumulates. An opening of a suitable size is cut, corners and plates are welded into it to create a frame, then a door is installed.
- Place the main door of the firebox higher; it should be of such a size as to ensure convenient loading of firewood. Here it is important to cut the opening, reinforce it with a corner and weld or bolt the sash. It should open easily and close tightly, secured with a latch.
- The legs must ensure the stability of the structure and prevent it from tipping over. It is most convenient to pre-weld the base from a corner or square pipe, and then weld it to the bottom of the potbelly stove.
- Weld several pieces of angle iron between the doors inside the housing. They will serve as a support for the grate, which is easiest to weld from reinforcement. Make the grate smaller than the diameter of the stove so that when heating it does not rest against the walls.
You can use ready-made doors made of cast iron; in this case, a frame from an angle is welded to the body and screwed through the holes. Standard-sized elements that are sold in hardware stores and are designed for conventional stoves are suitable.
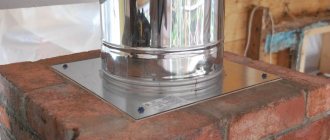
How to make an exhaust pipe in a homemade potbelly stove
To ensure normal draft and eliminate smoke in the room, you need to make the chimney correctly. For this, a thick-walled steel pipe with a diameter of about 100 mm or slightly larger is most often used. Procedure:
- Determine the location of the pipe entrance to the stove body. The easiest way is to do it in the middle from above, this will ensure a good outflow of combustion products and improve traction. If the upper part will be used as a stove for cooking, then it is better to connect the pipe to the side.
- It is easier to arrange the insertion location using an adapter, which you can make in advance. Then you won’t have to make a perfectly even hole in the potbelly stove, which will simplify the work.
- After welding the pipe to the body, take it outside and securely fasten it. Remember that its length should be at least 2 meters, and preferably even longer - to improve traction.
Important!
The surface of the chimney also gets very hot, so it can be wrapped in non-combustible insulation at the point where it passes through the wall or ceiling partition.
To reduce wood consumption, you can make bends in the chimney. But remember that in places where the direction of the pipe changes, soot is deposited especially heavily. Therefore, it is advisable to make small hatches there and clean the pipe at least once every 2 months.
It’s also worth watching a video on how to make a potbelly stove from car rims for your garage with your own hands. There the process is clearly shown, which will help you understand it even better and simplify assembly.
Fire safety rules when installing homemade stoves
Compliance with fire safety rules is the most important aspect when operating and manufacturing homemade stoves. This equally applies to factory-made stoves.
The surfaces of ovens are very hot - this can cause ignition of flammable substances. As for disk stoves, they do not have an ash pan; ash with particles of hot coals can spill through the grate. To collect them, it is necessary to install a container of appropriate diameter to prevent the entrainment of hot particles.
An important factor is the presence of a firebox door. A closed door slows down the combustion rate of the fuel load and prevents the escape of hot particles and sparks.
When building a sauna stove from disks or a sauna stove, combustible building structures must be located at a safe distance from hot surfaces and shielded with a layer of fireproof material. Fireproof material must have a low thermal conductivity coefficient. The location of the stove in the garden or country house is not recommended near combustible structures and materials.
It is better to choose a free space without strong wind load for the installation location. This will prevent the spread of sparks in the event of firewood falling out or the stove falling. You cannot construct furnaces from disks to operate on waste oil or in long-term combustion mode. The properties of special steel are such that complete sealing of a welded joint can only be checked using special methods and non-destructive testing equipment. The presence of leaks will result in the leakage of highly toxic components of the burning oil or the release of smoke and carbon monoxide, which are hazardous to human health.
Test firing of a potbelly stove from old disks
You cannot use the stove immediately after welding it. First, it is left for at least a day so that all connections stabilize and residual stresses go away. After this, firewood is laid and the potbelly stove is heated for 3 hours with the doors completely open.
It is important to check the reliability of welded joints. All places where smoke passes must be marked. Blemishes should be cooked no earlier than 24 hours after the stove has cooled down. Then the process is repeated again: it is important to make sure that everything is done efficiently and there are no defects.
Making a potbelly stove from wheel rims is not difficult if you have everything you need on hand. The main thing is to prepare the materials and weld them together efficiently. Pay special attention to the tightness of closing the doors and the configuration of the chimney, since draft depends on this.
Useful tips
It is important to lay a high-quality seam at the welding site - no defects should be noticeable on it. When working with a welding machine, you cannot try to weld everything at once - the work is done in stages
After welding the parts together, you need to wait until the seam cools down to touch temperature. When assembling the structure, do not forget that for proper operation of the stove it is important to provide the size of the combustion chamber for the type of fuel you plan to use. After completing the work, be sure to test the design and eliminate any identified deficiencies.
Attention! All welding work must be carried out in compliance with safety regulations, wearing protective clothing and a mask. Do not touch parts until they have cooled down