Any owner of a private home has encountered a heating problem. Floors are a particularly important heating element. Proper floors do not allow dampness into the house and retain heat in it for a long time. Recently, ground floors have been rapidly gaining popularity.
They are effective because they are practical, reliable and relatively inexpensive. If a basement is not planned during construction, then heated floors on the ground in a private house are one of the best options for thermal insulation.
This structure is built directly on the ground, taking into account all its unevenness and will help prevent cold from entering from its surface. This option is far from the simplest, but it can be implemented independently, without hiring workers or equipment.
What is a heated floor pie on the ground?
Such floors have nothing to do with baking. They are called "pies" due to the fact that their thermal insulation has many layers and they look slightly like a layer cake. If you still decide to build, then keep in mind that heated floors on the ground require some measurements.
For example, groundwater should not be too high, because this will cause your “pie” to “float”. You should also make sure that the soil is strong enough, because the entire structure can simply settle. You should also remember that the “pie” reduces the height of the room, and dismantling such a structure is a difficult task, so everything must be done correctly the first time.
How to correctly calculate the thickness of the fill
When planning construction and calculating estimates, it is necessary to take into account the height of the layer that will be laid under the heating system. This affects the quantity of material purchased.
The operation of the heating system also depends on the volume of fill above it. If you make it very thin, then the heating of the floor covering will be uneven, and the system itself and the “pie” will quickly fail. Cracks may form in the floor covering. But significantly less fuel is needed to heat the building.
A layer that is too thick will absorb most of the heat. If this happens in a high-traffic area, the material may rupture due to overheating and excessive load. To avoid destruction of the floor covering, it is necessary to arrange expansion joints. Also, if the layer is too thick, fuel costs will increase.
If the slab or subfloor has large differences, you must first level it using a rough screed, and only then install the heating system in the floor.
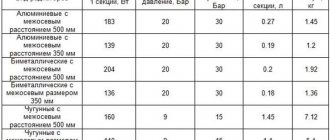
There are no universal values for the fill volume; it depends on many factors and is calculated individually not only for each house or apartment, but also for each room. However, there are three types of screed thickness:
- Minimum (about 2 cm, laid without reinforcement using self-leveling mixtures).
- Average (optimal) – 5-7 cm.
- Maximum – up to 17 cm.
SNiP states that 1-1.5 cm of mortar layer must be added to the diameter of the pipes used in the construction of a heated floor. For example, when using pipes with a diameter of 2 cm, another 1.5 cm is added to this height and a fill layer thickness of 3.1-3.5 cm is obtained.
The amount of mixture is calculated by the formula: multiply the area of the room by the height of the self-leveling floor. The solution should hide the height of each pipe of the heating system. The use of additional solid additives in the mixture allows you to reduce the pouring height by several centimeters.
What influences the required thickness of the concrete layer
The thickness of the screed for water heated floors is calculated taking into account the following data:
- Desired temperature in the finished building or apartment - the warmer it should be in the room, the thinner the layer.
- The presence of a slope at the base - if the subfloor is very curved, screed is made both under and above the pipes.
- Type of mixture or solution: at least 3 cm - for a wet composition with fiber fiber and plasticizer; not less than 4.5 cm – for semi-dry mortar; not less than 5 cm - for a wet mixture of CFRP or concrete.
- Room configuration.
- Diameter of water system pipes - to organize heated floors, pipes no larger than 2.5 cm in diameter are used (usually 1.6 cm is sufficient for living rooms).
- Ceiling height in the room.
- Base material (concrete, wood, soil).
Preparing the base
The structure of your structure includes several layers, and therefore several stages too.
Do not proceed to the next stage without completely completing the previous one.
The first thing we must do is prepare the foundation directly on the ground itself. To do this you need:
- remove a layer of soil. This must be done necessarily, because the fertile layer is usually loose, and the remains of vegetation can then begin to rot and decompose - this will cause an unpleasant odor, and it will be impossible to stay in the room. The floor pie requires about 20 centimeters, or even more (depending on the region).
Tip: measure each level and calculate how deep the soil needs to be removed. Leave marks on each level to make it easier to navigate;
- remove all debris and stones. This is also very important, because one unnoticed pebble can cause unevenness;
- The remaining clean soil should be leveled and compacted. This must be done very evenly - according to the level.
Installation on a wooden base
If the base is a subfloor, the algorithm for laying the pie is the same as for a concrete slab (how to make warm water floors on a wooden floor).
There are differences in installation (water heated floors installation technology) for wooden joists. In this case, a sheet of plywood is placed under the joists: it will serve as the basis for the cake. Lay a waterproofing film and place the insulation slab between the beams with a layer of approximately 10 cm.
To lay pipes, channels are cut out in the beams. First, reflective plates are placed in them, then the pipes themselves. To improve the reflective effect, pipes are often wrapped in aluminum foil.
The second option is flooring: chipboard sheets with milled channels are placed on top of the insulation on the joists and pipes are laid in them.
The third is rack: the channels are not milled, but are made by stuffing slats onto base sheets. The slats are made from edged boards with a thickness of 2.1-2.8 cm. The distance between them is left the same, 2.1-2.8.
When installing the screed, do not place it on a wooden base.
If a laminate is used as a covering, it can be laid on top of the pipes: any profile - slats, milled channels or PPS mats takes on the load of the ceiling and everything that is located above.
Under tiles (which warm water floor is better under tiles) or soft roll covering, a continuous base is required. It is made from plywood. Because plywood is a heat-insulating material; the thickness of the sheets should not be very large.
Separating layer
To prevent anything from moving apart, the base of the pit must be lined with geotextile or dornite. It is better to choose the first one, because it also protects against weed germination.
The correct underfloor heating pie must be separated from parts of the foundation and plinth (the lower part of the building wall lying on the foundation) with a special layer. It is strictly forbidden to rest the slab on protruding parts of the structure.
The correct floor should be made in the form of a floating screed.
Installation recommendations
If you decide to use a film structure, then using a screed compound is not advisable. Here you should use a special tile adhesive. The elements are fixed on it. Naturally, the thickness of the layer should be minimal, and the upper part of the film floor should be visible. Next, you can lay the tiles. First you need to wait for the previous layer of glue to dry. This method of installing tiles will avoid peeling of the floor covering.
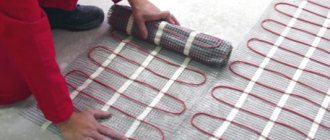
Technology for laying heating mats for electric heated floors
https://youtube.com/watch?v=fY3jneItmIs
Substrate
Further, some variability is allowed. To ensure that the floors do not settle properly on the ground, there are several installation options. The underlying layer must be selected taking into account the height of groundwater, expected loads, the same looseness of the soil, and so on.
Most often, a concrete layer is used - this is the most reliable and proven option. But there are cases when it is impossible to use concrete, then the following materials can be used:
- sand. It is used exclusively on dry soils to avoid water absorption through small holes in the sand. It is noteworthy that such a process can occur even in cases where dew forms on the surface. It will also be more difficult with sand because it needs to be compacted perfectly evenly, again, this needs to be done with the help of a level;
- crushed stone Crushed stone works well at high groundwater levels. Capillary suction is completely impossible in the crushed stone layer. Laying should also occur evenly;
- natural soil. It is used quite rarely and is most often coarse sand or gravelly soil (soil containing grains larger than 2 mm, but less than 50 mm). It will do if there is no groundwater or particularly loose soil.
- expanded clay This will do too.
Mineral wool slabs (a thermal insulation material made from mineral wool and a synthetic binder) will be an excellent insulation material. They have a high density, are quite strong and live a long time. Such slabs are laid in two layers; they can be vulnerable to moisture, so they need to be treated with a water-repellent substance.
Features when laying
We looked at the general principle of laying a screed cake under a heated floor, so now we will analyze in detail the features for different types of base.
In a frame house
The pie and the rules for assembling a heated floor in this case are quite simple. At the initial stage, a ceiling (rough) is made in a frame house. Its beams are attached to the foundation.
Waterproofing must be laid between the piles and wooden beams. It will help protect parts with different humidity and other characteristics from negative effects. As a waterproofing layer, roofing felt, waterproofing or linochrome are used. They are sold in rolls and laid in two layers.
The supporting base is performed in one of the possible ways:
- along wooden beams, considered the main ones;
- using not only main, but also secondary beams.
Secondary beams are also called logs. They make it possible to take a larger step of the main beams. This installation method increases the amount of work performed and the required materials. In addition, the thickness of the overlap in the second case will be much greater. All other layers are laid on wooden logs.
The correct installation of a pie for a heated floor in this case is as follows:
- cranial bars fixed to the sides of the load-bearing beams;
- boarding;
- waterproofing;
- thermal insulation;
- load-bearing beams with insulation;
- vapor barrier layer;
- boards acting as a rough covering.
On the ground
In order for underfloor heating to have the correct shape, the layers must be laid correctly. Otherwise, due to shrinkage, the insulation may shift and the entire surface of the screed will crack.
A cross-section of the pie gives a clear idea of the layers required. A durable warm water floor will be obtained by observing the following rules and sequence:
- Level and compact the soil tightly.
- Fill in about 10 cm of crushed stone and carefully level it.
- Next comes a layer of sand 5 cm thick. It is compacted and watered.
- Install waterproofing.
- Lay the reinforcing mesh.
- Fill in the rough screed.
- Lay a layer of waterproofing.
- Install thermal insulation.
Next, the cake with heated floor pipes is laid on the ground in the same way as with the concrete floor base described below.
On floor slabs, on concrete
If in a private house the pie is planned to be installed on concrete, then the layers are laid in the following sequence:
- Stay waterproofed. The rolled material is overlapped and secured with tape. Otherwise, leaks may occur. Waterproofing is also applied to the walls. The height should correspond to the planned level of the pie.
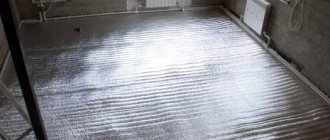
- Insulation layer. For this purpose, extruded polystyrene foam or foam is used. Foil-based thermal insulation or just a layer of foil is placed on top of it. This will make it possible to save energy consumed for underfloor heating.
- Damper tape. It is located around the perimeter of the room to compensate for thermal expansion.
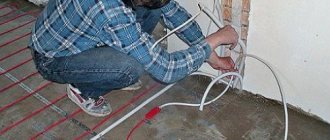
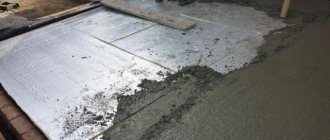
- Pipe system. It is important to use whole pieces of pipes, since the joints may begin to leak over time, and to find them you will need to dismantle the floor covering.
- Reinforcing mesh. Allows you to increase the strength of the structure and secure pipes. In addition, it is used to install beacons for even pouring of the screed.
- Checking for leaks. Next, it is necessary to check the system for leaks. If leaks are detected, they are repaired and inspected again. After making sure that the system is tight, proceed to the next stage.
- Screed layer. The concrete layer is leveled along the beacons. To make it, you need to take a mixture of at least M150. The screed is allowed to dry for about 30 days. If this is not done, it will crack and quickly become unusable. At this time, under no circumstances should the system be turned on.
- Laying flooring. As a floor covering, it is necessary to use materials suitable for laying on a warm water floor. Products not intended for this purpose will be deformed when exposed to high temperatures and will quickly become unusable.
On a monolithic slab
The monolithic slab has high strength. It is leveled with a rough screed and the installation of the layers of the pie begins.
This base is very cold, so it is important to properly insulate the floor. Extruded polystyrene foam is used for the heat-insulating layer. It is placed between a monolithic slab and a rough screed.
Next, the layers are laid in the same way as for concrete.
In the bath
Most often, bathhouse floors are installed directly on the ground. In this case, be sure to raise the floor above ground level. For this, beams with a cross section of 7*10 cm are used. They will take part of the load on themselves and allow it to be distributed much more evenly. In addition, leveling the base in this case will be very simple.
Two layers of waterproofing are laid on the support posts and foundation. Most often, roofing felt is used in this case.
After this, supporting beams are placed. Along the edges they are installed on the foundation, and in the center they are supported by 2-3 columns. The logs are fixed to the beams. To create a slope, they are cut in the center by 2 cm.
Skull blocks are nailed to the bottom of the logs using nails or self-tapping screws. They are positioned so that they form the letter T. The subfloor will be fixed to them.
Insulation intended for baths is placed on the subfloor boards. It is attached to the joists using a stapler with staples. After this, a vapor barrier membrane is laid. It is placed on the walls to a height of 20-30 cm.
To increase the reliability of the structure, all connections are glued with tape.
Lastly, the tongue and groove board flooring is secured. Self-tapping screws are attached to the groove at an angle of 45 degrees. In this case, they will not be visible on the floor covering.
Be sure to leave a gap of 2-3 cm to ensure proper air circulation. To do this, after fixing the vapor barrier layer, additional bars are filled.
In a wooden house
Making a heated floor in a private house is quite simple in stages. Compliance with all requirements will allow us to do this efficiently and reliably.
The sequence of layers will look like this:
- Insulation layer. In this case, the load level will be minimal, so you can use even the cheapest options, for example, glass wool.
- A layer of foil. The presence of a reflective surface on the foil allows it to be used advantageously.
- Pipe laying. At the intersections of pipes with joists, small cuts are made equal to the diameter of the pipe for their even laying.
- Load-bearing floor. For this purpose, it is best to use plywood, since it conducts heat much better than tongue-and-groove boards.
- Flooring. The final stage is laying the flooring. It must be suitable for underfloor heating systems.
As you can see, the principle of installing a heated floor pie is similar for different types of bases and has only slight differences.
Footing
Whatever bonding material you use, you will still need a footing. You will need a lean concrete mix B 7.5. We remind you that lean concrete is concrete in which the content of cement and water is reduced and the content of filler is increased.
This material is much “weaker” than its “fat” counterpart, but at the same time cheaper. In our case, it is not advisable to use a stronger concrete composition.
The footing is not reinforced, but must be separated from the base or parts of the foundation. Pieces of foam plastic or special tape are suitable for this.
If you want to further reduce the cost of laying a floor on the ground, you can use saturation of the upper layers of crushed stone with cement laitance. The resulting crust should be perfectly smooth and its depth should be several centimeters. This trick will help make a waterproof concrete crust.
Technology and installation of a wooden floor in a private house with your own hands, installation procedure
Today, natural materials are at the peak of popularity. A special place is occupied by wood, which is an environmentally friendly building element and is perfect for arranging floors. Very often you can find a wooden floor in a country house. Despite the fact that laying the floor is the most important moment in construction and renovation, you can refuse the services of specialists and make the floor in a private house with your own hands. But this requires maximum effort and attention. The floor must be reliable, strong and durable, so you should take seriously the study of flooring technology.
Waterproofing and insulation
Finally we got to waterproofing and insulation. At this stage it is necessary to isolate yourself from moisture. We will do this using a waterproofing film or a special membrane. Lay the film overlapping, and seal the cracks at the joints with construction tape.
The first thing you need to put is waterproofing material, not thermal insulation.
Might be interesting
Thermal insulation
Insulating the ceiling in a bathhouse - methods, materials, useful...
Thermal insulation
Tables of comparative characteristics of thermal insulation…
Thermal insulation
Why polyurethane foam insulation is the best...
Thermal insulation
Self-adhesive thermal insulation: how to choose and apply?
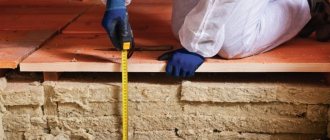
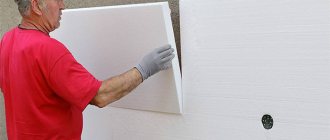
Use a layer of expanded polystyrene foam or dense polystyrene as insulation. You can also use special plates, but we recommend doing this only if the load on the surface of the structure is large.
You can choose the thickness of the layer yourself depending on the climatic conditions of the region, usually from 5 to 20 centimeters. Fill joints and cracks with construction foam.
Lay another layer of waterproofing material or just roofing material on top of the resulting “sandwich”. This is not necessary, but if you live in a humid region with high groundwater, it is better to be safe.
Materials and tools
For the water circuit, metal-plastic and polypropylene pipes are used.
For the arrangement of rough and finishing screeds, heat and waterproofing, you will need:
- quarry or washed river sand;
- crushed stone or gravel with a fraction size of 20–40 mm;
- heat insulator - extruded or foamed polystyrene foam;
- material for vapor and waterproofing;
- reinforcing mesh for finishing screed;
- cement grade from M-300;
- damper tape.
For the heating circuit, pipes made of metal-plastic, copper or cross-linked polypropylene are purchased. You will need a cabinet where distribution and control fittings (manifold, taps) are installed. Special fastening devices for laying pipes speed up the work.
Before starting work, prepare the tool:
- a concrete mixer or metal sheet for manually mixing the solution;
- shovels, buckets, grout;
- tape measure, bubble or laser level;
- drill or hammer drill;
- guides for leveling the floor - permanent or removable.
To compact soil, special devices are purchased or made from wood. Mechanical rammers with gasoline or electric motors can be rented.
Prepare a supply of water if there is no centralized water supply on the site.
The calculation of the required materials is carried out based on the geometric dimensions of the building and the thickness of the layers of the “pie”.
Damper layer
Lay a damper tape over the walls, which will be slightly higher than the planned thickness of the screed. This is necessary in order to isolate the future screed from the load-bearing elements of the foundation or plinth.
We remind you: the floor on the ground is strictly prohibited from being rigidly connected to the elements of the base.
Instead of tape, you can use strips of polystyrene foam, which also need to be laid a little higher. The excess pieces can then be trimmed off.
Installation on a concrete slab
Initially, you need to prepare and level the surface of the base. Sweep away the dirt and assess the condition of the concrete slab. When installing heated floors, the permissible height difference is half a centimeter (the process of installing a heated water floor with your own hands).
If more, the base needs to be leveled. This can be done either using a rough screed (sand concrete, concrete M300), or by scattering sand over the surface and leveling it.
Next you should lay the waterproofing. Plastic film will do. You need to cover the entire surface of the floor with film and place it on the walls to the height of the future screed. Adjacent strips are laid with an overlap of about ten centimeters, and the joints are glued with mounting tape.
Attach damper tape along the walls at the junction with the floor. It is necessary to compensate for the thermal expansion of concrete, otherwise the screed will crack when heated.
The tape is placed so that it ends up a couple of centimeters above the surface of the screed. You can fasten it with hardware or put it on a self-adhesive layer.
If the area of the room is very large and at least one wall is longer than 8 meters, an additional expansion joint is installed in the middle perpendicular to the long wall.
In this case, the pipe laying scheme must include at least two circuits: they are placed on both sides of the damper without crossing the tape.
Lay thermal insulation. To create this layer, you can use PPS, cork backing, or EPPL. For water floors, it is not advisable to choose basalt wool due to its hygroscopicity.
Floating screed
This screed performs several functions at once: it produces thermal insulation and sound insulation at the same time. The design feature of this screed is that the solution is placed on the surface of the insulation, and not on the base.
Well, or on a layer of roofing felt, if you covered the insulation on top with it. Here's what you need to pay attention to:
- It is advisable to do everything at once. In large rooms this will not be possible, so separate the finished and unfinished areas with partitions. This will create an expansion joint and help the screed to fully adhere;
- if possible, pour along the plaster beacons;
- The thickness of the screed should not exceed 20 centimeters, the minimum – not less than 5. Focus on the expected operational loads and the type of future floor covering.
Minimum and maximum thickness of screed for heated floors
Minimum thickness
Heated floor screed thickness
SNiP indicates 20 mm, however, this applies to metal-cement screed. If you do not use reinforcement, then professionals recommend a screed height of at least 40 mm (provided that the diameter of the water pipe does not exceed one inch (25 mm)). This is due to the fact that a small thickness will not be able to provide the necessary strength of the floor covering. Of course, a thin screed also has its own conditions, including:
— The presence of an existing subfloor;
— And the so-called rough screed (allowing further work to be carried out on a flat surface).
A thin layer is unacceptable in technical rooms, such as a garage, and rooms with more intense loads, for example, kitchens, baths, hallways.
“There is one point to consider. When heated, linear expansion occurs, which means that the dimensions of the concrete screed and the finishing floor covering will change slightly. Taking this into account, along the perimeter of the walls, just above the height of the floor, a damper tape is glued, which plays the role of a “compensator” for the physical dynamics of heated materials and takes on the resulting pressure.”
Sometimes developers offer to equalize differences in floor level due to thickness. The consequences are inhomogeneous heating. This happened to my colleague. Level differences in one of the rooms reached 13 cm (!). He did not give consent, and the builders “solved” the problem by adding crushed stone, sand, expanded clay, and also a jackhammer.
Floor reinforcement on the ground
Reinforcement is an important step that will help strengthen the concrete screed. The metal mesh will also serve to secure the pipes on it.
The reinforcing mesh should be a wire with square cells with a thickness of 5 to 10 centimeters. Depending on the design features, the thickness may vary.
The mesh is laid as follows:
- There is a protective layer underneath – a polymer material. The thickness of this layer should not exceed 1.5 - 3 centimeters.
- mesh installation;
- installation of special beacons (this is not necessary in small rooms);
- pouring the mixture.
Walking on unhardened mixture is not advisable; it is better to install special paths along which you will move. Even when the mixture is taken, it is better to continue walking along these paths, metal mesh has a much lower density and can bend under the weight of a person.
Stiffening ribs under the partitions
In order for the warm water floor to hold better, it needs to be strengthened. This is done due to stiffening ribs. To create them, extruded polystyrene foam is placed under the partitions - a material that consists entirely of closed small cells.
The material must be laid intermittently, and the resulting voids must be used for laying reinforcement. Thus, it should turn out that the entire structure is evenly reinforced with reinforcing bars.
Heated floor contours
For even greater savings, you can install pipes in a warm floor along the ground, this will create a literally warm floor. The reinforced mesh has just the right dimensions for placing a heating pipe on it.
To connect to the collectors, the pipes are led outside near the walls. The walls must be covered with protective tape. As for all other communications, they require a similar system.
After the final filling of the “pie” everything will be ready. Then you are free to make the floor the way you want. This design is just one of the possible options; if you wish, you can modify any of its elements. It all depends on your finances and construction conditions.
Risk of cracks
When using the traditional wet type of screed, it is very important to prevent cracks from occurring. Their appearance can lead to many negative consequences:
- It will become impossible to uniformly warm the room, which will negate the advantages of a modern heating system;
- uneven heating of floor areas will lead to overheating of individual thermal elements and their subsequent failure;
- may get hurt.
To prevent the occurrence of cracks when making screeds with your own hands, you must:
- correctly observe the proportions of the solution, as well as the drying mode;
- used to increase the elasticity of the composition;
- strengthen the structure with reinforcement or;
- install between the wall and the screed.
Damper tape or low-density foam can be used as a damper. Its main task is to compensate for the expansion and contraction of the material as a result of temperature changes.