Types of electric heated floors
All floors with electric heating elements can only be divided according to the basic principle of energy transfer. In this case, they are divided into two large groups:
- Film infrared floors;
- Cable (rod) floors.
The dominant principle of heat transfer from the heating element to the floor covering is distributed as follows: for film floors - radiation, and for cable floors - heat transfer. The difference is more noticeable if we remember that heat transfer occurs through direct contact, while radiation does not require contact.
These main principles also dictate the conditions for installing electric heated floors. In the case of cable floors, it is imperative to “bury” the heating element in the screed. But film floors can be installed without “dirty” work. Consequently, by purpose they will also have a target definition. Cable floors are ideal for monolithic, homogeneous coatings, such as tiles or self-leveling 3D floors. But infrared floors go well with laminate, linoleum and carpet.
But this division is not complete. Each of these heating methods should also be divided into groups depending on the form of release. So cable floors are divided into:
- Twin cable;
- Single core cable;
- Mats;
- Rod floor.
The differences between them are of significant importance during the planning and installation of heating elements.
In particular, a single-core cable is laid in such a way that both ends end up at the same point. Figuratively speaking, these are two wires for one electrical plug. This method of laying is called “double”: “double snail”, “double helix”.
The two-core cable can be laid leaving the end of the heating element open. It is much easier to install. In terms of power, these two representatives have the same standards, and they are produced in coils.
Mats are a two-core heating element fixed on a polypropylene mesh with a large mesh. The ease of installation is highly questionable, since the cable pitch and power of the entire product have already been declared. But in some cases, especially in small rooms, it is more convenient to work with this form factor.
Rod heating elements are a special subtype. If you imagine this structure visually, then remember a rope ladder. Only instead of ropes there are wires, and instead of steps there are rod heating elements. They are less convenient to use than all other types, since when changing the direction of cable laying, it is necessary to restore the electrical circuit; the rods themselves are not flexible. As compensation, the manufacturer declares increased energy efficiency and durability. But there are many questions with this.
One more property of cable heated floors must be emphasized - enormous inertia. The reason is that in order to heat the floor covering, the heat must first warm up a few centimeters of the monolithic cement screed. The minimum layer of screed should be 4 cm. If 1 m2 with a thickness of 1 cm weighs 16 kg, then 4 cm - 64 kg. But heating 64 kg of concrete is a very energy-intensive task, and it will take time. Therefore, on such floors it is difficult to maintain the set temperature with high accuracy. But they also do not cool down immediately. In a word, inertia can be used to your advantage, but not always.
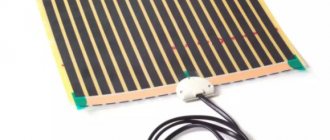
Infrared floors consist of two lavsan films, between which a layer of carbon is applied. Depending on the method of applying this layer, it is divided into:
- Striped films;
- Continuous films.
Since the power is regulated by the thickness of the carbon layer, and during installation these differences do not impose any special requirements, the difference is noticeable only during operation. In particular, if errors are made in organizing floor heating using striped film, a “zebra effect” may occur. With it, your feet feel the difference in the temperature of the floor covering. But note that this occurs due to installation errors. Other indicators, such as the rate at which the programmed temperature rises, radiation area or energy efficiency, do not reveal qualitative superiority, but only isolate quantitative ones. Yes, a film with continuous carbon coating heats up 8% faster, the radiation surface is 12% larger, but the price of such material is 35-40% higher.
See also: Water heated floor
An important feature of film heating elements is their method of heat transfer. Almost 95% of it is radiation. This can be proven very simply. Hold your hand at a distance of 5-7 cm from the turned on film, and you will feel a clear transfer of heat. And if you hold it between your palms, the heating is barely felt. It is this quality that makes infrared film an ideal option for heating floor coverings such as laminate, linoleum, and carpet.
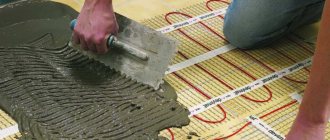
Heating mats
Heating mats belong to the electric cable floor, only the wire is fixed to the fiberglass sheet.
Device
The heating mats are 0.5 meters wide, and a wire is fixed on them at a set pitch. The device kit includes thermomats with cable and corrugation. A temperature sensor is inserted into the corrugation; it protects it from moisture. If the structure is filled with glue and it does not completely cover the sensor, then it is necessary to install a moisture-resistant device.
To install such a warm electric floor, you will need to stock up on a thermostat with a remote sensor, mounting boxes and wires. When choosing a thermostat, the level of energy consumption is taken into account, and the wires, or rather their cross-section, are selected taking into account the power of the device and the material from which they are made.
The design of the heating element is simple - a cable, usually two-core, no more than 45 mm. The cores are shielded and covered with a protective sheath.
The design of a warm floor with heating mats consists of a rough base, heat and hydromaterials, the mats themselves, tile adhesive and finishing coating.
Principle
The operating principle of the mat is the same as that of a floor made of ordinary cable.
The current passing through the conductor generates heat, through convection it is transferred to the screed, from it to the floor, and it warms up the air.
Advantages and disadvantages
Heating mats for electric heated floors
The main advantage of heating mats is the simplicity of their design and installation. There is no need to fasten the cable or calculate the laying step, the structure is completely ready, you just need to lay out the fabric.
In addition, such a floor warms up faster than a regular cable floor, the “pie” is less voluminous, and the mats are thin, they can be mounted in a layer of tile adhesive. Since the device is lightweight, it will not be supported by strong floors. But such floors are more expensive.
The disadvantages also include:
1. Difficulty in laying; if necessary, go around an obstacle. Let’s say it’s difficult for a plumber to get around, since you can’t cut the cable, you can only trim the mesh and bend the wire.
2. Inability to customize the laying step to suit your needs.
3. It is inadmissible to use it as the main heating, since the mats have little power.
What power is required
It must be said right away that film floors are not intended for basic heating of the entire home. It is more like an additional element of creating comfort in a separate room or even in the entire apartment. But cable floors are precisely oriented for use as the main source of heat.
Of course, these are conditional divisions. In fact, if floors act as the main source of heat, then the power of the heating elements should be:
- Rooms with one wall facing the street - 130 W/m2;
- Rooms with two walls facing the street - 160 W/m2;
- Internal rooms – 100 W/m2.
These are very general values, because for the Arkhangelsk region these figures need to be increased by one and a half times, and for the Astrakhan region they can be slightly reduced.
At the same time, during installation you can skillfully vary the pitch of the turns, thereby increasing heating in problem areas. For example, run a cable along the walls with a pitch of 8 cm, and in the middle of the room increase the step to 15 cm. But these parameters are determined with strict regard to the power of 1 linear meter of cable.
Varieties
Which type should I choose? Scientific developments and modern technologies have made it possible to create several modifications of classic electric surface heating. They look and function with some variations, but the general principle is the same: the power source is electricity.
- Classic cable. Classic cable floor diagram
- Electric mats. Instructions for laying an electric mat under tiles
- Film infrared. Infrared heated floor design
All of these varieties have heating elements, with the help of which the top coating is heated. An important aspect of choice is installation with or without a screed. Which option is better to choose? Let's figure it out.
Choice for a specific room
If this is the main source of heat and the walls of the room face the street, then definitely a cable system. In other cases, variations are possible depending on the floor covering.
For example, under laminate or soft floor coverings, a film system is recommended. But if you comply with certain conditions during installation and selection of materials for finishing floors, then both linoleum and laminate will perform their function well with a cable heating system.
When choosing, rely on the following points:
- This is the main source of heat, or secondary;
- Required power;
- Possibility of filling screed;
- What type of flooring is the system being prepared for?
Carefully analyze all the data, and the choice will become obvious.
FAQ
How expensive are electric heated floors?
Contrary to popular belief, their electricity consumption is not too high. It can be compared to the consumption of an oil cooler. At the same time, the operating mode of the heated floor is selected based on weather and climatic conditions, which allows you to save on heating on warm days.
There is information that infrared systems create strong electromagnetic radiation. How dangerous is it?
This issue has been thoroughly researched and tested many times. Radiation from a heated floor is 20 times lower than the sanitary standard. For example, the radiation from a TV is much higher, so there is nothing to worry about.
Is it possible to change the length of the heating cable?
No, you can't do this. The cable is cut into sections of a certain length, designed to connect to the network and create a given load. If the cable is shortened, the wiring will be at risk of overheating. In addition, the RCD may trip and energy consumption will become too high.
How long do heated floors last?
If these are products from well-known companies, only the warranty period can range from 15 to 50 years. Of course, you can count on such durability only if you follow the installation technology and rules of use.
Is it necessary to install a thermostat?
Yes, this is required. Otherwise, you will have to endure the heat or freeze with the heating system running. Installing a thermostat will not only allow you to adjust the heating mode, but will also make it possible to save on energy consumption on warm days.
General requirements for installation work
There is one very important rule that applies to any heated floors - the horizontal surface must be ideal. This must be ensured even before the installation of heat insulation and other work begins. And the reason here is that if the floors are leveled with a screed on top of the cable, then a very unpleasant situation can arise when in different corners of the room the thickness of the screed will be different. As a result, to heat the surface, the cable will work in opposite corners of the room with different intensities. This situation very quickly leads to equipment failure.
Leveling the floors is carried out with a cement-sand screed with a minimum thickness of 4 cm. Please note that the time for the screed to fully mature is calculated using the formula 1 cm thickness - 1 week. To speed up the process, you can use quick-drying mixtures that gain full strength at a thickness of up to 10 cm within 2-3 days.
Attention: all further instructions will assume that the floors in the target room are leveled horizontally.
Infrared film
Installation begins with priming, waterproofing and laying the substrate on the base. For waterproofing, a polyethylene film with a thickness of 0.2 mm is used, it is laid with an overlap of 10-15 cm, with the same allowance on the walls. The joints are taped.
See also: Warm floors - which type to choose? Options
For objective reasons, only three types of heat insulators can be used for the substrate:
- Extruded polystyrene foam (Penoplex);
- Cross-linked polyethylene foam;
- Cork agglomerate.
These three stand out from all other materials in this group due to their high elasticity and hardness. In other words, they do not wrinkle after prolonged squeezing.
In terms of physical indicators, their properties are approximately identical. But when compared by other criteria, the difference is noticeable. In particular, Penoplex is absolutely not resistant to most household solvents (acetone, 646, white spirit, etc.). And cork materials are poorly resistant to biological destructive factors - fungus and mold. This problem is partially solved by adding bitumen or rubber based binders to the cork agglomerate. But nothing can be done about the solubility of polystyrene foam.
Substrates are available in rolls or mats. The thickness of the material should be 6-10 mm. Before use, the substrate should rest at room temperature for 24 hours. Lay it on the base, fixing it with double-sided tape, so that there is a gap of 10-15 mm to the wall. The sheets are glued together with tape.
Working with film
Infrared film can be purchased in a boxed version or in bulk. In the first case, the package contains:
- Thermostat;
- Thermal sensor;
- Heating film;
- Bitumen insulation;
- Crimp terminals;
- Cables and wires.
The entire kit is designed for a specific area and includes everything you need. When self-configuring, it is necessary to provide for the compatibility of the purchased equipment.
In the price of a set of heated film floors, the main role is played by the thermostat - from 2200 rubles complete with a temperature sensor, and the film itself ≈ from 1000 rubles / m2. The cost of the film is significantly influenced by the capacity and area of the roll.
Before starting work, you should mark on the floor the places where the heating elements will be placed. IMPORTANT: heating elements should not be placed under stationary furniture and large household appliances . This is necessary to prevent local overheating of the film with its subsequent failure.
The film is laid by cutting strips of the required length along the “cut line”. It is very important that there are no overlaps.
All cuts are connected into a single electrical circuit, following the instructions from the manufacturer. All contacts are carefully sealed using a bitumen insulator. The power cable is connected to the location of the thermostat.
Install a temperature sensor. It needs to be placed under the film in a place where there is no carbon heating layer above it. IMPORTANT: a groove is cut in the substrate for the temperature sensor, wires and power cables . After placing all the components in the groove, it is closed with tape.
A groove is cut out on the wall and wiring is laid in it, leading it to the thermostat.
Connect the power and temperature sensor according to the manufacturer's instructions. To check the correct assembly of the system, turn it on for 1-2 minutes. If the film emits heat, then everything is in order and you can begin laying the floor covering.
Film floor covering
There are slight discrepancies in the preparatory work regarding this point. In particular, laminate can be mounted directly on the film, having previously covered it with a layer of polyethylene waterproofing.
A layer of plywood is required under soft floor coverings. It will protect the film from damage during operation. Plywood is used 8-10 mm.
What consequences can result from errors during the installation of ETP?
The most common mistakes in self-installation of ETP include:
- Purchasing extra materials. This happens when a person takes into account the total area of the room. It is necessary to take into account only the one that serves as the basis for the heated floor. The floor, which is occupied by furniture and heavy household appliances, is not taken into account.
- Do not cut the cable in the heating mat. It is important to plan the installation so that the entire mat is used. It is better to leave a small part of the floor uncovered.
- It is forbidden to turn on the floor with a screed until it is completely dry. This will cause uneven drying, the formation of voids and cracks.
- The cable must not be laid without first leveling and cleaning the subfloor. It is recommended to treat the base with a primer to prevent dust from settling and the formation of air pockets around the perimeter. This contributes to its severe overheating.
- The temperature sensor is installed in the corrugation in order to have access to it for repair and replacement.
- An important step before starting operation is measuring the resistance. If any abnormalities are found, it is recommended to contact a professional to correct the problem.
- To carry out rearrangement of furniture or repairs in the future, you should save the ETP masonry diagram. To do this, just take a photo of the floor before pouring cement.
Possible installation errors
The electrical base is unpretentious and is reliable with the correct choice of type and component accessories. If installation is done correctly, the structure will last a long time.
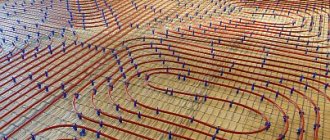
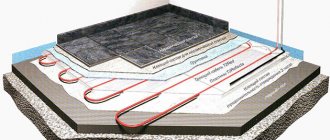
Cable heated floor
Cable systems can also be purchased in a complete set from the manufacturer, or in an assortment. The cost of thermostats and temperature sensor does not differ from film analogues, but the price of the cable varies depending on the release form and power. A two-core cable with a power of 20 W/m, depending on the manufacturer and length, can cost from 160 to 400 RUR/m. Placed on a grid, the same products are more expensive.
In this case, the same materials are used for the substrate as for the film floor, but their thickness should be 30-40 mm. The backing sheets are laid out at intervals and carefully fixed to the base. To do this, use self-tapping screws with wide washers. The joints between the plates are glued with polyurethane glue or silicone sealant.
See also: Film heated floor
On top, on the substrate, a diagram of the cable layout is drawn. The number of turns per 1 m2 is calculated by the formula: W/W1. Where W is the required power per 1 m2; W1 – power of 1 linear meter of cable. IMPORTANT: the distance between adjacent turns should not be less than 8 cm. Then, proceed to attach the mounting tape.
It is fixed to the base through the insulation, every 70-90 cm, perpendicular to the turns of the cable.
Laying the two-core heating cable begins from the place where the thermostat will be located on the wall. To secure the cable in the mounting tape, use a reed fixation system. The cable bends should be smooth, without kinks.
The distance between the cable and the wall must be at least 5 cm, and to heating devices and heating risers - 10 cm.
After laying the heating element, a temperature sensor is integrated into the substrate. It is inserted into a corrugated pipe with a plugged end. Place the temperature sensor at a distance of 25-30 cm from the wall, between the turns of the cable, and fix it well to the base. The wiring from it is pulled through a corrugated pipe to the thermostat. Power cables are also connected to it.
The wiring is connected in accordance with the instructions from the thermostat manufacturer. Then check the integrity of the electrical circuit and the correct assembly of the structure by turning on the heat for 2-3 minutes. If everything works, then be sure to sketch out the cable layout and only then start pouring the screed .
The minimum thickness of the screed above the cable is 4 cm. Using a cement-sand mixture will require waiting 4 weeks until it is fully matured. A thinner layer of screed is not recommended to prevent the appearance of the “zebra effect”, and also for the reason that this will increase the likelihood of cracks appearing after thermal expansion of the material. If the formation of cracks can be prevented by introducing polypropylene fiber into the screed composition for dispersed reinforcement, then the heating banding will remain.
It is perfectly acceptable to use quick-drying and self-leveling screeds. They are more expensive in price than a cement-sand mixture, but they go through the entire maturation cycle in 2-3 days with a layer thickness of 5-7 cm. To calculate the amount of such a mixture, use the following figures: 14 kg/m2 with a thickness of 1 cm.
IMPORTANT: until the screed is fully matured, turning on the heat is strictly prohibited!
After maintaining the technological interval to gain strength of the screed, the surface is primed and the laying of the floor covering begins.
The ideal option for such a surface would be ceramic tiles. It forms a monolithic connection with the base, and this increases the energy efficiency of the entire system. Linoleum and carpet will also be used on such floors without any complaints, although with less efficiency. Caution is required with laminate flooring. The fact is that the heating system “buried” in the screed has high inertia and precise temperature control on it is impossible. And for long-term operation of the laminate, strict temperature conditions must be observed. Therefore, when assembling laminate flooring on a cable-heated floor, you are taking a big risk.
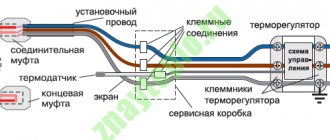
Temperature regulating and monitoring device
The thermostat is responsible for the process of adjusting and controlling the temperature level of the electric floor. After setting, it itself maintains the set temperature.
The thermostat is based on the indicators of the sensor; it is connected to it with a thermal protection wire.
Thermostats are either mechanical or automatic:
- Automatic ones have a digital display, it shows the degree of heating of the room. A convenient component in such a device is a remote control for adjusting the temperature.
- Mechanical - equipped with an adjustment knob, it sets the temperature level.
The thermostat works constantly, so the material from which it is made must be of high quality, and the contact connections are reliable. It reacts to any signals from the sensor - turns off or turns on the heating.