Insulation is an important stage in completing an apartment renovation or building a private house. By insulating external walls from environmental influences, their service life increases. Heating costs can be reduced by 30–40% depending on the difference in thermal conductivity of the insulation and the facade. Insulating a house with polystyrene foam is the most common way to increase the energy efficiency of a building; we will tell you in detail how to do this correctly below.
An example of insulating a house outside
Example of internal insulation
Insulate from outside or inside
Diagram - location of the dew point when insulating a house from the outside.
Insulating walls with foam plastic from the outside allows you to shift the dew point (0º C) into the insulation, and if you do it yourself, it is also much cheaper. The negative impact of seasonal temperature changes, leading to cooling and heating of the facade, is also eliminated. The difference in temperature between the inside and outside of the wall is eliminated, which slows down the appearance of cracks.
With internal insulation, the dew point is also in the insulation, but the front side of the wall is exposed to external influences and completely freezes in winter. Walls insulated on the inside are destroyed faster than without thermal insulation.
Video: thermal engineering calculation. Dew point
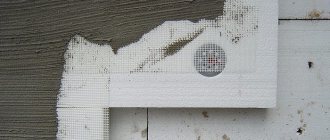
Attaching the starting profile
The next stage in insulating a house with foam plastic with your own hands is applying markings and attaching the starting profile. You need to push off from the bottom border of the wall, which should be covered by the insulation. It is marked using a hydraulic level at each corner of the building. To mark a line, a rope or cord is pulled through the indicated points.
At this level, the installation of the so-called starting profile begins, which will serve as the basis for the lower row of polystyrene foam. It will prevent the foam sheets from moving while the glue has not had time to harden.
For external insulation, the dimensions of the starting profile are determined based on the width of the foam. Fastening is carried out using dowels, the edges are joined using the oblique cut method or using corner joints.
Foam selection
To understand which foam plastic is better for insulating a house, you need to check the technical documentation. The marking should be PSB-S-40, self-extinguishing polystyrene foam. During manufacture, the density can be from 20 to 40 kg per cubic meter. Insulation of facades with polystyrene foam requires high density of the material.
The minimum possible density is 30 kg/m3, because it is necessary to create a mandatory protective layer.
Check whether the product corresponds to the documentation by breaking off a piece from it. If the edge is uneven, with round capsules, then the foam is of poor quality and is not suitable for outdoor use. At the required density, the granules are of the correct shape and the fracture is even.
Material properties
Expanded polystyrene – boards consisting of granules of foamed styrene. Due to the presence of internal voids filled with air, it has low thermal conductivity. The material is lightweight and environmentally friendly, which is why foam plastic is widely used in insulation.
Technical characteristics of insulation (click on the picture to enlarge)
Characteristics (GOST 15588–70):
- Thermal conductivity 0.037 W/(m*K).
- Density up to 40 kg/m3.
- Vapor permeability 0.05.
- Temperatures from minus 50º C to plus 70º C.
Disadvantages that need to be taken into account during installation work:
- flammability, high flammability, class G4;
- attracts rodents with the opportunity to create a warm nest;
- low resistance to chlorinated and aromatic hydrocarbons, acetone and carbon disulfide;
- low pressure resistance;
- Under ultraviolet light it releases toxic substances.
Why is this necessary?
The goal of façade insulation, like any other insulation, is to reduce to a minimum the exchange of heat between the rooms inside the house and the street. This will dramatically reduce heating costs in winter and air conditioning in summer. Of course, with temperature fluctuations in the off-season, your home will also be much more comfortable.
Insulation from the outside is the most reasonable choice for many reasons:
- Unlike internal insulation, the area and internal volume of rooms are not reduced even slightly.
- In case of insulation from outside, the dew point will not be either inside the room or inside the wall. If so, problems with freezing walls will be forgotten like a bad dream, and the walls will begin to deteriorate an order of magnitude slower, due to the lack of moisture.
- The thermal inertia of the main walls will act as an additional temperature stabilizer in the house. During night frosts, the mass of warm walls will not allow the air in the room to quickly cool down even without heating.
Not only private houses are insulated with foam plastic. It is also practiced to insulate part of the wall belonging to a separate apartment.
Which houses can and cannot be insulated?
Insulation diagram for a foam block house with description
Insulation of a wooden house
When the question arises - is it possible to insulate a wooden or foam block house with polystyrene foam, you need to know the main features of these materials. Thus, wooden walls have high vapor permeability, and due to the low permeability of polystyrene foam, moisture begins to accumulate inside the fibers. Therefore, in order to avoid rotting of the timber and dampness inside the house, it is necessary to use another heat-insulating material.
- A log house is most often insulated with aerated concrete or mineral wool, and siding is placed on top.
- A wooden frame house is suitable for external wall insulation; it is only important to waterproof the wood.
- A house built from foam blocks requires less insulation thickness due to its own low thermal conductivity. Sometimes it is not advisable to carry out thermal insulation work if high quality materials are used for construction.
What is this?
The modern building materials market offers a wide variety of solutions that are excellent for insulating inside and outside buildings, for basements, bathhouses, attics, etc. They differ in characteristics, properties, service life and nuances of application.
We can insulate external walls with polystyrene foam thanks to the Dow Chemical company. It was this company that first produced extruded polystyrene foam.
Expanded polystyrene foam, namely extruded, got its name from the device for its production and the method itself - extruder and extrusion, respectively.
It is not difficult to distinguish polystyrene foam from other insulation materials.
- Expanded polystyrene is available in the form of slabs of various colors;
- The surface of the insulation material is smooth;
- When broken, the inside of expanded polystyrene resembles foam rubber.
Many people do not see the difference between extruded polystyrene foam and regular polystyrene foam. Perhaps they just didn't look closely at them.
Yes, foam plastic is also presented in the form of slabs, but when broken we get granules. In this case, we are talking about expanded polystyrene foam, which has completely different properties and characteristics.
The best part is, despite the obvious advantages of extruded polystyrene foam, its price is approximately equal to polystyrene foam. That is, we are talking about fairly affordable and effective facade insulation.
What to use?
As soon as expanded polystyrene was released, it began to be used as insulation for brick and concrete houses, basements, change houses and other surfaces and structures. But the rules for proper use were developed gradually. Experts took into account errors and omissions, which allowed them to come to appropriate conclusions.
If earlier reviews of polystyrene foam were not the most positive, today this material is deservedly considered one of the best insulation materials for walls, basements, plinths, etc.
But to achieve maximum efficiency, extruded polystyrene foam should be managed wisely with your own hands.
- If you make mistakes at the insulation stages, the facades can quickly collapse. The culprit is one of the properties of polystyrene foam - complete vapor barrier.
- To work with facades and their insulation, only grooved polystyrene foam is used. It has a special marking - PSB 25F.
- All other types of extruded polystyrene foam are suitable for insulating the basement, roof, basement, floor, but not the facade.
- In order for PSB 25F to show its best side, mandatory waterproofing is required.
- The peculiarity of this expanded polystyrene is that it is able to remove moisture from the walls. This does not create favorable conditions for the growth and development of mold and mildew.
- If moisture remains trapped under the insulation, the facade will gradually begin to collapse.
For which facades is polystyrene foam used?
The choice of thermal insulation material largely depends on what exactly the building is built from. Not every heat insulator is suitable for a particular house, basement, or structure.
It is recommended to insulate concrete and brick walls with extruded polystyrene foam. At the same time, houses made of timber are not the best suited for this material. Wooden structures should be trusted with mineral wool.
Plus, there is one more important clarification regarding the use of expanded polystyrene. This insulation must have a fire retardant treatment. This requirement is due to the flammability of the material.
Calculation of foam thickness
Table of insulation thickness depending on the thickness and material of the external walls.
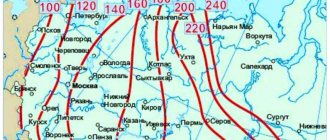
The thickness of foam plastic for wall insulation must be calculated individually for each building. The final indicator is influenced by the thermal conductivity of the wall material and the region in which the house is built. A thickness that is too small will not perform its functions, and a thickness that is too large will not provide additional benefits. To make the calculation, you need to know the thickness and thermal conductivity of the walls, as well as the foam. You also need to take into account the requirements of SNiP 23-02-2003, which establishes for each region a certain heat transfer resistance coefficient of residential buildings.
Recommended insulation thickness depending on region
For a house in the Moscow region (3.16), with red brick walls (0.67), 0.4 m thick, the following calculations are required:
- 3,16 – (0,4/0,67)=2,57
- 2,57*0,037=0,095
The resulting value is always rounded up, in this case to 10 mm.
Classes and grades of foam plastic
Foam classes
There are only two classes of foam: pressed and non-pressed. From the names it is clear that these materials have different production methods. The first is made using pressing equipment, the second - by sintering at high temperatures. But this production line also uses pressing equipment. However, the classification is what it is.
Expanded polystyrene suspension pressless
Which class the foam belongs to can be determined visually. Bespressovy is a complex of fairly firmly glued round and oval granules. The structure of this material is porous, the strength depends on the density.
Pressed polystyrene foam
Pressed sheet has the appearance of a fairly smooth sheet, the density of which varies and depends on the brand of the product. This material has excellent technical and performance characteristics.
Foam brands
Foam brands
Polystyrene foam produced using the non-press method is designated by the abbreviation PSB. Press - PS. The product name may also contain other letters, each of which indicates a feature of this product.
- A – the canvas has the correct geometric shape of a parallelepiped and a smooth edge;
- B – the edge of the product has an L-shaped cut;
- P – cutting of the blades is done with a hot string;
- F - façade or made using special forms;
- C – self-extinguishing;
- N – the product is suitable for external use.
The numbers in the name of the PPP indicate its density.
Brands of pressless foam
PSB-15
The most inexpensive product with a high degree of fragility. Used as a thermal insulation and packaging material, it crumbles easily and has low hygroscopicity. Traditionally used for insulating balconies and loggias, country houses, containers and outbuildings.
Foam plastic PSB S-15
PSB-25
Foam plastic of different brands
This brand of foam plastic is often supplemented with the letter “F”, so the material is recommended for insulating facades. Due to its higher density than PSB-15, it is used for the manufacture of landscape and interior decorative elements.
PSB-35
Expanded polystyrene PSB-S-35
A universal material with a wide range of applications. It is used for insulation of utilities, heat and gas mains, production equipment, thermal insulation of roofs and attics. Involved in the production of multilayer panels (including reinforced concrete) as a thermal insulation gasket.
PSB-50
Characteristics of polystyrene foam PSB-S 50
This material has the highest density among non-press foams. Demanded as a heat and sound insulator for objects of any purpose. It is able to provide high-quality protection from the cold, therefore it is used in the construction of underground communications, garages and parking lots, and in road construction.
Characteristics of brands of pressless foam.
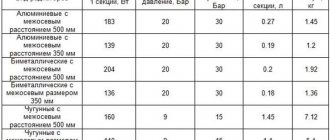
| Index | PSB-15 | PSB-25 | PSB-35 | PSB-50 |
| Compressive strength at 10% strain (MPa) | 0,04 | 0,08 | 0,14 | 0,18 |
| Density (kg/m3) | 15,0 | 15,1-25,0 | 25,1-35,0 | 35,1-50,0 |
| Thermal conductivity (W/mK) | 0,1 | 0,43 | 0,38 | 0,38 |
| Water absorption during the day in% of the total volume | 4 | 3 | 2 | 2 |
Pressed foam brands
Durable and rigid press (tile) foam is a closed-cell plastic. It is a radiotransparent material. It has found wide application in all sectors of industry and agriculture. PVC foams, which contain polyvinyl chloride resin, are produced using the pressing method.
Brands PS-1, PS-2, PS-3, PS-4.
They have a closed-porous structure, the degree of hygroscopicity is close to 0. They are extremely resistant to atmospheric influences. Self-extinguishing, petrol and oil resistant.
High-hardness foam PS-1-350
PS-1-150
They are used in radio electronics as a material that is unstable to electrical breakdown, as well as for the manufacture of containers and floats for aggressive liquids.
For insulation of building facades, pressless foam plastics of different densities are in demand. In order to buy truly high-quality material, you need to know how you can independently check the information of the manufacturer and seller.
Polystyrene foam of increased hardness PS-4-40
Among the largest Russian producers of foam plastic are the following companies:
- "Styroplast" (Chekhov);
- "Omegaplast" (Moscow);
- "Gamma Center" (Kolomna);
- "Kavminprom" (Mineralnye Vody);
- "Stavpolyester" (Stavropol);
- "Rosplast" (Moscow).
Preparing for home insulation
Due to the fact that polystyrene foam can be installed on almost any surface, it is used for brick, reinforced concrete and cinder block houses. Preparing the walls begins with cleaning any protruding parts, such as drainage pipes, ebbs and elements of external decor. If a large amount of hardened cement mortar protrudes into the brickwork, it should be carefully knocked down. The painted surface is sanded until the paint is completely removed.
One of the stages of preparing a wall is priming
After this, the surface is checked for cracks, unevenness and, if necessary, covered with cement. It is necessary to check the level and evenness of the walls. The difference between one edge and the other should not exceed 1.5–2 cm, especially if the finishing will be done using siding. When there is a significant difference, a screed is made. Putty is also used for depressions with a diameter greater than 3 cm. A layer of penetrating primer is applied to the finished surface, so work cannot be carried out in winter. This improves the adhesion of the glue to the wall surface and also prevents the development of fungus under the insulation.
Larger homes will require the use of a spray bottle to apply the primer, while smaller ones may use a brush or roller. After the walls have been completely processed, when the preparatory layer has dried, the installation of ebbs and slopes begins.
Video master class: proper preparation of walls
Insulation technology: preparatory measures
The process of insulating the walls of a house using polystyrene foam includes several main stages. Each of them is important. By performing all stages efficiently and in full, without skipping any of them, you can achieve high quality insulation.
Preparing the walls
Before you start doing wall insulation work with your own hands, it would be a good idea to watch a video on how to do it correctly.
Experts recommend creating insulation structures on walls that do not have defects. And for this you need to first inspect them. If during this process any defects in the wall structure are discovered, it is necessary to carry out work to eliminate them. You need to know that the surface of the walls that will be insulated must be cleaned of any coatings. In addition, there should be no mechanical damage , which includes chips, cracks and voids. Another important point is that the surface should be smooth without sudden changes. If you do not pay attention to this, then after the finishing is completed, the appearance of the walls of your house will not please you. In order to ensure the maximum effect of insulation, and the façade of the home to look attractive, it is necessary to replace windows and door structures during work.
Having completed the work within this stage, you can move on to the next one. It involves applying a primer composition to the surface of the wall.
Priming the walls
If it is necessary to apply a primer composition to a wall of a large area, then to facilitate this task it is necessary to resort to the use of a sprayer. If it is not there, then you need to use a wide brush. When the priming process is completed, you can proceed to installing the beacons.
Installation of beacons
Beacons are necessary so that when laying the foam, it lays down accurately and does not cause any deviations. will not cause any great difficulties for anyone .
This work is as follows: the beating cord is pulled from one side to the other with small indentations from the edges. You should use a cord equal to the thickness of the insulation. The insulation process is carried out not only using thermal insulation materials, but also using an adhesive composition, thanks to which the insulation is fixed to the wall. You should think about preparing it in advance. The dry composition is mixed with water in certain proportions in a separate container. The mixture that you end up with should look like thick sour cream. In addition, it must be homogeneous.
Methods for installing foam plastic
- Adhesive when lightweight foam sheets are used.
- Installation of dowels with wide heads that hold the slabs in place and are attached directly to the wall. The main thing to remember is that to minimize temperature transfer you need to use plastic dowels.
- A combined method that uses an adhesive solution and fixatives is the most reliable method, eliminating the possibility of peeling off the edges.
To attach to the walls, you will need a special adhesive solution, as well as plastic dowels with a wide head, 5 pieces per sheet. The amount of glue required depends on the manufacturer chosen.
Insulation technology:
- In one layer when the slab is full thickness;
- In two layers, when the sheets are glued to each other, and have half the required thickness.
How to determine the required number of sheets:
- To determine the required number of foam sheets, you need to multiply the height of the walls by their length, and subtract the area of all openings. The resulting value needs to be increased by another 20%, this is done in order to take into account the loss of material for fitting and cutting to the correct size.
- For finishing you need to buy a reinforcing mesh made of fiberglass or polyurethane, with cells 5 by 5 mm, 20–30% larger than the insulated area.
- The edges of the mesh must overlap, as well as the corners, in order to support the weight of the plaster.
- After this, finishing materials are purchased. It is important to check that the plaster and glue are suitable for application to the foam.
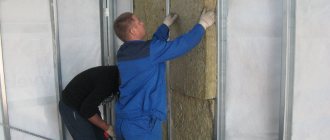
We insulate with our own hands
You can insulate the facade of your home yourself, and therefore I would like to provide step-by-step instructions for the correct installation of insulation on the facade of your home.
Preparation of the façade surface. No special preparation is required if the facade of the house has not been covered with any additional materials.
Therefore, a necessary part of surface preparation is to treat the facade with a suitable primer.
Selection of materials for insulation.
Before purchasing insulation material, you must completely measure the area of the house that you are going to insulate.
Don't forget to subtract door and window openings from the total area.
Also, in addition to the foam itself, you will need high-quality glue for the insulation, paint corners for the corners, a plastic paint mesh and umbrella dowels for better fastening of the foam.
Finishing putty is also necessary, which will be used to process the foam after installation.
Bonding foam plastic to the facade of a building. This process does not take as long as it might seem. A pre-prepared adhesive solution is applied to the foam in an even layer.
The same manipulations are carried out with the wall. After which the foam is pressed against the wall and tapped for better contact with the surface. After which the foam is secured with dowels - one in each corner and one in the center.
Foam putty. Puttying foam takes a lot of time .
First, you need to strengthen the corners with special corners for reinforcement, and then putty, not forgetting to use a plastic mesh.
Foam plastic can be coated with many putties: mineral, acrylic, silicone. You can also coat it with ceresite grade CM11.
To summarize, we can say that polystyrene foam is one of the most convenient, easy to use and most suitable materials for insulating your home.
The main thing is to correctly install high-quality material, and it will serve you for a long time and will perfectly retain the warmth of your home.
Read about the best insulation for floors in a wooden house in our material. Let's find out advice from experts. Let's get acquainted with the correct technology for joining linoleum here:. Useful tips. Watch the video lessons.
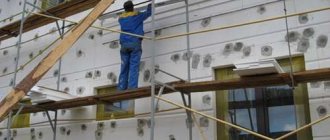
Installation of foam sheets on the facade
Installation tools:
- bucket 2–5 l;
- spatulas 8 and 20 cm;
- construction mixer;
- drill;
- building level.
The plate for applying the adhesive composition should be rough; if it is smooth, then brush it with a brush with metal bristles. The glue is diluted according to the instructions, mixed with a mixer, the finished consistency should be thick enough to support the weight of the slab. But if the mixture is too dry, it will not adhere the foam properly. In order to understand what the consumption will be, mix 50–100 g of dry glue, gradually adding water.
The first stage of installation is the starting profile
Installation begins with attaching the bottom plank or corner to the wall, at a level of 20 cm from the edge of the ground or blind area. The profile will serve as support while attaching the slabs to the wall, and after drying, allow the foam to support more weight of the plaster.
The finished adhesive mixture is applied along the perimeter to the rough side of the polystyrene foam, retreating from the edge by 3-4 cm, after which several patches are made in the middle of the sheet and applied to the wall. The surface of the sheet should be covered by approximately 40%. The first row starts from the bottom corner of the house, the next one is laid so that the edges fall in the middle of the previous row. If the walls are insulated in several layers, then the second layer is applied so as to overlap the joints of the previous one.
Apply glue and glue
If there is a gap between the insulation boards of more than 3 mm, it is sealed with polyurethane foam, the protruding parts of which are cleaned off after hardening. The same is done with the protrusions of the sheets. An adhesive composition is applied to the seams and fasteners to eliminate unevenness.
Video: the result of insulating the facade of a house with foam plastic after 2 years
Glue the insulation
Mixing the glue
To prevent the glue from thickening too much and drying out, it must be used all within an hour and a half to two hours. So we make the required amount of adhesive mixture right on the spot. To do this, take a large plastic bucket and pour water into it. Then slowly pour the adhesive into it. To avoid lumps, put a mixer attachment on the drill, turn it on at low speed and stir the mixture until not a single lump remains.
We wait 5 minutes for the glue to swell, then turn on the drill again for 2 minutes and mix. If after some time the glue thickens a little, you just need to stir it again without adding water to it.
Apply adhesive to foam boards
According to the technology of insulating walls with foam plastic from the outside, glue can be applied to the insulation in different ways. It all depends on how smooth the walls of our house are.
Method 1 - used when surface differences reach 1.5 centimeters. In this case, apply the adhesive mixture on all sides of the foam board, retreating 2 centimeters from the edge. The glue layer should be the same thickness (2 centimeters). To ensure that the slabs do not lag behind in the central part of the slab, glue beacons with a diameter of about 10 centimeters are evenly placed in this place (with an area of 0.5 square meters) 5 - 7 times.
An example of applying glue.
Method 2 - used when the unevenness of the walls is less than 1 centimeter. Along the perimeter of the slabs, as well as in their central part, we apply strips of glue 3 to 4 centimeters wide. As a result, from half to 60% of the surface should be covered with the adhesive composition. When the insulation is pressed against the wall, the glue will spread and occupy the entire space.
Important: To avoid air pockets, never make the adhesive strips continuous. They should look like a dotted line.
Method 3 - used when the walls are almost even and the errors are no more than 5 millimeters. In this case, we arm ourselves with a special notched trowel, applying glue to the entire base of the slabs. The comb tooth size is centimeter by centimeter.
Rules for installing insulation on walls
Once the glue is applied, there is no time to hesitate. Within 20 minutes, all the plates must be glued into place. First, we apply the polystyrene foam boards, slightly moving them to the side from the place where they need to be glued. This distance should be 2 - 3 centimeters. Then, using a building code or a trowel, we press the insulation against the adjacent slabs. The glue that will protrude from the underside of the foam and in the corners must be removed immediately.
We apply the sheet with an offset and press it against the adjacent one.
We check the correct installation of each foam plastic board using a level. We also use control cords and a rule to determine all deviations from the plane.
We check each sheet with a level.
The slabs must be laid tightly, at a distance of no more than 2 millimeters from each other. If gaps of larger width occur, they must be sealed. To do this, take either construction foam or long and narrow pieces of foam. There should be no glue in the seams, and the difference in thickness at the joints is allowed no more than 3 millimeters.
Important: if you move the slabs before the glue has hardened, they may not stick well. Therefore, when the need arises to correct some shortcomings, it is better to remove the slab. Having removed the layer of adhesive mixture from it, spread fresh glue and put the sheet back in place.
When installing insulation, we work from the bottom up, starting from the base profile. We pay special attention to the very bottom row of slabs, which will be decisive. The easiest way to do this is to place the first and last plates, and stretch a cord between them, attaching it to the top of the sheets. Along this cord we place the rest of the foam plates.
We lay out the next row with offset joints. It must be at least 20 centimeters. However, it is even better to lay the rows of insulation in a checkerboard pattern, making an offset of half the slab.
The foam joints must be overlapped; to do this, we glue them offset.
When laying the slabs, we carefully look at how their joints relate to the openings for windows and doors. They must not run along the same vertical line as the slopes. It is optimal if the joint passes either under the opening or above it. At the same time, the technology for insulating facades with foam plastic stipulates that the displacement should be at least 20 centimeters.
There is also this option: the wall is made of one material, and then a part of another material is added. For example, brick, OSB or foam concrete are connected. The junction of two adjacent insulation boards should be located at least 10 centimeters from the border of these materials. And if the walls have protrusions or recesses that must be insulated, then these places are also covered with a heat insulator of no less than 10 centimeters.
At the corners of the house, both inside and outside, the slabs are connected with teeth, that is, with a bandage. To prevent a long seam from forming vertically, causing cracks, the insulation is required to extend onto the adjacent wall. In the corners and on slopes, foam plastic slabs are placed with a margin that should allow bandaging.
As soon as the glue on the corner sets, the protruding excess slabs must be cut off. To cut the foam carefully, take a thin file with fine teeth or a wide knife. You need to cut using a ruler or a metal square.
In the corners, the slabs should be tied together.
When insulating slopes, we install insulation sheets flush against window and door openings. To do this, you will need a polyurethane foam sealing tape or an adjacent profile. If tape is used, it is glued directly to the door frame. When insulation is adjacent to it, it is compressed, becoming thinner by about a third. When insulating a window located on the facade, add insulation to its frame by 2 centimeters, no less. Preliminarily cover the entire window opening with polyurethane tape.
If there is an expansion joint on the wall, a gap of 1 to 1.2 centimeters in size is made at the location of the insulation. We forcefully insert a rope of foamed polyethylene into this gap, squeezing it by a third.
We fix the insulation with dowels
When the glue dries (usually this happens after 3 days), you can begin to finally secure the insulation. For this purpose, elastic plastic dowels with a wide perforated umbrella-shaped cap are used. They are fixed with a driven nail or a screw-in pin. Nails can be metal or plastic.
To prevent cold bridges, it is better to choose the option with plastic nails. The length of the dowel is determined by the thickness of the heat insulator and the material from which the walls are made. The dowel should go 5 centimeters into the concrete, 9 centimeters into the brick, and 12 centimeters for cellular blocks.
Important: dowels that have a metal rod inside should not be used. This is fraught with the appearance of cold bridges.
We fix the dowels in all corners of the slab, as well as in the center. There are from 6 to 8 dowels per 1 square meter. Near the slopes of doors and windows, at corners and near the base, more fasteners will be needed. They should retreat 20 centimeters from the edges of the slabs. How many additional dowels to take, and at what distance from each other to attach them, depends on several factors. These are, in particular, the size of the insulation sheets, the size of the house, the wind force and the quality of the dowels.
Before using the fastener, we make holes for it using a hammer drill.
The drilling depth should be 1 or 1.5 centimeters greater than the length of the dowel.
After clearing the holes from dust, we hammer in the expansion nails using a rubber hammer. If pins rather than nails are used, they are screwed in with a screwdriver. The dowel caps should not protrude too much above the plane of the insulation. This distance can be no more than a millimeter.
You may find the following materials useful:
- How to choose a hammer drill - criteria for choosing a hammer drill for home or permanent work.
- How to drill concrete, metal, tile and wood.
Do not forget that you must maintain the perpendicularity of the fasteners relative to the surface of the walls. From time to time we check how firmly the dowels are held, carefully trying to tear them off.
Final protective and finishing work
Polystyrene foam does not tolerate direct sunlight, so it is necessary to carry out external work to isolate it from the external environment. To do this, a special adhesive mixture is applied to the insulation, and a fiberglass mesh is placed on top of it, with an overlap of 6–7 cm. To strengthen the corners, the reinforced mesh should overlap the adjacent wall by 10–15 cm. If heavy finishing is planned, then the corners are reinforced metal corner. After completely covering the house with mesh, the layer is allowed to dry for 1–2 days.
When the mesh is fixed, it is sanded and primed. While the primer dries, fix the roof drainage system. After the primer has been absorbed, apply putty in a layer of 3–4 mm, or external plaster, and allow the layer to dry for 3–4 days.
Insulating a house with polystyrene foam is quite simple; the main thing is to choose substances compatible with the material so as not to dissolve the granules. It is also important to create a finishing layer that protects polystyrene foam from exposure to the sun.
Nuances of plastering and finishing
The technology for applying a plaster layer to polystyrene foam generally coincides with the general techniques for such work. Based on the maximum protrusions and depressions of the wall surface, determined using a long rule or a laser range finder, the thickness of the plaster layer is calculated. If the alignment with the reinforcing mesh was successful, then the plaster layer can be made very thin - 5-10 mm.
To apply a thin layer, the solution is mixed more liquid than for the previous stage. It will be easier to distribute and level. The composition is applied with two spatulas. A narrow one, 100 mm, is used to throw the plaster on the wall, and a wide one, 200-300 mm, is used to level it. The movement of the spatula along the trajectory should resemble a herringbone pattern. The plaster layer must be completely dry. After drying, it is sanded with finer sandpaper than for previous layers. If you start sanding a layer that is not completely dry, it can be damaged, and the sandpaper will clog and fail.
Experienced craftsmen advise at this stage to use sandpaper, which they have already used on the previous ones. The largest grains of abrasive material on it have already been ground off, and it will not leave large scratches on the surface. This is especially convenient if a layer of paint is planned to be applied to the plaster field. If the plaster itself serves as a finishing touch, then you can use new sandpaper.
Features of the material
Polystyrene foam is 98% air, which allows it to retain the maximum amount of heat in rooms. Therefore, this material is used not only for insulating the walls of residential buildings, but also for ceilings, floors, basements, foundations and warehouses.
Is there really one reason why polystyrene foam has become so popular? Not at all. There are other positive qualities inherent in this material.
Advantages
Let's start, as usual, with the advantages, because it is thanks to them that home owners choose polystyrene foam for insulation:
- Sound and thermal insulation of premises.
- Light weight, which helps reduce the load on load-bearing walls. This means that expanded polystyrene is also suitable for very old buildings.
- Versatility of use. It can be used for both interior and exterior work, for residential and non-residential premises.
- Moisture-repellent properties.
- Affordable price. The cost of polystyrene foam is quite low compared to other materials.
- Duration of operation. This advantage can be considered relative, since unprotected foam is quickly destroyed when exposed to sunlight. But if it is covered with facing material immediately after installation, the service life will be up to 30–35 years.
- Safety. The foam is coated with antipyrines, which prevent the heat insulator from smoldering and releasing caustic substances.
- Prevalence. This insulation can be found at any hardware store. At the same time, slabs of different densities and thicknesses are presented at one point.
As we see, there are really a lot of positive aspects, and now it becomes clear why those who want to insulate themselves buy polystyrene foam.
Flaws
Pros are pros, but each material also has several disadvantages. They should not be ignored at all, and sometimes a few disadvantages can outweigh a large number of positive aspects. Polystyrene foam also has its disadvantages:
- fragility. A slab of any density and thickness breaks easily. This must be taken into account during the cutting and installation process; it is advisable to be as delicate as possible with this material;
- low vapor capacity. You should not rely on natural ventilation if the house is lined with foam plastic. Vapors will accumulate in the rooms, and this will lead to a deterioration in the microclimate. This material is categorically not suitable for insulating wooden buildings;
- does not tolerate exposure to ultraviolet radiation and some paints and varnishes;
- if the foam is not coated with fire retardants, it easily ignites and produces acrid smoke;
- love of rodents and birds. Rodents settle in slabs and make their own nests. Birds pick holes in slabs that are not covered with facing material.
Having familiarized itself with all the advantages and disadvantages, the buyer makes his choice whether or not to purchase this insulation.