Gas convectors are justifiably popular. They operate on a commonly available type of fuel, which is attractive due to its low price, minimal volume of combustion products and high efficiency. Without any problems, you can install and even mount a gas convector with your own hands, if you know the specifics of performing this work.
We will tell you how to install a gas heating device that provides convective heating. Let us introduce you to the principle of its operation and design features.
In our article you will find a guide to the installation and production of proven homemade products. Our advice will undoubtedly be appreciated by independent home craftsmen.
How to heat a country house without mains gas, money and electricity?
The question is both complex and simple. If money is short, then complex and expensive systems that require expensive equipment and hassle-free installation are not suitable for you. Electric convectors are also no longer needed. Although they are inexpensive and easy to install, they are demanding in terms of allocated electrical power. If you have 15 kW, then there are no questions, but if it’s less, or do the lights often turn off? So you can freeze! RuslanM offers a solution.
- Two systems - insurance against accidents and disasters.
- You won't freeze if the power goes out.
- Both options can be installed with your own hands and without spending money on specialists.
- By combining liquefied gas + solid fuel, you increase the overall operating time of the heating system.
For example, during the day, while you are at work, gas convectors work, and in the evening you light the fireplace and get pleasant warmth from a real fire.
Ruslan's house.
Gas convector.
Cast iron fireplace stove with ceramic chimney.
Looking ahead, we will say that Ruslan also installed an original homemade gravity heating system in the house, a “warm baseboard” with a “heart” in the form of a cheap solid fuel boiler. We will talk about it at the end of the article, and now, about the first two options. Go!
Precautionary measures
The use of household appliances requires compliance with safety precautions. Be careful and listen to the advice of manufacturers:
- You cannot use a convector that has a damaged viewing window,
- if the device goes out spontaneously, do not re-ignite it earlier than after 3 minutes,
- To prevent burns, the convector is protected with a protective grille.
It is strictly prohibited:
- dry things on a running appliance,
- turn the device on and off for children and people with limited legal capacity,
- operate the device with the outer casing removed,
- repair the device yourself,
- place flammable objects at a distance of less than 1 m from it,
- leave it on if signs of a gas leak are detected.
If there is an unpleasant odor in your home, take immediate precautions:
- turn off the gas supply,
- extinguish all sources of open fire,
- do not touch switches and mobile phones,
- ventilate the room
- urgently call the emergency gas service,
- Contact a gas convector service center.
What is a gas convector
It should be noted right away that a convector is not a type of boiler; it works not only on a different principle (it heats not the coolant, but the air in a certain room), but also has a slightly different area of application. Most often, gas heaters are used in small houses where there is no need for constant heating. They can only heat the room where they are installed.
What does a convector consist of?
The design of the device is not too complicated, it includes:
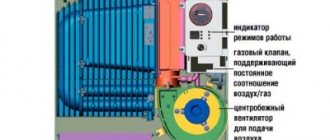
Diagram of a standard gas convector with a fan for forced convection.
- a heat exchanger that heats the air;
- programmer – a device for controlling and maintaining room temperature;
- control panel, which contains various indicators;
- gas valve to control gas supply;
- a fan supplying air to the valve and heat exchanger;
- a fan that provides forced supply of warm air into the room.
Gas convector - operating principle
As you can see from the diagram, everything is quite simple. The convector plays the role of a gas burner; cold air enters from below under the influence of convection, heats up and exits through the hole at the top.
The device works quite simply: the operating principle is based on the phenomenon of convection - warm air rises when heated and cold air falls. Gas models can operate using either natural or forced convection. In the latter case, a special fan is used to supply air.
Advantages and disadvantages
The quality of the device itself, as well as its performance, depend on the price. By choosing a cheap model, you will not save money, since the device may last you less than a year. Repairs in the current situation will not be cost-effective. Therefore, we will consider the advantages and disadvantages based only on high-quality devices. So, the pros:
- efficiency and quick heating of the room;
- easy installation of a gas convector with your own hands;
- there is no need to make a heating system (water);
- low price;
- unlike electric analogues, gas models do not burn oxygen;
- completely autonomous operation mode;
- not connected to electricity (except for convectors with forced circulation);
- It is possible to connect the heater to a gas cylinder.
But gas convectors are not without their disadvantages:
- if gas is used from a centralized system, then it is necessary to obtain permission to connect the device;
- it is necessary to punch holes in the wall outward where the heater will be mounted;
- considerable dimensions;
- if you decide to install several convectors, then gas will have to be supplied to each of them, and only from outside the building.
Choose models with a built-in fan. They are more efficient than their fanless counterparts.
Types of convectors
Devices can be classified by their power, as well as by design. If everything is clear with power: choose the one that can heat the room, then with the types of performance things are a little more complicated.
There are two types of heaters:
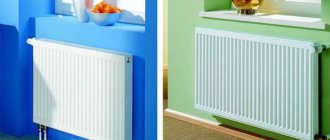
Wall-mounted models can fit very well into the interior.
- Floor-standing – devices are installed on the floor and do not require special installation skills. Such a convector can heat a fairly large room (even an industrial one), but it is heavy and requires a special base.
- Wall-mounted are more compact models that fit well into the interior of the house. Often the devices are mounted under the window to create a thermal curtain from cold air passing through the glass. Convectors of this type have low power, so they are only suitable for heating rooms in houses up to 100 square meters.
There is another subtype of heaters - built-in. They can be installed in the floor or wall, and not only do not spoil the interior, but also decorate it. In terms of parameters, such models do not differ from wall-mounted ones. But installing them is more difficult, since it is necessary to prepare a niche for the device in advance.
When choosing a convector, you should also pay attention to the material of the heat exchanger. The latter can be made of steel, cast iron or copper
Nowadays, models with a steel heat exchanger are more common, but cast iron ones have greater efficiency due to the properties of the alloy, and are also able to last longer. Their only drawback is their heavy weight. Copper analogues are effective and durable, but expensive.
All convectors under consideration are closed. Open ones also exist, but they take the air necessary for gas combustion from the room, and the waste enters the general ventilation. Due to these properties, it is highly not recommended to install open-type heaters in residential premises.
Principle of operation
The basic principle of operation of a gas convector using bottled fuel is the process of natural heat exchange, in which heated air rises and cold air sinks to the floor surface.
The continuity of this movement allows you to maintain the set temperature in the room. In addition, in addition to natural convection, artificial injection of air masses can be additionally used. In this case, heat exchange accelerates and the air heats up faster. In fact, the entire process of equipment operation comes down to the following points.
- Gas flows to the burner.
- Cold air enters the technological openings on the body - air intakes.
- Passing through the device, the air masses heat up, enter the room, rise and circulate further.
- Combustion products are discharged through a coaxial chimney outside the room.
Gas convectors with a cylinder connection do not require access to main communications. In this case, the main source of fuel entering the combustion chamber becomes the tank in which the pumped propane is under pressure. In addition to conventional cylinders, options with liquefied gas can be used - in this case, the operating time of the device on one refill will increase by 2-3 times.
Models of gas convectors can be wall-mounted or floor-mounted. The first group of devices is mounted on a rigid connection to the wall surface in a vertical position, without moving during operation. Floor-standing devices can be mobile, equipped with rollers for movement, or stationary.
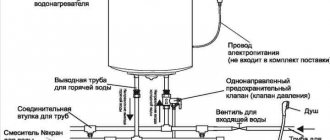
The design of a gas convector with cylinder fuel contains the following components:
- a burner with an igniter used to burn fuel in a closed chamber;
- heat exchange element;
- gas trap and chimney pipe;
- thermal relay to maintain a given temperature;
- automatic system that shuts off the fuel supply in the event of a device malfunction;
- housing with technological holes to ensure heat exchange processes.
An optional fan is installed to pump air. In addition, inside mobile equipment you can find a compartment for installing a gas cylinder of a certain size. “Home” stationary convectors use a connection through flexible gas hoses with the cylinder removed to a special outdoor cabinet, as required by fire safety rules.
Gas heating options
There are two options for those who are planning to install gas heating in a wooden house.
The first option is a traditional gas boiler. A centralized boiler heats the coolant by burning gas. The gas begins to circulate through the pipes, giving off heat to radiators, which heat the air in the rooms. If there is a gas main in your area, gas heating of the dacha will not be difficult.
Such things as heating design and gas heating scheme for a two-story house should be carried out by specialists with experience in this field.
Gas parapet boiler
Typically, owners prefer convection-type boilers. Condensing systems are more economical; they require a very low return temperature, which is poorly maintained in the house when radiators are used. Therefore, the best option would be a scheme that follows from the type of boiler - single-pipe and barracks type. So, a thick pipe will encircle the entire house along the perimeter, the radiators will not break it, but cut in parallel.
They do not require a constant pilot flame and therefore provide even greater safety. And if the area experiences frequent power surges and outages, you can purchase an uninterruptible power supply.
The second option for gas heating of a residential building involves a gas convector. If there is no main line in the area, and it is only possible to use imported gas in cylinders, then convectors will be a convenient solution to the problem. Gas convectors do not require distributing a heat carrier throughout the house - the convector is placed under the window, the cylinder is placed in the same or an adjacent room. There is an air intake from the street, where combustion products are discharged through a coaxial pipe. The only caveat in this case is that the convector provides heat only in the room in which it is located. Therefore, if there are several rooms in the house, you will have to install a convector in each. The main advantage of a gas convector is cost.
Gas convector
Finally
Although a gas convector is not a very popular means of heating, we can still say with confidence that it justifies its cost and the effort spent on its installation. Such a device would be the best option for a country house where you come on vacation in winter. The heater is capable of warming up the air in a room very quickly , it is more economical than its electric counterpart, and can also be powered from a gas cylinder. Perhaps the only significant drawback of the device is that it heats only one room, and not all rooms, as a boiler with a heating system does.
Radiators for water heating
First, we will examine radiators designed for operation in central and autonomous heating circuits.
Register
The simplest and most affordable homemade heating radiators are made from pipes of large (100 - 250 mm) diameter, capped at the ends and connected by jumpers. These devices - the so-called registers - have a large internal volume and, accordingly, significant thermal inertia, which makes them an ideal solution for systems with solid fuel boilers.
How to make a simple horizontal register?
- Pipes are cut into sections of 1.5 - 4 meters
(depending on the expected length of the register). - Holes for jumpers are drilled or burned with a gas cutter
. An important point: the configuration of the jumpers should create a closed circuit inside the device, eliminating stagnation of the coolant in dead-end areas. - The pipes are connected by jumpers
- pipes of sizes DN20 - DN32. - Parallel to the jumpers, pipe sections of the same length are welded, but already welded to the blank walls
. They will add rigidity to the structure. - The ends are capped with bottoms cut from a steel sheet 4 - 5 mm thick
. - Nozzles are welded into the lower and upper sections
, which will subsequently connect the register to the supply line.
In most cases, a regular round water and gas pipe is used as register sections. It is attractive due to its low price per linear meter and maximum tensile strength with minimal wall thickness, which is ensured by a circular cross-section.
However, sometimes you can find homemade heating radiators made from a profile pipe - square or rectangular. Its advantages are the relative compactness of the register and a slightly larger surface area for the same cross-sectional area.
Convector
The simplest convector is a coil of pipe with plates pressed onto it, increasing the notorious heat transfer surface. The most accessible material is steel. New buildings often serve as sources of ready-made convectors for garage owners: apartment owners in them en masse replace the heating devices installed by the builders with sectional radiators that are more attractive in appearance and have greater heat output.
However, steel has a serious drawback - low thermal conductivity. In order not to be unfounded, we will present the thermal conductivity values for three metals that are most often used in the manufacture of heating devices.
It is obvious that when creating a convector it is advantageous to use non-ferrous metals: their thermal conductivity will sharply increase heat transfer, making the heating of the fins more uniform.
Homemade copper heating radiators come in all sorts of designs based on copper and aluminum plates. Aluminum fins are much more affordable compared to copper; some difference in heat transfer is compensated by its increased area.
To assemble the convector, solder intended for copper water pipes is most often used; somewhat rarer plates.
Idea N4: Heater with a spiral
The classic version of a spiral-type heater involves connecting heating coils to the network. Heat-resistant dielectrics were used as the basis for installing the spiral in such models. But these are quite simple options, so in this article we will look at the principle of manufacturing a device whose characteristics are not inferior to a gas heater. It uses the same principle as a heat gun, but with less heat output.
To make it, you will need a heating coil, an electric fan, a metal pipe or box for the housing, a dielectric heat-resistant frame, and a power cord. The heater manufacturing process includes the following steps:
- Cut the asbestos cement pipe to the required length (in this example it will be used to make the supporting frame). Rice. 17: Cut the pipe to the required length
- Drill several holes in the pipe from different sides so that you can insert a nichrome spiral into them.
- Insert a spiral into the holes, in this example they are made in the form of a lattice, but this is not important, it is important that the heating elements have a different angle of inclination. Rice. 18: position of the spiral in the pipe
If you are assembling several pieces of spiral, connect them together on the outside of the pipe.
- Place a fan on one side of the pipe to force air flow. The direction of the blades should ensure the movement of air towards the spirals stretched in the pipe. The distance from the fan to the heating element must ensure safe operation so that the blades do not melt. For additional cooling, the fan and asbestos pipe can be separated in the housing. Rice. 19: separation of fan and pipe with heater
- Insulate the electrical connections both from the fan to the power cord and from the nichrome spiral. To insulate the spiral joints, you can use micanite tape, which is wound directly onto the asbestos surface.
- Place the finished heater in the most suitable housing. In this example, to protect against accidental contact with the spiral, an additional grill is installed in front of the pipe.
It should be noted that the fan power should not be too high so that the coils have time to warm up. In practice, you should achieve a blowing effect, and the heating performance can be adjusted by the length of the spiral. It is also advisable to coat the inside of the asbestos pipe with heat-resistant varnish to prevent asbestos particles from entering the air. It would be a good idea to ground the heater body to a ground loop.
Wall backing material
The main requirement in finishing walls, floors and ceilings is fire protection. For this purpose, a special substrate is used for a gas boiler in a wooden house. It should not support the combustion process and protect the walls from temperature effects.
Recommended backing material:
- Basalt wool. A layer with a thickness of 50 mm or more is installed on a rigid base (metal sheet). The density of wool is maximum.
- Basalt fireproof sheets. In the event of an open flame, they will protect the wooden surface of the walls from thermal effects.
It is prohibited to use polymeric materials – polypropylene, polystyrene foam
For floor-standing models, special attention is paid to preparing the floor surface. It is leveled, fire-resistant material is installed
In this case, basalt wool is not recommended, as it will shrink under the weight of the boiler. The solution is to install basalt sheets.
Advantages, disadvantages
Advantages:
- Easy to install and operate. It comes down to three steps: remove the packaging, hang it on the wall, plug it into the socket. The controls are intuitive.
- Reliability, long service life - up to 15-20 years. Virtually no moving parts, proven designs.
- Safety - maximum heating temperature of the thermoelement is 80 degrees. Fire and serious burns are not possible. Location on the wall or ceiling reduces the risk to a minimum.
- Environmentally friendly - does not burn oxygen.
- Efficiency - up to 97%.
- You can fit the convector into any interior by placing it on the wall, ceiling, or floor.
The disadvantage is the cost of electricity needed to operate. But, due to rising prices for other energy sources, the disadvantage is less noticeable in comparison with the advantages.
Choosing a boiler
If the source is gas, then it is best to choose an automatic wall-mounted gas boiler. This generator is equipped with a pump and protection. If a chimney is not provided, then you need to opt for a boiler with a closed combustion chamber. And to exhaust air in such a boiler, you can use a coaxial pipe. This will save money on pipe installation.
Wall-mounted boilers already have full automation, but if the water volume is more than 100 liters, install an additional expansion tank, even if there is a built-in one. It will make it possible to compensate for the expansion of water when heated. Otherwise, the pressure in the boiler will increase greatly as the temperature rises, and the automation will often turn off.
If the choice fell on an electric boiler, then it is best to choose a fully automatic boiler, with a built-in pump and expansion tank. This option will be more convenient to install and will avoid many mistakes.
If the fuel is of a hard nature, then such a boiler can be installed by yourself, only if you know how to weld. And they are able to weld heating pipes with their own hands. The outlet temperature of this type of boiler can reach 100 degrees and it will be difficult to install any pipes other than iron ones without the help of professionals.
When the boiler is selected, you need to select the right pipes and radiators. Various materials are used for pipes today. But when installing it yourself, it is best to use plastic. It is easy to install. The quality of metal pipes today has deteriorated greatly. So from the proposed option, choose metal-plastic or polypropylene.
The material has been selected, all that remains is to draw a diagram and choose a project for your home. The project will depend on the type of heating you choose.
Radiators are chosen depending on what kind of heat transfer you want to get and which ones suit your interior. The larger the radiator sections, the warmer the house will be. The calculation is 1 section per 1.5 square meters.
The appearance of radiators should not spoil the overall appearance. You will make the right choice by watching the video:
Calculation of materials is carried out after drawing up a detailed diagram of the heating system of your home.
Gas connection
Friends, at this stage it is important to be extremely careful! Let's say that you do not have the skills to work with gas appliances - then to perform the following work it is better to contact specialists
Installation of a gas heater to a gas supply source proceeds according to the following algorithm.
- Let's imagine that there is a special threaded outlet on the gas pipe. Then you just need to screw a gas valve onto this pipe. If there is no special allotment, then one will need to be made!
- The next step is to bring the gas pipe to the convector and connect them using a fitting. This process cannot be rushed.
- Secure the supplied pipe with special clips. The distance between them is 1 meter. To do this, you will need to drill holes on the outside wall of the building.
- Treat fittings and pipe joints with silicone to ensure a tight seal.
- Be sure to call your gas service representative to ensure proper installation and connections.
Permits
Unlike installing a solid fuel boiler in a wooden house, gas equipment requires a permit. To do this, you need to contact the local organization responsible for gas supply - Oblgaz or Gorgaz. Connection to the gas main should only be carried out by certified specialists, but installation of boiler equipment can be done independently.
Stages of obtaining a permit:
- Obtaining technical conditions. It indicates the requirements for connecting to the gas main. It is necessary to provide a house plan with its characteristics.
- Drawing up a gasification project. This work is performed by specialized licensed organizations.
- Based on the project, permission is issued to install a parapet boiler in a wooden house. The same applies to wall-mounted or floor-standing models.
- After installation, representatives of the gas service must check the building and the main line for compliance with the technical conditions and the agreed project. They also connect the equipment to the pipeline.
To optimize time and financial costs, it is recommended to use the services of Gorgaz subsidiaries. Their representatives know the nuances of design and the latest changes in requirements for premises and equipment.
Gas connection
Friends, at this stage it is important to be extremely careful! Let's say that you do not have the skills to work with gas appliances - then to perform the following work it is better to contact specialists
Installation of a gas heater to a gas supply source proceeds according to the following algorithm.
- Let's imagine that there is a special threaded outlet on the gas pipe. Then you just need to screw a gas valve onto this pipe. If there is no special allotment, then one will need to be made!
- The next step is to bring the gas pipe to the convector and connect them using a fitting. This process cannot be rushed.
- Secure the supplied pipe with special clips. The distance between them is 1 meter. To do this, you will need to drill holes on the outside wall of the building.
- Treat fittings and pipe joints with silicone to ensure a tight seal.
- Be sure to call your gas service representative to ensure proper installation and connections.
Types of heating systems
First of all, the house can be heated using an autonomous structure with forced or gravitational (natural) coolant circulation. Each of these methods has its own advantages and disadvantages. In addition, there are situations when it is better to use one or another variety.
Advantages and disadvantages of natural circulation
Gravity pumping is entirely based on the laws of physics. More precisely, the coolant moves through the pipeline due to the difference in weight between cooled and heated water.
A hot liquid has a much larger volume, but much less mass. Accordingly, it rises up the riser, moves further through pipes that are laid at an angle, and is pumped into heating radiators, where it is cooled.
Before making a final choice in favor of a certain type of fluid circulation in the system, you need to consider the pros and cons of each heating option
The list of advantages of such a solution should include ease of installation. A system with natural circulation lasts much longer and is stable. At the same time, the absence of a pump allows you to get rid of excess noise and ensure independence from the availability of electricity.
As for the disadvantages, this kind of solution can only be used when heating a small house. In addition, the system requires laying large-diameter pipes, which significantly increases the cost of organizing a home heating system.
When choosing natural circulation, you need to take a responsible approach to installation - errors will lead to a serious decrease in the speed of pumping the coolant
Distinctive features of pumping systems
To make water move faster through the pipes, a circulation pump is installed into the heating system. With its help, you can move the media with virtually no loss of temperature. As a result, a wooden building warms up much faster, which saves a considerable amount of fuel.
The main advantage of forced circulation is that the area of the heated house can be practically unlimited. At the same time, the owner is given the opportunity to control the amount of heat and the speed of the pump. The disadvantages of this solution are the dependence of the system on the availability of electricity and the high noise level of the equipment.
When installing a heating pump, you can use pipes of small diameter. This allows you to save on the purchase of plumbing fixtures
Advantages and disadvantages
Such convectors have both their advantages and disadvantages, which the reviews clearly show.
Among the advantages are the following:
- Heating a dacha with a gas converter is suitable for virtually any type of premises, since there are no space restrictions for equipment.
- They have a compact size and excellent design. Thanks to this, they can fit into any type of interior.
- To install such devices, there is no need to take into account the location of the heating system pipes. There is also no need to take into account their slope or the dependence of heating devices on each other. Installation of such convectors is not difficult.
- Heating a country house with gas convectors does not depend on adjacent premises.
- Gas convectors are highly resistant to freezing.
- In terms of efficiency, some gas convectors are superior even to the latest generation gas boilers.
Modern gas convectors have a beautiful design
. However, gas convectors also have some disadvantages, among which are the following:
- A gas convector can only heat one room.
- Heating with gas convectors cannot be used to heat water.
- They have rather limited thermal conductivity. Most gas convectors have a power of 2 to 7 kW.
- Gas convectors are not as compact as water convectors, so it is quite difficult to disguise them.
- In residential areas, hot water was always needed. Double-circuit gas boilers will be able to fully satisfy this need for residents, but gas convector heating will not.
- Gas convectors have a rather beautiful design, but thanks to gas boilers you can use compact radiators or a heated floor system that is completely hidden from view.
- The efficiency of gas convectors is approximately at the same level as that of gas boilers.
Gas convectors are large in size
Selecting a convector
How to choose a gas convector? First of all, attention is drawn to the technical characteristics of the unit. The best option is a device with a closed combustion chamber and a cast iron heat exchanger. The presence of a programmable control unit is considered important
Let's look at other factors that you should pay attention to when choosing a household gas convector
The presence of a programmable control unit is considered important
Let's look at other factors that you should pay attention to when choosing a household gas convector
Device power
Since heating occurs due to air circulation, the units operate effectively in only one room. Therefore, each room will require the installation of a separate unit. Power is determined from the calculation: 100 W are required per 1 m 2 of area.
Heat exchanger material
Since gas heating convectors operate on gas, which burns in a special chamber, the heat exchanger is exposed to strong temperature effects. If it burns out after some time, the device fails. Therefore, the material of this part must be resistant to high temperatures. The leader among heat exchanger materials is cast iron. This metal is resistant to thermal stress; in addition, it cools very slowly and distributes heat evenly. Gas convectors with a cast iron heat exchanger can last up to 50 years. The main disadvantages of such devices are the high price and large mass of the unit. A heater with a steel heat exchanger is cheaper and lighter
But when choosing a unit, you should pay attention to the quality of the steel. Steel heat exchangers can last at least 20 years
Combustion chamber type
Heaters may differ in design based on the type of combustion chambers:
- Open
combustion chamber. Installation of a unit with such a chamber requires the installation of a chimney with access to the roof. In addition, when the unit is operating, air will be taken from the room to maintain the combustion process. Therefore, good ventilation of the room is required. - Closed
combustion chamber. Such models are more popular because they do not require a pipe outlet through the roof (a coaxial pipe is installed opposite the device). And another advantage is that the oxygen in the room is not burned, since the air is taken from outside the building.
Availability of a fan
A gas convector with a fan quickly and evenly heats the entire room. Due to the forced air supply to the heat exchanger, the latter is cooled better. And since overheating is prevented, the service life of the heat exchanger is significantly increased.
Room type
If you want to install a convector in an apartment
, then the best choice would be a device with a closed combustion chamber and a chimney with a coaxial pipe. This type of device does not burn oxygen in the room. In private buildings
you can install any. But when using a device with an open combustion chamber, the room must have fresh ventilation.
Type of fuel
The use of liquefied gas is prohibited in apartment buildings. Therefore, the device is connected only to the main line
. In private homes, use a gas convector using bottled gas
possible, provided that the cylinder is installed outdoors in a special metal cabinet.
Amount of fuel consumed
Fuel consumption in gas heating equipment is considered economical. To calculate gas consumption, the following basic parameters are accepted:
- 1 kW of power will require 0.11 m 3 of gas from the main;
- 1 kW of power will require 0.09 m 3 of liquefied gas.
Based on these indicators, you can make a calculation. For example, a 4 kW heater (designed for 40 m 2 of area) will consume 0.44 m 3 of gas per hour of operation, and 10.56 m 3 per day. But, since the device does not work constantly, this figure will be significantly less.
Purpose
The convector is designed to run on natural gas for heating premises for various purposes. In this case, combustion occurs in a closed chamber, air is supplied from the street and combustion products are discharged there. The heat released during fuel combustion is transferred to the combustion chamber body and heat exchanger, and then to the indoor air. Due to rapid heating, the air rises, making room for colder air, maintaining an active convection process throughout the room.
A gas convector heats the air faster and more actively than its electric counterparts or, especially, converter-type radiators for a water heating system. This is due to the higher surface temperature of the heat exchanger and the increased rate of heat transfer from the combustion chamber.
A gas convector is an excellent solution in the following situations:
- The main heating of a small room or house with one or two adjacent rooms.
- As a replacement for a solid fuel stove, which was previously used to heat the house.
- For quick warming up and maintaining a comfortable temperature in the garage, utility room, or small country house.
- As an addition to the central heating system in rooms where installing a water radiator is difficult (basement and semi-basement, attic, veranda, etc.).
- For heating greenhouses.
As a replacement for main heating, a gas convector is only suitable for small houses or individual rooms. The efficiently heated area is easily calculated based on the available power models of gas convectors. Devices with a power of 2.5-6 kW are more often found on sale, less often up to 12 kW. In the first case, the convector is enough to heat a room up to 50 m2. The most powerful models are in demand only for industrial and public premises with an area of up to 100 m2.
Features of organizing gas heating in a wooden house
Before purchasing a gas boiler for installation in a wooden cottage, you need to think about what fire safety measures will need to be taken.
Note! Before installing gas heating, the house should be well insulated, otherwise the gas consumption will be too high. A lot of heat escapes through the roof, floor, door and window openings
Therefore, special attention should be paid to these areas.
If you want to install a “warm floor” system in your home, then you can say goodbye to this thought if the floor in the house is made of boards, plywood or OSB. The fact is that these types of bases are too mobile, and for the installation of “warm floors” a cement screed is needed.
There are two options for gas heating for a wooden house:
- boiler;
- convector
Each of them has its own characteristics.
A gas boiler
A heating system with a gas boiler works on the following principle: the coolant is heated in the heat exchanger of the unit and then moves into the heating system. As the liquid passes through the radiators, it cools and returns to the boiler. The maximum heating of the coolant reaches 80-85ºC.
Heating a wooden house with a gas boiler has the following features:
- The unit can be installed in a wooden house if there is mains gas, since a system running on bottled fuel will be too flammable.
- It is recommended to choose a convection type boiler, since condensing boilers operate at low temperatures. They will not be able to provide enough heat to maintain optimal heating levels.
- It is advisable to purchase a single-circuit model so that more power is used for heating.
- Units equipped with a closed combustion chamber are considered more fireproof. The flame burns inside the firebox, and the coaxial pipe has fairly compact dimensions.
- You should purchase a boiler equipped with electric ignition. Such a unit does not need to constantly maintain combustion, so it is safer.
Note! If the power supply is often cut off in your region, then to ensure uninterrupted operation of the boiler you will have to purchase an uninterruptible power supply
Convector
Heating with a gas convector is beneficial if there is no central main line nearby, and the fuel source will be gas cylinders. Then the convector is installed under the window, and the cylinder is placed behind the wall of the house in a metal container.
The disadvantage of such heating is that its power is only enough for a small room - usually only the room where it is located. If you place a convector in each room, you will have to provide each of them with a gas cylinder and a coaxial chimney. Also, convectors are not as multifunctional as gas boilers, which can not only heat a room, but also heat water.
A significant advantage of the convector heating system is its low cost, especially when compared with the price of radiators and a gas boiler.
Gas supply: main stages
The installation of the gas convector has been completed, now we need to get started with the gas supply. This stage is quite complex and responsible at the same time. To supply gas, do the following:
- According to regulatory documents, the pipe leading to the convector must go along the street. There are two options here: the first is that the pipe has a pre-installed threaded connection, the second is that there is no such connection. If there is a thread, then you can screw on the gas valve yourself, which will shut off the gas supply to the convector. If there is no withdrawal, one must be made. To do this, call professional gas welders from your local Gorgaz or similar office.
- After installing the gas tap, it is necessary to run a metal-plastic pipe to the convector itself. Using a tape measure, calculate the length of the pipe, simultaneously determining the presence of fittings.
- You need to buy pipe and fittings. The principle of purchase is that the seller must clarify the availability of a certificate of conformity of these pipes and fittings for this type of work.
- Lay the pipe, secure it with clips every m. To install the clips, you need to drill holes in the wall.
- When installing the necessary fittings, carefully lubricate the pipe and the fitting itself with silicone, which will provide additional sealing. Silicone will also serve as a lubricant and will make pipe installation easier.
As a result of the work, you should receive a convector mounted on the wall with a gas pipe connected to it.
Now the last stage of installation remains. A test run is required.
Before starting, open the gas tap and go over all fitting joints and threaded connections with a brush moistened with a water solution of soap or shampoo. This way you will be able to notice inflated bubbles (if any), which indicate gas leaks. If this happens, immediately turn off the gas supply valve. After checking the joints, start the convector. To do this, hold down the gas button for one minute. This way the gas will have time to pass through the pipes and enter the combustion chamber. Press the piezo igniter, a spark should ignite the gas. A blue flame will flare up in the firebox.
Adjust the operation of the convector by setting a comfortable temperature. During the first few hours of operation, you may smell an unpleasant odor of burning oil. This is normal, since the convector is new and the combustion chamber burns out. If the smell lingers for a long time, then you should turn off the gas and check all joints and threaded connections again.
It is advisable that all work on the installation of gas convectors be carried out by a professional who has sufficient experience in performing such work. This is also due to the fact that installing a convector yourself may void your warranty on the device. The gas convector must be accepted into the balance sheet by Gorgaz.
You must have a documented permit for the tie-in. In addition, all installation decisions, as well as the conclusions of the commission for acceptance of the device into operation, must be documented and signed in the appropriate manner.
Gas convectors are not as popular as their electric counterparts. Gas-powered devices require a centralized gas supply or cylinder, and are also not as safe. But gas models are cheaper to use, so they will be an excellent solution in a country house or cottage, where constant maintenance of heat in the room is not required.
How to install a gas convector
After you have chosen and purchased the heater, you can proceed to preparing the installation. Make sure you have the following tools and materials:
Tools necessary for installing a gas convector.
- drill and set of drills;
- pipe cutter;
- a set of wrenches and an adjustable wrench;
- shoulder blade;
- perforator;
- screwdrivers;
- sanitary and high temperature silicone;
- dowels and screws;
- gas tap.
When everything is ready, you need to choose the location of the convector. For the correct selection, use GOST. The latter requires mandatory installation of the heater under the window. Don’t be lazy in the process to try on the device to the chosen place, and also make markings after that. The next stage is preparing the premises. The room must be covered, as during work a large amount of dust will appear.
Installation
Technical requirements for installation of a gas convector.
Installation is carried out according to the following plan:
- Determine the hole for the gas pipe inlet. Do not forget to leave a distance for connecting this very pipe and fitting.
- According to the diameter of the exhaust pipe, you need to drill a through hole in the wall using a hammer drill. This is the most difficult stage, since the hole is large, so the work will take a long time (depending on the wall and the hammer drill), and a lot of dust will also appear.
- The next step is to drill holes for mounting the heater itself and hammer dowels into them.
- Now we connect the exhaust pipe to the convector and make a joint with silicone (capable of withstanding high temperatures).
- The heater itself is fixed to the wall with self-tapping screws. Outside help will be useful here, since the weight of the device is considerable.
Be sure to seal all holes with foam to prevent cold air from entering the room.
Gas connection
Take this stage extremely seriously. If you doubt your skills, it is better to entrust the connection to specialists.
Carry out installation according to the following scheme:
In accordance with GOST, the pipe must be installed from the street.
- If there is a special threaded outlet on the gas pipe, this will make life easier. You just need to screw the gas valve onto the pipe. But if there is no withdrawal, then it must be made.
- Next, bring the pipe to the convector. It is better to use metal-plastic. The connection of the fittings must be perfect.
- When laying a pipe every meter, it must be secured with special clips. To do this you also need to drill holes.
- To check the connections, you must call a gas service employee.
Remember to lubricate the fittings and pipe with silicone to ensure maximum sealing of the system.
Functionality check
Before turning on the device, be sure to call the gas service to check the connections for gas leaks.
After completing the installation work, you need to do a test run:
- First of all, open the gas tap, listen to all joints for possible leaks (you can use soapy water or a special device). If leaks are found, close the tap and fix them.
- After checking all joints, start the convector. During startup, hold down the button for a minute to allow gas to enter the combustion chamber.
- After the burner lights, adjust the operation of the device.
Installing a gas convector in a wooden house is no different from installing it in any other building. Fire hazardous elements are located inside the convector.
Installation
Once the type of heater has been determined, preparations for installation can begin.
You need to stock up on the necessary tools and materials:
- drill with a set of drills of different diameters;
- pipe cutting tool;
- wrenches, adjustable wrenches;
- perforator;
- a set of screwdrivers with different sections;
- screws, dowels;
- high temperature sanitary silicone;
- gas tap.
Installation
it is necessary to determine the location for the hole where the pipe enters;
The installation stage is the most difficult and can take a long period of time.
- it is necessary to drill holes for mounting the heater by hammering in dowels;
- after that, the exhaust pipe is connected. The joint between the heating device and the pipe must be carefully treated with silicone that can withstand high temperatures;
- mounting heating equipment on the wall. You need to invite a partner, the convector is heavy and difficult to install on your own.
Gas connection
This is the most unsafe stage. If you have no experience connecting coolants to gas, it is better to hire a specialist. Sequencing:
If there is a thread on the gas pipe, the outlet from the convector must be screwed on. If there is no thread on the tap, it must be done by welding it on the pipe; then, the pipeline from the gas source is connected to the apparatus with a fitting
You need to act extremely carefully and carefully; the pipe that is connected is fixed with clips. The step between fastenings should be 1 meter. The pipe is fixed on the outside of the building; joints and fittings are treated with heat-resistant silicone;
The pipe is fixed on the outside of the building; joints and fittings are treated with heat-resistant silicone;
Functionality check
When the installation procedures are completed, there is no need to rush to heat the room. It is necessary to launch and check for proper operation. It is better to start up the equipment for the first time with a specialist who is knowledgeable and will evaluate the operation of the device. The verification process is as follows:
- you need to open the gas valve and check for leaks. Can be done with a device, soap solution applied to the joints;
- press the start button and hold for about one minute. It is necessary for the gas to penetrate into the combustion chamber;
- When the burner is lit, it is necessary to check the operation of the device adjustment.
If everything works well at all steps of the first startup, you can try to heat the room.
Sandwich chimney device
For a wooden building, this system is an ideal option. Such a chimney consists of two pipes of different diameters located one inside the other. A heat insulator is placed between their walls. Such a chimney installed in a wooden house differs from a traditional brick one in a lot of advantages. Watch the video about the sandwich pipe:
The roof structure, made of wooden materials, even when dried well, seems to play a little over time. Displacements invisible to the eye and seemingly insignificant can lead to the destruction of a brick chimney, even the hardest one. But the sandwich, thanks to its design features, is not afraid of these threats.
And it is not surprising that the chimney in a wooden private house is increasingly being made in exactly this way. All its many advantages include the excellent fire safety of the pipe compared to a brick pipe.
Results
Convector heating is a very good option for heating rooms. Convectors can be recommended for installation both in small apartments and in large country houses. They have good performance and efficiency.
Homemade - this word means that the product is made with your own hands, but sometimes it is used with some kind of disparaging connotation. Yet this is far from the case. The most expensive hand-built cars in the world are created according to individual projects. What should we call them? Homemade? Everything that ensures the life of mankind is created by human hands.
The topic of this article is homemade products for heating a house, but its goal is not to teach, but to give an overview of those homemade options that talented people implement. Of course, self-production requires certain knowledge, experience, tools and materials for the job. Only in this case is it possible to produce a high-quality and safe heating device no worse, and in many cases even better, than industrially produced boilers.
Most often, craftsmen begin creating a heating system by determining the type of boiler, creating drawings and then constructing the boiler. This work is not easy, therefore, without good knowledge of the structure and operating principle of the selected type of boiler, experience, availability of the necessary tools and materials for its installation, it is difficult to complete it.
Gas boilers are difficult to make on your own, since this is high-risk equipment and is subject to special technical requirements. Attempts to make a homemade one are limited by the need to obtain a quality certificate and permits from supervisory authorities. It is problematic to pass all the required checks for compliance with quality parameters. But repairing a convector with your own hands is acceptable. Most often, the central pipe of the coaxial output burns out and it can and should be replaced.
Boilers of this type are characterized by extreme simplicity and low safety requirements during installation. An electric boiler can be compared to conventional electrical appliances that are used in the house. The only drawback is the high and constantly increasing price of electricity. But for a garage or cottage, if it turns on occasionally, it will be quite suitable.
Boilers using liquid fuel are also easy to manufacture. An obstacle to production can be the high price of injectors.
This class of boilers, and they are divided into wood, pyrolysis and pellet, is the most popular for self-production. A do-it-yourself wood heating boiler is one of the simplest and cheapest, but its efficiency is quite low. There are many drawings and practical tips on the Internet for making a boiler of this type. A wood-burning boiler can operate on any type of solid fuel.
Two-chamber pyrolysis boilers are quite expensive to manufacture on your own. They have two combustion chambers. In one, fuel burns with minimal access to oxygen. That is, the process of pyrolysis or dry distillation of wood occurs. The gas released from the wood burns in the second chamber, releasing a large amount of energy. Craftsmen have learned how to make a pyrolysis boiler from a gas cylinder with their own hands, which is economical and works great. The easiest way to make a boiler is from a gas cylinder with a capacity of 50 liters.
Often, apartment owners do not want to throw away old batteries when the time comes to replace them with new units, since there is an option to make an additional heating device from them with your own hands. This is quite feasible if you familiarize yourself with the necessary information and know about the materials suitable for assembly. A heater made from an old battery is a good option, suitable for an additional heat source.
Stove heating device in a private house: design of modern stoves
The main structural elements in a stove heating device for a private house are: foundation, trenches, ash chamber, firebox, smoke channels (smoke circuits), chimneys.
The foundation is the base of the stove, which takes on the loads from the stove and chimneys. This structural element must be reliable, since the safety of the structure in use depends on its strength. Correct placement of the stove foundation requires its location to be separate from the foundation of the house. The minimum gap between them is 3 cm, which is filled with sand.
First of all, they dig a well, which is then filled with small fragments of stone or baked brick, after which everything is carefully compacted. In this way, a pillow is prepared for the foundation. Then liquid cement mortar is poured into the pit. Laying a brick or stone foundation is done with bandaging of the seams. The last layer of cement mortar is carefully leveled.
After erecting the foundation, they begin to construct such a structural element of the furnace as shale. They are rows of brickwork that raise the oven on top of the foundation. To install the slates, two or three rows of brickwork are made. The bottom of the furnace is thus also involved in heat transfer.
An element of the design of heating furnaces, such as a blower, or ash chamber, serves to supply air to the firebox and to accumulate the ash coming from it. A special grate in the form of cast iron or steel rods is installed between the firebox and the ash chamber. While the stove is operating, the chamber door should be open, and at the end of the fire it should be closed to avoid rapid cooling of the air inside the stove.
The firebox in heating stoves is a furnace chamber in which fuel is burned - wood and coal. A special hole is installed in the upper part of the firebox to remove flue gas. The dimensions of the chamber are selected in such a way that it is possible to load into the furnace the amount of fuel necessary to heat the furnace.
At the bottom of the firebox, slopes to the grate are arranged, ensuring the free movement of ash into the ash pit. To prevent coals and ash from falling out of the combustion chamber, its door is installed above the grate by one row of brickwork. You can extend the life of the firebox by lining it with refractory bricks.
The operating principle of a stove heating system in a private home is based on heat intake through smoke channels, or smoke circulations. They can be positioned both vertically and horizontally, as well as rise and fall. How efficiently a stove operates depends on the size of the smoke ducts and their location.
The flue gas, passing through the channel, gives off energy in the form of heat to the walls, which heat the furnace. In order to increase heat transfer, smoke channels are designed in such a way that they are long and often change direction.
The smoke ducts of a modern stove heating of a private house can have a cross-section of 13 x 13, 13 x 26, 26 x 26 cm, their walls are made smooth (they are not plastered, since if the plaster is destroyed, the channels may become clogged). Access to the smoke circuits for cleaning them from soot is provided through special doors.
To obtain draft that helps remove gases from burned fuel, a chimney is installed, which is placed outside the house - on the roof. Most often it is made with a round cross-section, since gas movement in pipes with corners is somewhat difficult. In addition, round pipes are easier to clean. Ceramic or asbestos-cement pipes are used as the material for their manufacture.
Building regulations
Pipes may be laid in the outer walls of the building, but the diameter of the outer casing should not be less than the thickness of the fence. Vertical deviation is allowed no more than 30°, horizontal deviation - 1 m. Cutting is done where the pipe passes through the ceiling structure.
Chimney distance standards:
- to fireproof structures - 5 cm;
- to fire-resistant (plastered walls and wooden ceilings) - 25 cm;
- to fire-resistant ones, covered with asbestos sheets and galvanized - 10 cm, if the insulation protrudes beyond the edge of the channel by 15 cm on both sides.
The chimney is checked for density if the device uses the principle of self-production. The chimney end hole above the roof is closed. If smoke accumulates in adjacent ducts or adjacent rooms, the chimney duct is loose or not isolated.
The requirements for smoke ducts are:
- density sufficient to prevent the passage of gases and smoke;
- the diameter coincides with the outlet pipe of the heating unit;
- Permitted materials are used during construction;
- chimneys provide the required draft force;
- there should be no blockages or blockages inside the pipes;
- are not installed in the area of wind pressure.
Methods of water circulation in heating systems
The efficiency of water heating depends on the constant circulation of coolant through the pipelines. There are two ways to move hot water in a closed heating circuit:
- Natural way of circulation. The principle of moving hot water through pipes is based on the natural gravity of the warm coolant moving up and flowing down as it cools. In order for natural circulation to be good, it is necessary to install the pipework with a slope (for every 1 linear meter, the pipe should be lowered by 10 mm).
- Forced coolant circulation. In modern individual heating lines, the constant movement of hot water through the pipes is ensured by a circulation pump. This electromechanical device increases the speed of coolant movement, which leads to improved heat transfer.
Classification
Gas convectors are mainly divided according to two criteria: power and design. The power issue is more or less clear. You need to choose a device that can heat the room.
Depending on the design, the following heaters are distinguished:
- Floor-standing - installed on the floor. No special skills are required to install the floor-standing device. The device can heat fairly spacious rooms.
- Wall-mounted. This is a more compact option. The device fits perfectly into your home interior. Most often it is mounted above a window to create a thermal curtain from cold air. The power of the devices is low. They are suitable for use in houses up to 100 square meters.
When choosing a convector, be sure to pay attention to the material from which the heat exchanger is made. It can be steel, copper or cast iron
Raised beds
Recently, raised beds have become especially popular. With this method of their formation, the upper level of the bed is raised above the ground by 20-50 cm and placed in a separate box. This method has a number of advantages over a vegetable garden located in the same plane with the ground, namely:
- ease of care for the garden bed, since there is no need to bend over to carry out normal procedures (planting, weeding, loosening);
- you can create a bed from specially brought soil if the land on the site is not suitable for gardening purposes;
- much fewer weeds and pests settle in the garden bed;
- beds enclosed in separate high boxes look unusual and, with proper organization of space, become an independent aesthetic object.
Heating with liquid fuel
Do-it-yourself budget heating of a garage can be done using liquid heating units, including homemade ones. In our reviews, we have already described exhaust furnaces that provide cheap, and in some cases, free heat. For example, if you are changing engine oil, then over the spring and summer you can collect several barrels of finished fuel. A properly assembled oil stove will generate a large amount of heat and will delight you with even combustion without soot and soot.
Pyrolysis-type furnaces consisting of several parts, as shown in the figure, give good results. A fire is lit in the oil container, as a result of which oil vapors and pyrolysis products begin to form. They are burned in a vertical pipe with holes, producing a large amount of heat. By regulating the access of oxygen, you can adjust the intensity of combustion.
When using any stove, it is better to allocate a separate corner for it. You also need to think about a reliable foundation and lining the adjacent walls with non-combustible materials.
Using a stove with a plasma bowl to heat your garage, you can achieve maximum heat transfer and minimum fuel consumption. The oil here breaks down into its constituent parts in a hot bowl, after which it burns to form a bluish-white flame, similar to plasma. Of course, there is no trace of plasma here, since it is formed at much higher temperatures. These furnaces are characterized as the most productive.
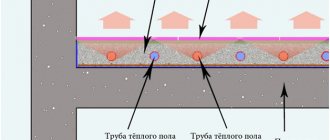
Warm floor
Home owners use heated water floors with their own hands, in two versions.
Warm floors evenly warm the room, increase the level of comfort and do not require additional energy costs, since the batteries and the floor circuit are powered from one boiler.
Self-installation of floors is quite accessible to owners who have carefully studied the principle of operation and the procedure for calculating heated floors. Before installation, you need to decide and purchase the necessary materials and components for the heated floor. During the installation of the circuit, strictly follow the rules and recommendations of specialists.
Ways to create a heated floor
In principle, a warm floor can be created in an apartment located in a multi-story building.
But usually connection to the heating system is prohibited. If there is permission, then connection will require an examination of the influence of heated floors on the operation of the system. Typically, this design requires the installation of a separate pump and mixing unit. These additional elements will maintain system pressure at the outlet. In private houses, heated floors and a do-it-yourself heating system in a private house are inextricably linked. The most popular methods of installing heated floors:
Pipes used for heated floors
To organize a heated floor, mainly three types of pipes are used. The best option is metal-plastic pipes, which are relatively cheap, easy to install and durable. Copper pipes are used, but they are very expensive, as well as cross-linked polyethylene pipes. They are inconvenient to work with because they are rigid, but they are not afraid of freezing and are easily repaired.
Color combinations
Stylists advise taking into account the following nuances:
- direction in the interior;
- combination of shades;
- illumination
It is much easier to choose a palette if the style for the kitchen and living room has already been selected. For example, neoclassicism and Provence have their own combinations. In a classic interior, designers combine pastel colors, pale colors, which are slightly diluted with dark shades. In French country houses you can often see soft blue, pink, and pistachio colors. Art Deco designers make up objects and finishing materials in black and white, sometimes beige and brown or silver and black. The main thing is to choose a shade for the walls. White will become universal, it will expand the space, and later you can paint them with any paint. However, in the cooking area, white ceases to look fresh. Beige or gray shades would be more practical. This background will highlight the other colors. In a monochrome interior, designers recommend gluing wallpaper in an unusual color or with a photo print.