Floors on the ground are laid on top of rough layers laid directly on the soil. This method is applicable for utility rooms, old-type private houses that do not have a basement.
There are several ways to create a floor on the ground, differing in the materials used and the method of laying them. Let's figure out what the difference between them is, in what cases one or another method is applicable, and show how to create the right floor pie.
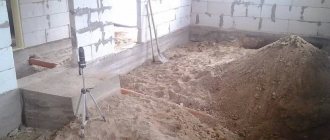
Construction of the floor begins with backfill. Source k-dom74.ru
Construction Features
Typically, technology allows you to install floors on the ground in a strip foundation. The method is not applicable for complex types of supporting structures that combine two or several types of foundation, for example, pile-strip.
Strip foundation in a private house Source betonbase.ru
There are several types of subfloors. Among them, concrete screed. Rely on: the structure can:
- on load-bearing walls;
- a cushion of soil backfill.
As a base, you can use plank flooring on wooden beams (joists). For each type of structure, a floor pie of a certain composition is constructed. Concrete cannot be poured directly onto the ground or clay.
Clay floor in outbuildings. Source 9ban.ru
It is necessary to prepare an intermediate base layer that provides:
- rigidity;
- thermal insulation;
- waterproofing;
- stability;
- ability to withstand loads.
Advice ! It is easier and faster to install wooden flooring. To arrange such a foundation, you do not need to carry out serious preparatory work.
The decision to lay floors on the ground is made based on the results of a soil study. It is important to know whether there is water lying close to the surface under the building.
Wooden floor on the ground Source prd.ru
Positive and negative sides
Floors on the ground have several advantages:
- ease of installation;
- efficiency;
- sustainability;
- ability to withstand significant weight;
- minimal load on the walls or its complete absence;
- wear resistance;
- maintainability;
- suitability for coating with any type of finishing materials;
- possibility of installing a “warm floor” system.
Design disadvantages include:
- the need to lay a layer of insulating materials;
- impossibility of installation over a layer of bulk materials more than 60 cm thick.
Important ! Floors on the ground cannot be laid in areas of flooding, river floods and swampy soil with an unstable level and close groundwater. The design of the floors must be created according to technology.
Groundwater lying close to the soil surface Source avatars.mds.yandex.net
Creation sequence
The rough plank floor is easy to install. A sand cushion is made on top of the soil, which is covered with geotextiles. The insulating material is covered with insulation.
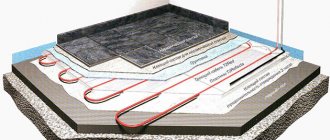
It is more difficult to create a concrete floor on the ground in a private house. Filling is done on top of several layers of building materials:
- sand;
- gravel;
- metal mesh (can be replaced with fiberglass);
- ten-centimeter concrete screed;
- waterproofing material;
- insulation (expanded clay, polystyrene foam, penoplex);
- additional protection from moisture;
- top concrete screed.
It is advisable to reinforce the last layer to avoid cracking when drying. If the homeowner decides to equip the home with a “warm floor” system, the structure will have to be assembled and configured before pouring the concrete screed. This is how floors are built on the ground; the correct pie provides high-quality heat and waterproofing, stability, and wear resistance of the structure.
Sand backfill Source izhevsk.ru
PS 02/25/2016
Almost a year after writing the article, we managed to sort out the questions raised just above.
Firstly, a program for calculating heat loss in Excel using the method of A.G. Sotnikova believes everything is correct - exactly according to the formulas of A.I. Pekhovich!
Secondly, formula (3) from the article by A.G., which brought confusion into my reasoning. Sotnikova should not look like this:
R
27 = δ conv /(2*λ gr
)=K( cos (( h H )*(π/2)))/K( sin (( h H )*(π/2)))
In the article by A.G. Sotnikova is not a correct entry! But then the graph was built, and the example was calculated using the correct formulas!!!
This is how it should be according to A.I. Pekhovich (page 110, additional task to paragraph 27):
R
27 = δ conv /λ gr
=1/(2*λ gr )*K( cos (( h H )*(π/2)))/K( sin (( h H )*(π/2)) )
δ
condition =R
27 *λ gr =(½)*К( cos (( h H )*(π/2)))/К( sin (( h H )*(π/2)))
Typically, the heat loss of the floor in comparison with similar indicators of other building envelopes (external walls, window and door openings) is a priori assumed to be insignificant and is taken into account in the calculations of heating systems in a simplified form. The basis for such calculations is a simplified system of accounting and correction coefficients for the heat transfer resistance of various building materials.
If we take into account that the theoretical justification and methodology for calculating the heat loss of a ground floor was developed quite a long time ago (i.e., with a large design margin), we can safely talk about the practical applicability of these empirical approaches in modern conditions. The thermal conductivity and heat transfer coefficients of various building materials, insulation and floor coverings are well known, and other physical characteristics are not required to calculate heat loss through the floor. According to their thermal characteristics, floors are usually divided into insulated and non-insulated, and structurally - floors on the ground and on joists.
Calculation of heat loss through an uninsulated floor on the ground is based on the general formula for assessing heat loss through the building envelope:
where Q
– main and additional heat losses, W;
A
– total area of the enclosing structure, m2;
tв
,
tн
– indoor and outdoor air temperature, °C;
β
— the share of additional heat losses in the total;
n
– correction factor, the value of which is determined by the location of the enclosing structure;
Ro
– heat transfer resistance, m2 °C/W.
Note that in the case of a homogeneous single-layer floor covering, the heat transfer resistance Ro is inversely proportional to the heat transfer coefficient of the non-insulated floor material on the ground.
When calculating heat loss through an uninsulated floor, a simplified approach is used, in which the value (1+ β) n = 1. Heat loss through the floor is usually carried out by zoning the heat transfer area. This is due to the natural heterogeneity of the temperature fields of the soil under the ceiling.
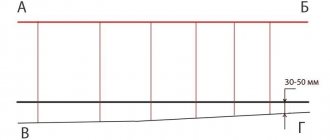
Heat loss from an uninsulated floor is determined separately for each two-meter zone, the numbering of which starts from the outer wall of the building. A total of four such strips 2 m wide are usually taken into account, considering the ground temperature in each zone to be constant. The fourth zone includes the entire surface of the uninsulated floor within the boundaries of the first three stripes. Heat transfer resistance is assumed: for the 1st zone R1=2.1; for the 2nd R2=4.3; respectively for the third and fourth R3=8.6, R4=14.2 m2*оС/W.
Fig.1. Zoning the floor surface on the ground and adjacent recessed walls when calculating heat loss
In the case of recessed rooms with a soil base floor: the area of the first zone adjacent to the wall surface is taken into account twice in the calculations. This is quite understandable, since the heat loss of the floor is summed up with the heat loss in the adjacent vertical enclosing structures of the building.
Calculation of heat loss through the floor is carried out for each zone separately, and the results obtained are summarized and used for the thermal engineering justification of the building design. Calculation for temperature zones of external walls of recessed rooms is carried out using formulas similar to those given above.
In calculations of heat loss through an insulated floor (and it is considered such if its design contains layers of material with a thermal conductivity of less than 1.2 W/(m °C)), the value of the heat transfer resistance of a non-insulated floor on the ground increases in each case by the heat transfer resistance of the insulating layer:
Rу.с = δу.с / λу.с
,
where δу.с
– thickness of the insulating layer, m;
λу.с
– thermal conductivity of the insulating layer material, W/(m °C).
Concrete screed
Before carrying out work, it is necessary to collect information:
- about the composition of the soil;
- about the level of groundwater.
On swampy soils around the building, a drainage system is created to remove soil moisture during the rainy season and active snow melting.
The preparatory layers of backfill are applied one by one after the previous building material has been thoroughly compacted.
Thick layers of sand and gravel are difficult to make dense enough. Over time, the backfill will shrink, which will be greater the thicker the preparatory layers. Therefore, it is better to pour the rough screed directly onto the geotextile fabric. This technology ensures high-quality crystallization of the material.
When concrete is poured over a layer of gravel or sand, the liquid leaves the mixture. The hardening process is disrupted and the strength of the screed is reduced.
Important ! Each previous layer is carefully compacted, and when pouring the screed, the period necessary for hardening and drying the material is maintained. It will not be possible to make a high-quality concrete floor on the ground in one or two days.
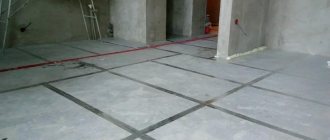
The screed cracked due to a violation of the laying technology Source remontik.org
Violation of the manufacturing technology causes:
- deformation, destruction of the lower layers;
- loss of structural strength;
- formation of bumps, depressions;
- cracking of the screed.
Before work begins, hot and cold water and sewage pipes are installed. After pouring the concrete, in order to introduce communication systems into the house, you will have to break the tightness of the structure and break part of the floor pie.
Installation of floors on the ground is carried out in several ways, which differ in process technology and applicable materials. Each method has pros and cons. The choice of technology depends on the foundation, soil, tastes and preferences of the homeowner.
Pouring a concrete screed requires knowledge and skills from craftsmen. During work, “wet” solutions are used. The concrete hardening process takes time. Each new layer of building materials is placed on top of the completely finished previous one. A poorly dried rough screed may burst if the concrete is not allowed to gain sufficient strength.
PREFACE
In 1981, the USSR State Construction Committee introduced “Rules for taking into account the degree of responsibility of buildings and structures when designing structures.”
According to these rules, all structures according to the degree of their responsibility are divided into 3 groups, and all concrete and reinforced concrete structures for each structure are calculated for strength using the same design resistances of reinforcement and concrete, determined taking into account the reliability coefficient for a given structure. In development of this provision, it is advisable to implement a differentiated approach to the reliability of elements and structures of the same structure, depending on their functional purpose and degree of responsibility. First of all, this applies to structures with economic responsibility, in which achieving the limiting state in terms of the strength of reinforcement and concrete does not lead to emergency situations or serious disruptions to the technological process. The calculation of such structures is carried out according to a given level of reliability, determined on the basis of the minimum present value, which includes the initial cost of the structure, the cost of maintaining it in operational condition, as well as the cost of damage from possible violations of the technology. This approach is most effective for the floors of industrial buildings, which can be calculated with a given level of reliability, determined depending on the operating conditions. Research by the Central Research Institute of Industrial Buildings has shown that the currently accepted level of reliability of the designed underlying layers appears to be too high and in some cases even exceeds the level of reliability of standard load-bearing structures of increased responsibility. The transition to the calculation of concrete underlying layers, taking into account the required level of reliability, will in a significant number of cases reduce the thickness of the floor by 20 - 30%. Using the Recommendations in design practice will reduce the cost of 1 m 2 of flooring by 1.2 - 2 rubles. while reducing labor costs by 0.2 - 0.3 man-hours and saving 8 kg of cement.
Suggestions and comments on the content of these Recommendations should be sent to the floor laboratory of the Central Research Institute of Industrial Buildings at the address: 127238, Moscow, Dmitrovskoye Shosse, 46.
Video description
How to properly create a floor pie for pouring a concrete screed can be seen in the video:
See also: Catalog of companies that specialize in finishing materials and installation of stoves and fireplaces.
Work must be carried out under certain conditions:
- Filling is done at temperatures above +5 degrees.
- The construction site or room must have a roof or canopy that protects from direct sunlight.
Sequence of work:
- Step 1 . First, a sand cushion with a thickness of 20 to 60 cm is poured. The layer is leveled and compacted to the maximum possible density. The backfill is filled and compacted using heavy rollers.
- Step 2 . Crushed stone is poured on top of the sand. Ideally, the layer thickness should be about 20 cm. By tamping the crushed stone, the density of the sand cushion increases.
- Step 3 . The backfill is covered with geotextile. The strips of fabric are laid overlapping by 15–20 cm. An overlap is made on the walls from the side of the foundation strip. A damping tape is installed around the entire perimeter. It provides a decoupling between the floor and the foundation strip.
- Step 4 . A metal reinforcing mesh is placed on top of the fabric and filled with concrete mixture. The rough screed must harden thoroughly. Work cannot be continued until the material has acquired sufficient strength.
- Step 5. Double roofing material is used for waterproofing. The material is laid on a rough screed, then treated with bitumen mastic.
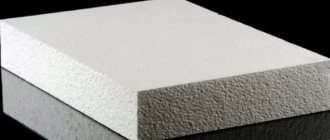
Laying penoplex for insulating a concrete floor Source altpol.ru
- Step 6 . The insulation layer is created from penoplex. Choose brands intended for the foundation. This insulating material is characterized by increased density, resistance to moisture, temperature changes, and the effects of bacterial and fungal infections.
- Step 7 . The next layer is a vapor-waterproofing film placed on the penoplex. The material is laid so that there is an overlap along the entire perimeter over the damping tape on the walls. Its height should be 18-22 cm. The film strips are positioned so that they overlap each other. The sides are taped with construction tape.
- Step 8. A reinforcing fiberglass mesh is laid under the finishing screed. Concrete is poured on top of this material. The thickness of the last layer can be from 5 to 10 cm.
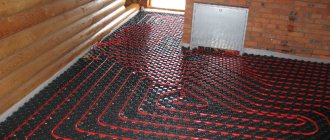
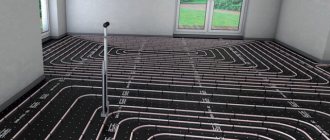
If a warm floor is created on the ground, then before pouring the finishing screed, the system is installed and pipes are laid. Concrete is poured after all commissioning work has been carried out.
Reinforcing mesh with damper tape around the perimeter Source vse-postroim-sami.ru
Floor calculation in SCAD
Pastel coefficients were set using Scad methods. But they just do not greatly influence the results of reinforcement.
| Quite natural. The rigidity has increased and the forces in the slab have changed. |
Those. do you want to say that in fact, the smaller the thickness of the slab, the more economically profitable it is? I think there is a problem somewhere in the scheme. But I can't figure out where.
Gentlemen, in general, no one could reset the gender calculation in Scud.
Selling skills and abilities
Help me to understand. The question is interesting. In general, based on what principles do you reinforce the floor?
In the late 90s, when I started my career, in our department at the design institute there was a special brochure, which contained the following as a keepsake: 1. Bed coefficient 2. Load per 1 m2, in tons 3. Floor thickness, in cm 4. Class concrete 5. Appropriate reinforcement and protective layer (maybe a gap, not a fact) But this is for memory. Almost 10 years have passed. I scanned this brochure, maybe that’s what remains. If I find it I'll post it.
And that SCAD 11.2 has already appeared. Or is this a myth? I've been waiting for six months since the May seminar
Aragorn! By the way, I found this brochure in my archive and am posting it. Use it. I recommend checking it in SCAD. I will wait for the results of the calculations. It’s interesting how my teachers designed it in terms of reserve in % Last edited by FOCUS, 01/20/2015 at 16:15.
Selling skills and abilities
| And that SCAD 11.2 has already appeared. |
Hm strange. We have SKad 11.1 official, and by default it was installed in the 11.2 folder
I read the manual, but there is not much that is not clear on page 8, apparently when selecting reinforcement, the values are from top to top and from bottom to bottom? Then what does it mean for only one mesh (note on cf - i.e. the area of the mesh in 2 directions.
Strange note: “in places where uneven precipitation is possible, double reinforcement of the concrete underlying layer should be used *top and bottom reinforcement.” Although judging by common sense and calculations of any monolithic slabs, an upper mesh is always needed. The only way I can assume that upper reinforcement is not needed is if we hypothetically assume that a plastic hinge will form in the upper zone of concrete, which will lead to an increase in the cross-section of the lower reinforcement. How to calculate this?
I’ll go look, maybe somewhere in the links there are instructions for calculations, but so far I’ve come to the conclusion: NOBODY KILLS COUNT FLOOR REINFORCEMENT. If this is not true, prove otherwise.
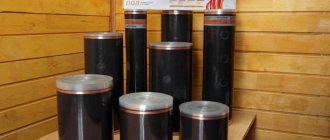
Dry screed
The technology for making dry screed is simpler. This method makes it possible to obtain results faster than when pouring wet mixtures. Expanded clay is used as a substrate for the finishing level.
Expanded clay backfill Source ad-cd.net
The installation of a floor on the ground begins with backfilling a sand cushion and pouring a rough screed. After the concrete layer has hardened and acquired the necessary strength, proceed to the following stages of work:
- The waterproofing film is laid using the standard method. Strips of fabric are laid in overlapping rows. One sheet overlaps the other by 10-13 cm. The side sections of the film are covered with adhesive construction tape. The edges of the canvases along the entire perimeter are raised onto the wall. The lifting height corresponds to the thickness of the dry screed.
- To create a flat horizontal plane of the floor, plaster profiles are used. Beacons are installed around the perimeter of the room. Their height is determined using a building level.
- Create a pillow from expanded clay. The bulk material is compacted and leveled along the beacons.
- The expanded clay layer is covered with available building material (tongue-and-groove plasterboard, plywood).
- The slabs are covered with finishing material.
Guide to insulating walls with foam plastic from the inside
Scheme for insulating a house wall with polystyrene foam.
The process of internal thermal insulation of walls using polystyrene foam does not differ much from external insulation. The working surface is prepared in the same order:
- The old cladding is removed.
- The cracks are covered.
- Irregularities are leveled out.
You can cover only the most even wall with polystyrene foam. The work is carried out using the following tools:
- Waterproofing.
- Primers.
- Special glue for working with foam plastic.
- Paint brushes.
- Plaster or drywall.
A dry and level wall should be treated with a primer. In the case of interior decoration, 1 time is usually enough. After the surface has dried, it must be covered with a layer of waterproofing. You can use ordinary plastic film. This material will protect the foam boards from moisture penetrating through the walls. In winter, the formation of condensation will occur especially effectively, so the film must be installed. Only in conditions of complete absence of moisture will thermal insulation remain effective for a long time.
Next, the lining is done with foam boards. They can be attached to the wall with plastic dowels, but everything can be done much more conveniently and quickly with glue. Modern adhesive mixtures allow you to securely attach polystyrene foam without much effort. The composition is applied only to the surface to be treated; it does not need to be applied to the foam. The foam is applied to the wall with glue applied and pressed tightly. There should be no gaps between the plates, because heat will escape through them. Glue the boards as carefully and tightly as possible.
After all the walls are covered with insulation boards, you can proceed to the final stage of work. For example, you can cover the walls with plasterboard, and then cover them with wallpaper or putty. This will take a little time, and the result will be an absolutely smooth, beautiful surface. You can do everything without drywall, by covering the foam with the reinforcing mesh you are already familiar with, puttying and painting.
Simultaneous external and internal insulation of walls gives maximum effect. If only internal insulation is done, condensation may begin to collect under the waterproofing layer. Because of this, mold will begin to appear and the windows will fog up. To avoid this, it is necessary to carry out insulation in strict accordance with the technology and regularly ventilate the room. Properly installed thermal insulation will allow you to save on electricity and heating bills and make your home as comfortable as possible. Good luck!
Plank flooring
The most budget-friendly ground floor on a strip foundation is constructed from boards. Wooden structures have a large number of advantages. They can be built in houses made of wood, stone, brick and concrete blocks.
Advantages of wooden structures:
- are cheaper than concrete screed;
- Wood beams can be installed independently;
- for the construction of a supporting structure and a plank floor, complex specific materials and tools are not needed:
- Wood structures put less pressure on the foundation of a house than a concrete screed.
Negative aspects of rough plank flooring:
- Wood degrades faster than concrete. It rots under the influence of moisture and fungus.
- The boards catch fire quickly.
- Wood is not resistant to moisture.
To protect wood from harmful insects and infections, building materials are treated with antiseptics, resins and other impregnations. Well-dried wood lasts up to half a century.
Video description
The sequence of installing a subfloor made of planks in the video:
The plank floor is mounted on a support system of longitudinal beams and transverse beams. Inside the room, columns are laid out along the walls of bricks. All free space between the supports is covered with expanded clay. For ventilation, leave 10-15 cm between the backfill and the plank floor.
A lag system is installed on the posts. The height of the supports is leveled. A plank subfloor is laid on top of the bars. The boards are laid:
- waterproofing film;
- insulating substrate;
- finishing material (laminated coating, linoleum, carpet).
There are several options for creating a floor pie along the wooden beams of the first floor. In the old days, logs were built from thick straight logs.
The building material was treated with resin. This impregnation provided protection from soil moisture, insects, and putrefactive bacteria.
Floor on joists Source lestnitsygid.ru
This design option consists of:
- from a clay pillow;
- waterproofing fabric, film;
- brick support pillars;
- beams and beams connected to each other by corners or any other types of fasteners;
- insulating material.