The popularity of used oil as a source of calories in heating systems is explained by its low cost. Before the era of energy crises, car companies spent money on recycling it. With the advent of heating devices that have automatic boilers for waste oil, it became advisable to burn it, obtaining heat and carbon dioxide needed by plants as the end products of hydrocarbon oxidation, as well as nitrogenous compounds in the form of impurities.
Automation for waste oil boilers is gaining popularity.
Assembly and commissioning
The bodies of such boilers consist of two pipes inserted into each other, the radius of which should differ from each other by 30–40 mm.
The external part must be equipped with 2 outlets - for direct and reverse supply of coolant. And inside the smaller-diameter pipe is a combustion chamber. The waste container is located next to the boiler - a pump is immersed in it to supply fuel to the pyrolysis chamber. The further installation process includes the following steps:
- Placing another container for oil at the bottom, with the creation of holes in it for gas vapor to enter the chamber for secondary combustion;
- Conducting contacts for electrical ignition of the burner through the combustion door;
- Inserting a fitting, thanks to which a gas-air mixture is formed, into the chamber wall;
- Creation of a chimney with a slide damper to remove combustion products, which the diagram provides;
- Placement of a gas outlet tube lowered to the level of the bowl with oil;
- Installation of a circulation pump on the return line, and safety groups on the direct line.
Before starting to operate the equipment, check the degree of sealing of the seams by filling the appropriate containers with oil and water. It is recommended to carry out the first launch by pouring only a 10 mm layer of oil purified from mechanical impurities with the addition of 100 ml of kerosene. The waste is ignited using a wick dipped in lighter fluid and lowered to the bottom of the container.
Fuel supply to the burner
This was one of the most difficult problems - to provide a droplet supply of fuel. The burner itself is not sensitive to solid impurities in the oil, but the drip mechanism is very sensitive. The problem was solved like this. I installed an oil filter from a car at the lower end of the intake hose, which provides complete filtration (there are filters with partial filtration, but they are not suitable for us). The filter has a metric thread. I was unable to find a suitable pipe to screw the filter onto. But I took a fitting of a suitable diameter, put a piece of oil-resistant rubber hose on it and simply pushed it tightly into the filter hole. The filter must be changed regularly, once a month.
Here is a selection of materials:
Everything you need to know about heating and climate control Features of the selection and maintenance of boilers and burners. Comparison of fuels (gas, diesel, oil, coal, wood, electricity). Do-it-yourself ovens. Coolant, radiators, pipes, heated floors, circulation pumps. Chimney cleaning. Conditioning
As an oil pump I use a high pressure fuel pump from an injection Volga GAZ 3102-40I. It is a bit difficult for it to rotate with oil inside, but this is compensated by the fact that there is practically no excess pressure at the outlet. The injector output is more than 3 atmospheres. In general, during testing the pump performed excellently. It has only one drawback, it is too productive. But this was easily dealt with. The solution is shown in the diagram. A structure is assembled from two half-inch tees, three fittings, a nipple and a piece of a pin (adjustment rod).
Now the pump pumps exactly as much oil as can be placed in the structure, taking into account the location of the rod in it, until the return flow comes out. All the rest of the oil flows back.
The lower fitting is fitted with a piece of medical dropper with a clamp for adjusting the dripping speed. Oil drips from it into an open funnel. The dripping speed must be adjusted so that the burner burns steadily, but does not smoke. The less oil, the better the combustion, but the flame may begin to go out. The adjustment depends on the viscosity, temperature and properties of the fuel. So if the fuel changes, a new adjustment is required. The oil should be at room temperature (10 - 20 degrees), otherwise it will not drip.
The tube loop in front of the burner is filled with oil and forms a hydraulic lock that prevents air from escaping from the compressor through this pipe. The funnel into which the oil is dripping must be open to prevent the pressure in the burner from influencing the dripping rate. The funnel should be at such a height that the oil level stabilizes at the very bottom of the funnel when the air compressor is turned on and there is no exhaust flow. I made the funnel from an empty plastic drinking water bottle. I cut off the bottom and glued a fitting into the neck. Just glue the fitting with oil-resistant glue. I first glued it in place. The moment instantly dissolved from the oil. For example, Poxypol will do.
Security measures
- A burner using oils and other GSPs can be dangerous if installed and operated incorrectly. To avoid a fire, a number of measures must be observed:
- floors and walls made of flammable materials are sheathed with metal or asbestos sheets;
- fuel reserves are stored at a safe distance;
- oil leaks must be removed in a timely manner;
- electrical elements of the installation must be carefully insulated to avoid sparking in the oil spray area;
- The burner must be placed out of reach of air currents and drafts.
A burner with an open nozzle must not be left running unattended!
The Babington burner, unlike a blowtorch converted for working in mining, is a reliable and durable unit that does not require complex maintenance. It is enough to periodically clean the fuel system, tank and sump, blow out the air duct in idle mode, and also monitor the serviceability of the compressor and oil pump. A working burner is a reliable and economical unit with a long service life.
Compressed air supply for waste oil recycling
Compressed air is required to prepare the oil mixture for combustion by atomizing it. This transport is directed to the nozzle, which is carried out under pressure. Due to the supply of oxygen through a separate channel, it ensures the combustion process in any device, including a DIY Babington burner using waste oil. Although the device was initially patented as running on diesel fuel, it was also adapted to run on technical oil.
Successful air supply requires a mini-compressor built into ready-made liquid fuel devices. It can be transported in other ways, for example, using the pneumatic principle. If there is no compressed air, the nozzle may not work correctly.
Compressed air in the burner is necessary to prepare the oil for combustion.
On a note! A small pressure gauge helps monitor the operating pressure, thereby maintaining the parameters necessary for full operation of the entire device.
Air flow regulation is provided by a special solenoid valve on the housing. Expensive equipment also includes air filters to purify the air. They will be useful in dusty mini-workshops, boiler rooms or other rooms where the air taken for the combustion process has many impurities. To operate a burner nozzle using waste oil yourself, you need an adjustable secondary air supply. The following burner parts are responsible for the synchronous operation of all components:
- nozzle (nozzle);
- fuel compartment;
- heating tank;
- air supply valve;
- oil supply regulator;
- a pressure gauge for checking pressure (there may not be one);
- blower (fan).
In finished devices, ignition is provided by electrodes. Compressed air is supplied through the air channel, from where it enters the nozzle. After heating, the used oil also goes there. If the nozzle is clean, it produces high-quality ignition of the fuel, which implies the appearance of an even, continuous flame.
Each exhaust burner must be equipped with an air supply valve.
Smoked meat with spicy marinade
Sometimes it makes more sense to marinate meat than to salt it. True lovers of smoked delicacies are against this method, because they prefer to enjoy the natural taste and smell of meat products. We will not argue about tastes, we will only note that there are also many lovers of savory snacks with admixtures of peppers and other spices. Marination exists as a method of preparing meat, and it cannot be ignored.
The brine must be prepared hot. We will present a step-by-step algorithm for obtaining the marinade. You will need to prepare salt, ground black pepper, allspice, bay leaf, thyme, garlic. Nowadays it is possible to use ready-made seasonings for salting meat, but by adding all the ingredients yourself, you can control their quantity in the marinade.
Of all the above, only salt is added strictly in a certain proportion. The remaining components are added solely at the request of the cook. For hot smoking, you need to take 50 grams of salt per liter of water, and for cold smoking - 70 grams. This difference is explained by the fact that high temperature provides additional protection against microorganisms, and also softens the meat by transforming fibers. When cold smoking, all hope is for a sufficient amount of salt.
A solution of salt and water is heated to a boil, then all other ingredients are added to it. Do not overuse too many spices. There are tastes and smells that go well together, but there are also those that should not be found in the same dish. If you don’t have subtle taste or are not confident in your knowledge, then you shouldn’t take risks. The simplest combination is salt, pepper, garlic, mustard. After 10-15 minutes of boiling, the marinade should be cooled.
Pieces of meat are immersed in the chilled marinade so that they are completely hidden. Semi-finished products are placed in the refrigerator for 3 days. After the specified period, the meat is taken out of the vessel and dipped in red pepper. The last manipulation for spicy lovers. If there is no such desire, then you can simply dry the pieces so that they are sent dry for smoking, even with a thin film.
Operating principle of waste oil burners
Liquid fuel burners are also called nozzles. Their work is based on the injection principle. That is, a strong air flow is created through the nozzle and a vacuum is formed in the fuel supply pipeline, due to which oil enters the combustion chamber and mixes it with air.
- Fuel preparation.
Before entering the burner, the fuel is filtered in a fuel filter and preheated in a special chamber. This is necessary to reduce the viscosity of the oil.For burning waste, preheating is 80-900C. The fuel preheating temperature is controlled automatically.
- Fuel supply.
Fuel is pumped out of the tank by a fuel pump. It is collected from the surface of the flammable liquid surface. This is due to the fact that the waste may contain mechanical impurities or water, which settle at the bottom of the tank. - Combustion process.
To maintain the combustion process, there must be a certain amount of oxygen in the combustion chamber. The air that is used to dilute and supply fuel is called primary air, and it supports the combustion process, but this is not enough.An additional fan supplies secondary air. The intensity of the fan is regulated using a damper and participates in the operation of the automation system.
- Ignition of fuel.
To carry out automatic ignition of a liquid fuel boiler, an ignition transformer and electrodes are used. The fuel is mixed with a stream of air and sprayed into small droplets. After which it is fed into the combustion chamber and ignites under the influence of high temperature.
Types of burners and their design
Oil combustion is classified according to 2 types of fuel entering the working chamber:
- drip method (under the influence of gravity by gravity);
- building up pressure.
The first type is used in homemade heat generators for small areas. It is considered a fire hazard and resource-intensive. The oil drips by gravity from a container located above in portions onto a hot bowl, where it burns, releasing calories.
In modern designs, the preparation of a suspension of oil with an oxidizer is carried out using the second method by injection of air.
The burner consists of the following parts and components:
- liquid fuel tank;
- oil pump;
- exhaust filtration system to remove solid and non-combustible fractions;
- nozzle;
- mechanism for dosed oxygen supply to form a torch;
- fuel pipelines;
- exhaust gas ducts.
The burner consists of various parts.
For initial ignition, devices have been developed to independently heat the oil to operating temperatures. The design ensures complete combustion of fuel. First, a low-pressure zone is formed in the nozzle area, where the heated oil enters and is converted into a cloudy mixture with the forced air. Next, ignition and complete combustion of the petroleum product occur.
Babington burner
The weak point of designs with forced fuel supply is the nozzle. To form an air-oil suspension, its working spray hole is drilled to 1.5 mm. During operation, it becomes clogged and requires cleaning.
In a Babington burner, oil flows down a spherical surface. Gradually, its layer thins to a film. Part of the fuel is converted into a cloud under the action of an air flow from an opening in the center of the unit, which ignites and forms a torch. Unburnt waste is collected by the storage tank and returned to the reservoir through a settling tank for reuse.
The difference between this design and others is that air is supplied under pressure through the nozzle, not fuel. Pre-filtration and removal of contaminants are not necessary. It is enough to increase the fluidity of the oil by initial heating.
Diagram of a Babington burner.
Drip type
It is possible to burn the waste without preheating and pressurizing, releasing it in doses into a hot cup evaporation burner. Fuel is supplied from a separately located container. The bowl works as part of a heating boiler or heat generator. This device is not used separately, unlike true burners that can be installed in heating units of different configurations.
For liquid fuel
Mobile and productive devices include a pyrolysis burner. Oil consists of hydrocarbons, which, when burned at room temperature, are not completely oxidized, releasing a small number of calories and a large amount of soot. Therefore, it is heated to degrees when the fuel splits into fractions.
When a container with a portion of fuel is set on fire, light components of the oils begin to evaporate from the surface and evaporate into the afterburner chamber. There they burn to colorless carbon dioxide and small soot fragments, releasing heat.
Advantages of this method:
- compact design;
- economical fuel combustion;
- environmentally friendly process safety.
The pyrolysis burner is a mobile device.
The disadvantages include the complex design of the initial ignition of the working composition, when it is necessary to heat a large mass of fuel.
Supercharged injection
This type of burner is used to create a torch with a temperature of +1200…+1400°C. The adjustment is carried out by intensive air pumping (in the metallurgy of bottled oxygen), which reduces oil consumption and increases the performance of the unit.
The disadvantages include:
- complexity of manufacturing and fitting parts;
- the need for fuel filtration;
- mandatory installation of automation.
The design is energy-dependent and consumes 20-25 W to produce 1 kW of heat.
General view of the finished structure
When the burner is set correctly, there should be no smoke. The only thing coming out is hot, wavy air.
There is an oil pump under the burner. Its task is to suck oil from the tank, where the oil settles, which passes around the propane cylinder twice (at the same time heating up), exits the door handle and, as a result, is sprayed.
Please note: in this installation there is no regulation of the propane supply, since it is quite inconvenient to control it with the cylinder handle alone, however, automation can be installed on everything.
Also, to make the design easier to understand, there is no fuel tank; the suspension is immediately poured into the sump. There are various drawings of these burners, but now we are considering the simplest option.
Advantages of this type of burner:
- It is quite easy to make without any help.
- cheap way to generate heat.
- An effective and functional device, it is lightweight, which makes the design mobile.
Kinds
These devices may differ from one another in several ways. First of all, if possible, regulate the power. There are three varieties:
Single stage
These are the simplest burners, the thermal output of which, also known as power, is always constant.
The amount of incoming heat is regulated by periodically turning on/off the burner.
The advantage of this device is its low cost.
The disadvantage is that all elements of the boiler, and especially the heat exchanger, operate with maximum thermal load and under conditions of sudden temperature changes. And this negatively affects the durability of the heat generator.
Two-stage
Such devices can operate in two modes: with maximum performance and half. Half mode is used as an intermediate mode for smoothly reaching maximum power, or as the main mode in relatively warm weather.
A two-stage burner is more expensive than a single-stage burner, but the boiler equipped with it operates in a gentle mode, and therefore lasts longer.
Modulated
The most expensive type of diesel burner, which is characterized by the ability to smoothly regulate power over a wide range - from 10% to maximum. Such burners do not turn off, but operate constantly - with the productivity that is required at the moment. This not only reduces the thermal load on the heat exchanger and furnace, but also eliminates temperature changes.
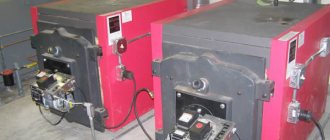
Diesel burner M 302
In addition, fuel consumption is reduced. After all, the operating scheme of one- and two-stage burners assumes some overheating of the coolant, as a result of which the amount of heat loss increases (it is proportional to the difference in temperature inside the room and outside).
If the boiler is equipped with a modulating burner, no overheating occurs (the temperature is maintained at the set point all the time), so heat loss, and therefore fuel consumption, becomes minimal.
Other types
Diesel burners also differ in the method of supplying primary air, which is used to prepare the fuel-air mixture. On this basis they are divided into two types:
- Diffusion (atmospheric): the simplest burners in which air is sucked in due to the pressure drop in a moving liquid stream. But with this method it is not always possible to ensure the supply of a sufficient amount of oxygen, so the fuel may not burn completely. The consequences are a drop in the efficiency of the installation and the formation of a large amount of soot.
- Pressurized or blown burners: Equipped with a fan that provides forced air supply in any volume. They cost a little more, but the fuel burns completely under any conditions.
Particularly powerful heat generators are equipped only with forced-air burners.
Additional Tips
When using a homemade burner, there are usually increased requirements for compliance with fire safety rules
Important to remember:
- Do not leave a working nozzle unattended.
- It is prohibited to install the equipment in a residential area.
- To heat the heating main boiler, a special room is usually made without flammable coating on the walls, ceiling and floor.
- To increase operating efficiency, heavily contaminated waste is enriched with clean oil.
- Reliable ventilation is built in the boiler room to remove gases and smoke after fuel combustion.
- Carry out regular maintenance and equipment reliability checks.
If used correctly, a homemade burner will last for many years. The savings from using this type of heating are obvious, because the used oil has already been paid for, and if not for the homemade firebox, it would have to be disposed of.
Conversion of a diesel device
Waste oil is tens of times more viscous than regular or stove diesel fuel.
Therefore, although the general principles of forming the air-fuel mixture are the same , the injector settings are very different.
Accordingly, the alteration directly depends on the design of the burner. In any case, you will have to change the fuel supply system and the device that forms the air-fuel mixture.
You can remake them according to the model of homemade ejector-type burners, because all the additional equipment is already on the diesel burner, or you can try to change the settings of the nozzle installed on the device.
You will find various ideas for such alterations and ways to implement them on thematic forums, links to which are located below :
- burnerclub.ru.
- termoportal.ru.
- forumhouse.ru.
Advantages and disadvantages of the Babington burner
Each technical device has a number of useful qualities and shortcomings. Obviously, this device has more pros than cons. The main advantage is the utilization of waste raw materials for the greatest benefit. Other advantages of oil and liquid fuel recycling equipment:
- burning waste helps preserve the environment;
- ease of operation and high energy efficiency;
- manufacturing of the device is possible under normal household conditions;
- obtaining heat at a minimum cost of raw materials;
- simple design manufacturing scheme, clear drawings;
- a homemade apparatus can be made from available materials;
- use in workshops and enterprises where a lot of processed raw materials accumulate that require disposal;
- the small dimensions of the burner allow it to be moved if necessary;
- waste and the lowest-grade oil go into the furnace;
- device functionality;
- relative fire safety;
- reuse of used oil.
The main advantage of the burner is the beneficial disposal of used oil.
Flaws:
- It is not recommended for use in cottages and residential premises due to burning and odor;
- the need to equip the premises with a fire extinguisher;
- It is imperative to follow all recommendations for the manufacture of the burner;
- the nozzle or nozzle should be checked periodically (if the holes are clogged with solid particles);
- sensitivity of the nozzle or nozzle to contamination;
- additional power supply to the components of the device (pump, compressor).
How to build your own apparatus based on the Babington burner principle: drawings
The principle of operation of a homemade burner, made based on the idea of Robert Babington, is clear from the drawings, where the components of the unit are visible:
Drawing of a waste oil burner according to Babington.
- waste oil tank;
- waste tray;
- fuel supply pipe;
- a small fuel pump for supplying portions of oil;
- hemisphere for spraying with a small hole;
- heating chamber with heating element (may be missing).
On a note! The testing nozzle is not a mandatory element for organizing the smooth combustion process. It can be successfully replaced by a nozzle - a small hole for supplying an air stream and fuel. To ensure that it does not become clogged, its serviceability must be monitored.
The used oil evaporates and flows down the hemisphere. These oily vapors are mixed with the air mass, resulting in a fuel mixture. The remaining oil that has not had time to be utilized flows into the pan, and from there through the tube back into the fuel tank.
This unit, based on Babington's patent, designed to burn liquid fuel, is quite simple. Therefore, it can be reproduced from scrap parts in a home workshop. Success depends on the exact compliance of the parts with their intended purpose and on the coordinated operation of all components. Therefore, before making a burner with your own hands, you should carefully calculate all the parameters.
The design of the burner is quite simple, so it can be made from available materials.
On a note! If you take one option as a basis, for example, the Gnome burner, using ready-made drawings and recommendations from craftsmen, it is difficult to make a mistake in the size and functionality of the parts.
How to choose?
There are several basic parameters that will help you choose the right burner for testing
To begin with, pay attention to the power of the unit, as well as the number of stages that are indicated in the description of the technical characteristics. They determine the main parameters of the equipment and the technological process in which it can operate.
The power must be greater than the combustion power of the unit, and back pressure must be taken into account.
Once you have figured out this parameter, pay attention to the thickness of the front walls of the door, boiler, generator, this will help you choose the optimal size of the nozzle and the chamber itself. The dimensions of the fire head must be selected so that it is thicker than the wall of the installation
The diameter of the hole also matters.
A characteristic such as oil consumption in the burner also plays an important role and can affect the further choice of device. It all depends on the model and manufacturer, since some consume half a liter of oil per hour, while others require more.
Nozzle
First you need to make a spherical nozzle; fuel will flow through it in the future. Make a hole in the sphere, the diameter should be approximately 0.25 mm
Please note that the power of a homemade burner depends on the diameter. The smaller the diameter, the lower the power and vice versa
All difficulties await you in the manufacture of the nozzle. The channel for air passage must be made perfectly smooth. It is necessary that the air hits forward and not against the walls of the nozzle. The best option is to make a hole on a special machine.
But if luck smiles on you and you find a jet with the desired diameter, then do not miss the opportunity and place it in the center of the spherical element. If you can’t find a hemisphere, you can use a small piece of sheet metal with a jet attached inside. As a result, you will receive an oil spray nozzle. Heated fuel will flow into it, and atomization occurs due to the incoming air. When installing such a device in a universal boiler, you get an effective and cheap heat source.
Completion of production
The burner will have a powerful flame, but for smooth operation it is important that all designs of external elements are thought out correctly. In the considered option, the waste flows down the sprayer in the shape of a sphere, but most of it returns back to the tank, a small amount ends up in the nozzle
To increase efficiency, it is recommended to install at least a weak heating element in the main tank. If you do not want to manually pour oil from one tank to another, you need to install a small pump. It is installed between the tanks and allows oil to be pumped from one to another, thereby ensuring circulation.
To increase the service life of the unit, it is recommended to treat the connections with high-temperature sealants. It is recommended to install a thermostat on the heating element (if one is not provided). It is enough to warm the oil to a temperature of 70 degrees, there is no point in doing more. The end result should be three nodes consuming power. These include:
- Compressor.
- Oil pump.
- A heating element.
Unfortunately, it is not possible to make a completely energy-independent design, since it is not recommended to exclude a heating element or an oil pump. As for the compressor, without it the burner will not work at all. But you still save a lot on fuel - used oil costs pennies.
How the burner came to be
Back in 1969, inventor Robert Babington was awarded a patent for this burner. True, today its term has long expired. In 1979, Babington proposed a new burner design. It was fundamentally different in that it had a double air spray. This invention was very similar to the Airtonic burner, which was also made using the technology of this inventor. It was used for military purposes in a field kitchen. Naturally, the burner was powered by diesel fuel and was irreplaceable. The final version was proposed by John Archibald. Many people call this man the inventor of the Babington burner. But it is impossible to give a definite answer. And it is unlikely that this plays a significant role for us. The most important thing is to be able to create such a unit with your own hands and ensure its efficient operation. Fortunately, doing this is not as difficult as it might seem at first glance.
Differences between glossy, satin and matte ceilings
Each group of canvases for suspended ceilings is divided into the following groups:
- PVC is a thin film made from polyvinyl chloride.
- Fabric is a material of synthetic origin that is made from polyester.
Glossy
The texture of the glossy PVC film is completely smooth. The varnish surface is capable of reflecting every decorative element like a mirror, which visually helps to increase the space and creates the effect of luxury. Such ceilings are universal, as they will look great in both classic and avant-garde interiors. But such a surface sometimes has a negative effect on people’s psyche.
Matte
Matte type canvases have a rough texture
PVC film will not reflect light, and therefore the ceiling does not attract much attention. White surfaces will visually strongly resemble plaster
Although there is an opinion that such ceilings look too ordinary, if you use decorative elements like ceiling plinths, built-in lamps, stucco moldings and other things, this drawback can be quickly eliminated.
Satin
Stretch ceilings - matte, glossy, satin - have one common quality, namely that they are all made of PVC film. The surface of satin is reminiscent of matte canvases, but still has special qualities. First of all, they include appearance, namely, that satin is something between glossy and matte fabric. The surface of the film has a practically smooth, fine-grained texture. They are produced in different shades, but the palette is still more modest compared to glossy-type analogues, but at the same time brighter than that of matte films.
Please note that only satin ceilings have a pearlescent tint and soft reflection of light. Artificial lighting will be diffused throughout the room and the color will change depending on the viewing angle
Fabric
Such ceilings are a synthetic fabric made of polyester threads impregnated with polyurethane. The texture is only matte. The texture resembles fabric, and the material is available in about 20 shades, most often pastel. The main difference from PVC films is that after installation the canvas can be painted. In addition to appearance, there are many other differences.
| Peculiarity | Glossy | Matte | Satin | Fabric |
| Reflection of light | Mirror effect | __ | Pearlescent shine, soft diffused light | __ |
| Moisture resistance | Stable | Stable | Stable | Not stable |
| Palette | A large number of rich and bright colors, photo printing is possible | Large range of colors, photo printing available | Large selection of pastel shades, including pearl and metallic | Small selection of shades, can be printed and painted |
| Nuances of care | The surface is smooth, easy to wash and clean | The surface is rough, resistant to frequent washing, and does not leave streaks. | The surface is smooth, dirt and dust do not accumulate on it, dirt can be easily removed | The texture is rough, dirt and dust accumulate on it, which are difficult to remove; cleaning with special means is required |
| Maximum width | 320 cm | 320 cm | 270 cm | 510 cm |
| Permissible room temperature range | From +5 degrees to +50 (if the temperature is higher, the material will begin to crack and deform) | Can be used at any ambient temperature, even in unheated cold rooms | ||
| Minimum service life | 10 years | 10 years | 10 years | 15 years |
Photo of a do-it-yourself waste oil burner
- Do-it-yourself grain crusher: types, principles of operation and tips on how and what to make an effective crusher from (85 photos)
- Do-it-yourself ski mount: installation and tips on how to install various types of mounts correctly (115 photos and videos)
- How to make a castle with your own hands: building decorative medieval castles and fortresses (110 photos)
- How to make skis with your own hands: choice of materials and technology for making skis at home (105 photos and videos)
- DIY cockroach trap: options, effective ideas! Operating principle of cockroach traps, types - glue, ultrasonic, electric, electrostatic, poisonous
- How to make a furnace for mining: drawings, operating principles and construction of simple and effective furnaces (video + photo)
What is Babington's famous invention?
Every invention has its own author, even if his name is undeservedly forgotten by his descendants. For example, in 1969, British inventor Robert Babington received a patent for a stove running on diesel fuel, which was reminiscent of lighting kerosene gas operating on kerosene vapor. Robert Babington's design was originally designed for kerosene, then it was adapted for diesel fuel. When the number of cars increased disproportionately, the used oil had to be disposed of somehow. Therefore, innovators were looking for devices suitable for these purposes.
First, based on the patented invention of R. Babington, a do-it-yourself diesel burner appeared, then it was adapted for burning oil and other types of fuel. The testing device appeared much later than the diesel design, but it surpassed its predecessor in popularity and safety.
After some time, a similar device was proposed again, since the first patent had expired, and the liquid fuel stove had not lost its relevance. Similar devices were repeated in different versions, and not only self-taught craftsmen, but also design bureaus of reputable enterprises tried to assemble the Babington burner with their own hands.
By design, the burner is a simple device, so it can be successfully manufactured at home. It is characterized by fairly high efficiency in terms of obtaining the heat necessary for heating:
Burner diagram based on the Babington principle, where 1 – heating sensor; 2 – casing; 3 – heat exchanger; 4 – fuel sprayer; 5 – glow plug; 6 – supercharger; 7 – fuel pump; 8 – friction clutch; 9 – electric motor; 10 – lever for switching operating modes; 11 – fan; 12 – skeleton; 13 – fuel pipe; 14 – combustion chamber
- technological installations;
- small workshops;
- workshops;
- garages;
- warehouse and utility rooms.
DIY waste oil burner - manufacturing features
The easiest way to make a burner is using a small gas cylinder or a blowtorch. To work you need to prepare:
- the above container;
- welding machine;
- grinder;
- a piece of 1.5-inch pipe;
- a round plate equal to the inner diameter of the pipe;
- a piece of wire 6 - 8 mm;
- bolt with a through internal hole for the oil supply nozzle;
- a thick round blank for the lid.
Beginning of work
- Two holes are drilled tangentially in the cylinder: from the bottom (for the mixture of air and oil to enter), and from the top for the flame to exit. Tubes with a diameter of 1.5 inches are welded. One is a continuation of the other, only a little higher; so that the fire swirls inside and does not immediately fly out into the street.
- An ignition hatch is made on top and equipped with a heavy lid so that it does not open during operation due to the pressure of incoming air.
Waste oil is a cheap fuel and for some types of premises it makes sense to install waste oil furnaces. , pros and cons of use.
You will find instructions for making a heat pump for heating a house.
Was steam heating once widely used in our country? Why has it lost its relevance now? In this article you will find the answer to this question and learn how steam heating of a private house works.
Air flow control
The pressure and amount of air supplied for combustion is regulated by a homemade damper (it is made according to the throttle principle, like in a carburetor).
The flap is installed in the supply pipe upstream of the fuel injector as follows:
- A hole for the rotary axis is drilled strictly according to the diameter of the existing workpiece.
- A round plate is cut along the inner diameter of the pipe, which in the closed position can completely block the hole.
- A rotary axis is made in the shape of the letter “L” and a damper is mounted on it with small bolts.
- In front of the damper, a hole is drilled or a slot is cut in the supply pipe to remove “excess” air (in case there is a lot of it for the burner).
The principle of feeding waste into the burner itself
To supply oil, a diffuser is installed in the intake pipe immediately behind the damper. The diffuser is a chiseled ring insert that slightly narrows the flow area. Thanks to it, a vacuum is created and oil (or other liquid fuel) flows through the nozzle and mixes with air.
It is preferable to use metal pipes for the supply pipeline
. A freon tank is well suited for the fuel tank, and the needle valve allows you to precisely regulate the oil supply.
Simple homemade burner
The oil must be separated from water and filtered.
Principle of operation
The fuel is supplied by gravity to the nozzle and is sucked in by air passing through the diffuser. The resulting mixture ignites inside the cylinder, and the torch is blown outside. Thus, the source of heat is the burner itself (heats up to a crimson glow) and the torch.
The flame can even be used to melt some metals such as copper, aluminum and others that have a lower melting point.
Types of homemade stoves in development
Engine oil contaminated with impurities will not ignite itself. Therefore, the operating principle of any oil stove is based on the thermal decomposition of fuel - pyrolysis. Simply put, to obtain heat, the waste must be heated, evaporated and burned in the furnace firebox, supplying air in excess. There are 3 types of devices where this principle is implemented in different ways:
- The simplest and most popular direct combustion design with afterburning of oil vapors in an open perforated pipe (the so-called miracle stove).
- Drip furnace using waste oil with a closed afterburner;
- Babington burner. How it works and how to make it yourself is described in detail in our other publication.
The efficiency of heating potbelly stoves is low and amounts to a maximum of 70%. Note that the heating costs indicated at the beginning of the article are calculated based on the indicators of factory heat generators with an efficiency of 85% (to get acquainted with the full picture and compare oil with firewood, you can go here). Accordingly, fuel consumption in home-made heaters is much higher - from 0.8 to 1.5 liters per hour versus 0.7 liters for diesel boilers per 100 m² of area. Take this fact into account when starting to manufacture a furnace for testing.
Design and disadvantages of an open-type potbelly stove
The pyrolysis stove shown in the photo is a cylindrical or square container, one-quarter filled with used oil or diesel fuel and equipped with an air damper. A pipe with holes is welded on top, through which secondary air is sucked in due to the chimney draft. Even higher is an afterburning chamber with a partition for collecting heat from combustion products.
The principle of operation is as follows: the fuel must be ignited using a flammable liquid, after which the evaporation of the waste and its primary combustion will begin, causing pyrolysis. Combustible gases entering the perforated pipe flare up upon contact with the oxygen flow and are completely burned. The intensity of the flame in the firebox is controlled by an air damper.
This stove has only two advantages during testing: simplicity and low cost and independence from electricity. The rest is all downsides:
- stable natural draft is required for operation; without it, the unit begins to smoke into the room and die out;
- water or antifreeze that gets into the oil causes mini-explosions in the firebox, causing fiery drops to splash from the afterburner in all directions and the owner has to put out the fire;
- high fuel consumption - up to 2 l/hour with low heat transfer (the lion's share of the energy flies into the chimney);
- The one-piece housing is difficult to clean from soot.
Although the potbelly stoves look different, they operate on the same principle; in the right photo, fuel vapors burn out inside the wood stove
Some of these shortcomings can be leveled out with the help of successful technical solutions, which will be discussed below. During operation, you should adhere to fire safety rules and prepare used oil - settle and filter.
Pros and cons of IV drips
The cardinal difference of this furnace is the following:
- a perforated pipe is placed inside a steel casing made from a gas cylinder or pipe;
- fuel enters the combustion zone in the form of drops falling to the bottom of a bowl located under the afterburner;
- To increase efficiency, the unit is equipped with air pressurization using a fan, as shown in the diagram.
Diagram of a dropper with bottom supply of fuel from the fuel tank by gravity
The real drawback of the drip stove is the difficulty of execution for a beginner. The fact is that you cannot rely entirely on other people’s drawings and calculations; the heater must be manufactured and configured to suit your operating conditions and the fuel supply must be properly organized. That is, repeated improvements will be required.
The flame heats the body of the heating unit in one zone around the burner
The second negative point is typical for supercharged stoves. In them, a jet of flame constantly hits one place in the body, which is why the latter will burn out quite quickly if it is not made of thick metal or stainless steel. But the listed disadvantages are more than offset by the advantages:
- The unit is safe to use because the combustion zone is completely enclosed by an iron casing.
- Acceptable waste oil consumption. In practice, a well-tuned potbelly stove with a water circuit burns up to 1.5 liters in 1 hour to heat 100 m² of area.
- It is possible to wrap the body with a water jacket and convert the exhaust furnace into a boiler.
- The fuel supply and power of the unit can be adjusted.
- Undemanding to the height of the chimney and ease of cleaning.
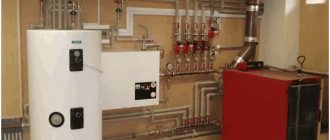
Boiler with pressurized air, burning waste engine oil and diesel fuel
How to make a burner yourself
To understand how to make a Babington burner device, you need to study its design from the drawings. You can find quite a few of these on the Internet, but for manufacturing it is better to adopt the experience of specialists and use a proven prototype for work. Below is a drawing of a burner made and tested by one of the experienced participants in one of the specialized forums:
Now a few words about what the unit can be made from according to this drawing. The author used a regular steel tee with threads for connecting pipes with a diameter of 2 inches (DN50) as a body. Instead of a tee, a cross of the same size will do. The remaining elements are in accordance with the list:
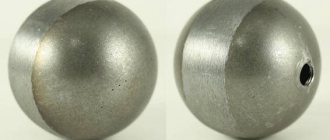
- Any metal part with a hemispherical end can act as a nozzle
Hemisphere or hollow ball for a Babington burner. There are several options - starting from a brass door handle and ending with various spherical nuts.
- The nozzle is made from a metal pipe with an external pipe thread, length – 150-200 mm.
- Copper tube with a diameter of 10 mm for the fuel path.
- Metal tube for organizing air supply. Diameter – at least 10 mm.
- Threaded fittings are used to connect a copper tube to the body.
You will also need a small pump to pump used oil. Units from a VAZ car or motorcycle cope well with this task; you just need to ensure their rotation from an electric motor. Any low-power compressor is suitable, including one from a refrigerator, since the pressure in the air path should be low (nominal - about 2 Bar, maximum - 4 Bar).
An important operation is to drill a calibrated hole of very small diameter in the improvised nozzle. But first you need to select a drill of the required size, because the power of the future homemade Babington burner will depend on the size of the hole. Calculating power will be discussed in the next section, and how to make a small hole yourself is shown in detail in the video:
How to make a burner for mining yourself
For successful combustion of oil, you must either preheat it to the evaporation temperature - approximately 300 degrees Celsius, or finely spray and enrich the oil vapors with air. You can heat the oil to such temperatures using powerful heating elements, but this will increase energy costs. An oil aerosol can be created by applying a stream of compressed air through a layer of oil. This effect is realized in the Babington burner - a device, an analogue of which you can assemble with your own hands from available components.
Babington burner - an alternative to a blowtorch
The Babington burner was originally patented to run on diesel fuel. Later, having made minor changes to the design, the craftsmen changed the design with their own hands and adapted the burner for burning waste machine and food oils. The degree of oil contamination does not matter much, since the fuel channels of the unit are free of bottlenecks prone to blockages.
Unlike a blowtorch, where the fuel-air mixture is sprayed under pressure through nozzles, in a Babington burner oil is pumped from a reservoir using a low-power pump and flows in a thin film along an inclined or spherical surface, and the oil-air mixture is formed by blowing a thin jet of compressed air air through this film.
The spraying effect is clearly presented in the video:
- The Babington burner consists of several functional blocks:
- Fuel - reservoir, pump and pipes for supplying fuel.
- Air, it consists of a compressor and an air tube.
- A hemisphere with a small diameter hole where the air stream mixes with oil.
- A nozzle that directs the flame in the desired direction.
The standard design can be modified with your own hands, increasing its efficiency.
To do this, the fuel tank is equipped with a heater that heats the oil before the burner starts operating, which makes it possible to increase its fluidity. In addition, a fuel channel made of a metal tube can be wrapped around the nozzle - this way the oil will heat up while the burner is operating. The burner nozzle is directed into the boiler, where the fuel chamber and water jacket are heated. You can also use the device to melt and heat metals.
Advantages of a DIY Babington burner:
- wide choice of fuel - used machine oils, lubricants of any viscosity, diesel fuel, fuel oil, any vegetable oils, including food waste;
- the presence of impurities in the fuel;
- simplicity of design - you can do it yourself.
Flaws:
- difficulty setting up the burner, especially often when changing the type of fuel;
- smell and dirt - the burner cannot be installed in residential premises, a boiler room is required;
- The use of the burner involves an open flame, so fire safety precautions must be observed.
There must be a powder or salt chemical fire extinguisher in the boiler room!
DIY Babington burner
You can assemble the burner yourself from simple components; for this you will need:
- A hollow ball or hemisphere with such a wall thickness that you can drill a hole with a diameter of no more than 0.3 mm. You can use any metal objects of a similar configuration, for example, a spherical brass door handle, nuts with plugs. The main condition is the possibility of reliable fastening of the air duct.
- Metal tube for supplying compressed air from a compressor, diameter - 10-15 mm.
- A compressor, for example, from a refrigerator, with an operating pressure of 2 atm, a maximum pressure of 4 atm.
- Fuel tank with a built-in heating element of 0.5-1 kW made of non-corrosion metal.
- Fuel sump and pipe to drain excess oil back into the tank.
- Copper tube, diameter - 10 mm, wall thickness - 1-1.5 mm for the fuel channel.
- Oil pump from a car or motorcycle with an electric motor to drive the pump. It is advisable to equip the pump with a filter with a large mesh at the inlet.
- The nozzle is a 200-400 mm long nozzle with an external thread of 2 inches.
- Crosspiece for two-inch metal pipe with internal threads.
- A 1" threaded drain and a 2/1" adapter to drain excess fuel into the sump.
- Adapters and fittings for connecting the fuel line, air duct and nozzle.
Preparing burner components for assembly
- The main and most important task is to make a hole of a given diameter in the spherical nozzle. The power of the burner depends on its size. For example, a boiler with a thermal power of 10-15 kW requires a burning torch obtained by operating a burner with one hole with a diameter of 0.2-0.25 mm. To obtain more power, there is no need to expand the hole - this will lead to larger droplets. It is better to make 2-4 holes with a diameter of 0.1-0.3 mm with a distance between them of 8-10 mm, otherwise the torches will be mutually extinguished. Fuel consumption can be calculated as follows: through one hole of 0.25 mm, 2 liters of waste are sprayed per hour.
Video about how you can make small diameter holes in a metal hemisphere:
- The tank is made of corrosion-resistant metal. A heating element is built into it with a thermostat set to turn off the heating element at a temperature of 70 degrees Celsius.
- It is necessary to make a fuel sump from the same material, equipped with a pipe with an overflow. Through this pipe, oil from the sump will flow back into the tank. To drain dirt from the sump, you can provide a plug in its bottom.
- Assemble the burner body: connect the nozzle from the squeegee to the 2-inch cross in the front part, then adapters: from the top for oil supply, from the back side for air. From below, a 2/1-inch adapter and a squeegee are connected to the crosspiece, through which excess oil will drain into the sump. The adapters are made of plugs with drilled holes into which the fuel and air channel tubes are inserted.
The housing can also be made from a tee, in which the air duct is inserted into the upper part, having previously drilled a hole of the required diameter.
- The fuel path is made of a copper tube, one end of which is wound around the nozzle three times, and then led through a plug adapter into the housing at the top. The fuel pipe is connected to the pump, a coarse strainer is installed and the other end of the pipe is inserted into the tank. The fuel path can be equipped with a valve. The pump is connected to an electric motor operating from a 220 V network.
- An air duct made of a metal tube is attached at one end to a hemisphere with a hole, having previously installed a plug adapter at the required distance. The hemisphere should be positioned so that the oil from the fuel tube evenly flows onto the rounded part of the nozzle, and then into the lower part of the housing and into the sump. The other part of the air duct is connected to a compressor, which is also connected to a 220 V network.
- Since the installation will have as many as three consumers of electricity, which are not turned on simultaneously, it is advisable to equip the burner with a control panel: install a separate toggle switch or button to turn on the heating element and a separate toggle switch to turn on the compressor and pump. If desired, you can equip the remote control with a light signaling system made of diode lamps.
- You can equip the burner with a controller that automatically turns on the units in accordance with the selected mode. Electric ignition is realized using spark plugs, and to extinguish the burner it is enough to turn off the oil supply.
Video - burner assembly diagram:
Preparing fuel for the burner
Almost any waste oil can be used in a Babington burner. Automotive waste with a large number of foreign inclusions is filtered before being poured into the tank through a mesh and mixed with cleaner oil. Oils with a small amount of impurities can be poured without preparation.
When using edible vegetable oils, such as deep frying, it is recommended to let it sit for several hours and carefully drain off the residue. These oils are sufficiently fluid at normal temperatures, so they can be heated in the tank only when the burner is started. When using fuel oil and other thick materials, they must be heated to a temperature of 70 to 90 degrees, otherwise the pump will work with overload.
In this article we consider in detail the entire process of making a long-burning potbelly stove: from arranging the foundation to making a chimney. The technology for safely disassembling a gas cylinder and then making a wood-burning potbelly stove from it can be found here. About the pros and cons of a long-burning wood-burning stove made by yourself, read:
Do it yourself
The process of making a Babington burner is not very complicated and, if you have all the necessary materials and tools, it will only take a few days, depending on the skills of the person.
To manufacture this unit you will need the following materials:
- steel tube DN10,
- metal tee with a diameter of 50 millimeters with internal thread;
- a metal sphere (or hemisphere) with a diameter of less than 50 millimeters;
- copper tube DN10 at least one meter long;
- metal elbow DN10 with external thread;
- a bend with a diameter of 50 millimeters with an external thread, a length of at least 10 centimeters;
You will also need a minimum set of tools:
- angle grinder (grinder) or hacksaw for metal;
- perforator;
- special chuck for thin drills;
- drill;
- drill with a diameter of 0.1–0.3 millimeters;
- soldering iron;
Preparatory stage
Before starting assembly, you need to make a hole in the sphere (hemisphere). This is one of the most difficult and critical stages, since the hole must be made exactly in the middle. Otherwise, the burner torch will be directed to the side, which in turn can negatively affect the quality of the product and its efficiency.
In addition, drilling holes of this diameter is a difficult task, since thin drills can break. Therefore, this process must be carried out carefully and slowly.
Step-by-step instruction
Babington burner
Once the sphere or hemisphere is ready, you can begin assembly. It is very simple and consists of several simple manipulations:
- The metal squeegee will act as a nozzle. It is cut to the required length and screwed into the tee. After this, a hole is drilled in the side of the burner, large enough so that the jet can be ignited through it.
- On top of the tee, closer to the nozzle, a hole is made for a copper tube through which fuel will be supplied to the device.
- An elbow is attached to the copper tube to connect the fuel line.
- A copper tube makes several turns (2-3 will be enough) around the nozzle. They must be done at some distance from the drive. This will allow the oil to be heated to the desired temperature before it hits the sphere.
- In the sphere, at the opposite end of the small hole, another hole is drilled along the outer diameter of the steel tube. The tube is hermetically inserted into the sphere. This is necessary so that the air exits only through a small hole, and pressure is created inside it. If a hemisphere is used instead of a sphere, then the tube is soldered at the small hole and sealed.
- From the opposite end from the nozzle, a metal tube with a sphere is inserted into the tee. She is fixed in it.
- Thus, the burner is ready for use. All that remains is to connect a compressor to the tube with the sphere, which will pump air into it and a fuel line to the copper tube.
- If desired, this system can be improved by connecting a pump to supply oil. You can also install a control unit with control sensors. This will make this system automatic and more secure.
https://www.youtube.com/watch?v=y-fOHSJONHc
Most popular models
In this section you will find descriptions of the most popular burners that use waste oil as fuel. All devices are mass-produced, and some of them are multi-fuel , that is, they can operate not only on waste oil, but also on other liquid petroleum products, for example, fuel oil or diesel fuel.
A distinctive feature of such devices is the availability of adjustments, thanks to which they can be adjusted to any fuel, achieving the greatest efficiency and environmental friendliness.
In addition, separate burners (without additional equipment) of various complete sets or completely finished heat generators are available.
Oil Therm Prometheus 15–50 kW
This burner is the maximum configuration, that is, it includes all the necessary elements and systems, so to turn it into a heat generator you only need an air compressor , which will have to be purchased separately.
The device is multi-fuel, fine tuning, as well as the selection of the required power, are made from the control panel, that is, the operator does not need to adjust anything independently, just select the desired mode on the remote control.
However, to switch to another type of fuel, manual adjustment of the injector is required. The advantages of this device are :
- a closed fuel heating chamber that does not fill the room with an unpleasant odor;
- ease of use - the operator only selects a mode, after which the control unit independently regulates the operating parameters of the device;
- automatic electric arc ignition of the torch, including when it fails; if several attempts are unsuccessful, the fuel supply is blocked and the burner is turned off;
- flame control.
The manufacturer positions this burner as universal, that is, suitable for any heating device of the appropriate power, including solid fuel, but without installing an adapter plate it can only be used for liquid fuel boilers and furnaces.
The device is not equipped with a secondary air supply, so it enters through the standard air supply of the boiler or furnace. The cost of this burner is 92.5 thousand rubles.
Gnome ST 10 kW
This burner is a fully equipped heat generator, which, for an additional fee, can be equipped with Wi-Fi or GSM modules, which will provide remote monitoring and control.
The maximum power of this particular Gnome modification is 55 kW, but it can be reduced to 10 kW without deteriorating performance or increasing soot formation. The device is equipped with a multi-fuel injector with automatic adjustment of all parameters according to the operating mode selected by the user.
This device is also not equipped with a secondary air supply, so it works with boilers and furnaces that provide air supply to the combustion zone.
The heat generator is protected from flame failure and fuel spills, and is also equipped with a room temperature control system and automatically switches to day/night operating modes, depending on the settings specified by the operator.
The fuel heating chamber does not emit unpleasant odors. The cost of this device is 55 thousand rubles, installation of Wi-Fi or GSM units will cost another 10 thousand rubles for each.
Berta 5–50 kW
This burner is non-automatic and is therefore not suitable for heating.
But it is ideal where it is necessary to warm up or dry various materials in the fresh air or in a ventilated room.
It is multi-fuel, but maximum combustion efficiency without manually resetting the nozzle is achieved only during testing, although any other liquid combustible waste is suitable as fuel.
Air and fuel are supplied into it through copper tubes, the height of the torch is adjusted by changing the length of the legs of the frame. An air compressor with a pressure of 3 atm is required for operation. The cost of this device is 18 thousand rubles.
Olympia AL-4V
This automatic burner produces 15-30 kW of power and only requires a power source and an air compressor to operate.
The device is equipped with a multi-fuel injector, but to switch to another type of fuel you need to reconfigure it manually, for which it is advisable to invite a manufacturer’s representative.
The burner operates in start/stop mode and is controlled by a microcontroller that takes into account :
- combustion and flame failure;
- room temperature;
- coolant temperature.
The cost of this device is 170 thousand rubles. The heat generator is compatible with any heating devices equipped with an air supply duct.
Types of waste oil burners
The operating principle of traditional liquid fuel burners is almost the same; they differ only in design features, level of automation, power and efficiency.
There are modified types of burners:
- burners with preliminary fuel gasification;
- evaporative burners.
Some liquid fuel burners combine all the elements in their design: pump, filter, heating chamber and compressor. Such models save space and do not require the installation of additional equipment.
All burners can be divided by operating mode:
- single-stage burners can only operate in one mode;
- two-stage ones are capable of operating at 40% of their power and at 100%, that is, they have 2 modes;
- modulating burners operate in a wide power range: from 10 to 100%.
Warming up used oil before burning it
An equally important stage in preparing the device for operation is heating the used oil before complete combustion to release heat. When heated, the oil becomes more liquid and plastic, resulting in an optimal consistency that burns well.
A preheating tank or heating coil is needed for any do-it-yourself waste oil burner - the drawings show an intermediate location. Usually this is a separate chamber or capsule of small volume, hidden in the middle of the body. The purpose is to warm up the fuel as efficiently as possible before the combustion process. Finished products most often have a temperature relay that monitors the heating level. As a rule, they operate in an operating range of 0-150 °C.
Some burner models are equipped with an electric heating element for heating the oil.
Note! Burners adapted for combined suspensions usually have a container for heating. Diesel fuel in homemade diesel burners does not require heating.
Manufacturers decide differently how to organize this stage. The Gnome waste oil burner (and other similar models) has a small electric heating element inside the container, which is responsible for heating the waste oil to the required level. Just as in this case, each manufacturer decides in its own way the issue of oil supply. Often float switches and pumps are responsible for the level of its supply. The system switches off automatically when the preheating tank is full.