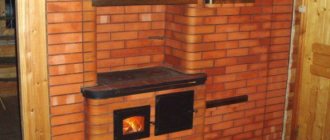
Complex-barbecue with a stove for a cauldron
In most cases, this complex includes a structure of:
The stove can be inserted into the grill, placed on it or attached to it.
As a result, it can be either removable or tightly fixed. In both cases, the owner of the cottage and the fireplace near it, in order to create a high temperature in the stove, needs to move the coals from the open part of the brazier under the stove.
Initially, it is necessary to select a project that is in harmony with the appearance of the house and garden.
A made barbecue with a cauldron will give the garden plot a new look and will be a favorite relaxation area.
We determine the location for installation in the area where the grill with a roof and a stove under the cauldron will be installed.
For the effectiveness and safety of the barbecue, you need to position it correctly in your yard. Usually the desired location is located next to the house and replaces the main kitchen in the summer.
The space where the grill with a roof and a stove for a cauldron will be installed should not be far from the house and kitchen, since you always need to bring cutlery, dishes and water.
Barbecues with a stove are made of fireproof material:
There are stationary structures and portable structures.
The barbecue under the cauldron can have a unique project and inimitable design:
Combined grill - equipped with a metal box and a cauldron base made of iron of the required thickness.
It is very popular. A portable version of the design is possible. A barbecue with a cauldron is easy to make with your own hands.
A barbecue with a brick cauldron is a massive stationary building that can be built by craftsmen who know how to work with such fire-resistant material.
The disadvantages of such a structure are its cost and the impossibility of moving it to another place. A properly made grill with a roof will decorate any area.
The camping cauldron grill is made from car rims connected to each other until the required height is obtained.
Equipped with a furnace and holes in the bottom to provide air.
A metal box with a grill grate and skewers is hung on the side walls of this design.
A barbecue made from disks requires pre-treatment of their surfaces. Suitable for a summer house with a gazebo roof.
Forged barbecue stands out for its strength, functionality and durability.
It belongs to professional products and is made manually or by machine.
The wrought iron grill is decorated with a pattern. More expensive models have a sink.
The professional forged barbecue is equipped with wheels.
In other words, with such a device you can go hiking for several days without fear that you will quickly get bored with the monotonous menu, and soon you will irresistibly want to go home to your usual food.
Technical indicators
Compared to traditional insulation, penoizol has many advantages. The main characteristics worthy of attention include:
- Thermal conductivity. The only low figure is 0.041 W/m/K. To ensure good performance, it is enough to lay a layer 10 cm thick.
- Soundproofing. Noise absorption is at a quite decent level. It is approximately 65%.
- Fire resistance. The flammability group to which penoizol belongs is designated G-1. Its flammability category is B-2. This indicates that it will not melt when exposed to fire. When high temperatures are reached, the material will begin to evaporate, without producing toxic substances. Under the condition of an open fire, 10 times less smoke is generated compared to polystyrene foam.
- Resistant to chemical components. The insulation does not react in any way to aggressive environments. This primarily applies to solvents of organic origin.
- Resistance to humidity. Penoizol has the ability to absorb moisture well, but it gives it away with equal success. The characteristics of the material are not affected. It is capable of absorbing up to 1/5 of moisture. Penoizol subsequently evaporates it. To prevent mold from forming on the wall, install a ventilation gap. The heat insulator absorbs approximately 20% of moisture throughout the day.
- Vapor permeability. The insulation in question is hygroscopic, and therefore allows the walls to breathe. Air circulates freely throughout the structure.
Is it possible to make a stove from a gas cylinder?
Many owners of private houses often wonder whether it is possible to make a stove from a regular gas cylinder. The answer to this can be said – yes it is possible! Using such a device, it is quite possible to make a potbelly stove that will heat any room, be it a house, a garage or a warehouse.
In addition, it should be said that this design is very easy to assemble yourself from an old cylinder that is no longer needed on the farm. This is what will be discussed in this article. Operating principle of the furnace
This stove is a practical device for unheated rooms that need to be heated from time to time. Thanks to its design, this oven will heat up very quickly and produce heat, which will make it possible to reach the desired temperature in a minimum time. Nevertheless, it cools down just as quickly, so to solve this problem, it will be quite enough to cover it with brick, which will retain heat.
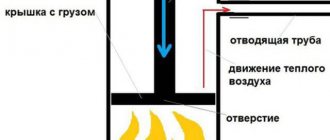
The main component of such a potbelly stove is its body, which has small doors for storing fuel. The design also includes a chimney and a blower, which is designed to remove air. It ensures a stable combustion process.
The general principle of operation of the furnace is simple, it is as follows:
Fuel is placed in the firebox (most often it is wood or coal). When they burn out enough, heat is released from them, which warms the metal case. It, in turn, transfers heat into the air, as a result of which the room heats up. The chimney removes smoke from the room, so there is no harmful waste from combustion in the room
It is also important to know that if the chimney is straight, then a lot of excess heat will come out along with the smoke, so it is wiser to make a broken-shaped pipe that will trap heat. After the stove is as hot as possible, you should stop adding firewood and wait until it burns out completely.
The heat will then begin to gradually subside and stop completely when the fire goes out. Ultimately, the remaining ashes must be cleaned out of the housing and the stove door closed until the next use.
The advantages of such a homemade stove are obvious: the entire design is very simple and quite practical, and the device itself can be used both for heating and for cooking food in a short time.
Compound
In the production of penoizol, inexpensive components are used, due to which the finished material is affordable.
To produce this insulation you need:
- urea-formaldehyde resin;
- foaming component;
- orthophosphoric acid;
- water.
Dosed parts of these components are placed in special equipment (foam generator), to which compressed air is supplied. Through the use of such a device, a foamy mass is formed, intended for filling voids.
The modified foam is white in color and has a jelly structure. With its help, it is possible to quickly seal all air spaces. The applied foam hardens after 10 minutes. After 4 hours the mass becomes solid, and after 3 days it acquires “final” strength. 72 hours is enough for the material to dry completely.
Assembly Procedure and Step-by-Step Guide
Before you begin processing a body made of a thick-walled metal pipe, you need to determine the height of the structure.
The usual height of a dining table and the working surface of a gas stove is 90-100 cm. If you take a shorter piece of pipe, the cauldron will be installed lower, which means that you will have to work with your back bent. It is also not worth making a structure that is too high; when the boiling oil is at a height, you will have to rise on tiptoe to stir the dish, which is even more inconvenient than bending your back. Therefore, the recommended height of the boiler lid level is 90-95 cm. In order for the structure to be stable, it is necessary to weld plates at the bottom on the inside and outside to increase the support area. In this case, it is recommended to place the bottom at a distance of 5 cm above the legs. The firebox door and the vent are made on one side of the stove, this is both more convenient and simpler than making cutouts on different sides. The grate is installed at least 7 cm below the bottom edge of the firebox door. This is done this way so that the burning wood does not fall out of the firebox when the door is opened. The installation point of the chimney should be opposite the firebox door, while the place where the chimney is inserted into the body and the top side of the door should be separated by at least 5 cm in height.
Now that the main points are clear, the algorithm of operation can be presented as follows:
- Measurements are taken of the pipe section and the correctness of the cuts on both sides is checked;
- If necessary, the top and bottom of the segment are aligned;
- Using chalk or a white marker, the body is marked, the areas of metal that need to be removed are highlighted, and marks are made where elements will be welded from inside the pipe;
- A window is cut out for the firebox door and for the vent door. The area of the plenum door should be no more than 30% of the area of the firebox door.
- The cut elements are processed and prepared for installation as doors;
- A line is drawn on the inside of the body for installing the grate. A ring is bent from reinforcement with a diameter of 8-10 mm and welded along the indicated line;
- A circle for the bottom of the oven is cut out of sheet metal. The wheel is processed with an abrasive wheel and adjusted as accurately as possible to the diameter of the body. After this, it is installed in place and boiled on both sides - from the side of the firebox and from the side of the legs.
- Hinges are installed on the doors.
- Plates from a strip 2-3 mm thick are additionally welded onto the firebox door from the inside of the body. This is done in order to ensure a tight fit of the door itself to the oven body.
- In the upper part of the body, triangular cutouts are made along the entire circumference, 30-40 mm deep and 50 mm wide. This is necessary for better fixation of the cauldron on the stove body.
- Stepping back 10-12 cm from the top edge on the opposite side of the firebox doors, insert the chimney pipe at an angle of 60 degrees. The length of the segment protruding beyond the body should be 15-20cm.
- 4 holes with a diameter of 10 mm are drilled on the firebox door, in the corners at a distance of 15-20 mm from the edges of the door. An additional thick metal screen is attached to the door on the inside. This is necessary so that when opening the coals do not spill out of the firebox, and the door itself does not get too hot.
- The stove grate is made from fittings with a diameter of 16-24 mm. The distance between the reinforcement bars should be no more than 10 mm. The rods are connected from the bottom with 3 crossbars - in the center with the longest jumper and two equal ones on the sides.
- It is better to make the constipations from sheet steel 1.5-2 mm thick; the constipations must be strong and reliable; it is even better that the sheet plate is spring-loaded.
After assembling the entire structure, to give it an attractive appearance, it is recommended to clean the entire surface using a grinder with a wire brush and prepare it for painting with heat-resistant paint.
The first fire after painting should be done without cooking in a cauldron; heat-resistant paint bakes when heated, emitting an unpleasant odor, so it is recommended to avoid cooking for the first time.
As can be seen from the description, a stove for a cauldron made from a pipe can be assembled even by novice craftsmen, especially since during use, ideas for further improvement will appear, for example, installing additional removable surfaces similar to the work surface in the kitchen
You will probably have to pay attention to the chimney, equipping it with a deflector and a spark arrester. To make it easier to carry the stove, you can also consider the option of placing transport wheels so that the entire structure can be easily transported by one person
Possible difficulties
During manufacturing there is a risk of encountering the following troubles:
- poor quality of seam welding;
- the grate gets stuck when lowered into the cylinder;
- lack of structural stability;
- release of an unpleasant odor during cooking.
A common cause of poor weld welding is the incorrect choice of welding electrodes. To avoid this, choosing their markings according to the thickness of the metal being welded will help.
Important! Iron, steel and stainless steel sheets require different electrodes, and the angles must be made of the same metal as the furnace cylinder. To prevent the grate from getting stuck in the middle of the cylinder, its dimensions are selected 5-10 mm smaller than the internal diameter of the body. To prevent the grate from getting stuck in the middle of the cylinder, its dimensions are selected 5-10 mm smaller than the internal diameter of the body
To prevent the grate from getting stuck in the middle of the cylinder, its dimensions are selected 5-10 mm smaller than the internal diameter of the body.
The instability of the structure results from the incorrect choice of the angle of inclination of the supports. The taller and narrower the cylinder, the straighter the oven legs should be.
An unpleasant odor inside often appears if iron with poorly cleaned paint is used for the structure, so before folding the sheet for the body, it is burned with a blowtorch.
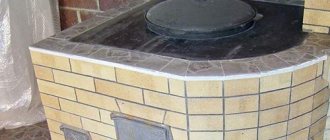
Laying a stove for a brick cauldron
Note! To obtain the most even seams, place thin wooden slats between the bricks. You can pull out the slats after the masonry has set a little. In addition, this technique will allow you to easily unstitch the seams in the future if necessary.
In addition, this technique will allow you to easily unstitch the seams in the future if necessary.
When laying, bandage the seams, that is, start laying one row with 1/2 brick, another with a whole brick, the third with 1/2 again, and so on. Here are other recommendations.
- All iron structural elements must be installed directly during the laying process.
- If cutting bricks is done with a grinder, then a lot of dust will be generated during the work. Therefore, it is recommended to use protective equipment - glasses and a respirator.
- If you did not purchase a special factory stove for the cauldron, then in a regular stove you can cut out a circle of the appropriate diameter and clean the edges with a file (this way, ash will not get into the food, and smoke will not leak out of the firebox).
- When installing pipes, join them at an angle of more than 90 C for better traction.
- After finishing the masonry, you can unstitch the seams or finish the structure with tiles. Then the oven is dried, for which you should light a small fire in it.
How to build a barbecue oven yourself?!
You can see a detailed review, instructions for laying and ordering a barbecue oven here
We are building a stove for a cauldron. Order
Row No. 1,2. These rows will serve as the bottom of the future structure. When laying them out, leave a small space that will allow you to clean the ash pan (it will be covered with a lid) and the stove itself. Use wire to secure the door. Clamp the wire with adjacent bricks, then secure with mortar.
Row No. 3. Here you close the ash pan doors and continue forming the walls. Also at this stage it is necessary to install the grate.
Row No. 4. When laying this row, leave a hole through which smoky gases will escape.
Row No. 5. Continue building the walls and install doors for the combustion chamber. The size of the doors depends mainly on what type of fuel will be used. If it is firewood, then it should be about 40 centimeters wide, and if it is coal, then less.
Row No. 6-8. Continue building walls and cover the combustion chamber.
Row No. 9-11. Lay the brick according to the diagram, leaving a small hole for smoke to circulate.
Row No. 12. Cover all the outer walls of the combustion chamber from above by laying a plate with a hole on the steel corners. The hole itself must be located directly above the cylindrical combustion chamber.
That’s it, our do-it-yourself cauldron stove is almost ready, all that remains is to install the chimney pipe.
How to properly make a chimney for a potbelly stove?!
Previously, we talked about how to properly build a chimney; you can see more about this here
Classic crusher
To increase the volume of production of foam granules, it is worth using the design of an industrial foam crusher, which you can purchase - but it is more profitable to make it yourself.
Industrial crusher knives.
In the production of foam chips, the material enters the shredder body towards two knives mounted on the drum and on the shaft. Getting between the cutting edges, the foam is crushed and produces granules of the desired size.
When manufactured independently, the shredder is assembled from a welded metal box, inside of which two shafts with long teeth rotate. They can be made, for example, by screwing ordinary screws into a wooden roller or by installing and securing rods in drilled holes.
You can earn good money in the production of foam chips with minimal investment.
The same low-power and low-speed engine is selected as the rotating device as for the crusher-grater. The result is particles with a diameter of several millimeters, which, if necessary, are refined manually. The principle of operation of such crushers is illustrated by photos of already manufactured ones.
Drawings, dimensions and diagrams of smokehouse grills made from a gas cylinder
A multifunctional oven is a nuisance when developing a project. Each segment operates in its own mode, so all the nuances are taken into account and a diagram is drawn up. There are two options for smoking: cold and hot.
Depending on the chosen technology for preparing food, a drawing of a barbecue-smokehouse from a gas cylinder is drawn up
Cold cooking of meat occurs with cooled smoke, which enters through the pipe and cools down during this time. Products made using this method can be stored for up to six months.
Hot cooking also occurs with the help of smoke, but it comes from the firebox located under the smokehouse. The shelf life of the products is up to two months.
The design elements will be spaced at different distances from each other in order to preserve the principle of food preparation
To make a smokehouse-barbecue from a gas cylinder, methods of processing fish and meat are chosen. Depending on how many functions the oven should have, a design is chosen. At the same time, the standard dimensions of each of the elements are taken into account and the indicators are correlated in a single design.
The average length of the barbecue is 80-100 cm. The distance between the skewers is approximately 10 cm. The total length is calculated based on how much shish kebab needs to be cooked at the same time. The width is adjusted by the length of the skewer. Manufacturers produce them 30-50cm. Therefore, the standard width is 25-30 cm. The height of the grill is 20 cm. The coals should be located low so that the food does not burn, but also close enough to provide enough heat.
The standard height of the finished barbecue is 80-100 cm, depending on the location
Typically, the grill is made from sheet iron 2 mm thick. Advantages of used gas cylinders:
- wall thickness 2-4 mm;
- the cost is low, they are purchased at scrap metal collection points;
- streamlined shape promotes good smoke circulation;
- compact interesting structure;
- The body is almost ready, the manufacturing process boils down to making holes and connecting the parts together.
Attention! For a multifunctional grill-smokehouse you will need 2-3 gas cylinders. The first goes under the firebox, the second under the smoke generator, smokehouse and barbecue areas, the third - for the cold smoking chamber.. At the design stage, they think about the convenient placement of skewers, a cauldron, firebox lid and shelves
At the design stage, they think about the convenient placement of skewers, cauldron, firebox lid and shelves
When connected correctly, multifunctional structures from a gas cylinder are obtained. Any stove must include a chimney and a smoke generator. Since the structure is heavy, they think about attaching wheels to move the barbecue-smokehouse around the site. Stationary legs are made under the hearth.
The smokehouse grill is often decorated with forged elements, which not only serve as decoration, but also serve as support for the lid.
Preparatory work
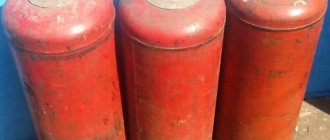
Selecting a gas cylinder
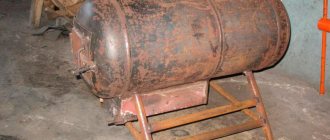
For work, it is better to use a propane tank. It is most suitable for this design due to its dimensions. You can buy a cylinder at any scrap metal collection point, the main thing is that it is intact, without holes or large dents.
It doesn’t matter when the cylinder was produced or when it was tested. Do not pay attention to the uniformity of the paint coating the walls of the container; it will still burn out immediately during the first tests of the stove. The main thing is that rust does not eat through the walls; it is better if they remove the tap before you and release the gas from the cylinder
The main thing is that rust does not eat through the walls; it is better if they remove the tap before you and release the gas from the cylinder.
Gas cylinder
Expert opinion Pavel Kruglov Stove maker with 25 years of experience
You should not purchase a new vessel; it is better to use these funds to purchase sheet metal and other materials. Ask your neighbors and friends if they have an unnecessary cylinder collecting dust, which they will gladly give you as a gift or sell it for a small fee.
Materials and their quantity
It is difficult to indicate the exact quantity of materials. Much depends on the size of the water container or the size of the compartment for stones. Here is a list of the necessary materials, and how many you will need is up to you:
- gas cylinder;
- sheet of metal, 2-3 mm thick;
- if after construction there are pieces of reinforcement or rods left over, you can use them to make a grate and handles for doors;
- for the legs you can use a corner or a profile pipe. If the farm has a piece of large diameter pipe, you can cut a piece 60-70 mm wide, cut it in half and weld it to the cylinder;
- pipe, cross-section 120 mm, length 400 mm for the chimney outlet;
- rod or reinforcement for making a mesh in which we place stones;
- bricks for the foundation of the bathhouse stove.
Do not use mica stones or granite. In the first option, carbon monoxide will be released when heated, and granite will quickly collapse when exposed to high temperatures. It is better to lay the heater with diabase.
Tools
You will need:
- welding machine with hand and eye protection;
- workbench with a vice;
- clothing with long sleeves made of thick material;
- electrodes for welding structural steels. An inexpensive option is ANO-21 or MP-3, with a diameter of 3-4 mm;
- Bulgarian;
- cutting and cleaning discs;
- metalworking tools;
- sandpaper, metal brush.
Step-by-step instructions for constructing a stove from a gas cylinder
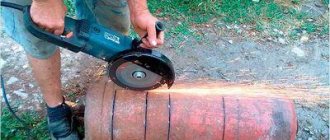
- We check the cylinder for the presence of residues, since if they are present there is a danger of fire or even explosion. The easiest way is to leave it outside with the tap running for a week or two.
- We outline the cutting line using a marker so that it turns out clear. To do this, we retreat from the top part 20-25 cm, at our own discretion. Next, we will use the lower part with the bottom of the cylinder for the base of the stove for the cauldron.
- Using a grinder, we make a neat cut, and then try on the cauldron. The ideal option would be for the cauldron to fit 2/3 full. If the cauldron has a larger volume, you need to use a grinder to make vertical cuts about 5 cm from the top, every 10-15 cm and, if necessary, bend them.
- We measure 15-20 cm from the bottom and cut out an opening for the firebox door to place firewood. It must be made wide enough so that in the future there will be no difficulties with adding firewood or cleaning from combustion residues.
- On the opposite side of the firebox window, a few centimeters higher, you need to make a round hole of small diameter (about 15 cm) for the combustion products to escape. Ideally, you need to add a metal pipe, the diameter of which will correspond to the hole in the firebox, which will make the draft stronger. To increase traction, if necessary, you can make an inverter-type output. This will require a smaller diameter pipe and a little time. Thanks to this implementation, traction will be provided in all weather conditions.
- Now you need to try on the cauldron and, if necessary, enlarge the cuts or bend them slightly. It is necessary to achieve a tight fit to ensure the fastest possible heating, and therefore quick cooking.
- Having completed the manufacturing process, we heat the oven so that there are no odors or old paint left.
That's all, the stove made from a gas cylinder with your own hands is ready for use - practical, cheap and fast. The work process will require 4 grinder discs, a little time and an old propane tank.
A stove for a cauldron will find its place on any personal plot or in a private household and, for sure, will gather all family members and guests around it. You can cook healthy and tasty food in the fresh air every day, and if we are talking about a stationary stone oven, then it is also a source of heat for heating the house during the cold season. Well, the main thing is that you can build a stove from a cylinder with your own hands, without any special skills in the construction field. All you need is hard work and your own imagination.
Cook-steam-simmer
Archaeologists have long been surprised by the incongruously small size of the fireboxes of ancient Roman culinary ovens compared to the size of the cooking utensils built into them. It was clear that the design was generated by economy; Italy had never been rich in fuel. But how did the Romans boil water using a small bundle of firewood with a heat release of barely 3000 kcal/kg in a cauldron in which a small person could bathe? There is no doubt that they were boiling: many sources indicate that water was continuously boiling in a large cauldron.
Ancient Roman cooking oven with cauldrons
Over time, the secrets of the Roman cauldron oven were revealed. Firstly, smoke tooth 3 (on the left in the figure) in combination with the rise of the semi-circular arch of the woodshed 8 behind it formed the so-called. draft (emphasis on the first syllable) 4 – gas channel of variable cross-section without shut-off valves. The boiler for cooking and stewing 5 in it is simply a cooking vessel built into a cast iron or stone stove 2; There was a burner above the firebox. But the role of hot water boiler 6 is twofold.
Firstly, it represents an aerodynamic obstacle to the flow of gases, and their turbulence behind it creates an invisible gas smoke tooth before lowering into the chimney 7, which further traps the gases in the draft. Then, remember: the water in Roman boilers boiled all the time. The Romans used boiling water sparingly and, having scooped it up, immediately added fresh water.
Boiling requires a large consumption of so-called. latent heat of evaporation, so the gases near the boiler 6, lingering, cool further and their flow rate drops even more. Two clearly demarcated regions are formed: in the draft the thermodynamic process is closer to isothermal, and in the furnace to adiabatic. As a result, the zone of sharp cooling of the flue gases, along the length of the draft, remains above the tooth. In a smooth draft, she would have the opportunity to jump forward, but in this scheme it is excluded by the rise of the arch of the woodshed behind the tooth, immediately behind the tooth there is a visibly distinguishable potential hole.
As a final result, the firebox of Roman kitchen stoves turned out to be exactly the same as a bell-type stove in terms of gas dynamics, with high efficiency and self-regulating: the flue gases circulated in the firebox until they burned out completely. Only part of them passed over the tooth into the draft, carrying exactly as much heat as was needed to support the culinary process.
Nowadays, hot water in jugs is not carried around the rooms, but the Roman cauldron can easily be modified to meet the requirements of modern times, on the right in Fig. An aerodynamic barrier will be created by an oven in place of the hot water boiler, and heat extraction can be assigned to a hot water supply heat exchanger with a storage tank in the chimney lower. By the way, its best design in this case is 2-3 sections of an old cast-iron heating radiator.
Making a stove for a cauldron from sheet steel
This is also one of the simplest options for making a stove, which will require:
- the cauldron itself to measure the diameter of the combustion chamber;
- welding, electrodes for it;
- steel sheets - the thicker they are, the better for the structure;
- hammer;
- corners for making handles and supports;
- electric drill;
- Bulgarian.
Note! Work should be done outdoors, near a source of electricity. At the same time, safety rules must also be followed. Step 1
Measure the circumference of the cauldron - according to the obtained size, further work will be carried out
Step 1. Measure the circumference of the cauldron - according to the obtained size, further work will be carried out.
Step 2. Using a grinder, cut a rectangle from a sheet of steel, the length of which would be equal to the circumference of the cauldron. Make a hole in the rectangle.
Step 3. In the upper part of the future structure, mark and make several vertical slits so that the smoke can subsequently escape freely. Next, cut a rectangular hole at the bottom for loading firewood.
Step 4. Roll the sheet into a cylinder. To do this, use the appropriate form, wrap the steel around it and achieve extreme precision with a hammer, or (if possible) use special sheet bending equipment.
Step 5. Cut out supports and handles for the structure from the corners.
Step 6. Using welding, connect the sheet into a cylinder, then weld the bottom, handles and support elements to the structure. Although the latter can be screwed using ordinary bolts, having previously made holes in the steel.
Note! To protect the stove from corrosion, paint it with heat-resistant paint in several layers. That's it, you can put the cauldron in, load the fuel and start the fire!
Let's improve the design
Let's improve the design
For this purpose, we equip the stove with a chimney pipe, grate, ash pan and doors. The manufacturing procedure is the same as described above, but you will have to add a few points.
Step 1. Cut not only the firebox hole, but also another, smaller one located below, for the blower. At the top, cut a third hole for the chimney.
Step 2. Install a grate between the combustion and blower cutouts by welding supports - pieces of corners - inside the housing. To make a simple grate, you can use steel wire - fold the pieces of the required length and connect them together by welding. There is no need to attach the grate to the supports.
Step 3. Weld the chimney to the corresponding hole in the housing
It is important that the height of the chimney exceeds human height, otherwise smoke will get into the eyes
Step 4. Equip the chimney with a spark arrester - a tin can with numerous holes made in it.
Step 5. You can cut the doors from the same sheet steel, although you can purchase ready-made ones.
As a result, you will get this kind of stove for a cauldron with your own hands, which is convenient to clean from soot and where it is convenient to load fuel. Smoky gases will be discharged into the chimney, and draft adjustment will be carried out by the blower door. Although it is not so convenient to transport such a structure, since it is larger.
How to use it correctly?
Before you start cooking, you must first remove the cauldron from the stove and heat the inside of the device using a small portion of firewood. In this way, you can eliminate any remaining odors and check the tightness of the installation of doors and chimneys.
During further operation, observe the following rules:
- when fuel burns, the surface of the container and its legs are completely heated, therefore, to ensure fire safety, the structure must be installed on a thick sheet of metal;
- regularly clean the oven from ash residues;
- use only solid fuel for heating. It is strictly prohibited to pour liquid petroleum products into this model of furnace;
- limit the access of children and animals to the heated device;
- do not place the stove near flammable objects;
- Do not light the stove with flammable liquids;
- such a stove is not suitable for burning household and construction waste;
- it is advisable to use only dry firewood, since when raw wood burns, drops of condensation will form and settle on the working elements of the device;
- equip the stove chimney with a spark arrester in the form of a tin can with a large number of holes made with an awl.
Cooking
With a table
This device, which provides ease of use of the unit and improves its functionality, requires a larger amount of welding work. The table can be made retractable, folding or detachable. It is attached to high legs made of steel profiles or reinforcing bars.
The table is mounted directly under the lower plane of the grill or taken to the side. For a retractable structure you will need profiled guides. The folding or removable version is installed on door hinges similar to those used to secure the lid.
Disadvantages of the product
The main disadvantage of penoizol is that it produces sediment in the range of 0.1−5%. These indicators are better for the material that is between the walls under some pressure. Other disadvantages include:
- Low tensile strength. It's pretty easy to tear.
- Increased moisture absorption. In some situations this is a significant drawback. This feature prevents the use of this type of foam in the underground part of the foundation and when constructing a screed. It is necessary to lay additional waterproofing.
- The need to use special equipment. This is true for liquid forms of foam.
- Installation temperature requirements. It should be above +5°C. High-quality foam will only be obtained if this requirement is met. In addition, liquid urea foam can release phenol-formaldehyde during installation. This is possible if it contains low-quality resin.
Design with useful additions
Stove with ashlar.
If desired, you can improve the oven during the manufacturing process. If you are confident in your abilities, you can make a “tuned” installation. The basic principle is similar to that described above.
And this is what will give the oven more convenience.
- A metal ring is welded onto the upper rim of the pipe. Its outer diameter should match the diameter of the pipe, and the inner diameter should be 5–15 cm smaller. Next, you can install a series of rings on the circumference for a standard wood-burning stove-stove. Now you can adjust the size of any cauldron by removing or adding rings.
- It is quite possible to make a stove with a grate and a blower. The grate is mounted inside, between the upper and lower fireboxes. Now the crumbled ash is removed from below, and a fire is lit on the grate. In this case, legs are not needed; you will get a solid cylinder, but with two doors.
Consumables
In addition to the cylinder itself, for the construction of the furnace you need to purchase the following cast iron materials:
| No. | Name of material and stove fittings | Unit change | Quantity |
| 1 | Pipe with a diameter of 100 - 150 mm | m | 3 – 4 |
| 2 | Steel corner | m | 4 |
| 3 | Steel sheet | m² | 0,5 |
| 4 | Grate | PC. | 1 |
| 5 | Fire door 180x150 mm | PC. | 1 |
| 6 | Blower door 100x70 mm | PC. | 1 |
| 7 | Asbestos cord | m | 1,5 |
Camping stoves for cauldrons
The only thing that sets the cauldron stove apart from other similar devices is the round hole into which the dishes are installed.
- The diameter should be selected so that two-thirds of the cauldron is inside the stove. With a shallower immersion depth, it will not be possible to achieve uniform heating of the entire surface, and with a greater depth, it will be difficult and inconvenient to remove the cauldron from the stove.
- It is desirable that the hole be of the correct shape and with smooth edges. Then the cauldron will fit tightly enough to them, preventing smoke from leaking into the cooking area.
Otherwise, the stove for a cauldron is no different from others: it has a firebox and a grate (firewood is placed on it). A compartment for collecting ash is placed under it: for ease of maintenance, a box can be installed here. The firebox and ash removal hole are equipped with doors. To regulate the combustion intensity, a damper is installed in the furnace, the position of which will determine the amount of fresh air entering the firebox.
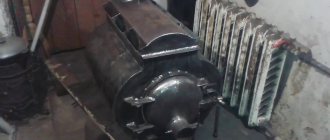
For trips to nature, you will need a compact mobile stove that can easily fit in the trunk of any car. The body for it will be a pipe. In order not to buy a blank, it can be cut from an old 50 liter gas cylinder - in the countryside there is usually plenty of this stuff. Just in case, the container should be rinsed by filling it several times with water using a hose. If this is not done, the gas remaining inside may explode when cut.
A do-it-yourself stove for a cauldron made from a pipe (or from a gas cylinder) is made as follows:
- The balloon needs to be cut approximately in half. In order for the cut line to be smooth and strictly perpendicular to the axis of the cylinder, it is better to apply it along the paper tape wound around it. Set the top part aside.
- Having installed the lower part vertically, you should place the cauldron on top of it. That one, as mentioned above, should be mostly inside (two-thirds of the height). If the diameter of the oven turns out to be insufficient, several vertical cuts 50 mm long should be made in its upper part, placing them in increments of 150 mm.
- You need to cut a hole in the wall through which fuel will be inserted. There is no need to grind, otherwise filling the firebox will be inconvenient. The distance between this opening and the bottom should be approximately 20 cm. First, drill in the corners using a drill with a crown with a diameter of 50 mm, then make cuts between the holes with a grinder.
- In the upper part on the back side you need to drill or cut holes for the exit of flue gases.
Actually, in this form the oven can already be considered ready for use. Only first you will need to heat it thoroughly so that all unwanted odors disappear.
A slightly more complex option involves the presence of a blower and a grate. To install the latter inside the furnace, you need to weld two corners, having previously trimmed their ends to fit against the curved wall. The grate will also need to be trimmed to give it a round shape.
Stove for a cauldron in the courtyard of the house
In this version of the stove, the openings of the firebox and ash pan must be equipped with doors. They can be cut from the top of the balloon, which, as the reader remembers, we set aside at the very beginning.
Doors should be slightly larger than the openings they cover. They can be equipped with purchased loops, or with homemade ones. In the latter case, two bolts are welded to the door, and two nuts of a larger diameter than the bolts are welded to the body.
To hold the door closed, a rotary latch is bolted to it, and a hook-shaped catch is welded to the body.
The most primitive camping stove for a cauldron can be quickly made from two used car rims. In one of them, the middle is cut out with a grinder, so that only the rim remains of the disk. Now this part needs to be welded to the second disk, so that it looks like a barrel.
The spokes of the second disk should be located at the bottom - they will serve as a grid for storing fuel. All that remains is to cut a hole in the side wall to add fuel - and you can use the improvised stove.
The principle of operation of a do-it-yourself foam crusher
In the production of foam chips the following is used:
- production of granules of a given size using a special technology by foaming polystyrene balls; waste recycling - grinding of polystyrene foam residues in special structures for grinding foam.
Crushed material is used in construction as a component of cement mortar to level the surface and form concrete floor screeds. The recycled foam product is the basis for the production of polystyrene concrete.
The expanded polystyrene shredder consists of the following components:
- base; electric motor casing; hopper; tank; damper handle.
The crushing chamber structure includes a body, a base, a knife plate and a mesh.
Using an adjusting mechanism and a spring block, the distance between the rolls is set. Waste foam is loaded into a tank, from where it enters the working area. During rotational movements, the shaft passes through the axes of the drum, the foam falls between the knives and is cut into fractionated parts. The crushed material is removed from the working area for sorting onto a mesh with air. Large pieces of waste are again returned under the knife for grinding, and the crushed foam is fed into the dispensing hopper.
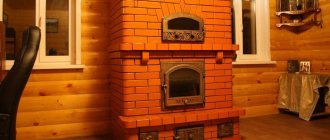
Brick stove for cauldron
Brick and stone are durable building materials. Their use in masonry is practical. A stove for a brick cauldron can be built by an ordinary worker who has a technical mind and can read the order drawings. And if you know a stove maker, then the issue is easily resolved.
You can find many detailed instructions on the Internet. The design of the system is simple. No heavy, dirty work on foundations is required. Simple masonry is used.
There are several types of brick stoves. The main task is to promote strong, uniform heating of the boiler walls. What stove layers don’t do to ensure uniformity of heat supply to the boiler.
Classic versions of combustion boilers, a vase-like shape, and an inverted pyramid are the main tricks that craftsmen go to in order to obtain even heat.
Mesh crusher
The simplest way to make a foam crusher with your own hands is to create a small grater machine, the design of which consists of:
- a round mesh element in the form of a disk; a shaft on which the mesh is installed; a base for mounting the motor and shaft. The engine can be taken, for example, from a concrete mixer, additionally installing a gearbox to reduce the speed (too fast rotation will lead to too small particles).
The foam is fed onto a rotating mesh, the size of the holes of which determines the diameter of the resulting granules. Feeding is carried out manually and requires preparation of the material - cutting it to the width of the disk.
The advantage of this option is its low cost. The disadvantage is the difficulty of grinding all the pieces and a large amount of dust in the air. The first problem is solved by manual grinding (boxes and brushes), the second by using eye and respiratory protection.
Types of stoves for cauldrons
Depending on the material of manufacture:
- metal stoves (factory-made and home-made);
- stationary brick structures.
Brick stoves vary depending on the method of installing the cauldron:
- in classical designs, the cauldron is placed almost completely in a brick recess;
- in modified versions, the cauldron is installed on a specially mounted burner.
Ovens are also divided according to the method of cooking:
- specialized devices only for using the cauldron;
- universal (multifunctional) devices in which food can be cooked using a cauldron and other devices (for example, a grill for frying meat or a portable hot smoker).
The choice of one type of design or another depends on personal preferences.
conclusions
Properly configured production of foam chips can bring a certain profit.
The main thing is to provide a sufficient amount of raw materials and resolve the packaging issue. The granules are distributed into bags and bags and stored until used or sold. At the same time, the cost of servicing a ready-made crusher is relatively small - the main costs fall on paying for electricity (when connected to the network) or purchasing fuel (when using diesel engines).
To crush waste polystyrene foam, a foam crusher is used, the designs of which include a shaft crusher, a hammer crusher, a rotary crusher, and an installation that operates on the grater principle. This makes it possible to process materials of varying strengths. Regulating the operation of installations makes it possible to produce fractions of various sizes.
Tools
To make a stove for a cauldron from a gas cylinder with your own hands, you will need to prepare in advance a set of tools and protective equipment, namely:
- tape measure and marker;
- chisel, hammer and pliers;
- electric drill and drills for it;
- welding machine with electrodes;
- a grinder with a set of wheels for cutting and grinding metal;
- a stiff brush with steel wire bristles.
Sparks and scale flying in different directions when cutting and welding metal parts of the furnace can damage the skin and retina of the eyes, so you need to use protective equipment during work:
- welding mask;
- special glasses;
- suit made of thick fabric;
- closed shoes;
- gloves.
Equipment necessary for self-insulation
To carry out installation work on insulating the premises, you will need the following mechanisms and equipment:
- Compressor;
- Foam generator;
- Pumps (for supplying solution and for supplying foam);
- Source of electricity;
- Additional fastening and formwork elements;
- Special protection (gloves, glasses, respirator).
Equipment for applying thermal insulation
Use in winter
Work in winter is difficult, as problems are created due to low air temperatures. This factor adversely affects the structural composition of penoizol. Approximately 50% of the resin consists of water. For this reason, the viscosity of the material increases. Despite all these unfavorable aspects, penoizol can be poured under certain conditions. Its components must be stored in a warm room at a temperature of at least +15°C, for example in a garage.
The installation must also be placed in a warm place. You can install the cheapest tourist tent for this. The materials must be compactly rolled up, covered with a layer of plastic film, and then the fan heater installed. Before starting work, it is necessary to heat the solution to +40°C, and the resin to +20°C. For this, a regular boiler is used.
More information about do-it-yourself penozol:
If all these rules are followed, you can get penoizol that is no different from the material installed under normal conditions. It is unacceptable to keep it at a temperature below +15°C, as it does not dry well. The moisture it contains will freeze. It will fulfill its role as a heat insulator only with the onset of spring. Moisture that does not freeze in the spring will evaporate by itself. Dry foam will remain unchanged.
Insulation of building envelopes is an important part of the design of a residential building.
Walls are no exception, because they account for 25-30% of the total heat loss of a building.
To achieve the maximum positive effect from work on thermal insulation of a room, it is necessary to choose a high-quality material that has an optimal set of positive properties.
The choice may consist of materials such as:
One of the excellent options may be foam insulation insulation, which we will talk about in more detail in this article.
Interwall thermal insulation
It can be used both for a building under construction and for an already operating building that has voids between the outer and inner walls . In the first case, injection is carried out directly into the open cavity of the wall.
For an existing building, the insulation process is carried out as follows:
- In the seams of the outer wall, you need to drill holes (in a checkerboard pattern) equal in size to the hose of the pressure equipment being installed;
- Pumping equipment hoses are installed in the holes located at the very bottom
- Next, the foam insulation mixture is supplied under pressure into the interwall space;
- After penoizol appears in the holes of the next tier (in height), the supply of the mixture is stopped and they move to the row above.
- The lower holes are sealed with plugs to prevent insulation from leaking out;
- The sequence of work is repeated until complete thermal insulation of the wall structure is ensured.
Advantages of burners during mining
Advantages of using such structures:
- absence of rubbing parts of the working area and the impossibility of their mechanical wear;
- ease of manufacture in home workshops;
- information accessibility (there are many drawings and manufacturing instructions on the Internet);
- cheap fuel;
- energy productivity of oil as a source of calories;
- compactness of the working part of the device, allowing the burners to be built into heating systems that were installed previously;
- developed fire safety measures.
The impossibility of mechanical wear is an advantage of the burners.
The use of these devices improves the environmental situation in the country.
Quality burner brands
It is believed that North American manufacturers (USA and Canada) provide unrivaled quality and reliability. Their products are installed on industrial space heaters. Among European companies, German and Austrian companies are popular due to their traditional production culture. Chinese, Korean and Polish products are replicas of industrial burners for utility rooms in the household. They are distinguished by their affordability and versatility.
Nortec
The Chinese leader in climate control equipment offers budget universal burners of the WB series. Heat sources include animal fats, heating oil, waste vegetable and automobile oils, and diesel fuel. To reconfigure the system when changing the type of hydrocarbons used, it is enough to adjust the air supply mechanism manually.
Nortec is a universal burner.
Features of using universal Nortec burners:
- The use of gasoline, solvent, and substances that form explosive mixtures when heated is prohibited;
- to facilitate starting and ensure the stated operating mode, the oils should be diluted with diesel fuel in a ratio of 10:1;
- It is not recommended to burn fresh, unused petroleum products.
Products are certified.
Euronord
The Chinese manufacturer produces Euronord burners for installation on stationary and mobile heat generators and water heating furnaces for indoor spaces. They are equipped with compressor and fan equipment for supplying oil and air. The range of models is represented by a single-stage combustion type from 16 to 230 kW.
Advantages of the company's products:
- preliminary fuel purification is carried out in a filtration segment, which is more successful than a filter similar to a car one;
- the air line passes through the oil heating chamber, which improves the degree of combustion of the components;
- fuel heating is two-level.
The manufacturer sells products with safety and quality certificates.
Euronord EcoLogic
Euronord Ecological burners are adapted for heating structures of global manufacturers thanks to a unitary seat, which facilitates installation and maintenance work.
Euronord EcoLogic – burner for heating structures.
Operating mechanisms and functional parts are accessible without removing the entire unit.
Electronics, control unit and electrics from European manufacturers of German Siemens and Italian Fida levels.
DanVex
The Finnish concern DanV ex Oy (Osakeyhtio) offers Russian consumers ready-to-install fan-compressor burners complete with compressors of its own production. DanVex liquid fuel appliances are designed to operate on the company’s heating units, but can be integrated into designs from third-party manufacturers if the technical specifications and flange sizes match.
Olympia
The Russian company offers consumers waste oil burners of the AL model range. For domestic needs, a single-stage AL-4V device with a power of 15 to 45 kW is used. The package includes a floating fuel intake with a pump and filter on a bracket. Oxygen is pumped by an air compressor with a pressure of 2 bar. The burner is equipped with a continuous purge system to prevent parts from melting when it stops. All types of waste and their mixtures are suitable. The burner is installed on various types of liquid fuel boilers and thermogenerators.
Olympia – waste oil burner.
"Stavpech"
The boiler plant in Stavropol produces heating appliances under the Stavpech brand: boilers, air heaters, components and automation at an affordable price. It also produces “Gnome” burners with a power from 10 to 35 kW.
Its features:
- fuel is supplied to the combustion chamber by compressed air from a compressor;
- the oil is heated by heating elements in the fuel tank and a heater in the nozzle;
- the supply of primary air is regulated by a reducer, secondary - by a fan;
- Mineral and synthetic oils of industrial origin and vegetable rapeseed oil, animal fats and their mixtures of arbitrary dosage are burned.
The burner is universal and works on water heating equipment and heat generators from other manufacturers.
Tools
What you can't do without:
- Welding machine and accessories for it;
- Grinder (angle grinder);
- Drill.
It is better to buy all the iron not at a metal warehouse, but to find scraps or used ones. You can search at scrap metal collection points.
We will need:
- Gas cylinder 27 or 50 liters;
- 0.7-0.8 m of pipe (profile or regular) for each leg, for all – 2.1-2.4 m;
- Sheet 4 mm 300*300 mm, for the grate (you can weld the grate from 6-8 mm reinforcement, but this will take longer).
Specifications
To obtain a qualitative assessment of the properties of this material, it is necessary to evaluate its technical indicators. These include:
- Operating temperature range – from -50 to +120 degrees;
- Material density – 5-75 kg/m3;
- Daily water absorption by mass – 10.5-20%;
- Thermal conductivity – 0.028 –0.047 (W/m) *°C;
- Humidity (mass fraction) – 5-20%;
- The standard service life is 50 years. According to recent studies, it is not limited.
Tensile strength:
- For bending deformations – 0.1-0.25 kg/cm. sq.;
- For compression (at 10% linear deformation) – 0.07-0.5 kg/cm. sq.;
- Tensile – 0.05-0.08 kg/sq.cm;