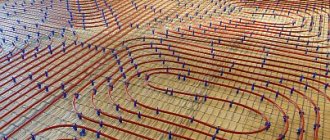
What is a heated floor on the ground?
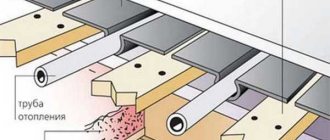
The design of a warm floor, which is installed indoors, resembles a kind of “pie”, since it consists of several layers.
Pouring a heated floor over the ground directly depends on the characteristics of the soil. It must meet certain requirements and standards.
So, groundwater should be no higher than 5–6 meters from the level of the top layer
It is important that the soil of the site does not have a high value of looseness and airiness. Therefore, construction work on sandstone and black soil is not allowed
It is also important to take into account the load that will be placed on the structure during operation. The floor arrangement must provide the following:
- reliable thermal insulation of the room;
- prevent groundwater from flooding the premises;
- eliminate external noise;
- prevent the penetration of water vapor;
- provide comfort to residents.
Regulations
- SNiP 2.03.13-88 paragraphs 2.144-1/88 (nodes 63, 69, 75, 81, 87), 2-244-1 (nodes 140,147,149, 160, 161).
- Design of heated floors: DIN 18560 and SNiP 41-01-2003.
©Opolax.ru
Articles on the topic
- Polystyrene underfloor heating system
- Heating electric cable
- Which underfloor heating is better, electric or water
- Infrared heated floor, heating film
- Water heated floor system: principle of operation, device, description
Selection of pipes for floor heating
Contrary to popular belief, the choice of pipes for installing a heat exchanger in the floor is not so wide. There are two options: cross-linked polyethylene and copper. The most obvious advantages of special materials are durability, resistance to deformation, and a low coefficient of linear expansion. But the main advantage is the oxygen barrier, which ultimately prevents the formation of sediment on the inner surface of the pipes.
The purpose of using copper is the high thermal conductivity of the tubes and resistance to corrosion. An obvious disadvantage is the complexity of installation and the high risk of failure if there are solid particles (sand) in the coolant. Despite the fact that all you need for soldering is an inexpensive gas lamp and flux, bending the coil correctly is a difficult task. This is despite the fact that there can be several dozen turns of the copper tube and one mistake, resulting in a break, leads to the failure of the entire segment or the need for additional soldering.
Polymer (polyethylene) tubes have a higher coefficient of thermal expansion; in addition, they lose their strength properties when heated above operating temperatures, however, in heated floors, in principle, the coolant does not heat up above 40 °C. Ease of installation is an obvious plus. It bends easily and is laid in a spiral or coil. The pipe is supplied in coils of 200 m, allowing you to lay warm floors without a single connection throughout the entire volume of the future screed. Most branded polyethylene tubes require the use of special tools for crimping and welding.
Video description
In this video you will see the secrets of good screed pouring:
The mixture is laid out in small slides. A shovel is used to level them. Pouring a heated floor with a perfectly flat surface is not always possible. Therefore, in order to achieve this result, the solution is laid above the established profile. The next morning they come and remove the excess. But you don’t need to wait until the mixture hardens completely. It should harden a little.
Upon completion of the work, they begin to remove the guide profiles. The places where they were are treated with cement mortar and leveled.
Finally, a small amount of water is applied to the surface and covered with a polyethylene film. This will prevent the base from cracking. To prevent the floor from drying out too quickly, it needs to be moistened for at least 3 days.
See also: Catalog of companies that specialize in heating systems.
Recommendations for choosing materials
Here is a list of equipment and building materials that will be used to install a water heated floor:
- pipe with a diameter of 16 mm (internal passage - DN10) of estimated length;
- polymer insulation - polystyrene foam with a density of 35 kg/m³ or extruded polystyrene foam 30-40 kg/m³;
- damper tape made of polyethylene foam, you can take “Penofol” without foil with a thickness of 5 mm;
- polyurethane foam;
- film 200 microns thick, tape for sizing;
- plastic brackets or clamps + masonry mesh at the rate of 3 attachment points per 1 meter of pipe (interval 40...50 cm);
- thermal insulation and protective covers for pipes crossing expansion joints;
- a manifold with the required number of leads plus a circulation pump and a mixing valve;
- ready-made construction mixture for screed, plasticizer, sand, gravel.
Why you shouldn’t use mineral wool for thermal insulation of floors. Firstly, you will need expensive high-density slabs of 135 kg/m³, and secondly, porous basalt fiber will have to be protected on top with an additional layer of film. And the last thing: it is inconvenient to attach pipelines to the cotton wool - you will have to put a metal mesh.
Explanation regarding the use of masonry welded mesh made of wire Ø4-5 mm. Remember: the building material does not reinforce the screed, but acts as a substrate for securely fastening pipes with plastic clamps when the “harpoons” do not adhere well to the insulation.
Option for attaching pipelines to a mesh of smooth steel wire
The thickness of the thermal insulation is taken depending on the location of the heated floors and the climate in the place of residence:
- Ceilings above heated rooms are 30...50 mm.
- On the ground or above the basement, southern regions - 50...80 mm.
- The same, in the middle zone - 10 cm, in the north - 15...20 cm.
In heated floors, 3 types of pipes with a diameter of 16 and 20 mm (DN10, DN15) are used:
- made of metal-plastic;
- made of cross-linked polyethylene;
- metal - copper or corrugated stainless steel.
Polypropylene pipelines cannot be used in TP. Thick-walled polymer does not transfer heat well and elongates significantly when heated. Soldered joints, which will definitely end up inside the monolith, will not withstand the stresses that arise, will become deformed and will leak.
Typically, metal-plastic (left) or polyethylene pipes with an oxygen barrier (right) are laid under the screed.
For beginners, we recommend using metal-plastic pipes to install heated floors on their own. Causes:
- The material bends easily with the help of a limiting spring; after bending, the pipe “remembers” the new shape. Cross-linked polyethylene tends to return to the original coil radius, so it is more difficult to install.
- Metal-plastic is cheaper than polyethylene pipelines (with equal quality of products).
- Copper is an expensive material; it is connected by soldering and heating the joint with a torch. High-quality work requires a lot of experience.
- Stainless steel corrugation can be installed without problems, but has increased hydraulic resistance.
To successfully select and assemble a collector block, we suggest that you study a separate manual on this topic. Here's the catch: the price of the comb depends on the method of temperature control and the mixing valve used - three-way or two-way. The cheapest option is RTL thermal heads, which operate without mixing and a separate pump. After reading the publication, you will definitely make the right choice of control unit for heated floors.
Homemade distribution block with RTL thermal heads that regulate flow based on return flow temperature
Waterproofing and insulation
Finally we got to waterproofing and insulation. At this stage it is necessary to isolate yourself from moisture. We will do this using a waterproofing film or a special membrane. Lay the film overlapping, and seal the cracks at the joints with construction tape.
Use a layer of expanded polystyrene foam or dense polystyrene as insulation. You can also use special plates, but we recommend doing this only if the load on the surface of the structure is large.
You can choose the thickness of the layer yourself depending on the climatic conditions of the region, usually from 5 to 20 centimeters. Fill joints and cracks with construction foam.
Lay another layer of waterproofing material or just roofing material on top of the resulting “sandwich”. This is not necessary, but if you live in a humid region with high groundwater, it is better to be safe.
How to make a subfloor in a wooden house
Let's consider one of the most difficult options - installing subfloors on joists without floor beams. Such a floor is often found in small rooms of a private house or in cases of peculiarities of log house construction technology, when floor beams were not used.
Making a subfloor with your own hands
Step 1. Marking. Make a zero mark around the perimeter of the room using a water or laser level. This will be the finished floor level. From this mark you need to minus the thickness of the final coating and the lag. Make a second mark; the supports for the joists should be located at this level. They can be made from concrete, blocks or bricks. There must be concrete in the ground; only the above-ground part is allowed to be laid with bricks.
Marking the zero level using a laser level
Scheme for finding the level of the future floor
Step 2. Make supports in any way; the distance between them should take into account the linear parameters of the log and the total load on the floor.
Adjustable screw supports
Adjustable screw supports for logs - photo
Columns for logs
Step 3. Place all the logs under the rope, do not forget to insulate them with two layers of roofing felt.
Step 4. Secure the joists. To do this, you can use metal corners and fix them to the walls of the log house.
Attaching the log
The photo shows how to attach the logs to the wall.
Example of waterproofing lag
Do not forget to leave a gap of approximately 1–2 cm between the walls and the ends of the joists; take metal corners with oblong slots to ensure free longitudinal sliding. Tighten the screws in such a way that the logs can move in the slots. For reliability, it is recommended to attach the logs with dowels through at least one post; the side of the corner fixed to the log must also be movable.
Step 5. Prepare the material for the subfloor.
Oriented Strand Boards
We have already mentioned that in our case all the scraps are suitable, some can be covered with plywood or OSB, and some with pieces of boards or unedged materials. It is desirable that the sheets of plywood and OSB be moisture-resistant; if they are not, then soak them with drying oil or an antiseptic.
Plywood FSF
Step 6. Check the distance between the joists. If it is the same, then all the workpieces can be cut to a standard length.
Checking the distance between joists
Step 7. Place the boards on the prepared shelves. We have already mentioned that these can be either wide boards nailed at the bottom of the joist or skull blocks installed later on both sides. You should not try to make the subfloor continuous; small gaps do not affect anything. In order to save materials, it is recommended to specifically leave a distance of 5–8 centimeters between individual boards. But this can only be done in cases where pressed mineral wool or foam boards are used as insulation.
Sub flooring
Arrangement of the subfloor
Step 8. Vapor and waterproofing. If you have extra money and time, you can install hydro- and vapor barriers in any case.
Vapor barrier layer on subfloor
Vapor barrier laid on the floor
If you don’t want to act rashly, then figure out why such protection is needed. Mineral wool has excellent heat saving properties, does not rot, and does not promote the proliferation of microorganisms, including fungi. This is great, but it has two very significant drawbacks. First, with increasing relative humidity, thermal conductivity increases sharply. Water conducts heat well; there is no need to talk about any heat-protective functions. Secondly, it takes a very long time to dry. This means that all adjacent wooden elements will constantly be exposed to high humidity. There is no need to explain what the result of such conditions is.
Laying vapor barrier on the floor
If you insulate the ground floor with mineral wool, then a vapor barrier is required. It will prevent moisture from the ground from penetrating into the thermal insulation. If foam-based materials are used as thermal insulation, then such vapor barrier is unnecessary, these materials do not absorb water.
Vapor barrier on the floor - photo
Now about waterproofing. In any case, the subfloor below does not need to be covered with such materials; there are no “gushing” sources in the underground. But after thermal insulation is laid on the subfloor, it is necessary to protect it from moisture penetration from the finished floor. This applies to all types of materials, mineral wool and foam. Waterproofing protects not only them from water, but also the subfloor boards and joists.
Materials for floor insulation in a wooden house
Floor insulation with mineral wool
Insulating layer over mineral wool
What should be the thickness of the screed?
The screed under the heated floor must be done correctly. The thickness of the screed is a very important parameter. It depends on what finishing materials you choose. If the thickness is taken into account incorrectly, the heating will become uneven and the heating itself will be ineffective.
So, if you need to level the rough base or eliminate serious horizontal differences on it, the thickness of the screed will be about 5 cm. At the same time, you can lay heat and waterproofing under it. A layer is poured on top of the insulating elements, the thickness of which should be at least 2 cm. In this case, it will be possible to begin installing the heated floor only after 28 days. All manipulations can be done with your own hands.
The thickness of the screed also depends on what kind of mortar you will use. If it contains cement and sand, then in general there should be a layer of 5 cm above the heating structure. If you decide to add a plasticizer to the mixture, the thickness of the screed can be reduced to 2-2.5 cm. However, in this case you will have to use reinforcing mesh or reinforcing compound. Otherwise, the layer thickness will be 3 cm.
If the heating structure is made of pipes, then the height of the “pie” will be about 8.5 cm. This size is unacceptable if the house has low ceilings. In addition, you also need to consider where the apartment is located. If it is located on the lower floor, then the thickness of the “pie” can be 11 centimeters.
If you do not want to make too large a screed, then it makes sense to arrange. In this case, its thickness will not exceed 3 cm. Although, when using special plasticizers, this parameter can be reduced to 2 cm. In this case, overheating of the elements is excluded.
A screed under a heated floor can be built very quickly with your own hands.
It is important to prepare and pour the mixture correctly
Installation of heating circuits - step-by-step instructions
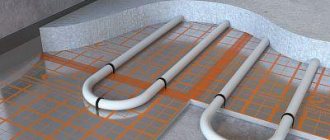
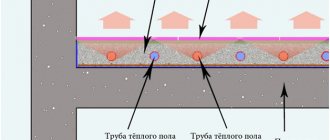
First of all, the base is covered with a waterproofing film with an overlap of 15...25 cm on the walls (thickness of thermal insulation + screed). The overlap of adjacent panels is at least 10 cm, the joints are taped. Then the insulation is tightly laid, the seams are filled with polyurethane foam.
Next, let's look at the points on how to make a heated floor yourself:
- Cover the walls with a damper strip to the height of the monolith. Place the waterproofing overlap over the expansion tape.
- Mount a distribution cabinet with a pump and manifold inside.
- Lay out the circuit pipes according to the diagram, using a measuring tool and observing the laying interval. Immediately bring the ends of the loops and connect them to the comb.
- Attach the pipe to the thermal insulation by inserting plastic “harpoons” in increments of 50 cm. If the structure of the insulation does not hold the clamps well, before rolling out the pipelines, place a metal mesh and tie it to it with clamps.
- Install expansion tape on the expansion joints, as shown in the photo. The latter are installed along the boundaries of concrete monoliths, between individual heating circuits and in doorways.
- Lay the lines to the radiators by wrapping the pipes with heat-insulating sleeves. The connections to the comb should also be insulated - in this place the loops are located too close, there is absolutely no need to heat the floors in the corridor.
- Connect the collector to the heating network of a private house, supply electricity to the cabinet for the circulation pump and other automation (if available).
The passage through the deformation joint - it is better to cover the pipes with covers or wrap them with insulation
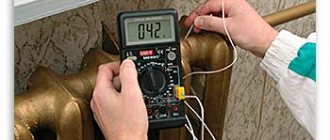
After assembling the system, you need to fill the contours of the heated floors with water and check the tightness of the joints by pumping up a pressure of 2-4 bar (focus on the response threshold of the boiler safety valve). The technology for filling and releasing air from each TP loop is described in detail in the next material.
It also doesn’t hurt to start the boiler, warm up the heated floors without screed, and visually verify the correct operation of the system. How to install underfloor water heating is shown in the video:
Necessary concepts
In order to understand how concrete can be used for heated floors, let’s define some concepts. It is important for us to distinguish between the types of floor heating systems, the levels and purposes of the screed, and the methods of its installation.
Classification of TP (warm floors)
At the moment, the market offers several different systems mounted in the horizontal plane of the floor. Some are used as the main heating, some only increase the level of comfortable stay in the room.
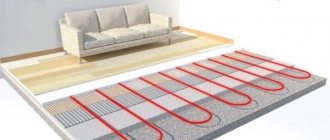
Heating systems can be water or electric. The latter are distinguished by the heating element used.
The device offers electric horizontal heating systems based on the following elements:
- cable;
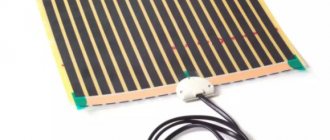
- film;
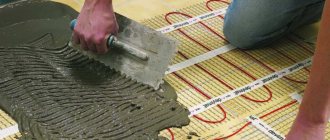
- thermomat;
- rods.
Classification of electric heated floors
Stages of work on pouring screeds
Due to the design of the horizontal heating system, the screed is done several times.
To understand the process, we divide the filling into 3 stages:
- Rough screed . Apply to the intended base for leveling. Performed when necessary.
- Leveling screed , which is poured over the thermal insulation material. The system is directly installed on this layer.
- Final fill . This is a pour over the heating system. Arranged if necessary.
Types of screeds
In addition to different heating systems and the need for different levels of pouring, there are other screed options other than pouring the floor with concrete mortar.
There are 3 types of screeds used when installing heated floors:
- Wet screed: the usual method of pouring concrete or cement-sand mortar.
- Semi-dry screed: leveling the floor with a ready-made compound, a certain degree of humidity.
- Dry: an ideal way to level the floor, recommended only as a rough layer.
Water floor installation technology
This will require making a concrete pad on the ground base on which a layer of thermal insulation will be laid. To ensure the strength of the base of the future warm water floor, taking into account its volumetric expansion, at least one layer of reinforcing metal grating with a rod thickness of at least 5 millimeters is used.
The floor heating pipes are routed along this grid. The material used to make them is usually stitched polypropylene. The wiring diagram can be in the form of a “snake”, “snail”, “spiral”, or combinations thereof. But, in general, the laying step is from 100 to 300 millimeters. Practical ways to fix pipe bends laid in a “snake” or “spiral” can be:
- standard pipe fastening brackets;
- special plastic “rails” with grooves securing the pipe;
- snap brackets;
- layer of fixing profile.
It should be taken into account that there are also limits on the length of one ring of such a pipe, and in order to prevent heat losses and reduce pressure in the general heating system, they cannot be exceeded. As a rule, the diameter of the pipe laid in the circuit is also important.
pipe with a diameter of 20 millimeters.
For a more reliable floor structure, another layer of reinforcing grid can be laid on top of the pipes, similar to that lying under the pipes of floor heating circuits. Then a layer of cement-concrete substrate is placed on top for the coating, as described above. After the layer has hardened, which lasts up to 30 calendar days, the warm water floor can be started slowly. The floor surface can be decorated with floor coverings. Parquet, various types of laminate, tiles, linoleums, etc. are quite appropriate.
As a rule, installing a heated water floor is much faster, since it does not require holding time to set and strengthen the concrete base of such a floor. In the design set of such a water floor heating solution, the use of foamed polystyrene or dense foam is mandatory. These materials are laid on top of the base for fastening the heating tubes. They serve as the base for the floor covering. To obtain the required temperature in the room, the different thermal conductivities of flooring materials should be taken into account in advance.
Types of insulation
When preparing the base for a heated floor, thermal insulation material plays an important role. When choosing it, the characteristics of the room and the type of base are taken into account.
The bulk of insulation has the same degree of thermal conductivity, but its thickness should be selected individually.
Let's look at the most common types of thermal insulation.
Expanded polystyrene and foam plastic
The production technology of polystyrene foam insulation is the formation of channels in the texture of the material for air movement. The products are durable and can withstand heavy mechanical loads. Foam insulation is lighter, it “breathes” well - it allows water vapor to pass through better.
Penoplex is available in different sizes: 120 X 240 cm, 50 X 130 cm, 90 X 500 cm. These products differ in density: polystyrene - 150 kg/m³, polystyrene - 125 kg/m³. Since foam plastic is less dense, it is deformed under physical influence, which reduces its thermal insulation properties. Therefore, it is more often used when laying between joists.
Cork
Natural material, the main raw material for production is oak bark, so the product is expensive. It is produced in sheets and rolls, but the characteristics are the same, the only difference is in thickness.
Cork gasket is:
- low thermal conductivity;
- waterproof;
- elasticity;
- light resistance;
- fire safety;
- resistance to temperature changes;
- chemical resistance.
If funds allow, this substrate is the best option - it saves heat resources.
The material does not shrink or deform under mechanical stress. Mold does not form on the cork and does not attract insects. The only negative is that it steals the height of the room.
Mineral wool
A long-known type of insulation with increased fire safety. Available in slab form, which is convenient for installation. In the presence of an aluminum substrate, the useful coefficient of mineral wool increases several times, even when installed on the ground.
The structure of the material is rigid, so it is not susceptible to chemicals. In addition, it retains heat well and absorbs noise.
Despite many advantages, there are also disadvantages:
- contains toxins and carcinogens;
- Mineral fibers are hygroscopic and require protection from moisture.
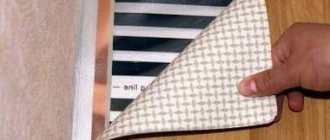
Foamed polyethylene
Today, penofol is often used as thermal insulation. The thickness of the product reaches 3 - 10 mm, the surface is foil with reflective properties. This layer eliminates the need for waterproofing material.
Foamed polyethylene is:
- with one layer of foil - grade A;
- with two - B;
- self-adhesive (foil on one side, self-adhesive base on the other) - C;
- combined (foil on top, special film on bottom) - “ALP”.
All of these insulation models are excellent for preparing the basis for a water-heated floor. It should be said that this material absorbs moisture, which leads to a decrease in thermal insulation properties.
The height of the floor on the ground relative to the strip foundation
Rice.
4. Floor on the ground on the belt extension Fig. 5. The ground floor is adjacent to the wall of the strip foundation
Rice. 6. The ground floor is located above the foundation strip
Rice. 7. The ground floor is adjacent to the top of the tape
There are no constructive mandatory recommendations regarding the mark (height) of the floor installation on the ground. It can be installed at any height shown in Figures 4-7, top
The only thing you need to pay attention to when choosing this option is where the front door will be in height. It is advisable to attach to the mark of the bottom of the door so that there is no difference between the bottom of the door and the floor, as in Figure 8, or so that you do not then need to cut an opening in the tape for the door
Rice. 8. Height difference between the ground floor and the doorway
Rice. 9. The floor is level with the doorway
Note: It is better (more correct) to provide an opening for the front door at the stage of filling the tape. Just do not fill this place, insert boards or foam plastic there, so that there is an opening in the tape. If you forgot to leave the opening, then you will have to either make the entire floor higher (and this will increase the cost of bedding), or cut an opening in the finished strip, cut the reinforcement in it, weaken it, etc.
Thus, if the opening under the front door is made correctly (at the stage of filling the tape), then we arrange the floor on the ground so that the top of the floor is level with the opening under the door (taking into account the finishing coating). In order to correctly calculate the thickness of the floor structure, and determine at what point you need to start its construction, you need to understand what the thickness of all its layers will be, what this depends on. More on this later.
Principle of calculation
It would be a big mistake to believe that you can insulate any building structure, as they say, “by eye.” It’s good if you’re lucky and guess right, but the likelihood of such luck is small, you can make a mistake in one direction or the other. Both are bad. The consequences of insufficient thermal insulation have already been discussed above. And its redundancy leads to completely unnecessary waste of materials or complication of the design.
Everything must be based on calculations. Yes, many readers are frightened in advance by the prospect of carrying out any calculations. Let us hasten to reassure them - nothing supernaturally difficult awaits them. Moreover, we will “arm” them with an understanding of the calculation principle and a convenient calculator, in which they just need to indicate some initial data.
So, for insulation to be considered complete, the total heat transfer resistance of a building structure (it is often called thermal resistance) must not be lower than the established standardized value. This indicator is measured in m² × °C / W, and is calculated for each region, taking into account the specific climatic conditions. The specific value can be found in the SNiP tables, checked with a local construction organization, or simply taken from the proposed schematic map of the territory of Russia.
It is important that different structures have their own standardized values. Since we are dealing with floors, we are interested in the meaning “for floors”
To make it easier to navigate on the diagram, these indicators are highlighted in blue numbers.
Normalized values of thermal resistance for building structures of residential buildings by regions of Russia
Now - a small formula that will be required to carry out the calculations.
The thermal resistance of a homogeneous layer of a building structure is equal to:
R = h/λ
h – the thickness of this layer (important – expressed in meters)
λ is the thermal conductivity coefficient of the material from which this layer is made (measured in W/m×°C).
Thermal conductivity coefficients are tabular values, the meaning of which can be easily found on reference Internet resources. And for insulating materials, in addition, they are usually indicated by the manufacturer in the passport data.
The total thermal resistance of a building structure consisting of several layers, including an insulation layer, will be equal to:
Rc = R₁ + R₂ +…+ Rt = h₁ / λ₁ + h₂ / λ₂ + …+ ht / λt
The symbol “t” in this case indicates that these are indicators of the thermal insulation layer.
So, if the value of the normalized thermal resistance is known, if you have an idea of the structure of the floor structure being created, then it is not at all difficult to determine the thickness of the insulating material that will provide the required level of thermal insulation.
ht = (Rc – h₁ / λ₁ – h₂ / λ₂ – …) × λt
Knowing the thermal conductivity coefficient of the selected thermal insulation material, we obtain its required thickness.
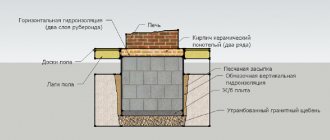
Creating a concrete base
Pouring a reinforced concrete base is required to create a durable, high-quality floor (for more details: “How to make a concrete floor in a private house with your own hands - instructions”). It is best to mark the surface for pouring using slats 5 cm wide and 2 meters long. It is worth keeping a step between them of about 1 meter, which will allow you to fill the solution in stripes. A square meter of reinforced mesh 3 centimeters thick is placed in the center of the room. Along the perimeter of the room, the junction of the base and the walls is taped with damper tape.
This is done in such a way that it protrudes a couple of centimeters above the level of the future concrete screed. It is best to use concrete mixture grade M100. Filling begins from the far corner of the room opposite to where the entrance opening is located. The strips are poured sequentially, and after the mixture has dried, the slats used for marking are removed and the seams are filled with mortar. The screed is covered with polyethylene and regularly moistened for better fixation and achievement of maximum conditions.
Litter layer
When the thickness of the bedding layer is 4-5 centimeters, it can be considered load-bearing. It is created by pouring a cement-sand screed over a layer of coarse crushed stone using concrete grades B7.5 or B10. This layer will act as a surface level regulator (for more details: “Pouring a heated floor - how to make a screed correctly”).
To prevent the mixture from spreading, the surface is limited using slats. It is necessary to wait until the screed hardens and hardens, while moistening it regularly. A modern alternative to pouring mortar is the use of profiled membranes, the use of which reduces the time for laying the layer.