Cozy, comfortable living in a private house requires a lot of care from the owners. So the coming cold took us by surprise: it was blowing from the window frames, cold was blowing from the walls, the wind was blowing in the chimney, there were snowdrifts in the attic. How can you keep your home warm in affordable, ergonomic ways that won’t put a big dent in the family budget? We offer you several simple solutions to this problem.
How to keep your home warm
1. In the morning, open the curtains and/or blinds to allow sunlight into the house. Glass in a window allows light to pass in, but not back out. In the house, light accumulates, bouncing off walls and furniture, and eventually turns into heat.
2. Use thick (blackout) curtains at night to prevent heat from escaping through the windows. Without sunlight, windows become your enemy. Create thick wallpaper to prevent heat from escaping.
* You can simply use a thick blanket to which a rod or stick is attached to maintain the shape.
Measure your window and find something solid, such as a stiff rod or strong stick, that you can then wrap the curtain around. You can also use an old curtain rod (if you have one).
Replacing conventional incandescent lamps with LED or fluorescent lamps
Even the most durable incandescent light bulb will not reduce your bills in any way, because only 10% of the electricity is used for lighting - the rest is lost in the form of heat, which, however, cannot heat the house. Therefore, it is better to buy an expensive, but more economical LED or fluorescent light bulb. This solution will reduce energy consumption by 10 times.
How to make the floor warmer
5. Cover the floors with carpets. There is nothing more unpleasant than standing barefoot on a cold floor in the morning. In addition to feeling great, rugs also provide an extra layer of insulation that keeps cold air from rising up from the floor, which means your feet will thank you.
6. Use a sealant (cotton wool or foam, for example) to seal any cracks in the windows. After this, cover the cracks with strips of cotton fabric (the width of each strip is 4-5 cm). This will prevent heat from escaping from your home.
7. It is advisable to have thick, massive doors in your house that will keep you a lot of heat. You can also upholster an old front door with leatherette filled with foam padding.
It is advisable to plaster all cracks with polyurethane foam. If you decide to install a new door, then see if you can keep the old one, because... two entrance doors create an air gap between themselves, and it insulates heat.
Replacing old wooden windows with metal-plastic ones
Even if you have installed a brand new metal-plastic profile, this does not guarantee that heat loss will be completely eliminated. The window may be drafty. Use a burning match or just a dampened finger to locate the leak. It can also be indicated by condensation, and in critical cases, frost.
If you have only been using the window for the first year, and there are drafts, it is possible that the installation was not carried out in good faith. You can count on warranty repairs. If the profile has been installed for a long time, it is advisable to adjust the locking mechanism and replace the seal.
How to keep your home warm
8. Attach a sheet of foil behind the radiator and it will reflect heat back into the room with little heat escaping through the wall. It is worth noting that the gap between the foil and the battery must be at least 3 cm.
9. If for one reason or another you cannot attach a metal foil screen, try insulating the house from the outside. Order insulation of the end wall (as a rule, this is done with special slabs).
10. Shower with the door open (if possible). The heat and moist air created by bathing will raise the air temperature throughout the house.
11. Dry things in the house. Just like swimming with the door open, this method increases air humidity, and you will feel more pleasant and comfortable.
LiveInternetLiveInternet
Quote from belorys_kh
Read in full To your quotation book or community! Winter cold, how to insulate the front door In order to keep your house or apartment warm in winter, you need not only an effective heating system, but also proper insulation of doors and windows. As with windows, experts estimate that up to 20% of heat can be lost through the front door.
In our article we will tell you how to insulate iron and wooden entrance doors, thereby increasing the thermal efficiency of your home.
Insulating wooden or metal doors around the perimeter of the frame is a simple task that anyone can do. To do this, you will need a self-adhesive or mortise seal, which can be purchased at most construction supermarkets.
When using a self-adhesive seal, it is necessary to degrease the surface of the door frame with alcohol or acetone, and then stick the seal around the perimeter. The mortise seal is simply “pressed” into a special groove cut into the door frame.
Advice
To determine what thickness of sealant to buy, use plasticine wrapped in cellophane. Place it between the door and frame and press down. The thickness of the resulting roller will be the required thickness of the seal. If the seal is not selected accurately, then heat will escape through the remaining cracks or (if the thickness is too large) the excess load on the lock will shorten its service life or prevent the door from closing at all.
When talking about insulating a metal door, it is important to understand that we are talking about a standard, non-insulated door consisting of a metal profile with a sheet of metal welded to it. Such a door may provide protection against burglary, but it certainly will not protect against the penetration of cold and extraneous noise.
In fact, most metal doors are designed this way, because externally it is almost impossible to distinguish a door filled with insulation from a “dummy” door.
To insulate the door you will need:
- foam plastic or polystyrene foam panels corresponding to the size of the door (according to the thickness and area of the metal frame)
- fiberboard sheet
- sealant or liquid nails, screws
- tools: drill, tape measure, jigsaw, screwdriver, marking pencil
1. Take measurements of the door leaf, including the profile, and transfer the resulting dimensions to a sheet of fiberboard. Cut out the lined template, not forgetting to make holes for the peephole and door lock.
2. Fill the inside of the door with foam plastic, securing it with sealant or liquid nails
It is important that when filling the door with polystyrene foam there are no voids left anywhere; if there are any, they must be filled with polyurethane foam. Don’t forget that you also need to make a hole in the foam for the door peephole.
3. After the foam plastic is fixed and all the voids are blown out, a pre-cut fiberboard sheet is screwed in using screws evenly distributed around the perimeter of the sheet. When the insulation work is completed, the door is covered with paneling.
It should be said that the design of the doors may vary slightly, and this determines what materials you will need. If the canvas has a prefabricated structure (consists of two sheets of metal, one of which is removable), you will not need a sheet of fiberboard.
Insulating a wooden door is not much different from insulating a metal door, since the door designs are in most cases the same.
If the wooden door is empty inside, then the insulation is laid inside. On an all-wood door, you can attach a wooden frame with self-tapping screws, into which the insulation will be placed.
But most often, solid wood doors are insulated with upholstery. To upholster the door you will need batting or any other soft insulation, nails with wide heads and leatherette.
Advice
The size of the leatherette is calculated by the formula - the area of the fabric + 5 centimeters on each side for the hem. The door must be removed from its hinges, freed from fittings and laid on a flat surface. Then the insulation is laid out on the canvas and secured using a furniture stapler. After this, leatherette is fixed to the door - starting from the upper corners, maintaining the tension of the material and avoiding distortions.
How to choose a heater
There are a few things you should know before purchasing a heater.
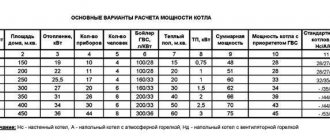
First you need to decide what you need it for. Based on this, you should choose how powerful the heater is needed. Find out the area of the room (room). An ordinary apartment with ceilings of 2.75 - 2.8 m needs a heater with a capacity of at least 1 kW for every 10 sq. m.
A big plus will be the presence of a temperature and power regulator in the heater. There are several types of heaters:
15.1 Oil heater
How does he work:
Inside such a heater there are 2 or 3 heating elements that are used to heat mineral oil. This oil has a fairly high boiling point and when it heats up, heat is transferred across the entire metal surface of the device.
With the help of such a heater, the air is heated quite quickly, and the oil heater does not dry out the air. It can be equipped with a thermostat, with which the heater turns off when the temperature reaches a set level.
15.2 Convector
How does he work:
Cold air is passed through the heating element and heated, and then exits through the grilles located in the upper part of the device. An additional source of heat is the convector body, which also heats up. But you should place the heater away from furniture, because... a warm case can ruin it.
Convectors can be mounted to the wall or placed on special legs. The device is quite safe, because its heating element is hidden inside the housing. If the convector has a thermostat, it can operate continuously.
The only negative is that the heater warms the room slowly. It should be used to maintain the desired temperature.
15.3 Heat fan
How does he work:
Inside this heater there is a thin spiral that gets very hot. The heat created by heating the coil is distributed throughout the room using a fan.
The air in the room heats up quite quickly, and the device itself is easy to carry, because it's pretty light. Typically, a heat fan is used in offices.
But it is worth noting that the device dries out the air, which in turn is harmful to health. It is not advisable to use a heat fan where there is an asthmatic person. Another disadvantage of such a device is the constant noise during its operation.
15.4 Infrared heater (quartz emitter)
How does he work:
This device, unlike others, heats the objects around it, not the air. Further heating of the room occurs thanks to the heat emanating from heated floors, walls and furniture. This allows you to save electricity, because the device itself may not work, but the room continues to be warm.
If savings come first, then you should choose just such a heater. But you should know that infrared quartz emitters are the most expensive and require a specialist to install them.
Saving on hot water
The condition of your plumbing directly affects the size of your utility. If the mixer leaks, water losses can amount to up to 300 liters.
It would be good if, instead of a regular toilet cistern, a cistern with an economical flush would be installed. If you place a bottle filled with water in the tank, the water drain per day will be 20 liters less. Use the European method of washing dishes. Clear plates, forks and spoons of food debris. Collect dishes in the sink by plugging the drain. Arm yourself with detergent and start washing. Pour clean water into a separate container and rinse the dishes in it. This way you will reduce water losses several times. It’s even better to buy an economical dishwasher, which, by the way, uses only cold water.
If your shower head has smaller holes, the water savings will also be significant.
It is better to turn off the water while brushing your teeth. If you open the tap completely, 15 liters of water will flow out every minute. This way you can save up to 900 liters of water per month per person. To avoid doing the same thing every time, you can install attachments on the faucet that automatically turn off the water when you lower your hands.
You will be surprised, but most apartments in Europe have no heating!
There are legends about thrifty Europeans; many people know that people abroad have a different attitude towards the issue of maintaining a cozy atmosphere in their homes. The average temperature in a European home in winter does not exceed 21 degrees above zero. And in winter our radiators work at full capacity. Maybe Russians should learn from their neighbors how to maintain an optimal microclimate in their apartments?
When our compatriots find themselves visiting the Germans or English during the cold season, they notice that the room is quite cool. Many Europeans heat their homes on their own, since centralized heating is expensive here. Residents of foreign countries usually choose economical heating options. At home, Europeans wear thick sweaters and woolen socks, and sleep in cozy pajamas.
The heating in the house has been turned off or has not yet been turned on, how to warm up?
- Dress warmly! Take the example of Europeans - wear warm clothes at home; in cold weather, additional layers of clothing will not hurt. If you get cold, throw a woolen stole over your sweater. This will be much cheaper than using an electric heater.
- Don't forget about slippers. If they are not there, you shouldn’t even get out from under the blanket! Do you know that heated shoes have been invented for cold weather today?
Most of our people do not want to tolerate this state of affairs before the start of the heating season. There are many ways to heat your own home. The temperature should not be allowed to drop to critical levels if there is a small child living in the house, this is very important!
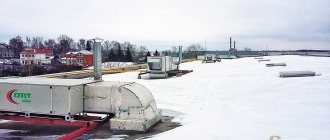
Ventilation, steam removal and insulation
In addition to maintaining heat in a building, ventilation and maintaining humidity levels are essential. These parameters are interrelated, and optimal insulation should be carried out in conjunction with sufficient ventilation and vapor barrier of the house.
The design of the thermos house retains heat well, but resists normal ventilation of the air in it. This requires the installation of an additional supply ventilation system.
In addition, normal air exchange helps remove water vapor that inevitably forms when the air is heated. Ventilation and vapor permeability of insulation are the most important parameters and require consideration when choosing a thermal insulation method.
Sections of our website are devoted to these issues, where methods for optimal ventilation of buildings are discussed in detail in accordance with the material chosen as insulation.
Types of insulation
It is clear that the development of construction went in the direction of an optimal combination of wall strength and insulation. The times when they built castles and houses with walls a meter thick are gone; mass construction cannot be so wasteful.
To reduce the thickness of the walls while maintaining sufficient strength, it is necessary to use additional insulation.
The first experiments in this direction were the laying of hemp, tow, and moss between individual logs of log houses - people noticed that this improves heat conservation even in wooden houses, although wood itself is an excellent heat insulator. Today, the industry has moved far from those first mineral insulation materials.
The most common insulation materials today are:
- Mineral wool
- Glass wool
- Ecowool
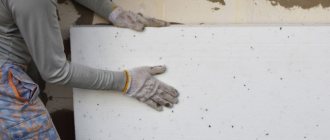
- Expanded polystyrene
Separate articles on our website are devoted to types of insulation. The use of one or another type of thermal insulation may depend on the material from which the house is built and on the construction technology.
The most common insulation materials have approximately the same level of thermal conductivity (see Fig. 2), and differ in density, in accordance with design standards.
Fig. 3 The most popular insulation materials
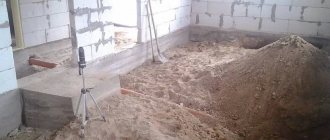
Thermal imager models
Previously, thermal imagers had lenses made of germanium or zinc sulfide, which significantly affected their cost due to the high cost of the material.
This makes it possible for many people to purchase any model. those who care about health, warmth and comfort in the home.
The minimum detectable temperature is - 40 degrees C.
The maximum detectable temperature is 330 degrees C.
Seek Thermal Compact
The innovative model is almost ideal to use.
The model is compact in size and fits into a regular clothing pocket.
Quite convenient as a device for remote use.
Solves specialized tasks, such as adjusting shooting modes and editing received images.
A thermal imager will help in diagnosing electrical wiring faults.
This function will prevent short circuit of the wiring.
This model is used as a professional device for detecting heat leakage.
The compact gadget Seek Thermal Compact is used using a mobile application.
The application is downloaded to a tablet or smartphone and connected to the thermal imager.
This model is powered by a mobile phone or tablet.
The thermal imager is compatible with Android.
Seek Therma Shot
With its help, problems of searching and detecting heat leaks can be easily solved.
Overlaying visible and thermal images and combining them is a convenient feature to use.
They also buy it for extreme situations, since it is not susceptible to failure due to its shock-resistant housing.
Also used on construction sites or hard-to-reach areas.
This thermal imager is suitable for stationary surveillance.
The presence of a built-in battery allows this gadget to work up to 4 hours without recharging.
Refers to autonomous independent devices. Does not require connection to a phone or tablet.
If you download the SeekYiew mobile application, images can be broadcast to a smartphone or tablet via Wi-Fi and analyzed and edited.
The thermal imager has a 3.5 inch display. You can adjust palettes, spots and dots on the finished image quite quickly, which is its undeniable advantage.
All temperature conditions are saved in the image, which allows you to see the temperature at another point in the visible image without re-taking it.
Seek Therma Reveal PRO
A model with all the above functions of the Shot thermal imager.
The difference from the previous thermal imager is that this model is equipped with a flashlight, which allows it to be used in the dark
Seek Thermal Reveal thermal imager model
The model is equipped with a battery.
The kit includes a USB cable for charging and data transfer.
This thermal imager has a charger; MicroSD 4 GB and built-in flashlight.
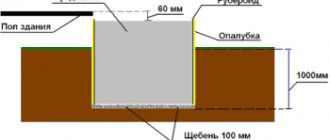
Building codes
Thermal conductivity values determine the suitability of the material in construction. Building codes and regulations (SNIP) use in their calculations the so-called thermal protection coefficient - a value inverse to the thermal conductivity coefficient of the material. It is multiplied by the thickness of the wall and the heat transfer resistance of the building structure is obtained, denoted by the Latin letter R. Its physical meaning is in calculating the specific heat flow through the wall per unit time.
Simply put, building codes determine how thick a wall must be to retain heat over a certain period of time.
In a general sense, standards (GOST-16381-77) characterize materials according to their thermal conductivity, type of raw materials, flammability and strength.