Floors on the ground are laid on top of rough layers laid directly on the soil. This method is applicable for utility rooms, old-type private houses that do not have a basement.
There are several ways to create a floor on the ground, differing in the materials used and the method of laying them. Let's figure out what the difference between them is, in what cases one or another method is applicable, and show how to create the right floor pie.
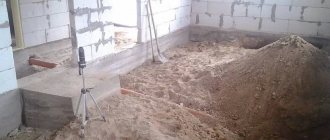
Construction of the floor begins with backfill. Source k-dom74.ru
Construction Features
Typically, technology allows you to install floors on the ground in a strip foundation. The method is not applicable for complex types of supporting structures that combine two or several types of foundation, for example, pile-strip.
Strip foundation in a private house Source betonbase.ru
There are several types of subfloors. Among them, concrete screed. Rely on: the structure can:
- on load-bearing walls;
- a cushion of soil backfill.
As a base, you can use plank flooring on wooden beams (joists). For each type of structure, a floor pie of a certain composition is constructed. Concrete cannot be poured directly onto the ground or clay.
Clay floor in outbuildings. Source 9ban.ru
It is necessary to prepare an intermediate base layer that provides:
- rigidity;
- thermal insulation;
- waterproofing;
- stability;
- ability to withstand loads.
Advice ! It is easier and faster to install wooden flooring. To arrange such a foundation, you do not need to carry out serious preparatory work.
The decision to lay floors on the ground is made based on the results of a soil study. It is important to know whether there is water lying close to the surface under the building.
Wooden floor on the ground Source prd.ru
Options for thermal insulation materials
The result of the work depends, first of all, on the quality of the materials. When assessing the positive qualities of thermal insulation and the thermal conductivity coefficient of different materials, one should not forget that natural and synthetic materials have different technical characteristics, on which the quality of work and the quality of the thermal insulation itself depend. Among the most popular materials today, it is worth highlighting insulation made from natural materials - mineral wool, expanded clay, glass wool. And artificial materials - polystyrene foam, extruded polystyrene foam, polyurethane foam. These insulation materials are quite widely represented on the market, however, in order to select the right material you need to know the basic characteristics of the material.
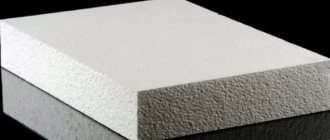
Expanded polystyrene
Expanded polystyrene or polystyrene foam consists of granules bonded together during the manufacturing process. Density is a qualitative indicator of a material. The higher the density of expanded polystyrene, the higher its thermal insulation qualities. Expanded polystyrene is produced in slabs with a thickness of 20 to 50 mm. The main application is thermal insulation of buildings and communications. The material is lightweight and does not absorb water. However, among the disadvantages it is worth noting that mice often settle in the thickness of the foam. It is flammable, so you need to be careful when installing. To insulate the floor on the ground, material with a high density is used, low density is used for installation on walls and ceilings. For the floor, slabs with locking joints at the ends are used.
The attraction is low cost and availability. Most often used to fill voids under wooden floors.
Extruded polystyrene foam
This relatively new material is most often used to insulate the most critical areas, including the floor along an earthen embankment. Penoplex, unlike polystyrene foam, does not have a cellular structure consisting of individual granules. This is a material that is monolithic in structure and has a higher density compared to other materials. It is able to withstand large mechanical loads. The second important point is that it is chemically neutral, does not react with other materials and does not absorb water. This type of insulation is capable of withstanding 50 or even more freeze-thaw cycles and does not lose its characteristics and shape.
The cost of this material is higher than that of conventional polystyrene foam, but its service life is almost twice as long.
Polyurethane foam
Polyurethane foam is not yet used very often in thermal insulation of floors on the ground. Used as a sheet material, it has little mechanical strength, bends easily, and over time is prone to sagging under pressure. But the more modern sprayed polyurethane foam has every chance of becoming one of the most popular types of thermal insulation.
When installed, it forms a monolithic sheet of the required thickness that does not allow water to pass through. Over time, the material acquires good mechanical density and even somewhat resembles extruded polystyrene foam. Another advantage of sprayed polyurethane foam is its high adhesion; it literally fills all the cracks and adheres tightly to all surfaces.
Mineral slabs
Traditional natural materials such as basalt wool and glass wool can also be used in floor insulation. Both stone wool and glass wool are suitable for insulation work under a concrete screed. True, only of high density and subject to excellent waterproofing. The fact is that both materials tend to accumulate moisture over time. There will be nothing wrong with the mineral slabs themselves, they do not rot or deteriorate, but for concrete such a “wet” layer will create big problems.
Expanded clay
It has established itself as a reliable and popular insulation material. It can be used both for concrete pie and for insulation over a sand bed. The peculiarity of the application is to use expanded clay of the desired fraction and density. The second point is the need to lay a layer of waterproofing under the expanded clay, and it is advisable to pour a reinforced concrete screed on top.
Penoizol
Liquid foam plastic, also called penoizol, has been used for insulation in European countries for almost 80 years. Like other sprayed materials, it has excellent adhesion, so it fits perfectly on any surface. In terms of its thermal insulation properties, it can be compared with penoplex and expanded polystyrene.
Penoizol - floor insulation on the ground
A distinctive feature of this material is its excellent vapor permeability, therefore, when insulating a private house, it must be installed on reliable waterproofing.
Positive and negative sides
Floors on the ground have several advantages:
- ease of installation;
- efficiency;
- sustainability;
- ability to withstand significant weight;
- minimal load on the walls or its complete absence;
- wear resistance;
- maintainability;
- suitability for coating with any type of finishing materials;
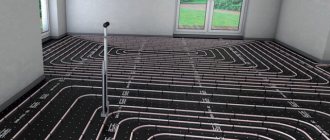
- possibility of installing a “warm floor” system.
Design disadvantages include:
- the need to lay a layer of insulating materials;
- impossibility of installation over a layer of bulk materials more than 60 cm thick.
Important ! Floors on the ground cannot be laid in areas of flooding, river floods and swampy soil with an unstable level and close groundwater. The design of the floors must be created according to technology.
Groundwater lying close to the soil surface Source avatars.mds.yandex.net
Calculation of floor insulation on the ground
The most difficult part of the process of arranging thermal insulation is calculating the thickness of the insulating layer. To simplify the determination of the thickness of floor insulation on the ground, experts recommend using the thermal insulation parameters on the walls of the house. For example, the insulation capacity for ground surfaces is 40-60% greater than the thickness of wall insulation.
You can calculate the thickness of the insulation according to GOST 26263–84 or SNiP 2.02.04-88. To determine the thickness of insulation for the walls of a house, it is enough to know the thermal conductivity coefficient of thermal insulation and the thermal resistance of wall masonry recommended by SNiP for the climate in a given area. The method for calculating insulation for a floor on the ground is much more complicated. The reason is that the characteristics of air, namely the heat transfer and thermal conductivity coefficients, remain practically constant. For soil, characteristics vary depending on the composition, density and moisture content of the soil.
Creation sequence
The rough plank floor is easy to install. A sand cushion is made on top of the soil, which is covered with geotextiles. The insulating material is covered with insulation.
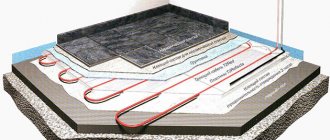
It is more difficult to create a concrete floor on the ground in a private house. Filling is done on top of several layers of building materials:
- sand;
- gravel;
- metal mesh (can be replaced with fiberglass);
- ten-centimeter concrete screed;
- waterproofing material;
- insulation (expanded clay, polystyrene foam, penoplex);
- additional protection from moisture;
- top concrete screed.
It is advisable to reinforce the last layer to avoid cracking when drying. If the homeowner decides to equip the home with a “warm floor” system, the structure will have to be assembled and configured before pouring the concrete screed. This is how floors are built on the ground; the correct pie provides high-quality heat and waterproofing, stability, and wear resistance of the structure.
Sand backfill Source izhevsk.ru
Concrete screed
Before carrying out work, it is necessary to collect information:
- about the composition of the soil;
- about the level of groundwater.
On swampy soils around the building, a drainage system is created to remove soil moisture during the rainy season and active snow melting.
The preparatory layers of backfill are applied one by one after the previous building material has been thoroughly compacted.
Thick layers of sand and gravel are difficult to make dense enough. Over time, the backfill will shrink, which will be greater the thicker the preparatory layers. Therefore, it is better to pour the rough screed directly onto the geotextile fabric. This technology ensures high-quality crystallization of the material.
When concrete is poured over a layer of gravel or sand, the liquid leaves the mixture. The hardening process is disrupted and the strength of the screed is reduced.
Important ! Each previous layer is carefully compacted, and when pouring the screed, the period necessary for hardening and drying the material is maintained. It will not be possible to make a high-quality concrete floor on the ground in one or two days.
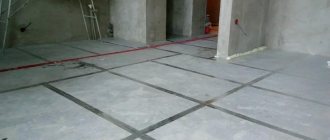
The screed cracked due to a violation of the laying technology Source remontik.org
Violation of the manufacturing technology causes:
- deformation, destruction of the lower layers;
- loss of structural strength;
- formation of bumps, depressions;
- cracking of the screed.
Before work begins, hot and cold water and sewage pipes are installed. After pouring the concrete, in order to introduce communication systems into the house, you will have to break the tightness of the structure and break part of the floor pie.
Installation of floors on the ground is carried out in several ways, which differ in process technology and applicable materials. Each method has pros and cons. The choice of technology depends on the foundation, soil, tastes and preferences of the homeowner.
Pouring a concrete screed requires knowledge and skills from craftsmen. During work, “wet” solutions are used. The concrete hardening process takes time. Each new layer of building materials is placed on top of the completely finished previous one. A poorly dried rough screed may burst if the concrete is not allowed to gain sufficient strength.
Video description
How to properly create a floor pie for pouring a concrete screed can be seen in the video:
See also: Catalog of companies that specialize in finishing materials and installation of stoves and fireplaces.
Work must be carried out under certain conditions:
- Filling is done at temperatures above +5 degrees.
- The construction site or room must have a roof or canopy that protects from direct sunlight.
Sequence of work:
- Step 1 . First, a sand cushion with a thickness of 20 to 60 cm is poured. The layer is leveled and compacted to the maximum possible density. The backfill is filled and compacted using heavy rollers.
- Step 2 . Crushed stone is poured on top of the sand. Ideally, the layer thickness should be about 20 cm. By tamping the crushed stone, the density of the sand cushion increases.
- Step 3 . The backfill is covered with geotextile. The strips of fabric are laid overlapping by 15–20 cm. An overlap is made on the walls from the side of the foundation strip. A damping tape is installed around the entire perimeter. It provides a decoupling between the floor and the foundation strip.
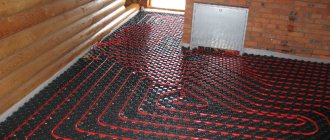
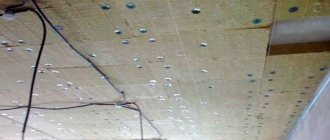
- Step 4 . A metal reinforcing mesh is placed on top of the fabric and filled with concrete mixture. The rough screed must harden thoroughly. Work cannot be continued until the material has acquired sufficient strength.
- Step 5. Double roofing material is used for waterproofing. The material is laid on a rough screed, then treated with bitumen mastic.
Laying penoplex for insulating a concrete floor Source altpol.ru
- Step 6 . The insulation layer is created from penoplex. Choose brands intended for the foundation. This insulating material is characterized by increased density, resistance to moisture, temperature changes, and the effects of bacterial and fungal infections.
- Step 7 . The next layer is a vapor-waterproofing film placed on the penoplex. The material is laid so that there is an overlap along the entire perimeter over the damping tape on the walls. Its height should be 18-22 cm. The film strips are positioned so that they overlap each other. The sides are taped with construction tape.
- Step 8. A reinforcing fiberglass mesh is laid under the finishing screed. Concrete is poured on top of this material. The thickness of the last layer can be from 5 to 10 cm.
If a warm floor is created on the ground, then before pouring the finishing screed, the system is installed and pipes are laid. Concrete is poured after all commissioning work has been carried out.
Reinforcing mesh with damper tape around the perimeter Source vse-postroim-sami.ru
What about a wooden house?
Most often, the foundations for wooden houses are insulated with expanded clay or polystyrene foam. We pour expanded clay into a special formwork, mixing it with concrete. Foam boards can simply be glued to the foundation walls, providing waterproofing.
The simplest and most effective method of insulating the foundation of a wooden house is to spray polyurethane foam. No additional work or separate waterproofing is required. Using a special gun, we spray insulation onto all surfaces. Polyurethane foam dries instantly. It forms a smooth surface impenetrable to cold and moisture.
If polyurethane foam was applied to the outside of the building, it should be covered with other materials. The insulation is afraid of direct sunlight. We glue a mounting mesh onto the layer of polyurethane foam, onto which leveling plaster can be applied.
Dry screed
The technology for making dry screed is simpler. This method makes it possible to obtain results faster than when pouring wet mixtures. Expanded clay is used as a substrate for the finishing level.
Expanded clay backfill Source ad-cd.net
The installation of a floor on the ground begins with backfilling a sand cushion and pouring a rough screed. After the concrete layer has hardened and acquired the necessary strength, proceed to the following stages of work:
- The waterproofing film is laid using the standard method. Strips of fabric are laid in overlapping rows. One sheet overlaps the other by 10-13 cm. The side sections of the film are covered with adhesive construction tape. The edges of the canvases along the entire perimeter are raised onto the wall. The lifting height corresponds to the thickness of the dry screed.
- To create a flat horizontal plane of the floor, plaster profiles are used. Beacons are installed around the perimeter of the room. Their height is determined using a building level.
- Create a pillow from expanded clay. The bulk material is compacted and leveled along the beacons.
- The expanded clay layer is covered with available building material (tongue-and-groove plasterboard, plywood).
- The slabs are covered with finishing material.
How to insulate a basement from excess moisture
The basement should be dry. If moisture seeps through the walls, all insulation efforts will not bring results. Another problem is condensation. Moisture, unable to find a way out of the basement, condenses on the walls and ceiling. Mold or mildew may appear.
In a humid environment, many insulating materials lose their characteristics and become useless. For example, wet mineral wool does not prevent cool air from entering the room.
How to properly insulate the foundation and basement to avoid excess moisture? It is very important to provide ventilation holes in the basement. When there is an influx of fresh air, moisture will be able to leave the basement
If there is high humidity in the basement, you can insulate its walls with insulation that does not react to moisture. You can use special equipment to cover the entire basement with a thin layer of insulating foam. This material instantly swells and forms a smooth surface that does not allow moisture to pass through.
Plank flooring
The most budget-friendly ground floor on a strip foundation is constructed from boards. Wooden structures have a large number of advantages. They can be built in houses made of wood, stone, brick and concrete blocks.
Advantages of wooden structures:
- are cheaper than concrete screed;
- Wood beams can be installed independently;
- for the construction of a supporting structure and a plank floor, complex specific materials and tools are not needed:
- Wood structures put less pressure on the foundation of a house than a concrete screed.
Negative aspects of rough plank flooring:
- Wood degrades faster than concrete. It rots under the influence of moisture and fungus.
- The boards catch fire quickly.
- Wood is not resistant to moisture.
To protect wood from harmful insects and infections, building materials are treated with antiseptics, resins and other impregnations. Well-dried wood lasts up to half a century.
Video description
The sequence of installing a subfloor made of planks in the video:
The plank floor is mounted on a support system of longitudinal beams and transverse beams. Inside the room, columns are laid out along the walls of bricks. All free space between the supports is covered with expanded clay. For ventilation, leave 10-15 cm between the backfill and the plank floor.
A lag system is installed on the posts. The height of the supports is leveled. A plank subfloor is laid on top of the bars. The boards are laid:
- waterproofing film;
- insulating substrate;
- finishing material (laminated coating, linoleum, carpet).
There are several options for creating a floor pie along the wooden beams of the first floor. In the old days, logs were built from thick straight logs.
The building material was treated with resin. This impregnation provided protection from soil moisture, insects, and putrefactive bacteria.
Floor on joists Source lestnitsygid.ru
This design option consists of:
- from a clay pillow;
- waterproofing fabric, film;
- brick support pillars;
- beams and beams connected to each other by corners or any other types of fasteners;
- insulating material.