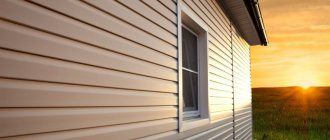
Experts are quite ambivalent about the option of insulating a house from the inside of the walls. Most often, this method is considered as an alternative if for some reason it is not possible to insulate the house from the outside. In any case, it is not recommended to insulate a house from the inside without the necessary qualifications. If there is no clear understanding of how to insulate the walls of a house from the inside, then mistakes in choosing insulation and vapor barrier materials are guaranteed to lead to the constant formation of condensation, which will cause the spread of fungus and mold in the walls.
The general principle of work is unchanged - the sheathing and insulation is attached between its joists Source in.pinterest.com
Basic principles of internal thermal insulation
The correct choice of thermal conductivity of insulation makes work on internal insulation as effective as creating an external thermal layer, provided that the heat barrier is correctly placed.
Not every heat-insulating material is suitable for insulating a house from the inside. It must meet certain properties to achieve the assigned tasks:
- Low permeability.
- No secretions harmful to human health.
- Waterproof.
- Ability to maintain configuration under mechanical loads.
It is important to know! The vapor permeability of insulating materials should decrease, that is, the insulation must provide more reliable protection for vapor than a wall. This purpose guarantees the free exit of moist air through the thickness of the wall to the outside.
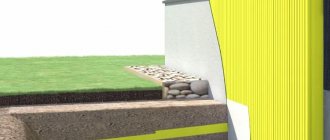
To avoid problems with insulation from the inside, first of all, you need to determine the location of the dew point. Its correct position should be in the wall or insulation, but not at the junction between them.
Changing the location of the dew point Source mynovostroika.ru
If this happens, then the accumulation of moisture and, as a result, rot, mold and mildew on the surface is inevitable. This situation is possible due to the large thickness of the insulation, since the wall is completely insulated from internal heat.
This also happens as a result of low vapor permeability. Walls made of brick and concrete are especially susceptible to this phenomenon. In this regard, internal thermal insulation in such houses is justified only in non-alternative options.
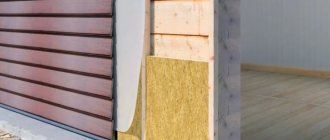
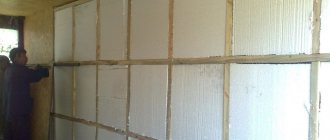
But in buildings made of timber or logs, such a layer of insulation is quite acceptable; you just need to maintain a gap between the wall and the insulation. Therefore, in order to meet all the requirements for internal insulation, you must first make a frame on the wall from a vertically located beam along the width of the insulation size.
Then a waterproofing film is spread and secured along the wall and insulation material is placed between the slats. It, in turn, is fixed with transverse strips and then a vapor barrier film is stretched on top.
When walls are insulated internally, such a “pie” is created Source moydom-irk.ru
Dew point concept
By this concept it is customary to understand the boundary of a surface with certain temperature indicators at which any substance acquires a different state.
If when setting the freezing and boiling points everything is simple: in the first case, water becomes ice, and in the second it takes the form of steam, then in the case under consideration, moisture condensation occurs.
This value is extremely mobile, since it is influenced by many factors, namely:
- Atmosphere pressure,
- relative humidity both outside and inside the house,
- actual temperature.
In simpler words, based on information about the level of relative humidity, it is necessary to calculate the limiting temperature values at which condensation forms.
The correct calculation of the presented indicator is directly related to the insulation of housing.
Without taking this value into account, the risk of fruitless costs for the purchase and installation of thermal insulation material, under which moisture will accumulate, increases.
“Crying” walls will ultimately result in the appearance of mustiness in the premises, fungal deposits and mold.
Types of materials and selection criteria
In order to avoid problems during the further operation of the house, you need to choose the right insulation. In addition to physical properties, it also has mechanical parameters. Within this characteristic, the following materials are determined for insulating walls inside the house :
- Mineral wool is a product produced in rolls, produced in different thicknesses.
- Bulk insulation is a material in the form of polystyrene foam granules, has a different configuration and size.
- Foam blocks are insulation, which includes foamed concrete, sand, bone glue and pine rosin.
- Plates are insulating material in the form of plates, which are made by pressing and gluing and have different sizes and thicknesses.
Internal wall insulation with slab heat insulator Source teplostroy.by
See also: Catalog of companies that specialize in insulating country houses.
Interior design - decorative stone in the bathroom
Decorative stone for walls, as a material with high resistance and strength, can also be used in bathrooms. An original decoration will make your daily hygiene area look like an elegant SPA salon. Decorative stone can be freely used as a detail or decorate the entire wall. Just be sure to check before installing the material in a flood-prone area, such as behind a faucet, that the decorative stone model you choose is suitable for that use.
Selection Criteria
Before you insulate the walls from the inside in a private house, you need to get acquainted with the parameters by which these materials are divided. First of all, you need to know the following features:
- Thermal conductivity . It should be low enough.
- Weight . Lightweight products do not require additional fastening.
- Vapor permeability . The higher this property of a material, the more effective its use, since less moisture penetrates and the walls remain drier.
- Possibility for further finishing.
And also, it must have a long service life, allowing replacement no more than once every 12-14 years.
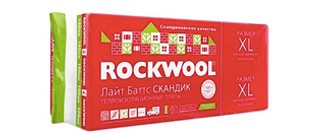
Application of mineral wool
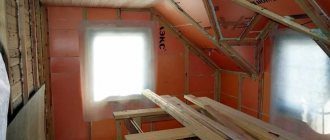
The technical characteristics of this material today allow us to consider it one of the most popular insulation materials. Its main advantage is its low cost and low degree of thermal conductivity.
And also an undeniable advantage of mineral wool is its versatility. It can be applied to any uneven surfaces of any shape: roofs, ceilings, non-standard openings in walls.
All work with mineral wool must be carried out in protective clothing Source skmig.ru
Mineral wool is divided into three types:
- Basalt.
- Slag-like.
- Glass wool.
All varieties of this insulation are united by one property: due to the interweaving of fibers, air spaces are formed inside it, providing a low level of thermal conductivity.
It is important! Mineral wool easily absorbs moisture, so it is recommended to use it as insulation inside the house only in addition to the outer insulating layer.
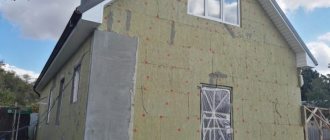
We insulate the walls from the inside using polystyrene foam
When choosing between mineral wool material and expanded polystyrene, you need to keep one nuance in mind. This insulation has low vapor permeability, so it is not recommended to use it on walls with high vapor permeability (timber, logs, porous concrete).
It will be more effective to use for thermal insulation of brick walls and blocks with low moisture permeability. An adhesive mixture is used to glue this material.
When fixing the insulation, in addition to glue, special nails with heads are used.
Special fasteners with wide caps for insulation materials Source pro-uteplenie.ru
Installation of slabs is carried out sequentially in several stages:
- The surface is being prepared. Cleaned, primed and marked with beacons.
- A rail is fixed at the bottom to support the PPS sheets so that there is no displacement during connection.
- Apply glue to the surface of the wall and the plane of polystyrene foam.
- Apply, align and glue the insulation sheets. It is recommended to do this some time after applying the glue.
- The slabs are additionally secured with nails. They are driven in so that the caps are slightly recessed into the polystyrene foam.
- Then a mesh is applied to the slabs, and the surface is treated with plaster mortar with finishing rubbing. After drying, the panels are ready for further finishing: painting or wallpapering.
On a note! Despite the fact that internal thermal insulation is positioned as an alternative to external insulation in bad weather conditions, insulation of walls inside the house is recommended in the summer when the partitions are heated and in the absence of precipitation.
Insulation of walls from the inside in a private house with penoplex
Insulating the walls from the inside of the room with penoplex is also possible. The algorithm is like this
- Surface preparation. This stage involves removing wallpaper and other facing materials from the wall. Then you need to clean the surface from dust and dirt, and check if there are any unevenness. If a depression or crack is found, it must be filled with putty. Surfaces on which condensation has appeared for a long time are often affected by fungus or mold. To get rid of this problem, you need to treat the wall with antiseptic solutions. After this, apply the primer, wait for it to dry, and only then can you move on to the next stage of work.
- Cut the slabs to the required sizes. For this you need to use a ruler, a knife and a square.
- Prepare an adhesive solution. It is selected according to the recommendations of the manufacturer of the insulating material. Knead strictly according to the instructions indicated on the package.
- Apply glue to the slabs and wall. Attach a heat insulator.
- Using plastic dowels, provide additional fixation. This step is optional, but it guarantees greater reliability.
- Check the tightness of the connection in the areas of door and window openings. Fill the seams between the plates with sealants. If you find areas with a large distance, you can cover them with foam.
- Vapor barrier. For penoplex, this is another optional installation step, but this procedure will help avoid unexpected problems.
Attention!
You can begin interior decoration of the room only after completing the listed steps.
Stages of work
First of all, before insulating the walls of a house internally, it is important to know that the dew point will change - the place where moist air turns into condensation.
Consequently, if you choose the wrong material or its thickness, then such insulation can worsen the condition of the walls: mold, mildew, or destruction of the partition will appear.
It is important! In order to avoid irreparable mistakes, it is better to entrust all calculations for choosing insulation, as well as installation work, to specialists from a trusted construction company.
Before starting work on wall insulation, certain rules must be followed:
- Remove old coatings to the base of the surface, clean, remove possible formations of mold or mildew.
- Treat the wall with an antiseptic and primer solution. At the same time, give each coating a chance to dry.
- When using polystyrene foam, plaster the surfaces with the placement of beacons, which will allow for a more even plane. Allow to dry for at least two days.
- Laying the material.
- Finishing the wall.
Comparison table for insulation inside
When comparing the characteristics of thermal insulation materials, they take into account not only their thermal conductivity, but also their cost. The ability to inexpensively perform internal insulation attracts many homeowners.
Although it is not recommended to pay attention only to price - in fact, materials with good vapor permeability are best suited for interior work.
Before making a final decision, it is worth comparing other parameters that clearly influence the choice of material. For a more convenient comparison, they can be summarized in a table.
Table 1. Main indicators of materials used for internal insulation.
| Name | Thermal conductivity, W/m °C | Vapor permeability, mg/m·h·Pa | Flammability (class) | Density, kg/m3 |
| Mineral wool (glass wool) | 0,041–0,044 | 0.5 | incombustible | 155–200 |
| Mineral wool (basalt) | 0,048–0,071 | 0,49–0,6 | refractory | 50–200 |
| EPPS | 0,028–0,031 | 0,005–0,011 | G3, G4 | 25–45 |
| Liquid ceramics | 0,0012–0,003 | 0.02 | incombustible | 500–600 |
| Cork | 0,040–0,050 | 0.03 | incombustible | 110–260 |
| Foamed polyethylene | 0,031–0,055 | 0,01–0,03 | G1, G3, G4 | 25–33 |
| Penofol | 0,037–0,052 | 0.001 | G1 | 44–74 |
Video description
Insulation instructions in the following video:
Advice from professionals
When carrying out such work, you need to pay attention to the following points:
- Vapor barrier will help if you make a hermetically sealed joint at the seams.
- The thermal insulation layer should not have a high vapor permeability parameter. In the case where this indicator is higher near the wall than that of the insulating material, steam will escape outside.
- To achieve complete adhesion of polystyrene foam to the wall, the beacon method of applying plaster and the method of leveling the glue with a comb are used. This allows air bubbles to pass between the wall and the insulation.
On a note! To prevent moisture from appearing on the walls, a high-quality ventilation system must be installed in the house - hoods and valves on the windows.
Natural ventilation must be calculated no less carefully than forced ventilation Source sovet-ingenera.com
Conclusion
Thermal insulation inside walls is not the most popular way to reduce heat loss in a room. Reduced area, the need for more careful calculations to determine the “dew point” and other disadvantages force owners of apartments and private houses to choose external insulation. Moreover, installing insulation outside minimizes the risk of dampness in the premises.
At the same time, if insulation on the façade side fails (the appearance of the house is disrupted, there are expansion joints at the insulation site), the internal placement of heat-insulating materials can also be made more effective. If you use special technologies and take measures to prevent the appearance of dampness on the walls, the effect will be no worse than that of external thermal protection.
Floor
simple and cheap options
The first is to insulate the living spaces around the perimeter: no matter how well the floor is fitted and the baseboard is selected, there is a gap between the floor and the wall. If the basement is not insulated, cold air will penetrate from below through these gaps. And this is where penofol comes to our aid: we fasten strips of this material (with a foil layer inside the room) using a furniture stapler (or small nails, if there is no stapler) so that one edge goes to the wall and the other lies on the floor. Quick, simple - and the room becomes noticeably warmer. Check it out!
They also use penofol for continuous thermal insulation of the floor (someone already does what they do: someone fixes it on the basement side, someone uses it instead of a backing for flooring, but I have heard only positive reviews from both).
The second is the floor surface. Homespun rugs in village houses, in addition to their decorative function, also have a purely practical one: this is additional insulation. So, if there are carpets, rugs, paths and rugs
— lay them on the floor, and you will be warm))
Insulating the front door with foam rubber
If you want to insulate your front door without taking a lot of time and money, use the most familiar, widespread material - foam rubber. It is not suitable for sealing the sides of a door frame, but it can be sewn onto a wooden door on both sides.
To work you will need the following:
- Foam rubber;
- Upholstery fabric;
- Glue;
- Threshold board;
- Slats made of wood and plastic.
- First of all, cut off the outdated covering from the door and get rid of the remaining insulating materials. Wash the surface thoroughly.
- After the door has dried, stick layers of foam rubber cut exactly to size on its inside and outside sides. If necessary, pieces of foam rubber can be glued together in 2-3 layers (for example, if the material is thin, or you think that additional insulation will not harm).
- Now stretch the upholstery material over the foam, securing it to the door with nails or a staple gun. You can decorate the surface with a pattern of wallpaper nails. Do not overdo it: the nails press and press in the insulation, because of this its heat-saving properties are lost.
- Now it's the turn of the door frame. Stuff slats around the perimeter of the door, which were previously covered with foam rubber and fabric. At the same time, control the position of the closed door: it should fit tightly, without gaps.
- The last stage of insulation is installing the threshold. The threshold board should completely cover the gap under the door, but not interfere with the door leaf opening and closing.
Instead of foam rubber, you can use materials such as polystyrene foam (2 to 5 cm thick) or polyethylene foam. In terms of their heat capacity, they surpass any traditionally used materials.
This simple and economical method will help you quickly insulate your door, further protecting you from extraneous noise.
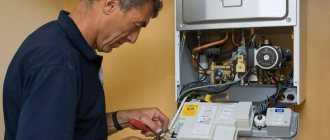
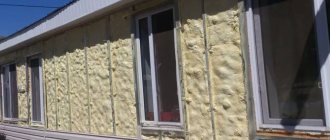
Polyurethane foam
Recently, polyurethane foam has been gaining popularity.
It is considered one of the most reliable insulation materials. The presented material has positive properties:
- Withstand mechanical loads;
- Withstand thermal loads;
- Fire resistant;
- Durable;
- There are no seams or joints that need to be sealed.
In other words, this insulation does not have the disadvantages that mineral wool and polystyrene foam have.
If we look at the properties of this product, we can say that it has no disadvantages.
The only difficulty you may encounter is applying the material. Polyurethane foam consists of two components that, when mixed, form foam. It is applied using a special device.
The foam is sprayed directly onto the wall on which the frame is installed.
There is no need to use fixatives. Polyurethane foam hardens and dries quickly.
A nylon mesh can be installed on top, and any finishing work can be done on it.
Like a glove
The thermal insulation-bonded system includes adhesives, plasters and reinforcing mesh (they provide fixation of the thermal insulation layer, as well as its protection from external influences).
In order for façade insulation to adhere firmly to the walls, branded complexes should be used, that is, a set of components produced by one manufacturer (RockFacade from Rockwool, Denmark-Russia; “Warm Wall” from Knauf, Germany-Russia; Capatect from Caparol, BauColor from BauCoior; Ceresit from Henkel Bautechnik - both Germany, weber.therm.cottage, weber-vetonit trademark, international concern Saint-Gobain, etc.). “Foreign” products may not take root in the friendly family of “native” materials, which will lead to partial peeling or even destruction of the thermal insulation system.
Thermal insulation boards are glued to the walls with a special mineral glue and additionally fixed with façade dowels.
The first row is installed on an aluminum rail. The insulation is installed without breaks or voids. True, there are narrow gaps between polystyrene foam boards, which are filled with polyurethane foam. A polymer-modified adhesive mixture is applied to the heat-insulating lining, into which an alkali-resistant fiberglass mesh is embedded. This is followed by another layer of mineral glue and a decorative coating (structural plaster, facade paint and ceramic tiles, etc.). If all work is carried out strictly according to the instructions, then the warm wet-type facade will seem to merge with the outer wall and become a stable basis for the embodiment of architectural ideas in any style.
What to do with the roof
The question of the need to insulate the roof would not make any difference. This isolation must be carried out without failure. Only in this case should the material characteristics and climatic conditions in the region be taken into account.
When the leakage of house roof insulation is reduced by 15%.
And if the attic space is used as a loft, it is simply impossible to do without reliable roof insulation. In the absence of a planned residential building in the attic, it is sufficient to insulate the ceiling of the house or attic.
Conclusion. From the above, we can conclude that those people who value convenience and comfort will not neglect heating at home.
The money saved on electricity, water and gas can be considered well earned and the material will be paid off in the first cold season.
Insulating a dacha is an activity that should not be postponed, but completed before the weather gets colder. You should know that the insulation procedure itself concerns many elements of the building, moreover, it can last several weeks
But something else is more important - to choose the materials and execution technology wisely, since this determines how effective the result will be. It is worth adding that with the help of the simple techniques described in the article, you can save a little on thermal insulation
So, how to insulate a country house? Let’s immediately say that insulation can be of two types:
Let's look at the features of each of them.