The high cost of modern thermal insulation materials often pushes developers to look for an alternative.
Not many people know that such an alternative exists. For many years now, wall insulation with straw, clay and sawdust has been used as insulation in a fairly large number of private houses. The use of natural materials is not only a cheaper, but also a much more environmentally friendly option for organizing home insulation. In addition, traditional natural insulation materials are not inferior to synthetic ones in basic parameters, including thermal insulation.
However, natural insulation materials must be properly prepared and applied, so insulating a house with straw should be done strictly following the technology. We will talk about this below in our article.
A little physics
Before delving into the technological aspects of using the product, let’s look at its physical and technical characteristics. And they are not too happy. Thus, the density of hardened clay is 1600-2400 kg/m3 (slightly less than that of concrete), and the thermal conductivity is 0.7-0.9 W/m°C.
It turns out that clay as a wall insulation is, to put it mildly, useless, so why is it still used?
The fact is that this material is an excellent binder, the strength of which is not affected in any way by the sucrose found in organic fillers (it is destructive for concrete), and this, in turn, opens up the widest scope for maneuver.
This is interesting: We insulate the walls of a frame house with mineral wool with our own hands: Instructions
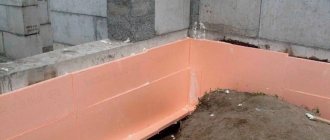
Waterproofing works
Ceiling waterproofing
The clay mixture is placed on the flooring wet. Therefore, it is necessary to somehow protect the base from moisture. Usually a simple film is used for this. It is laid on top of the ceiling and attached to it with staples or some other way. The same film will protect the insulation from fumes from the room, for example, if clay is used in a bathhouse.
It is not recommended to use various impregnations and chemicals. Moreover, varnish or paint. Especially in a bathhouse or in a room with a stove. When heated, chemicals begin to emit harmful fumes, and varnish and paint can melt, “cry” and also evaporate toxic substances.
Ceiling preparation
Clay insulation scheme
Of course, only prepared floors can be insulated. There are several ways how this can be done:
- hemming with bars 50x50 mm;
- use of edged boards;
- hemming with tongue and groove boards.
The use of bars is considered the cheapest option, since they are not sewn up completely, but with a gap of 20 mm. These cracks will then be filled with a clay mixture. They are joined lengthwise on beams. It is important to securely and correctly fasten the bars. To do this, you can use nails no shorter than 10 cm or wood screws no less than 9 cm long.
A shield is attached to the reverse side. It is needed so that the clay mixture does not spill through the cracks between the bars when they are filled. When work with 1 section is completed, the shield is moved further or a new one is installed.
Hemming with boards takes much less time and saves effort, but in financial terms it turns out to be noticeably more expensive, especially if a tongue-and-groove planed board is used. On the other hand, if the flooring is immediately leveled, then the ceiling in the room will be smooth and beautiful. Additional work with it is no longer required. This is usually how the ceiling of a bathhouse is insulated with clay.
Choosing straw for the ceiling
Straw with clay as insulation for ceilings has the following quality requirements:
- Thermal insulation of ceilings should be carried out only with straw that has been well dried in a special chamber.
- Straw bales should be easy to lift with one hand, strong and maintain their shape. Bundles of the same size should have the same weight. The difference in weight may indicate the presence of moisture in the bundle.
- Metal wire is susceptible to corrosion, so tying should be done with a nylon cord.
Advantages and disadvantages of insulating ceilings with straw
Insulating ceilings with straw has its positive and negative sides, after weighing them, you can decide whether to choose this method.
Advantages:
- excellent thermal insulation properties, several times higher than those of wood;
- environmentally friendly and breathable material;
- the material can be easily disposed of by burning;
- lightness of the material and its installation process.
The disadvantages of straw insulation for ceilings include the ability to ignite poorly compacted material and the likelihood of damage by rodents. The quality of the material is directly dependent on the conditions of collection of raw materials, their storage and drying method.
Instructions for installing straw on the ceiling
You can insulate the ceiling with compressed straw blocks and light adobe.
The first method involves laying blocks tightly pressed against each other or staggered, which are covered on top with a waterproofing film and then with the finishing floor covering.
Ceiling insulation with light adobe looks like this:
- The attic is covered with a vapor barrier film, onto which a solution of clay and straw 5 cm thick is applied.
- A dry straw layer 10-15 cm thick is laid on the dried base.
- A protective layer of clay mortar 2 cm thick is applied.
- The wooden flooring is installed along the joists.
Features of using sawdust as insulation, its advantages and disadvantages
Sawdust remains a cheap and effective means of insulating bathhouses and outbuildings
Sawdust is a waste product from the forestry industry, but it is an environmentally friendly material and does not emit caustic substances. Since ancient times, sawdust has been one of the oldest materials used as insulation.
Today, new types of insulation are replacing the material under study, but many continue to use it because they know its performance characteristics and its noticeable low cost.
Sawdust can be thrown in loose form into the wall frame
They are used to insulate the walls of small houses, bathhouses and gables in the attic. These waste products from the timber processing industry can be used at any stage of construction. It is not necessary to fill up the wooden dust or put it in bags on the frame; they can be thrown into the finished walls from above and compacted well. To increase the performance characteristics, sawdust is often impregnated with various antiseptic compounds, which prevents the appearance of insects in the insulation.
Advantages of sawdust
For many years, sawdust, as insulation, dominated among all types of thermal insulation. They were used in different forms. Some people poured clean wood scraps, others mixed sawdust with glue or cement, thus creating blocks with which they later laid out the wall. Over the years, this material has been used in various forms to insulate rooms.
Sawdust, like any other building material, has its advantages and disadvantages. The first group of characteristics includes:
- Environmental friendliness of the material. The composition does not contain harmful components that could have a negative effect on the human body. If you intend to create blocks from sawdust, then for these purposes you can use clay and lime as additional binding components.
- Low cost. Sawdust is often obtained free of charge at various wood processing enterprises. Costs may only be due to shipping and handling costs.
- Long-term operation. Mankind, through long operational experience, has determined in what form it is best to use this material, therefore, before filling the walls, sawdust is specially moistened and dried several times. In recent years, antiseptics have begun to be added, thereby creating a barrier to the penetration of insects. Bags of silica gel are placed in the filled cells of the walls with sawdust to completely remove moisture from the heat insulator.
- No special preparation required. Wooden waste is filled manually without the use of special tools and equipment. The material is filled in freely, after which compaction is performed.
- Low thermal conductivity. Due to the fine fraction, this raw material has significantly lower thermal conductivity compared to boards or timber due to the absence of solid wood fibers.
Disadvantages of sawdust as insulation
A building insulated with sawdust should be used carefully
Unfortunately, this insulating material has more disadvantages than its analogues, but over a long period of existence, measures have been invented that allow minimizing all negative factors.
The disadvantages of sawdust as insulation include:
- Increased fire hazard. Sawdust is a flammable material, but in order to partially avoid the problem and reduce the risk of fire, additional membranes made of tin or galvanized steel are created in the wall where the sawdust will be poured.
- Attracts living creatures and fungus. Since sawdust is a natural product, it can harbor small rodents, insects and mold. Today, this problem can be easily solved with the help of appropriate drugs that are harmless to the human body.
- The material shrinks. This drawback is significant, since it is not always possible to add material. It is for this reason that the sawdust is soaked several times before installation to make it heavy and to compact the entire composition as best as possible.
- Fast moisture absorption. The material in question absorbs moisture well. To prevent this from happening, during operation it is hermetically protected with a vapor barrier and waterproofing film.
As you can see, all the main disadvantages of sawdust as an insulating material can be partially covered with the help of special preparations, materials and folk experience in using wood shavings.
Composition of clay insulation
Red clay is considered optimal for the preparation of insulating composition.
Red clay is quite hygroscopic and plastic. You can also use white clay, which is slightly inferior in these characteristics. The maximum insulation effect can be achieved if insulation is carried out with clay with the addition of sawdust or chopped straw.
It is better to choose sawdust from coniferous or oak wood. When preparing this component for the manufacture of insulation, the sawdust should be dried and soaked in an antiseptic. To protect against rodents, lime should be added to the solution.
Clay-straw insulation is also actively used, when instead of sawdust, chopped straw is introduced into the clay solution. Most often, the roof or ceiling is insulated with straw, but it is also possible to insulate the walls.
Preparing a mixture of these components is one of the main points in the process of insulating the walls of a frame house. The result of insulation will depend on the quality of the composition. If the proportions were violated during the preparation of the clay mass, the insulation will not perform its functions fully; most likely, after drying, it will crack and crumble.
The process of applying the clay mixture is not that long. It will take more time for the clay layer to dry out, which at above-zero temperatures will take at least a month.
Clay insulation technology consists of only three stages:
- Preparation of insulating composition.
- Application of insulation.
- Drying and strengthening.
There are several ways to insulate a ceiling using clay.
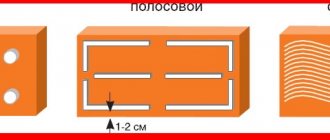
Clay-sand mortar: insulate the ceiling
The traditional method is when the ceiling is insulated with a solution of a mixture of clay and sand in a ratio of 6:2. Water is added in such an amount that the resulting mixture has a consistency similar to thick sour cream.
The algorithm for insulation with clay-sand paste is as follows:
- The ceiling of the room is covered with dry boards of the required thickness.
- The gaps between the boards are covered with clay and left to dry.
- The plank ceiling is covered with a vapor barrier membrane film. It's better to use a whole piece. If the vapor barrier is made of several pieces, the film is laid overlapping.
- The joints of the film are fixed with tape.
- Clay, sand and water are mixed in the specified proportions and the mass is brought to a homogeneous consistency.
- The boards and film are covered with a layer of mortar to a thickness of 5-8 cm. The poured surface is leveled with a wooden plank. A horizontal level is established along the top layer of fill.
- When the clay mass hardens, a layer of dry sand 10-15 cm high is poured on top of it.
- Logs and a finishing floor are mounted on top.
When laying joists, attention should be paid to organizing the ventilation gap.
Ceiling insulation with clay and sawdust
The insulation composition may consist of clay and sawdust (or chopped straw). This insulating mass should have a thicker consistency. Clay and sawdust are taken in a ratio of 2:3. Insulation clay and straw is also mixed in this ratio of elements.
The algorithm for insulation with this composition will look like this:
- Ceilings are covered with waterproofing material.
- Ten-centimeter wide slats are laid and fastened on top of the waterproofing in increments of 30-40 cm.
- We prepare the composition; for this, clay and wood (straw) filler are mixed in the specified proportion and brought to the desired consistency.
- Spread the solution into the spaces between the slats and let dry.
Do not be afraid that after drying, cracks or crevices will appear on the surface of the putty. This is a natural addition of material. These defects are eliminated using a thin layer of liquid clay, which can be covered on top with a layer of sawdust or earth 5-6 cm thick. After eliminating the cracks, installation of the finished floor can begin.
Layered insulation with alternating clay and sawdust
In this case, we are talking about layer-by-layer laying out insulating layers of clay and sawdust alternately.
The layer-by-layer insulation algorithm is as follows:
- We install a vapor barrier.
- We make a mixture of clay and straw (sawdust) in a ratio of 2:3.
- Add water until the mixture becomes homogeneous and thick like sour cream.
- We spread the resulting mass on boards covered with a vapor barrier in a layer of 2-3 cm. Let it dry completely.
- If cracks appear after drying, fill them with liquid clay, as mentioned above.
- After complete drying, cover the clay insulation with a layer of dry granular substance. Sawdust, shavings, and straw can be used as a dry layer.
- The topmost layer is laid with dry soil 5 cm thick.
You can make a wooden flooring on top of the insulation. If you do not plan to use the attic space, then the layered insulation can be left uncovered.
Insulation of walls outside
Despite the fact that clay-based mixtures are most often used to insulate ceilings, this insulation can also be used to improve the energy-saving properties of the walls of a house.
An important point is that the insulation of walls with a clay mixture is carried out only from the outside. The use of this type of insulation indoors is not effective and does not last long. Under the influence of moist air, clay insulation gets wet, and with a temporary increase in temperature it dries out again. Thus, the clay coating applied to the inner surface of the walls very quickly loses strength, cracks and crumbles.
The algorithm for insulating the walls of a frame house is as follows:
- A shingle grid made of a centimeter strip 2-3 cm wide is fixed to the insulated wall. This creates a reinforcing layer on which the mixture will be applied.
- A clay solution is prepared, into which sawdust, chopped straw or reeds are added to reduce thermal conductivity.
- The solution is applied to the shingles and leveled; the evenness of the layer is checked with a level.
- After the mixture has completely dried, the sheathing is attached to the walls and the façade is sheathed. If exterior finishing with siding, block house or other materials is not provided, the clay layer can be covered with whitewash with the addition of lime.
There is another method of insulating walls with clay, when vertical surfaces are insulated using pre-prepared clay slabs. Such plates are made very simply:
- The prepared mixture is poured into a form made from boards, laid on a sheet of plywood.
- The mixture is leveled and left to gain strength.
- After complete drying, the finished slabs are removed and attached to the walls using wooden lathing.
As we can see, the technology of thermal insulation using clay insulation with the addition of sawdust or straw is quite simple. At the same time, if all requirements are met, this insulation is quite effective. Its use will help you not only increase the thermal insulation performance of the structure, but also save significant money.
Clay insulation
There are several options for clay mixtures: with sand, with sawdust or with straw. The principle of operation in them is usually similar. But it also has its own characteristics. A very important point is the correct preparation of the working mixture. The quality of the insulation, its durability (if the proportions are not met, the material may crumble or break), and the ability to retain heat depend on this.
Sand and clay
Any repair begins with the preparation of a working solution. Sand and clay are loaded into a concrete mixer and water is added. You can mix them yourself, but this is a very long and labor-intensive process, because you need to achieve a uniform consistency, like thick sour cream.
The resulting solution is coated with the boards. The layer should also be uniform, approximately 5-7 cm. The mixture is allowed to dry for at least 2 weeks. Then sand is poured over the clay; the layer should be thick, at least 2-3 cm. This will not only protect the mixture from sudden temperature changes. Over time, cracks may appear in the clay. Sand will fill the voids as necessary. Thermal insulation will not deteriorate.
The process of laying the clay layer is completed by treatment with liquid steam and then dry. It turns out that the material first gets a little wet, and then, as it were, hardens.
Clay with sawdust
Clay with sawdust
This is the most common insulation option. Any sawdust will do. You can get them almost free of charge at any carpentry workshop. The mixture is prepared as follows: first soak the clay so that it becomes liquid. To do this, 5 buckets of clay are filled with 2 buckets of water. Allow to absorb a little moisture and stir until smooth. Then 2 buckets of the resulting liquid clay are poured into a concrete mixer and sawdust is added to the bowl. The finished solution will resemble a concrete screed in its consistency. It is poured onto boards and leveled. It is advisable to compact the layer a little when insulating the ceiling with clay and sawdust in order to get rid of excess voids. The thickness of the layer should be at least 10 cm. It is left to dry for 1-2 weeks. If cracks appear after drying, they are covered with a thin layer of clay.
Protecting straw bale from damage
Using straw compressed into blocks as insulation makes it possible to obtain walls that are resistant to rot, fire, rodents and insects. But these conditions are met only with high-quality pressing of raw materials. For the bundles, dry rye is used, which contains a large amount of silica, so rodents do not eat it. Tightly compressed raw materials do not have access to air, therefore they are not flammable and do not allow mice and rats to gnaw through passages. For additional protection against rodents, metal mesh is installed at the bottom of the walls. Rotting of straw can begin when the humidity in the blocks increases to 20%.
Additionally, plaster will help protect the thatched walls. The traditional option is clay plaster, but for external wall coverings it is recommended to use cement-sand plaster, which is more resistant to moisture. Interior finishing can be done with lime plaster.
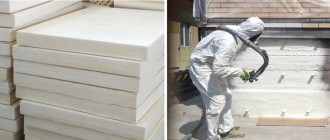
The process of production and subsequent operation of straw insulation
The production process of wooden panels with straw insulation consists of several stages. It starts with gluing together wooden panels. Only dried and polished boards are used - this is the only way to avoid subsequent deformation. Gluing is done using a vima (a special gluing press) of our own design. Next comes the assembly of the wooden frame for the panel. Thanks to the reinforced structure, each panel can serve as a load-bearing wall. The next step is to press the straw into the panel. This is done using a hydraulic press. At the final stage, the front sides of the panels are covered with a layer of pouring plaster.
Panels for the construction of a one-story house with an area of 28 square meters. meters fit into two or three gazelles. If there is a foundation, then a ready-to-move-in house can be erected in three to four days with just a crane and a hammer. If there is no foundation, the client is asked to contact a contractor. There are no unique or complex requirements for the foundation for such a house. If desired, such a house can be disassembled at any time, loaded into a car and reassembled in a new place.
This is interesting: How to insulate aerated concrete? Instructions
Insulating a frame house with straw: progress of work
Most often, straw blocks are used to insulate the walls of a frame house. Straw insulation is carried out exclusively on the outside of the building and only in the summer. Weather conditions also play an important role; warm, sunny weather is ideal for such work.
The work algorithm is extremely simple and installation of insulation can be easily done with your own hands.
The entire progress of work can be divided into the following stages:
- Calculation, purchase and preparation of insulation.
- Installation of sheathing.
- Installation and fastening (fixing) of blocks.
- Applying a layer of plaster.
- Final finishing.
Preliminary preparation of straw insulation involves soaking the blocks in a 10% solution of copper sulfate. Immediately before installation, the insulation should be thoroughly dried.
The straw blocks are secured using iron rods placed perpendicular to the foundation and passing through the “body” of the block.
After fixing the blocks, the finished straw wall is covered with a layer of plaster (clay-cement mixture). In addition to decorative, plaster and finishing also perform a protective function.
Protecting straw bale from damage
Insulating walls from the outside with straw requires applying a layer of “breathable” plaster over the straw blocks, which will protect the natural insulation from rot, fire, insects and rodents. To protect against rotting, you should also ensure that there are no leaks. Only a high-quality compressed and dry straw block meets all the declared characteristics.
Like solid wood, straw begins to rot at a humidity of 20%.
The fire hazard of straw is much lower than that of wood. Straw compressed into bales without access to air practically does not support combustion at all.
The high density of straw compaction does not allow rodents to reproduce. Rats, mice and other rodents are simply not able to chew through tightly compressed blocks of straw; many place metal mesh underneath.
Insulation of a wooden house with straw is carried out using pressed straw
blocks made from the stems of various cereal crops. Rye straw is most often used, since it contains the most silica in composition and is not eaten by rodents. This element in the composition of straw fiber provides the material with the proper density and resistance to biological damage.
It is thanks to its strength and resistance to rodents that not only the roof can be insulated with straw, but also the attic and walls can be insulated.
Straw blocks are easy to install; insulation of a frame house in this way is possible with your own hands. And if part of the insulation block is damaged, it can be easily replaced with a new undamaged block.
Main advantages of straw bale
Summarizing all of the above, we can draw the following conclusion: straw blocks in straw houses are quite cheap, environmentally friendly and safe for humans.
- The economic profitability of such blocks, used for insulation and construction of houses, is determined by the fact that the blocks themselves are inexpensive.
- In addition, this material is quite light in weight, which means it does not require a massive foundation, such as, for example, a brick masonry house.
- Among other things, the labor costs for erecting walls or insulating a house with straw will require much less labor than building from the same timber.
- Building a house from straw is possible in a fairly short time. Typically, it takes about 4-5 months from the start of construction (foundation) to its completion (moving in of residents).
- Houses with straw insulation are easy to breathe, they are absolutely safe for human health, and they provide a temperature and humidity regime that is comfortable for living.
- Thanks to its good thermal insulation properties, straw insulation allows you to save on heating your home, which makes it economical to operate.
- Straw walls made from compressed blocks have excellent fire safety characteristics.
- Straw blocks are universal in use and can be used to insulate walls, ceilings, floors and roofs TEXT_LINKS.
Tools, fixtures and other process components
This process requires quite a few tools. Often the list consists of the following components:
- concrete mixer;
- barrel;
- sawdust;
- clay;
- water;
- capacity;
- glassine;
- putty knife;
- cardboard;
- boards;
- construction stapler;
- hammer;
- nails.
It should be borne in mind that to install clay-based insulation, we will need to create a small structure that will consist of boards, cardboard and other components.
Flaws
In addition to a large number of obvious advantages, insulating the ceiling with clay has several disadvantages. These features must be taken into account in order to soberly assess your strengths and correctly calculate the time it will take for repairs:
- clay is quite difficult to work with, physically, it will require a lot of strength;
- the insulation process is labor-intensive;
- clay takes a long time to dry, even in hot weather it will take at least 15 days for the layer to dry completely, in cloudy, cool or damp weather - up to 1 month;
- Repairs can only be done in summer; work is not recommended in winter.
Beginning of the use of straw in construction
This construction technology originated in the 80s of the 19th century in the USA. The basis of the technology for this construction was developed by the pioneers of Nebraska.
The appearance of houses made of straw was associated with the lack of other building material in the steppe zone, where the state of Nebraska is located. Construction with straw bale construction became possible with the advent of the first mechanical balers, which made it possible to obtain straw blocks of sufficient density and strength.
Some thatch buildings built at that time still stand today. Not only residential buildings, but also schools, shops and other buildings were built from straw. For the most part, these are one-story buildings with an area of no more than 80 m2.
Insulating a frame house with straw: main advantages
Straw, as an environmentally friendly and effective material for home insulation, is recognized by construction experts all over the world. Today, house insulation with straw is used not only in the construction of private one-story houses and cottages, but also in the construction of high-rise buildings. This thermal insulation technology is also gaining popularity in Russia.
In terms of thermal conductivity, straw is 4 times more efficient than wood and 8 times more efficient than brick. That is, a house built from straw or using insulation from straw blocks will need to be heated 4 times less than a wooden one and 8 times less than a brick building.
Due to the increased silica content, straw is more durable and stronger than wood building materials. Straw is also superior to wood in its ability to “breathe”, i.e. absorb moisture from the environment and, if necessary, release it back into the air. Straw is also distinguished by excellent vapor barrier properties, thanks to which the room “breathes” (ventilates) even with closed windows and doors.
The benefits of straw insulation do not end there. Due to its porous structure, straw is also a good soundproofing material. Therefore, today it is quite popular to insulate walls with straw, as well as insulate ceilings and interior partitions with straw.
Thus, straw can be considered simply an ideal option for insulating a house. It meets all the requirements of the most picky developer:
- durable and environmentally friendly,
- has high heat and sound insulation properties,
- easy to install,
- economical.
Clay with sawdust as insulation
One of the most popular options is clay with sawdust for insulation on the ceiling. Wooden shavings, especially in their loose state, retain heat well, and you can collect them in any carpentry shop for a nominal fee.
There is only one drawback: over time, the loose mass sags, losing part of its thermal insulation properties.
But if it is mixed with gypsum or liquid clay, the “fluffy” structure will remain for a long time, which means that the use of such technology is not without meaning.
Recipe
If you are interested in clay with sawdust as insulation, the proportions here are simple. For three buckets of clay, take two buckets of wood shavings, mix it all and fill the space between the joists with the resulting mass.
We suggest that you familiarize yourself with a solution of fireclay clay for laying stoves. What can you do for free? Proportions for making clay mortar.
You can easily not only walk on such insulation, but also dance, but you can’t call it too effective. Of course, the proportion of wood material can always be increased, but then the insulation will lose strength, which means that some kind of floor will have to be invented on top of it.
Some useful tips from experts
Even though some insulation materials may not seem so cheap, experts recommend not saving on purchasing high-quality and environmentally friendly material, because only in this way can the goal of a comfortable atmosphere and temperature in the house, and the health of all household members, be achieved. Properly selected materials for roof insulation will help extend the service life of all structural elements of the house.
Even the highest quality insulation may not be effective if it is installed poorly. Therefore, it is best to trust people with relevant experience to carry out roof insulation work. In addition, installation work may differ slightly depending on the material from which the house is made; for example, the insulation of the roof of a frame house and a wooden or brick one may have some differences.
When choosing insulation with the optimal ratio of cost and quality, remember that you and the people closest to you will live in the house where it will be used.
Economical thermal insulation
The cost of building your own home (not to mention purchasing a plot for it) can put a dent in almost any budget. Therefore, in private construction, preference is often given to more economical options for materials.
The cost of modern insulation makes you think about how to save on this expense item when building a house. The simplest sawdust can be used for thermal insulation of a house, while the cost of this material will be minimal. You can purchase them at a very low price at any sawmill.
It is necessary to treat them with special compounds that can prevent this. In addition, it is also necessary to ensure their protection from rodents and fire. You can mix sawdust with clay, lime or cement. As a result, you will have insulation ready for use. It can be used to insulate roofs, floors and walls.
Process technology
Insulation of walls or ceilings is carried out approximately according to the same scheme. First, preparatory work is carried out, the surface is prepared for applying insulation. Then they proceed directly to filling the frame with clay mortar.
Surface preparation
The walls or ceiling must be covered with waterproofing material at the start. If the film does not cover the surface in a continuous piece, the material must be overlapped. This will ensure maximum density of the waterproofing film.
Wooden beams are attached every 30-40 cm. They will form a frame for filling with the mixture.
Preparation of clay solution
It all starts with a properly prepared mixture. It is this factor that is decisive. It determines the result and effectiveness of home insulation. When preparing the mixture, it is important to strictly observe the proportions. The process of preparing a solution from clay consists of two stages:
- Fill the clay with water and leave for several days. The mixture should become homogeneous and resemble the consistency of thick sour cream.
- The finished mixture of clay and water must be mixed with sawdust in the following proportion: for 1 bucket of clay, take 2.5-3 buckets of sawdust. They must be small, without large pieces. It is recommended to use sawdust from coniferous trees or oak.
The resulting mixture can be used immediately or the next day. Because clay dries slowly, the mixture can last longer.
The final stage is to apply the prepared insulation into the resulting gaps between the beams.
If small cracks appear during the application of the solution, they must be immediately moistened and rubbed with liquid clay. This thin layer can then be covered with a 5cm layer of sawdust.
After filling all the cells you need to be patient for 2-4 weeks. This is approximately how much clay is needed to completely dry and harden.
Finishing wall finishing work
After the clay mixture has completely dried, the final stages of work are carried out:
- surface plastering;
- final finishing.
The ancient method of using clay is an excellent alternative to expensive materials. It has a lot of advantages and a few minor disadvantages. You don't need to spend much time and effort once to enjoy the results of your work for many years.
Looking back into the past, we can say with confidence that the old methods of using clay in construction over the years, although losing their popularity, remain reliable, proven and safe.
Filontsev Viktor Nikolaevich
Advantages and disadvantages
In modern crisis conditions, sawdust can be an excellent alternative to expensive types of thermal insulation materials, which are presented in large quantities on the market. Insulating a new or old house, bathhouse or other outbuildings with sawdust provides a significant reduction in costs.
Despite the fact that the thermal conductivity of this material is significantly inferior to insulation materials such as mineral wool or polystyrene foam, sawdust has a large number of advantages, which include:
- maintaining an optimal level of humidity indoors throughout the year due to the fact that such material removes excess moisture accumulated in the house;
- excellent vapor permeability, which other industrially manufactured thermal insulation materials do not have;
- resistance to high humidity and condensation that appears on various surfaces due to temperature changes;
- the ability to absorb and release steam back when the air in the room is too dry.
This is a natural, environmentally friendly material that helps create a healthy environment in the home by retaining heat and regulating the level of humidity in the room. Sawdust, unlike other thermal insulation materials, does not block the process of vaporization and does not allow the creation of high humidity in the house.
This is an environmentally friendly material that creates a healthy microclimate in the house. Sawdust not only does not emit toxic substances, but creates a comfortable microclimate thanks to the phytoncides that are found in wood of various species. This natural insulation is great for allergy sufferers.
The advantage of sawdust is its low cost compared to industrial insulation. If desired, they can be removed from the sawmill or woodworking shop for free, paying only for transportation costs.
This is reliable thermal insulation that can last a long period of time if you treat the sawdust with an antiseptic before use, which will protect it from pests, rot, mold and mildew.
This is a universal insulation material that can be used to insulate an entire building. When working with sawdust, you do not need to use special tools. The material can be backfilled in any hard-to-reach places, thus providing good thermal insulation along the entire circuit.
Despite having a large number of advantages, sawdust also has a number of disadvantages:
- high degree of flammability;
- the ability to attract rodents that live in bulk dry materials;
- tendency to caking, which can result in the formation of voids in places of thermal insulation.
These disadvantages can easily turn into advantages if you treat wood shavings with fire-retardant compounds before use. To prevent sawdust from caking, they are mixed with compounds that maintain their original volume. Boric acid and slaked lime are used against rodents.
Characteristics
Modern straw building materials have the following characteristics:
- Most often this is a compressed rectangular block measuring 500x400x1000 mm;
- The weight of a dry block is 15 - 20 kg, an increase to 25 kg is permissible. Further weighting indicates excess moisture, which will negatively affect the quality of the product;
- The density of the compressed raw materials is about 120 kg/m³;
- Raw materials are treated with fire retardants, which reduce the flammability of the material, and antiseptics, which prevent rotting. Antibiotics kill microflora and fungal spores;
- Compressed and plastered straw burns worse than wood. It's really hard to light it, it just chars and sometimes smolders;
- The energy consumption of a house made of straw blocks or panels does not exceed 37 - 40 kWh/m² per year;
- The main problem with straw is rodents. To combat them, it is treated with slaked lime, and quicklime is added to the plaster solution;
- Another problem is rot and mold. To combat these enemies, antiseptics and antibiotics are used, as well as increased block density, which does not allow moisture to accumulate;
- The fragility of thatched buildings is a myth;
- Double-glazed windows are often used in combination with straw, and plastic windows are insulated using standard methods (Find out in more detail how to insulate plastic windows for the winter).
Chock: birch or coniferous
Wood in houses built using Cordwood technology ranges from 40 to 60%. The rest is the solution and insulating mixture. 30 different types of wood are used, but softwood stumps are preferred: Pacific yew, juniper, bald cypress, cedars. Chunks of Douglas fir, western larch, pine, and poplar are also suitable. You can take alder and aspen, but not birch logs! Birch logs are the most unsuitable material for such projects; all stories on the topic “I built a house from birch logs” end sadly.
Before use, firewood must rest for a year, or better yet, three, otherwise significant shrinkage is possible (up to 10 cm).
Member FORUMHOUSE Metamorphos:
– Of course, the type of wood is important. As you know, oak only gets stronger from moisture
It is important how to treat the wood: stain (to enhance the color and texture), moisture-bio-fire protection, resin-based compositions (crystallize the structure of the wood, blocking the pores), as well as various waxes and varnishes (give the wood shine and water-repellent properties). At a minimum, end machining is required.
After it, the hut will have a luster.
Well-dried wood is prepared for construction: the bark is removed from the hemp, the end edges of the firewood are sanded to smooth out burrs that will accumulate moisture.
Before you start stacking firewood (or at least its ends), it is advisable to soak it with an antiseptic or burn it with a blowtorch.
Solution for laying firewood: choosing the best
Experts give various recipes for mortar for building with firewood. Here it is: 9 parts sand, 3 parts sawdust (preferably from softwood), the same amount of building lime, 2 parts Portland cement. For external waterproofing, silicate plaster and linseed oil are used. Another recipe suggests mixing 3 parts sand, 2 parts wetted sawdust, 1 part Portland cement and 1 slaked lime.
Some builders plant firewood on a mixture of clay and sand or straw. The name of this “clay” technology is “clay mortar”.
Houses made of clay, photo. Projects in Russia.
According to FORUMHOUSE member Vatar, it is undesirable to do this:
“It was our Kulibins who began to make clay mortars, sculpt them from clay, and then scrupulously cover up the cracks every year. I know from my own experience working with clay mortar how difficult it is to choose a composition with the least amount of cracking. In addition, the clay for the solution must sit outside during the winter. Alternatively, you can experiment with the composition clay-lime-sand-sawdust, and the ratio of clay to sand should be no more than 1 to 4.
If the gazebo is made of logs and clay, processing the ends with a blowtorch will be more organic.
Gazebo made of logs and clay, processing of ends.
Sawdust with lime (or a mixture of sawdust soaked overnight with vermiculite), polyurethane foam, fiberglass, cellulose, and polystyrene are used as an insulating layer when building a block house.
Metamorphos forum user suggests this solution:
– To reduce the thermal conductivity of cement, you need to knead foam concrete (perlite concrete, expanded clay concrete, or, at worst, sawdust concrete), use various additives in the form of lime, PVA glue (this will ensure a reliable bond between the cement and the wood), and all sorts of plasticizers. It would be good to tint the concrete with pigment at the mixing stage, because the whitish-gray color does not look very good with wood. As an option, during laying, concrete is placed in the inner layer (about 15 cm), and the outer layer (the same amount) is filled with two-component polyurethane foam with a density higher than 35 kg/cub.m. This will provide the necessary strength, the absence of cracks when drying and good thermal insulation, and the yellowish color of the polyurethane foam in this case will not spoil the appearance.
Advantages and disadvantages
Minuses:
- clay is not a modern insulating material;
- labor-intensive manufacturing process;
- strict adherence to proportions during production - otherwise, the entire work will become unusable.
Pros:
- environmental friendliness of the material;
- cheapness;
- strength;
- durability;
- moisture resistance;
- good thermal insulation properties;
- ease of repair and cleaning of the premises.