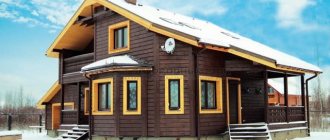
A French balcony requires a frame with floor-to-ceiling glass. If you cover the top and bottom of the extension with windows, you will get a panoramic glazing option. The visual effects of such a solution will be an increase in area and a lighter structure. Panoramic glazing looks beautiful and stylish from the inside and outside. But you cannot sacrifice comfort for the sake of aesthetic considerations. If you want to install floor-to-ceiling windows and renovate the loggia, take care of protection from the cold.
From this article you will find out whether it is possible to insulate a platform with glass across the entire wall. We will talk about the specifics of implementing such a project.
Why should you insulate a panoramic balcony?
Insulating a balcony with panoramic glazing will allow you to get additional living space that can be used at any time of the year. Here you can place a work area. If the adjacent room is a kitchen, you can organize a dining area on the loggia. The temperature on the insulated balcony will be quite comfortable even in frosty conditions, provided that the work is carried out exactly according to the technology.
The easiest way to insulate a panoramic loggia is at the design stage. In this case, preference should be given to “warm” windows. This translucent design consists of:
- Warm profile. Panoramic glazing is assembled on the basis of aluminum frames, which provide special bridges. They are inserts made of polymers with low thermal conductivity. “Warm” French windows are considered to be structures based on a plastic profile with a thickness of 80 mm or more.
- Double-glazed windows. For increased thermal insulation, special energy-saving double-glazed windows are used. Low-emissivity glass sheets are used in their production. The internal chambers are filled with argon. This not only improves energy efficiency, but also has a positive effect on sound insulation.
However, insulation of a panoramic balcony is possible even after installing the glazing. For this purpose, various thermal insulation materials and underfloor heating systems are used.
How to make a warm loggia: distinctive features
You can connect the loggia area to the living area using any of the methods discussed for insulating the balcony. Although a balcony and a loggia have similar design features, it is still much easier to insulate a loggia than a balcony, and here’s why:
- While the balcony is open and ventilated on all sides, the loggia is built into the overall facade of the building and has only one open side, unless it is located in a corner apartment. Its side walls, roof and floor are shared with other, sometimes even heated, rooms, so they are less affected by adverse weather conditions. Consequently, less effort will be required for thermal insulation;
- Directly during construction, most loggias already have a permanent brick or block parapet, which saves time and money on its construction. But even if the project provides only a light fencing structure, then, since the loggia slab is based on the main walls, there are no problems with the construction of any parapet structure, as well as with the use of any of the available insulation technologies. The owner of an apartment with a loggia will not have to think about the possible risks of its deformation from overload.
So, we are convinced that it is possible to insulate the loggia with a thinner thermal insulation layer. This means that the gain in usable area of the loggia in front of the balcony will also be noticeable.
If you like the idea of expanding your living space, don’t waste time and start implementing it. Look at the photos with design solutions to this issue - it will add enthusiasm.
https://youtube.com/watch?v=YKO00flP1tA
Choosing material
To insulate a balcony with French windows, you need to choose a thermal insulation material. In this case, it is necessary to take into account not only its ability to retain heat, but also the weight, thickness of the fabric, and the required number of layers. During insulation, the possible load on the balcony slab should not be exceeded. In addition, if the thickness of the final layer exceeds the size of the metal profile, the swing sashes of the French window will not open.
A wide range of thermal insulation materials are offered on the market. To insulate a French balcony, the following are used:
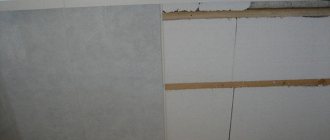
- Polystyrene foam is one of the most budget-friendly materials. Due to its low cost and light weight, it is widely in demand. It is easy to work with polystyrene foam, it has a fairly long shelf life and is resistant to impacts. Mold and fungi, easily tolerates temperature fluctuations. However, this material also has its drawbacks. Polystyrene foam sheets are fragile, as a result, the heat insulation layer must be protected with sheathing; in addition, foam plastic is “afraid” of paints and organic solvents, and is demanding on the quality of the rough surface.
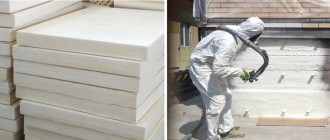
- Penoplex is a more modern insulation material. This material is made from extruded polystyrene foam. It has excellent performance characteristics: increased strength, can be used even in conditions of high humidity. Manufacturers offer it in the form of slabs of various formats.
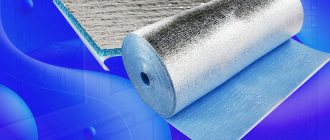
- Foil polyethylene foam. The most common products are the Penofol brand; this name has even become a household name. The material is made of polyethylene foam, the canvas is covered with a layer of aluminum foil on top. Thanks to this, it reflects heat. Penofol is sold in rolls and is easy to work with. Thin sheets of penofol (from 4 to 15 mm) are usually used in conjunction with other insulation materials.
- Mineral wool. This material is usually classified based on the raw materials that were chosen for its manufacture. Mineral wool can be glass, slag or stone. The material is distinguished by increased noise and heat insulation properties and tolerates exposure to elevated temperatures well. Nevertheless, mineral wool is often used to insulate French balconies. Condensation can form on the balcony, and mineral wool is a hygroscopic material. The result may be the appearance of mold in the apartment.
Exterior works
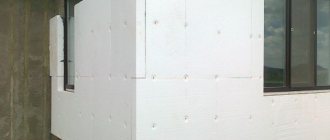
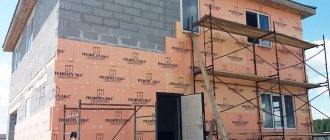
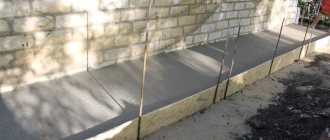
For best results, insulation from the outside is necessary. This is a very complex process that is life-threatening and impossible without special equipment and professional skills. Therefore, it is recommended to entrust this matter to specialists. You can insulate the parapet yourself. It has direct contact with the street, so the insulation must be of high quality.
The first step is to waterproof the parapet. A slab of polyethylene or roofing felt is attached to its inner surface. These panels are covered with wooden beams and secured with dowels. It is necessary to take into account the width of the balcony; the thickness of the thermal insulation layer will depend on this.
The next layer is a vapor barrier: plastic with foil glued on top, which will protect against condensation.
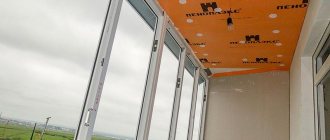
Insulation of walls and ceilings
A loggia with panoramic glazing can be translucent on only one side, the façade, or on three sides. In the first case, you will need to insulate not only the floor, ceiling, but also the side walls. This will minimize heat loss. With three-sided glazing, the insulation of a panoramic loggia will not be as effective.
To insulate the walls and ceiling of a balcony with floor-to-ceiling windows, thermal insulation material no more than 50 mm thick is used. Most often, several thin insulators are combined. The work is carried out according to the following algorithm:
- Insulation of a loggia with panoramic glazing begins with cleaning the surfaces; if there is an old finish, it is dismantled, all dust and debris are carefully removed.
- The walls and ceiling are treated with antiseptic compounds to prevent the future appearance of fungus and mold.
- The waterproofing material is laid and fixed. A sheathing is mounted on top of it. For its manufacture, experts do not recommend using a metal profile, otherwise “cold bridges” will form. It is best to use a wooden beam; dowels are used to secure it.
- Thermal insulation sheets are mounted using mounting adhesive. If the material is thin, the sheathing may not be installed, and special fasteners are used for additional fastening. The insulating sheets are laid without gaps.
- Next, wiring is laid to connect lighting points and sockets.
- After this, you can finish the loggia. For this, lining or drywall is most often used. These materials will also improve thermal insulation.
The question often arises whether it is possible to insulate a balcony with panoramic cold-type glazing. To do this, it is necessary to carefully seal and insulate all joints and seams between the French window frame, walls, and floor. Particular attention must be paid to the corners.
The main stages when installing thermal insulation from the inside
Work on insulating walls, floors and ceilings is carried out after installing new glazing. If the balcony or loggia is already covered with metal-plastic or other modern double-glazed windows, then the integrity of the layer of polyurethane foam and sealants applied during installation is checked once again.
Surface preparation
The loggia parapet is carefully inspected to identify cracks and defects. To achieve minimal heat loss, as well as protect the structure from waterlogging, it is necessary to carefully seal all cracks with polyurethane sealant or polyurethane foam.
Additionally, all seams between the parapet, walls and floor are processed. The surface of the walls bordering the street is also inspected. It is necessary to protect all structures as much as possible from moisture penetration and heat loss through cracks and defects.
Waterproofing device
After eliminating identified cracks and defects, it is necessary to protect the surfaces of the room from external moisture. To do this, the inside of the balcony or loggia is completely covered with waterproofing films. The membranes are attached with an overlap, overlapping adjacent sheets by 5 - 10 cm and gluing all seams with protective tape.
When using polyurethane foam or extruded polystyrene foam, the waterproofing layer does not need to be laid. The low permeability of the materials will not allow moisture to penetrate the body of the insulation.
Laying insulation
After preparation is completed, the walls, ceiling and floor of the loggia or balcony are covered with thermal insulation materials. Rigid slabs are attached to concrete or brickwork using disc-shaped polymer dowels. The distance between individual fasteners should not exceed 40 cm. Most often, five dowels are used for one standard plate.
The joints between the sheets are additionally insulated with toluene-free polyurethane foam. All winter versions of such materials may contain toluene, but its use is unacceptable due to the negative effect on polystyrene.
Vapor barrier device
After laying the insulation, all structures are covered with a vapor barrier. For these purposes, it is best to use special polymer membranes or foamed polyethylene. The presence of a thin layer of foil on the inner surface of the material will help create the effect of a thermos and additionally protect the room from heat loss.
The vapor barrier can be fixed using polyurethane glue. All joints are also made with an overlap of 5–10 cm and taped with waterproofing tape.
Frame installation and sheathing
After the main protective layers have been assembled, a frame is installed from wooden blocks of 40x20 mm or 50x25 mm for attaching the finishing material. Sometimes a metal profile 60x27 mm is used instead of wood.
The sheathing guides are fastened only after the elements have been leveled. For fixation, self-tapping screws are used, the length of which allows you to attach a beam or profile directly to a concrete or brick base. The location of the frame is determined based on the selected material.
So, for drywall it is better to set vertical guides, and for plastic panels - horizontal. The distance between the guides should not exceed 40 cm. After installing the frame, the walls, ceiling and floor are sheathed with the selected finishing material.
Insulating a balcony or loggia will allow you to expand the useful space of the apartment and get an excellent office or relaxation room.
Floor insulation
In order for the French balcony to be warm enough, it is necessary to take care of the floor insulation. It can be passive or active. In the first case, thermal insulation materials are laid, which reduce heat loss.
Active insulation means heating a room. Most often, a heated floor system is used for this. The fact is that moving a heating radiator or organizing a new circuit in an apartment is prohibited.
Passive floor insulation
How to insulate a balcony, or rather its floor? The work is carried out as follows:
- The old finish, if any, is cleaned from the floor surface, and all construction debris is removed.
- All existing seams and cracks are filled with sealant or polyurethane foam. To continue working, you must wait until the composition has completely dried.
- After this, a waterproofing membrane is laid. It is attached to the walls using construction tape.
- The sheathing is assembled from wooden beams. The distance between the logs should be about 500 mm. The subfloor must be level. The section of the beam is selected depending on how much the floor should rise, as well as depending on the thickness of the insulation.
- Thermal insulation material is placed between the lathing joists. It is fixed with mounting glue.
- To increase the efficiency of thermal insulation, penofol is placed on top. Its metallized layer should “look” upward.
- If you plan to install a heated floor system, it is installed at this stage.
- Fiberboard sheets are laid on top of the “warm floor”, onto which a cement screed is poured.
- A decorative covering is mounted on top. To increase thermal insulation, it is recommended to use laminate, cork or linoleum with a backing.
Active insulation
Insulating a loggia with panoramic glazing will help make the heated floor truly comfortable. An electrical or infrared system is used for this.
Both cable and film heated floors operate from the electrical network.
However, each of these technologies has its own characteristics that affect efficiency, power and service life. The main difference lies in the principle of operation of the system.
Classic electric heated floor - cable. It can be single or double core. The live wire heats up and the temperature is transferred to the sheath. The latter, in turn, heats the screed. Cable heated floors have a number of advantages:
- Price - cable flooring will cost much less.
- Simple installation procedure - special couplings are used for connection.
- For fastening, glue or screed is used.
Infrared heated floor is a special thin film. Electricity is converted into infrared radiation. It heats up the surfaces of objects.
This technology has a number of advantages:
- Heating speed - literally after turning on the system, the room becomes warmer.
- During installation, no screed is required, which means the floor does not rise as much.
- Warmth is felt when touching objects.
If we compare cable and film heated floors, the use of the latter is more economical. When the infrared system is turned off, the room cools down quickly. In the case of cable floor heating, the cement screed accumulates heat. When the power supply is turned off, it will gradually release it.
In terms of strength and durability, infrared film is preferable.
IR systems are resistant to damage and stress. While cable floors are afraid of loads. If even one section is damaged, the entire system will become unusable. If one section of the IR system is damaged, the entire remaining surface of the film will continue to work.
Electric cable heated floors are cheaper to operate.
In this case, electricity is consumed somewhat more economically. With proper installation and care, the system can last about 20 years. Infrared film flooring is an excellent option for additional heating. This solution is advantageous to use if the balcony is combined with an adjacent room.
What kind of floor insulation are you planning for yourself?
Active ("Warm floor" system)
63.64%
Passive (penoplex, polystyrene foam, mineral wool)
36.36%
Voted: 11
Step-by-step instructions for insulation
After all thermal calculations have been completed and a heating system has been selected based on heating type and power, the contractor must prepare a place for placing heating devices. The simplest option is a warm baseboard, which can be purchased complete with all the necessary equipment and does not require partial dismantling of the floor.
Skirting
Installing a warm baseboard with a factory kit is not difficult; it can be done independently by a home craftsman :
Study the manufacturer's instructions and check the equipment.- Mark the location for installing the heater.
- Install the iron base on the wall and strengthen it with self-tapping screws.
- The main heating element is placed.
- With the help of connections, a thermal circuit is assembled using special fasteners.
- Connect the input and output from the heating element to the distribution comb of the heating system.
- Turn on the pump to the heating system, open the cold coolant and check the density of the assembled thermal circuit.
- If no leaks are found, the heating element is covered with a decorative panel, after which the installation is considered complete.
When carrying out installation work, the contractor must pay attention to the length of the supply and return pipelines; if it exceeds 15 m, then several independent coolant supply circuits must be made. Otherwise, the required coolant pressure will not be created in the interpipe space of the heating element, ensuring the design circulation rate.
Slopes
This is a fairly simple construction operation that any home craftsman can perform on his own.
Technology for insulating slopes of panoramic windows:
- Thoroughly clean the working surface of the slope from debris, dust and layers of building material.
- Cracks and chips on the surface are repaired with mortar.
- Cut off protruding foam residues.
- The entire surface for insulation is primed with a deep penetration primer; it is desirable that it also has antibacterial properties.
- Penoplex is cut to the size of the slopes; for this, a sheet with a thickness of 20 mm and a density of at least 30 kg/m3 is better suited.
- The insulation is installed with special glue.
- A corner with reinforced mesh is installed in the corners for rigidity.
- After the glue has set, apply it to the outer surface and lay the façade reinforced mesh.
- Carry out external finishing.
Special glass
In order to install electrically heated glass, specialists first complete a glazing design and an electrical installation diagram.
The main stages of installing a panoramic window with electric heating:
- The window is mounted along the wall opening, while the power supply cable is carefully brought out.
- An electrical control network is installed with the installation of a thermostat.
- Connect the output of the power cable to the common heated glass control network.
- Install panoramic window frames.
- The sashes and fittings of the window system are installed.
- The window block is sealed in the wall opening.
- Check the functionality of the electric heating using a thermostat.
Fences, railings on a panoramic balcony
A balcony with panoramic windows is often uncomfortable for people who are afraid of heights. In this case, it is recommended to install railings. They can be welded or forged. The design of the structure depends on the design of the loggia and the interior.
Thus, forged metal railings look great together with classic interiors. For apartments decorated in a modern style, welded fencing made of chrome-plated stainless steel is suitable.
Let's sum it up
Owners of panoramic glazing may encounter such a problem as the openness of your private life to prying eyes. A way out of the situation can be either covering the windows with tinted or “mirror” film, or installing blinds that cover either only the lower part of the glazing, or the entire glazing from ceiling to floor. The second option is preferable, as it helps to at least partially escape the heat in the summer. After all, a fully glazed balcony is a type of greenhouse attached to the facade of a house.
Related article: Insulating the loggia ceiling with penoplex
Combining with a room or kitchen
An insulated loggia can be combined with an adjacent room. This can be a room for any purpose: kitchen, living room, bedroom or children's room. When combining a room, it is prohibited to completely demolish the wall; only the balcony block is dismantled. It is recommended to attach a loggia to the adjacent room after insulation. To carry out such work, it is necessary to obtain permission to carry out redevelopment. By the way, heating bills will increase slightly as the living space of the apartment increases.
Making an opaque bottom of the glazing
The main disadvantage of panoramic glazing is that the room adjacent to the balcony is almost completely visible. If high-rise buildings are located close to each other or the apartment is not high up, the lives of household members may be visible to neighbors. To avoid this, the bottom of French windows is made opaque.
It’s worth thinking about a solution at the design stage. If a plastic profile is used, the lower part can be made of sandwich panels. Not only do they add privacy, but they will also further increase thermal insulation. Another option is to use special glass. The canvas can be tinted, mirrored or matte. This makes it possible to maintain translucency, but at the same time provide the required level of privacy.
Insulating a balcony with French windows allows you to get additional comfortable space and increase the area of the apartment. Modern materials and technologies ensure a comfortable temperature on the balcony even in severe frosts. It is better to entrust insulation work to professionals. The final price will depend on the type of insulation, the type of French windows installed, the presence of finishing that needs to be removed, the need to install heated floors and the cost of the equipment used.
French doors
French doors (another name is a French exit to the balcony) will add brightness and lightness to the living space. Of course, any type of lighting will make the room visually wider, but natural sunlight will do the best job. Actually, this is why French exits are installed in houses.
The advantages of a French exit include:
- High light transmittance. This design not only significantly reduces energy costs, but also allows ultraviolet rays to “work” as filters.
- Elegance and style. The French exit is an original and modern interior solution that will add piquancy and elegance to even the kitchen.
- It is advantageous to install French balconies overlooking open areas, which allows you to admire the beauty of the city without worrying about polluted air and noise.
French balconies are now available for installation in all regions and even small towns. If you want to place an order from a certain master from another location, you will have to pay for delivery
It is important to remember that models presented in specialized stores often copy products, of which there are a huge number in the country. If you are looking for something exclusive for your home, one of a kind, something that cannot be found on the storefront, we recommend going directly to private companies