Thermal protection device for the base is a necessary stage in the construction of any facility for residential and industrial purposes.
Thermal insulation with polystyrene foam is an energy-saving measure. High-quality and modern thermal insulation “Penoplex” professionally protects the base and foundation from freezing.
Similarly, the energy efficiency of the building increases, which enhances the structural protection of the building, leads to careful use of energy resources and significant savings on heating costs.
We will tell you about insulating the base with Penoplex with your own hands in the article.
Do-it-yourself insulation of the foundation with penoplex.
Preparation of the work front.
To carry out the work you will need the following tools: tape measure, construction knife, hammer drill, concrete drill 200 mm long (according to the diameter of the dowel), mixer for mixing glue, wide brush, shovels, tamper.
You can calculate the number of slabs knowing the area of the insulated foundation and the area of the slab. The area of the foundation is calculated by multiplying the perimeter by the height of the foundation, and the area of the slab is 0.72 m2.
It is ideal to carry out insulation during the construction phase
But this can be done in a house that has already been built and it doesn’t matter how long the building costs
To insulate the foundation from the outside, it is necessary to dig it around the perimeter to the depth of soil freezing. This is a different indicator for each region, but usually it fluctuates in the range of 0.6 - 1.2 m, unless we are talking about the permafrost zone.
The width of the trench should allow work to be carried out on fastening slabs and applying waterproofing without being particularly crowded.
The exposed walls must be cleared of any remaining soil and roots. If the foundation wall is uneven, it is necessary to level it with cement mortar. After the leveling layer has dried, you can begin insulation.
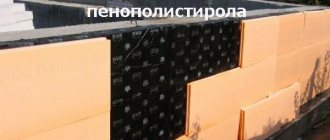
The thickness of the foundation walls in private housing construction is usually 0.4 or less than 0.6 m. To insulate such walls, 10 cm thick penoplex is used.
Installation of polystyrene foam boards.
Before installing penoplex slabs, a layer of waterproofing must be applied to the walls. This work is carried out using a wide brush and bitumen mastic. To make the work easier, you can use a ready-made bitumen primer that has the consistency of slightly thickened paint.
The primer has high adhesion to concrete surfaces and adheres well to the wall. The drying time for the primer is one day. The next day you can begin attaching the insulation.
Penoplex boards are attached to the wall using cement adhesives for fastening polystyrene foam. You need to dilute the glue according to the instructions on the package and let it sit for a while.
The slabs can be glued in both vertical and horizontal orientation. It all depends on the depth of the foundation. At a depth of 1.0 m, you can dig below the laying level in order to attach the insulation vertically without cutting off the remainder. If the depth is no more than 90 cm, then you can turn the slab in a horizontal plane, and cut the slab installed in the second row in half along the long side.
The adhesive must be applied pointwise to the slabs. A continuous layer of glue can be applied if the foundation wall is perfectly flat. After applying the glue, the insulation is pressed against the wall and left for a short time. The next slab is combined with the groove of the previous one and thus moved along the perimeter of the house. Fastening the slabs begins from the bottom. The groove in the slab gives a tight fit to each other and eliminates the appearance of gaps, cracks and cold bridges.
Then, additional fixation is performed using dowel nails
This is especially important when the insulation of the foundation is combined with the formation of the base of the house and part of the insulation extends above ground level. On each slab it is necessary to install five dowels in an “envelope” pattern - one in the center and two in the corners
Having finished fixing the slabs with dowels, some of the slabs that extend above ground level and form the base are plastered over a plaster mesh.
Preparing the walls
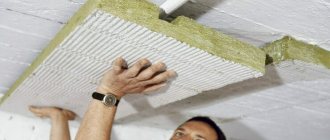
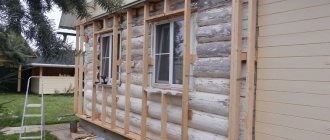
First of all, the surface is subject to revision in order to repair defects, prime and, possibly, treat the walls with fire-retardant impregnation and an agent against pathogenic microflora. To install penoplex on wooden walls, you will need to sew a sheathing of slats. It is impossible to stick EPS onto concrete or brick; insulation of a wooden house with penoplex from the outside under the siding must have vents for removing condensate. In addition, the slats must have a sliding fastening, otherwise the fasteners may break due to shrinkage processes, fluctuations in temperature or humidity of the wood.
The second step is to measure the geometry of the walls; this is necessary to determine the size of the bracket overhang in each specific case. Next, you need to make fasteners for the vertical profile, but do not cut them to size, only mark them. Trimming to size is carried out immediately before installing the penoplex on the wall.
What is penoplex?
There are a great many types of insulation. Penoplex and expanded polystyrene occupy a special place in this list.
Actually these are names of the same material. Expanded polystyrene, or to be precise, extruded polystyrene foam, is the general name for polymer insulation made from styrene. Penoplex is the brand name for expanded polystyrene.
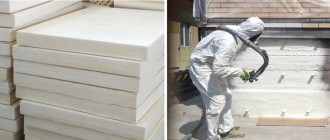
Penoplex is produced in the form of slabs with a thickness of 2 to 15 cm. Size 60x120 cm with a mounting groove on the long side.
The advantages of the material are:
- Low thermal conductivity;
- High strength (compression index – 27t/m2);
- Low water absorption coefficient;
- Durability (does not rot and decay up to 50 years);
- Resistant to temperature changes.
Penoplex has one drawback - low fire resistance.
But since the entire volume of material will be hidden underground, this indicator will not have a negative impact on the structure of the foundation. However, this should be taken into account if you want to insulate the entire house from the outside.
This material should not be used indoors either. Styrene emissions can have negative health effects.
Selecting a thermal insulator
To insulate the foundation of a house from the outside, it is important to select a material whose properties are most suitable for the building, taking into account all its features and the climatic conditions of the area. Today, the following are especially popular among many consumers:
- expanded polystyrene;
- liquid polyurethane foam;
- extruded polystyrene foam.
Expanded polystyrene
It is an improved version of polystyrene and its derivatives and is a gas-filled material. Widely used in various branches of construction and industry.
Penoplex installation
The main advantages are:
- Low degree of thermal conductivity. Allows you to keep the room warm. For example, a material 11 cm thick gives the same results as a two-meter brick wall.
- Waterproof. Moisture absorption is about 6%, which allows the material to be used in conditions of high humidity without fear of deformation.
- Long service life. Withstands up to 60 cycles of operation in temperature conditions from -40 to +40 C.
- Insensitivity to biological effects. The material is not exposed to microorganisms, mold and fungi.
- Environmental friendliness. During production, substances that are harmless to human health and the environment are used, so expanded polystyrene is also used in the food industry.
- A light weight. Thanks to it, the insulation of facades becomes labor-intensive and does not take much time.
- Heat resistance. When ignited, fire-resistant types of polystyrene foam tend to self-extinguish.
- Soundproofing properties. This is especially important for owners of houses and apartments in noisy areas. The use of 3 cm thick polystyrene foam sheets for insulation can reduce noise by 25 dB.
- Vapor tightness. The indicator depends on the density and structure of the type of polystyrene foam. Varieties with low vapor permeability are similar in this indicator to certain types of wood: pine, oak.
- Chemical resistance. The substance is not subject to the aggressive effects of ethers and alcohols, but is destroyed under the influence of solvents.
- Resistance to mechanical stress. Mechanical strength during tension is approximately 20 MPa.
- Relatively low price, which increases the availability of the material for many consumers.
Installation diagram
So, polystyrene foam is an ideal option for use for various purposes, especially for thermal insulation of the foundation.
Liquid polyurethane foam
Liquid polyurethane foam is a polymer insulation material that is widely used to obtain a uniform insulating coating.
This is one of the few materials that are simultaneously a thermal insulation, vapor barrier and waterproofing layer. They allow you to significantly save money and labor costs when performing thermal insulation work.
In the context
The advantages of liquid polyurethane foam are:
- Low degree of thermal conductivity. This allows you to significantly reduce heat loss.
- Long service life. The service life is more than 30 years.
- The ability to create a favorable microclimate in the room due to optimal thermal conductivity and sound insulation.
- Considerable strength. Due to its good density and strength, the material is able to withstand large mechanical loads without losing its performance properties.
- Absolute sealing, which is very important when performing any type of insulation work.
Liquid polyurethane foam
Thermal insulation of the foundation using liquid polymer can be carried out both from the inside and from the outside. For external use, additional protection from direct sunlight may be required.
Protection is carried out by applying liquid rubber or facade paint, which prevents the loss of waterproofing properties and increases service life.
Extruded polystyrene foam
It is a relatively young type of polymer heat insulator and is produced by foaming raw materials during the extrusion process. Due to a number of advantages, the material has won the trust of many consumers and today is widely used in various fields of construction.
Formwork for blind area
The advantages of the material are:
- low water permeability;
- low thermal conductivity;
- resistance to mechanical loads;
- resistance to chemical attack from inorganic solvents;
- ability to withstand a wide range of temperature changes: from -50 to +75 C;
- long service life;
- a light weight.
Installation drawing
Extruded polystyrene foam is widely used for internal and external insulation of buildings, roofs, is an integral part of sandwich panels, etc. One of the most common varieties is penoplex.
Insulating the foundation from the outside with penoplex is relevant and popular due to its excellent performance qualities. Such slabs have increased strength and can withstand enormous loads, providing excellent waterproofing and drainage of groundwater.
Finishing
Do-it-yourself thermal insulation of the foundation with penoplex allows you to solve several problems related to the construction of the foundation and equipment of the basement.
Sequence of activities
Controversial issues have been resolved - it’s time to get to work. The first step is to prepare the object, namely: concrete structures that will be subject to finishing measures must be freed from soil.
The technology for insulating the base with penoplex is similar to the sequence of work using polystyrene foam. There are some deviations towards complicating the process.
Excavation
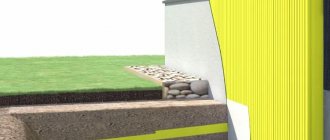
A trench is dug around the house, sometimes reaching the bottom of the foundation. For a shallowly buried tape this is justified. Deeply lying belts that go below the soil freezing level do not require such drastic measures. It is enough to open the concrete below the soil surface by 25-60 cm.
Concrete structures are freed from soil, leveled, and allowed to dry. Then they are cleaned of dust and treated with a deep penetration primer. Irregularities with height differences of 2.5 cm or more require leveling with mortar. The base walls are plastered, rubbed, and left to dry. The presence of significant protrusions and depressions makes it necessary to perform priming several times.
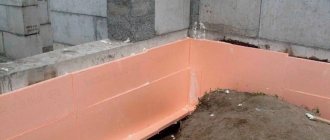
Waterproofing of concrete structures
The next step is waterproofing. It is done in two layers. Bituminous mastic is applied first. It can be purchased ready-made at retail outlets. If you have a dry bitumen block, then by heating it, then mixing it with used motor oil, you obtain a suspension suitable for waterproofing a concrete base. A layer of 2-4 millimeters is applied to the concrete.
Next, Technonikol sheets are laid. Heat the film with a gas burner, stick it on, smoothing it out and squeezing out air bubbles from under it. The sheets are applied with an overlap of 10 cm, the joints are coated with mastic.
From this point on, the technology for performing work proceeds in two ways: from the soil level - up and down. The underground part of the base is insulated with bedding, the above-ground part with penoplex.
Drainage arrangement
Foundation drainage
For houses with a large roof area, there is a need to lay drainage and drainage (blind area) around the perimeter of the foundation. Geotextiles are laid into the existing trench. Its edges are brought to the surface of the soil. Pipes with holes (drainage) are laid on top of the canvas. They are then connected to the storm sewer system. The pipes are covered with a layer of crushed stone 10 cm thick and the whole thing is wrapped in geotextiles. The trench is filled with expanded clay backfill. The slope of the pipes must be at least 3 degrees. The structure of the backfill promotes intensive outflow of water, and also serves as an insulating layer to protect concrete from freezing and damage from frost heaving of the soil.
Installation of EPS
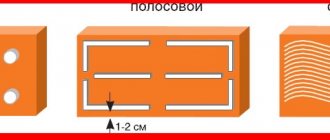
Mark the level of the bottom row of insulation. Using pre-prepared dowels and screws, the start profile is attached, on which the penoplex will rest. A special adhesive is applied along the perimeter of the slabs. In the middle, add a few dots of glue. The mortar on the slab, after pressing it against the wall, should occupy at least 40% of the surface area.
The EPS is placed in the profile and pressed against the wall. The slabs are placed so that the protruding parts of the selected quarter are on the side of the foundation. In this case, water will not have a chance to get under the insulation. The adhesive composition is also applied to the ends of the slabs. This will ensure their gluing together and the formation of a monolithic ring around the entire base.
The front surface of the EPS is again coated with an adhesive composition. It is recommended to secure the above-ground part of the insulation with special plastic mushrooms. Each plate should be secured with five clamps: in the corners and in the center. A perforated metal corner is fixed along the upper edge of the insulating layer, protecting the penoplex board from damage. A reinforcing mesh is applied. Use a spatula to embed it into the adhesive.
Watch the video: using extruded polystyrene foam
Laying the blind area
Depending on the size of the roof canopy, a warm blind area is installed. Based on a depth of 30 cm, a 10 cm layer of sand is poured. It is compacted, covered with waterproofing, on top of which a layer of penoplex is placed. This entire sandwich is filled with cement mortar. The resulting concrete screed should have a reverse slope in order to drain water away from the house. The width of the blind area should exceed the overhang of the canopy by 50%.
Cladding the base with stone over polystyrene foam. The procedure for finishing the base
Let us remind you that you can start facing with stone only when the surface of the base is properly prepared and leveled. The order in which the stone is laid differs depending on the format. For example, working with stone tiles follows the following algorithm:
- The first bottom row is laid out immediately entirely along the mooring cord or, if possible, along a pre-screwed starting profile UD-28.
- The degree of indentation of the tile is normalized by the top edge and the even back edge.
- When the first row has met the glue setting time (about an hour), the cladding is continued. The second row begins with a trim, providing an offset by a third of the length of the tile.
- A wiping layer of glue is applied to an area of 0.5–0.7 m2 under a 6–8 mm comb, the strips are oriented vertically.
- Before laying, glue is applied to the back side of the tiles in the opposite direction using a comb of the same size.
- When using jointing strips, they are pressed into the rubbing layer flush with the back surface of the tile, while the vertical direction of the strips does not allow excess to be squeezed out.
- Vertical seams in one row are formed using short pieces of jointing strip, which are then removed.
- After finishing the cladding, the seams between the tiles are filled with glue from a plastic bag with a cut corner and embroidered with a knife of the appropriate width with a semicircular profile. Only the seams in which the jointing strips are inserted remain without jointing; in this case, the vertical seams are unstitched by pressing the knife first against the top rail, then to the bottom, so that the jointing profile converges in the middle with a small convexity.
Nuances that should be taken into account when insulating the base
Upon completion of the work, the trench is buried with the same soil or it will be replaced with expanded clay and sand, which improve thermal insulation.
and at a depth of about 30 cm from the top of the trench, a ten-meter layer of sand is poured and compacted tightly. After this, roofing material is laid, the width of which is slightly greater than the width of the dug trench, and its joints are coated with bitumen.
When the bitumen has hardened, penoplex is glued to the bottom of the trench on top of the roofing felt with acrylic glue, its joints are coated with polyurethane foam or the same glue. After the glue has dried, you should make a concrete screed with a slope away from the base, which will allow excess moisture to be drained away from the house.
The final finishing of the base can be done from clinker tiles, stone or using other materials. Insulating the foundation base helps reduce heat loss by more than 20%. Carrying out the work also protects the base from mechanical damage, protects against the formation of cracks and mold, and the development of fungus.
If external thermal insulation is not done, the service life of the foundation is significantly reduced due to the fact that it is exposed to harmful factors - frost, moisture. You can carry out external insulation of the foundation plinth with your own hands; for this you should purchase materials and carefully study the technology for carrying out the work.
For a master class on insulating the foundation base from the outside, watch the video step by step:
Which material to choose?
The main requirement is this: the material for insulating the base must be waterproof. Among the main aggressors attacking the basement are melt and groundwater, and it should not allow them to pass through.
Various non-waterproof materials are also used, but with additional protection. For example, some use mineral wool with a sheet of polyethylene, reinforced mesh and plastered on the outside. This is quite difficult to implement, so it is preferable to use another solution, such as, say, insulating the base with foam plastic.
Foam plastics are inexpensive, versatile materials. Among their various brands, penoplex is especially popular for insulating bases. This is a polystyrene-based foam; Penoplex insulation is easy to install with your own hands, and it can be used for a long time. Penoplex is not fragile, unlike other foam plastics, and “lives” for at least half a century.
Advantages and disadvantages of insulating the base with penoplex
The main advantages of penoplex include the following:
- High density, thanks to manufacturing technology (20-22 t/m2);
- Low moisture permeability;
- When burning, it does not emit harmful chemical compounds;
- Relatively low price;
- Light weight of a structure made from this insulation, which does not carry additional load on the walls, foundation, and basement of buildings;
- Long service life (up to 50 years).
The disadvantages of penoplex include:
- Low vapor permeability (steam does not pass through, but is blocked);
- Combustion class G3 - the material melts and burns;
- Like polystyrene foam, it attracts rodents.
Insulating the foundation with penoplex from the outside
The width of the foundation should be sufficient for ease of work.
The excavated soil should also not create obstacles to work or movement on the site. It is better to immediately determine most of it. Take it to the garden or off site.
Construction of a foundation drainage system. If the groundwater level is high or the drainage from the roof of the building is improperly organized, water collects below and seeps to the foundation. As a result, he suffers significant damage. To avoid this, you need to build drainage for the foundation. Its installation will not take much time, especially since the trench for insulation has already been dug.
How to make foundation drainage:
- dig a trench;
- the bottom of the trench should have a slope of 5-6°;
- the bottom is covered with gravel. Layer thickness 70-100 mm;
- geotexile is laid on the gravel, in which the drainage pipe is wrapped;
- The structure is covered with gravel from above.
Now you can continue work on insulating the foundation yourself with penoplex.
Dry the foundation surface well. It is easier to remove all excess from a dry surface.
Eliminate foundation defects. Over time, the foundation could become deformed. The presence of cracks is highly undesirable. Therefore, the cracks need to be widened and treated with a primer. When the primer dries, seal the gap with sand-cement mortar. It is worth noting that it is better to level out all deep recesses or depressions. Otherwise, an air gap will appear at the junction of the sheet and the surface. In itself, it does not pose any threat. But if water gets into it, then the surface of the foundation will gradually collapse.
Treat the foundation with bitumen mastic. In this way, reliable waterproofing is created, because the foundation is the part of the house that comes into most contact with moisture.
Break off the foundation level. You will use this upper edge as a guide when installing the insulation.
Attaching penoplex to the foundation. After the waterproofing layer has dried properly, you can begin installing the penoplex. The sheet is attached to the solution using the “blot” method or with a notched trowel over all surfaces. Many people use foam adhesive. Next, it is installed in place and pressed tightly for better adhesion to the surface. The presence of a tongue-and-groove system simplifies installation.
Attach the penoplex with umbrella dowels. This stage is performed only if it is planned to insulate the foundation and basement of the house at the same time.
Installation of mesh for insulation (protection of foundation insulation from rodents). A reinforcing polymer or metal mesh of fine weaving is used. The metal one is more difficult to fix, but this is the only way to protect the house from rodents. Polymer is easier to work with. To attach it, you need to apply a strip of glue on the top of the sheet and attach the mesh. Next, use a spatula to pull the adhesive mixture down. When leveled, it will hide the mesh.
Finishing the insulated surface with glue or plaster. It is better to apply the glue in two thin layers rather than one thick one. Firstly, this will make the layers dry faster. Secondly, the penoplex will be protected from mechanical damage when backfilling the soil.
Fill the trench with the excavated soil. But it is better to use expanded clay. It will serve as an additional heat insulator.
What is extruded polystyrene foam
Not everyone clearly understands what polystyrene foam actually is. In general, this is nothing more than ordinary and well-known foam plastic, used in everyday practice, mainly for packaging fragile items. This is a durable, lightweight, heat-saving, biodegradable and almost insoluble material obtained by filling styrene granules with gas and then heating them.
When exposed to temperature, the granules “swell” until they occupy the entire volume available to them and sinter together.
Extruded or extruded polystyrene foam is distinguished by a special manufacturing technology. For ordinary polystyrene foam, polystyrene granules are simply heated with water vapor, while to obtain EPS, several processes are used at once: the granules are mixed and heated, a foaming agent is introduced, and then extruded under high pressure, i.e. pushed through the molding hole.
This technology provides greater uniformity and, therefore, greater strength of EPS compared to foam plastic.
How to finish a base on top of penoplex?
So, the penoplex is installed, but the base of your house is ugly, it has acquired the characteristic appearance of an orange inflatable boat! How to fix it? To do this, firstly, you need to apply plaster over the penoplex.
Well, now, on top of the primer, you can install the selected finishing material. There is no limit to imagination here. You can decorate the base with natural wild stone to create the impression of “my home, my fortress.” You can use a brick finish. There are ceramic tiles of various types and textures, and there are decorative plasters - the so-called textured ones.
Having finished finishing, you can rejoice: you have significantly increased the thermal insulation properties of your home.
The final stage of insulation of the basement part of the foundation
There is one important point here. The walls of the house should always be slightly wider than the basement. Otherwise, water will flow from them into the cracks, which will cause not only excessive moisture in the structure, but also a breakdown in strength.
Types of base
If a mistake was made during the design or construction of the house and the base part of the foundation is wider than the wall, then additional measures will have to be taken to drain rainwater. The easiest way is to use metal canopies around the entire perimeter of the base.
Protection of the base from precipitation
Flashings for the foundation plinth
If the excess thickness is insignificant, then it is eliminated after insulation of the facade walls. And in the vast majority of cases they will have to be insulated; these are today’s state requirements for the thermal protection of buildings. And not only public, but also private houses. Building a residential building without a project is prohibited by regulations, and no one will sign the project if the latest building codes and regulations are not followed.
As for the use of dowels to fix the insulation on the base part, there are two opinions among professionals.
Dowels for thermal insulation
First, if you wish, you can drill holes and use special dowels with large heads. The practical effect in terms of the strength of the insulation will be insignificant, but it will take a lot of time and labor
We don't even take into account the cost of materials
Second. Carefully fix all slabs protruding above the ground. If in the lower part air pockets are allowed between the slabs and foundations, then on the base part the fit should only be continuous. Is the concrete surface on the plinth too uneven? You will have to carefully scrape off all the protrusions or pre-plaster them.
Insulation of the foundation from the outside with polystyrene foam
Carrying out installation work on insulating the foundation with foam plastic is not difficult. Insulation should be applied to the waterproofing. Insulation of a strip foundation with polystyrene foam is carried out as follows:
- the wall is treated with a heat-insulating coating;
- the surface of the wall is covered with a waterproofing layer;
- measurements are taken of the freezing depth, to which 5-10 cm is added;
- the container (bucket) is filled 1/4 with water and foam glue is added;
- the composition is thoroughly mixed with a mixer until the consistency of thick sour cream;
- glue is applied to the foam sheet in several places and leveled using a notched trowel;
- the insulation sheet is pressed tightly against the foundation wall;
- the subsequent sheet is inserted into the lock of the previous one, if provided;
- the sheet is glued to the wall by pressing the material;
- the foam is covered with a PVC membrane;
- the dug trench is filled with sand.
All steps to insulate the foundation with foam plastic are not complicated. At the same time, experts do not recommend nailing the insulation to the foundation wall with nails, since you can break through the waterproofing.
How to insulate a foundation with your own hands
We clean the surface from dirt and construction surplus. We use an iron and coarse synthetic brush;
We level the walls if the difference is more than 10 mm. To do this, we use beacons fixed at intervals of 1-1.5 m and cement mortar. If the difference between the foundation walls is more than 25 mm, reinforcement is made using a chain-link mesh and the solution is applied over it.
We apply waterproofing. The simplest and most affordable option is liquid bitumen. It is rolled out hot with a roller. Not very comfortable. A dirty process and also harmful. A respirator and protective clothing (which you don’t mind throwing away) are required. Usually bitumen is heated in iron barrels, mixed with used machine oil in the proportion: 30 liters per 100 kg of bitumen. Oil is needed to increase the plasticity of waterproofing in severe frosts. The coating is applied inside and outside, both outside and on the base part of the foundation. Layer 2-4 mm.
“Be careful to apply it evenly over the entire area.” For information: Special waterproofing is also sold, including in the form of bitumen mastic and built-up rolls
I won't talk about her. But if anyone is interested, follow the links. There are instructions and detailed descriptions...
For information: Special waterproofing is also sold, including in the form of bitumen mastic and built-up rolls. I won't talk about her. But if anyone is interested, follow the links. There are instructions and detailed descriptions...
The insulation is fastened by gluing it to the waterproofing (applied to the base of the foundation) and using dowels. The adhesive composition can be found specially designed. It comes in the form of a dry mixture (which must be diluted) or ready-made. Some of them are pictured.
Applying glue to the surface of the sheet is done approximately as shown in the figure below:
After which the slab is pressed against the foundation 2 cm from the intended placement location and, with pressure, moves in the desired direction (this ensures uniform “flattening” of the glue). The connection of the plates is done using the tongue-and-groove method. The gap is covered with acrylic-based glue. If your penoplex does not have such a connection, then the correct solution would be to lay the sheets in a staggered pattern with an offset. To do this, take a heat-insulating board that is twice as thin as required (that is, instead of one sheet of 100 mm, we take two of 50 mm each). Lay accordingly in two layers, with a slight offset to cover the joints of the first layer.
After the glue has dried, you can begin to thoroughly fasten it with umbrella dowels. The dimensions of the dowels are selected based on the thickness of the penoplex. For example, for a slab with a thickness of 50 mm, a dowel with a length of 120 mm and a diameter of 8-10 mm is needed. One sheet requires 5-6 dowels, and at the corners of the house - 6-8 pieces.
A hammer drill is used for drilling. Operating mode for concrete – drilling with impact function. For the above dowel sizes, you will need an SDS/plus type drill, 160 mm long.
“All excess penoplex protruding beyond the foundation is cut off with a hacksaw.”
After completing the installation, you need to cover the places where the dowels fit with acrylic glue. By the way, you can read about all the ways to attach polystyrene foam to the wall in this article - link.
Penoplex protection. Now we need to protect the slabs from direct mechanical and atmospheric influences. We do reinforcement. We use fiberglass mesh for facade work. Using a spatula, apply a layer of wet plaster, into which we “sink” the mesh with an overlap of 10 cm.
“To reduce the number of seams, place the mesh horizontally relative to the foundation.”
After gluing the mesh, wait until it dries completely and apply a second (leveling) layer. Perforated metal corners are used to fasten the corners. After the second layer has dried, we clean the surface using sandpaper.
All. All that remains is to apply a protective and decorative coating. Here the choice is yours (siding, facade panels, block house, facade plaster, etc.).
Another important point is the insulation of the area adjacent to the vertical foundation. That is, horizontal insulation.
Constructive decisions:
Insulation of the basement from the outside
1. Applying plaster composition over a metal mesh
- building wall
- Basement ceiling
- Cutting from mineral wool slabs
- Cement-sand plaster on metal mesh
- Basement wall
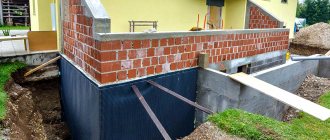
- Blind area
- PENOPLEX FOUNDATION® insulation
- Waterproofing
- Foundation
2. Cladding with clinker tiles
- building wall
- Basement ceiling
- Cutting from mineral wool slabs
- Clinker tiles
- Basement wall
- Blind area
- PENOPLEX FOUNDATION® insulation
- Waterproofing
- Foundation
3. “Heavy” cladding (natural/artificial stone)
- building wall
- Basement ceiling
- Cutting from mineral wool slabs
- A natural stone
- Basement wall
- Blind area
- PENOPLEX FOUNDATION® insulation
- Waterproofing
- Foundation
4. Facing with facade panels (basement siding, block house)
- building wall
- Basement ceiling
- Cutting from mineral wool slabs
- Plinth panel
- Basement wall
- Blind area
- PENOPLEX FOUNDATION®
- Waterproofing
- Foundation
Insulation of the basement floor from the inside
- building wall
- Plaster on metal mesh
- Basement ceiling
- Cutting from mineral wool slabs
- Facing tiles
- Blind area
- PENOPLEX COMFORT®
- Basement wall
- Waterproofing
Table No. 2 “Required thickness of PENOPLEX for insulation of basement floors, including those located below ground level”
Extruded polystyrene (Penoplex)
Extruded polystyrene foam in our country is better known under the brand name “Penoplex”. Expanded polystyrene, or more precisely, its extruded variety, is the general name for a polymer insulation material produced on the basis of styrene. Penoplex is the brand name. Thermal insulation is produced in the form of sheets or plates, the thickness of which can vary from 2 to 15 centimeters. The sheet size is 60*120 centimeters; there is a special groove along its long side to facilitate installation.
The advantages of this material include:
low thermal conductivity coefficient;
high level of strength compared to brittle foam;
low moisture absorption rates by the material;
long service life due to resistance to destruction and rotting - up to 50 years;
good resistance to temperature fluctuations.
Penoplex has only one main drawback - its increased flammability. Since during external insulation of the foundation the bulk of the material will be below ground level, this nuance will not have a negative impact on the structural parts of the foundation. However, if you decide to insulate the entire building from the facade with this material, this point should be taken into account.
Requirements for insulation
To obtain a high-quality result, it is not enough just to carry out all activities professionally.
It is quite difficult to choose insulation that is optimally suited for a specific purpose, both in quality and financially. After all, today you can find many options for insulation in different price categories and from different manufacturers.
Do-it-yourself installation of extruded polystyrene foam on a plinth
Therefore, when choosing, you should pay special attention to the following qualities of the material:
- Low hygroscopicity. This parameter is very important, as it determines the degree of moisture absorption. At a high rate, the material will absorb moisture and as a result will collapse, which will lead to the destruction of the base itself.
- High strength. The thermal insulator must withstand heavy loads of underground compressive forces. For example, the impact of soil, which increases in volume when frozen.
- Low thermal conductivity. The thermal insulator must have a reduced thermal conductivity coefficient to ensure good thermal insulation.
- Long service life. The thermal insulator should have approximately the same service life as the building, because replacing it is a rather labor-intensive process.
Taking into account all these requirements, you can choose the most suitable material for insulating the outside of your house with your own hands.
Coating waterproofing and penoplex
Important points of thermal insulation
External basement insulation First of all, when building a house, you need to decide whether the house will have a basement or not. In the case of a house with a basement that will be used as a living space, there is a need to insulate it to prevent heat from escaping through its walls. In this case, the total heat loss can reach up to 15% of the heat loss of the entire building. To reduce the cost of insulation work and to avoid errors associated with the installation of insulation, it is necessary to solve many factors at the design stage.
It is worth paying attention to:
- functional purpose of the basement;
- original building materials used to construct the walls;
- climatic zone of residence.
Do-it-yourself technology for insulating the foundation plinth from the outside with penoplex
Before you begin installing the insulation after the initial preparation of the base, you should apply a waterproofing material.
The most commonly used is bitumen mastic, which is characterized by its low cost and ease of use.
The mastic is applied to the entire area of the base with a brush and left until completely dry. It is not recommended to preheat the material and glue penoplex directly onto it - this design will not last long.
Do not dilute the mastic with acetone or gasoline, since these solvents will destroy the penoplex by reacting with it. Mastic can be purchased in a ready-to-use form or made independently by melting the bitumen in a container and mixing it with used machine oil in a ratio of 1:3, which will give the material greater elasticity and the mastic will not crack even in severe frosts.
It should be applied in a layer 3-5 mm thick. After application, you must wait until it dries completely. The next stage is gluing sheets of waterproofing, for example TechnoNIKOL, carried out using gas burners, which should be kept at a distance of at least 20 cm from the surface to be treated so as not to damage the material.
Preparatory work
Having analyzed the advantages and disadvantages, we will consider the stages of preparatory work for external insulation:
- The soil around the house is selected, the depth of which should be equal to the depth of the foundation. Next, for ease of installation, a trench about a meter wide is dug.
- The base is cleaned of dust and dirt.
- If necessary, the surface of the base is leveled using a cement mixture.
- Next, waterproofing is performed with roofing felt. However, you can get by with a less expensive method, namely, priming with bitumen mastic. The mastic is applied in 2 layers, with the second layer applied only after the first has completely hardened.
Keep in mind: a more reliable option would be to use deep penetration waterproofing, such as Penetron.
Do-it-yourself insulation of the foundation with penoplex.
Preparation of the work front.
To carry out the work you will need the following tools: tape measure, construction knife, hammer drill, concrete drill 200 mm long (according to the diameter of the dowel), mixer for mixing glue, wide brush, shovels, tamper.
You can calculate the number of slabs knowing the area of the insulated foundation and the area of the slab. The area of the foundation is calculated by multiplying the perimeter by the height of the foundation, and the area of the slab is 0.72 m2.
It is ideal to carry out insulation during the construction phase
But this can be done in a house that has already been built and it doesn’t matter how long the building costs
To insulate the foundation from the outside, it is necessary to dig it around the perimeter to the depth of soil freezing. This is a different indicator for each region, but usually it fluctuates in the range of 0.6 - 1.2 m, unless we are talking about the permafrost zone.
The width of the trench should allow work to be carried out on fastening slabs and applying waterproofing without being particularly crowded.
The exposed walls must be cleared of any remaining soil and roots. If the foundation wall is uneven, it is necessary to level it with cement mortar. After the leveling layer has dried, you can begin insulation.
The thickness of the foundation walls in private housing construction is usually 0.4 or less than 0.6 m. To insulate such walls, 10 cm thick penoplex is used.
Installation of polystyrene foam boards.
Before installing penoplex slabs, a layer of waterproofing must be applied to the walls. This work is carried out using a wide brush and bitumen mastic. To make the work easier, you can use a ready-made bitumen primer that has the consistency of slightly thickened paint.
The primer has high adhesion to concrete surfaces and adheres well to the wall. The drying time for the primer is one day. The next day you can begin attaching the insulation.
Penoplex boards are attached to the wall using cement adhesives for fastening polystyrene foam. You need to dilute the glue according to the instructions on the package and let it sit for a while.
The slabs can be glued in both vertical and horizontal orientation. It all depends on the depth of the foundation. At a depth of 1.0 m, you can dig below the laying level in order to attach the insulation vertically without cutting off the remainder. If the depth is no more than 90 cm, then you can turn the slab in a horizontal plane, and cut the slab installed in the second row in half along the long side.
The adhesive must be applied pointwise to the slabs. A continuous layer of glue can be applied if the foundation wall is perfectly flat. After applying the glue, the insulation is pressed against the wall and left for a short time. The next slab is combined with the groove of the previous one and thus moved along the perimeter of the house. Fastening the slabs begins from the bottom. The groove in the slab gives a tight fit to each other and eliminates the appearance of gaps, cracks and cold bridges.
Then, additional fixation is performed using dowel nails
This is especially important when the insulation of the foundation is combined with the formation of the base of the house and part of the insulation extends above ground level. On each slab it is necessary to install five dowels in an “envelope” pattern - one in the center and two in the corners
Having finished fixing the slabs with dowels, some of the slabs that extend above ground level and form the base are plastered over a plaster mesh.
Features of different types of profile mounting
The simplest option for installing a load-bearing frame involves using long self-tapping screws with a plug driven into the wall 5-7 cm as support. This method can only be used for absolutely smooth and flat walls and in the absence of separate finishing of the basement of the building. That is, the metal wall profile must be installed vertically on top of the penoplex, from the top to the foundation. The method is suitable for small one-story brick rooms. The advantage of this method of installing a frame for siding is the minimum pressure of the plug with a self-tapping screw on the foam board. A significant disadvantage of the installation technique is the inability to regulate the extension of fasteners in the horizontal direction.
To insulate a frame house with polystyrene foam from the outside under the siding, strip hangers are most often used, sewn directly onto the wall with ordinary wood screws. Since the weight of vertical profiles turns out to be quite large, it is best to choose suspensions with stiffeners. To remove the petals, a square-shaped hole is cut out of the foam, after which the cork is glued back onto the mounting foam. Thanks to the perforations on the bent parts, you can easily adjust the vertical position of the profile and secure it to the tape with metal screws.
For buildings with weak walls, it is best to use specialized fasteners. For example, to insulate a house made of aerated concrete with penoplex for siding, you will need to make or buy specialized brackets with a heel length of at least 10 cm.
For your information! It is often necessary to insulate a small frame room, such as an enclosed veranda or terrace, built from lumber or plywood. In this case, wooden blocks can be used as brackets; they are fastened with self-tapping screws along the installation lines of the metal profile.