To insulate a balcony yourself, you do not need to be an experienced builder. The technology itself is quite simple; if you follow all the steps of the step-by-step instructions, you can easily insulate your balcony with your own hands.
We will use penoplex as insulation - a lightweight, durable, environmentally friendly material that effectively retains heat in the room. By following our step-by-step instructions, you will clearly understand how to properly insulate a balcony from the inside with your own hands.
Advantages of penoplex:
Retains properties for at least 50 years.
The insulation is lightweight, which is very important for insulating balconies and loggias.
The high strength of penoplex is also suitable for floor insulation.
Environmentally friendly material that does not release hazardous chemical elements into the air.
It’s so easy to work with it that even an inexperienced craftsman can insulate a balcony with penoplex.
Before you start insulating a balcony with penoplex with your own hands, you need to calculate the volume of material for its insulation and prepare the tools.
How to calculate the thickness of the insulation layer
To insulate a balcony, it is advisable to use slabs 3-5 cm thick. Walls in contact with the living space are usually not insulated. Another condition when choosing the thickness of the insulation is how exactly the room will be used in the future. If you decide to attach a balcony, then you should definitely choose a thickness of 5 cm.
Why is slab reinforcement necessary?
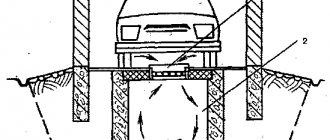
A balcony is not a loggia - it is a cantilever structure. The balcony slab can be fixed as follows:
- on protruding beams;
- to a separate supporting structure attached to the facade;
- with the edge pinched in the facade of the house.
Even if the house design provides for a large margin of safety, the weight of window blocks, insulation materials, external and internal cladding will significantly increase the load on the slab. Half of the additional load will fall on the edge of the balcony, and this is already a lever that will work to break.
There is also the factor of material fatigue. When insulating a balcony with penoplex is carried out in an old house, the slab must be reinforced.
Required materials and tools
We will need foam sheets , their quantity is calculated using the following method. The area of one sheet is 0.72 m2. We calculate the area of the walls that require insulation and divide them by 0.72 and round them. This is how we get the number of sheets needed to insulate the room.
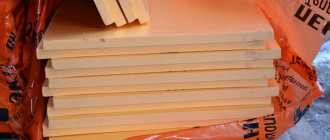
Penoplex slabs (sheets). For insulation I use the “COMFORT” marking
We also need wooden blocks to make the sheathing. The cross-section of the bars should be exactly the same as the thickness of the penoplex. Bars 3 meters long are available for sale.
Wooden blocks for insulation are used with a section of 3x3 or 5x5 cm
Foil penofol (foiled polyethylene foam) - performs the function of vapor barrier. Temperature changes between the cold walls and the warm air of the balcony lead to the appearance of condensation in the form of moisture. Which leads to the appearance of fungus and mold. Penofol serves as a vapor barrier, preventing the formation of condensation and mold.
Foil penofol
Dowel nails , for fastening the sheathing. For bars with a cross-section of 5x5, a dowel 10-12 cm long is suitable, for a cross-section of 3x3 cm, 8 cm. For a standard balcony you will need 70-100 pieces
Wood screws 3.5x35 or 3.5x45 mm. It will take about 100-200 pieces
Polyurethane foam - for sealing gaps between sheets of insulation and sheathing. 2-3 cans of foam are quite enough.
Construction tape
Moisture-resistant plasterboard - 12 mm thick. The area of a standard sheet is 3 m2, we divide the area of the insulated walls by 3, we get the number of sheets we need.
Among the tools we will need: Hammer drill (you will need a drill with a diameter of 8 mm) Screwdriver Utility knife for cutting insulation Jigsaw or hacksaw for cutting bars Tape measure Pencil or marker Hammer Construction stapler - for fixing penofol
The technology for insulating a loggia with your own hands is no different from insulating a balcony. Below I will give a couple of tips on how to understand which walls should be insulated and which should not!
Now you can start insulating!
Advice from professionals
In order for the insulation to truly fulfill its purpose, you must follow the following expert advice:
- For those living on the upper floors, special attention must be paid to ceiling insulation. Since there is no slab on top, all the heat can escape through the roof. Therefore, it is very important to inspect the balcony canopy, eliminate all defects, and only then proceed with the installation of insulation.
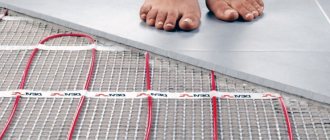
- In order for the waterproofing layer to last for a long period, it is recommended to give preference to penofol. It retains moisture well and has excellent soundproofing qualities. If a heated floor system is used for the floor, a layer of penofol must be placed under the heating elements. This will protect it from damage.
- For the ceiling, you can use self-tapping screws with hats in the shape of umbrellas. They do not destroy the insulation and can be used for further installation of the cladding.
- In order for the insulation layer to last for a long period, you do not need to ignore waterproofing. Moisture protection maintains thermal insulation and reduces the risk of unpleasant odors.
- Before installing insulation, you must carefully consider and remove all sockets. Since after installing the insulating layer, it will be difficult to carry out such work.
If it is necessary to combine insulation materials, preference should be given to materials with the same density. Otherwise, the thermal insulation properties will not be performed properly.
The small size of residential premises is increasingly leading to the fact that many property owners are beginning to equip balconies and loggias. In order for the room to be warm, it is necessary to carry out all the insulation work. Most often, penoplex is used for such purposes, since the insulation does not burn and retains its thermal insulation properties well. However, in order for the insulation to last for a long period, you should follow all the advice not only on the choice of material, but also on its installation.
Assembling the sheathing
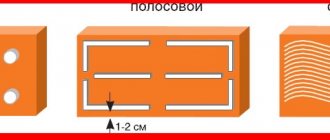
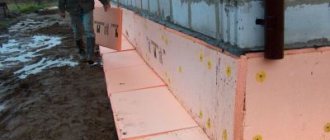
First, we fasten the beam under the window sill, leaving a gap of 1-1.5 cm at the top. We cut the beam 1.5-2 cm shorter than the length of the parapet, place the beam against the wall and drill holes with a diameter of 8 mm with a hammer drill for dowel nails in increments of 50-70 cm.
Having previously unscrewed the nails, we hammer the dowels into the timber so that they fit into the holes in the wall. We tighten the nails with a screwdriver. The beam is fixed.
We fasten the lower beam in the same way, retreating from the floor by 1-2 cm.
After we have secured the upper and lower beams, we proceed to fastening the cross beams using the same method. The distance between the transverse bars should be 60 cm. If the balcony is often exposed to wind loads, reduce the step of fastening the transverse bars to 40 cm.
Every 2.5 meters, two beams are attached in a row (see the picture below!) This is done so that we can then attach a sheet of drywall to them!
After all the cross bars are secured, we move on to the side walls of the balcony. How to understand which walls to insulate and which not? Everything is very simple, if the wall is load-bearing, it does not need to be insulated. But to achieve an ideal result, you will have to insulate both side walls, the ceiling and the floor. The wall adjacent to the room is usually not insulated. That's what we'll do!
Thermal resistance standards
It has already been written above what indicators make up the standards for thermal resistance. It should be remembered that thermal conductivity is how well a material conducts heat, and thermal resistance is how well it retains heat. Therefore, when choosing wall materials and insulation, you should choose those that have a high coefficient of thermal resistance.
The thermal resistance coefficient of the wall is calculated using the formula:
R (thermal resistance of the wall) = thickness in meters / thermal conductivity coefficient of the material in W/(m·ºС).
This coefficient does not have to be calculated independently, since there are ready-made tables that indicate the required thermal resistance for the region. The greatest requirements are for cities such as Anadyr, Yakutsk, Urengoy and Tynda. The smallest ones are for Sochi and Tuapse. In Moscow, the coefficient should be at the level of 3.0 W/(m·ºС), in the northern capital – 2.9 W/(m·ºС).
Requirements for thermal resistance apply not only to the walls of the building, but also to the ceilings and windows. You can make calculations using the same formula, but you can find the data on the Internet or at a construction company.
Taking into account all the data, we will obtain a formula for calculating the thickness of insulation for an internal wall. It looks like this:
Rreg – regional indicator of thermal resistance (ready data or independent calculation);
δ – thickness of the heat insulator;
k is the thermal conductivity coefficient of the insulation W/m2·ºС.
Now let's take a closer look at the thermal resistance coefficients for a load-bearing wall and the parameters that affect thermal insulation.
Installation of thermal insulation
We begin laying the foam sheets from the corner. Using a tape measure, measure the internal size of the sheathing cell and cut out the appropriate size of the penoplex. Then we insert it into the crate.
Using this method, we fill the entire frame of our structure with insulation.
After all the foam sheets are laid, we fill the visible gaps with polyurethane foam as shown in the figure below.
After the foam has dried, cut off the excess foam with a utility knife.
We lay penofol on top of the insulation, with the foil layer facing out. And we secure it to the bars with a stapler. It is important that the foam foam joints do not fall on the corners of the balcony. We glue the foam foam joints with tape.
Ceiling insulation
After we have insulated the walls of the balcony, we move on to insulating the ceiling. If you plan to cover the ceiling with plasterboard or clapboard in the future, then the technology is exactly the same as for insulating walls. But if you decide to install a suspended ceiling, then you can do without lathing. For these purposes, there is a special adhesive for penoplex on sale, which looks like polyurethane foam. It is applied to a sheet of penoplex, after which it is glued to the ceiling. A sheet of penofol can be glued later with double-sided tape.
Tip: To insulate the ceiling, one layer of penoplex 2 cm thick is enough.
Insulation of the floor on the balcony with penoplex
We begin insulating the floor on the balcony by installing the sheathing. We fasten the bars around the perimeter of the floor, then the transverse bars in increments of 40 cm.
After the insulation sheets are laid, the balcony floor is covered with plywood. And you can lay laminate or linoleum on it.
Criterias of choice
The reliability of the thermal insulation of the balcony depends on the quality of the material used. Penoplex is in great demand and a large assortment of such insulation is available on the modern market. To purchase good extruded polystyrene foam for arranging a loggia, you must take into account the following selection criteria:
- Strength. The insulation should not shrink during operation. Therefore, it is recommended to pay attention to the edges of the material. They should be smooth, their structure should be uniform, and when pressed they should not change their shape.
- Safety. The thermal insulation product must have a quality certificate that ensures the environmental safety of the material. It is necessary to study the composition of the extruded product. Safe insulation does not contain harmful chemicals, including phenol-formaldehyde resins, dust, and only environmentally friendly raw materials are used for its production.
- Technical indicators. The quality certificate must indicate the main characteristics of the material - thermal conductivity no more than 0.03 Watt/mC°, water absorption for thirty days 0.4 percent, compressive strength ranging from 0.25 to 0.41 mPa.
- Thickness and brand of insulation. To ensure good thermal insulation on the balcony, it is enough to select extruded slabs with a density of 30 - 53 kg/m³. Their thickness should be between 20 and 35 millimeters. Penoplex grades 45C and 31C are very popular.
An important aspect of the choice is the manufacturer. You can ensure protection against low-quality material by purchasing insulation from well-known companies with a good reputation.
Final finishing of walls with plasterboard
After the walls are insulated, we move on to the final stage. We cut out sheets of drywall of a suitable size and attach them to the sheathing with wood screws. First, we grab a sheet of drywall in the corners, after which we fasten it around the perimeter and to the cross bars.
Serpyanka is glued in the corners and at the joints of drywall sheets. Subsequently, all walls are puttied, primed and painted or covered with wallpaper of your choice.
How to insulate a balcony with your own hands (Photo)
Look at step-by-step photos of each stage of balcony insulation.
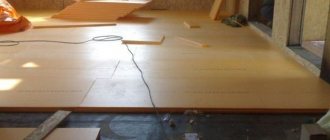
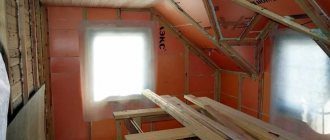
This is what the finished sheathing looks like. Notice that at a height of 1.2 meters from the floor, there are two bars. The bottom one is for attaching the first sheet of drywall, the next one is for the second sheet of plasterboard
Try to fit the foam sheets tightly to the cells of the sheathing, avoiding large gaps. If there are still gaps, you should foam them with polyurethane foam, and cut off the excess with a craft saw.
Don't forget about the places under the windowsill. All cracks must be filled to avoid cold bridges.
We lay penofol and fasten it to the sheathing with a stapler. We glue the joints of two sheets of penofol with tape. Important! Penofol is attached with the foil side to you!
The final stage is the installation of drywall sheets.
As you can see, the technology for insulating a balcony from the inside is quite simple, the implementation of which you can easily cope with. Following all the recommendations in this article will allow you to properly insulate your balcony and make it more comfortable and functional.
Slab reinforcement, glazing, external cladding
Strengthening the balcony slab
The preparatory stage looks like this:
- Remove from the balcony all “extra” objects that will interfere with the work.
- Remove the railings from the fence and remove the trim. Assess the condition of the metal and the strength of its attachment to the facade. If the rust damage is insignificant and the fastening points are not loose, then the grille is left as a load-bearing subsystem. In this case, the old paint and rust are removed from the fence down to the metal, degreased, a primer is applied, and painted in two layers.
- Mount the frame for the sheathing, tying it to the fence grid. It can be made of wooden beams or a combination - a profile on the outside, timber on the inside. The timber must be treated with an antiseptic. A profile is attached to the top of the fence. Its width should be such that the window block and ebb will fit. The distance between the sheathing posts is chosen to be 600 mm (according to the size of the EPS sheet). The total width of the profile (wall height) or beam must correspond to the thickness of the insulation. And when reflective thermal insulation is additionally used, another 20 mm is added. Or a counter-lattice is also attached to the racks, which will create the necessary gap between the foil surface of the insulation and the inner lining.
- If the grille is heavily rusted or the strength of its attachment to the facade is in doubt, then it is dismantled. Instead, a supporting structure made of galvanized square pipe is installed. The frame is fixed to adjacent surfaces
- For apartments on the top floor, along with the frame, a truss made of pipes and a corner for a canopy (canopy) is installed above the balcony.
- Strengthen the slab. If a balcony with an extension is being installed, then the reinforcement and frame profiles are combined in one structure.
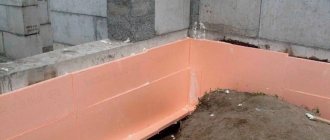
- If necessary, repair the stove. Clean the crumbling areas from all sides (preferably from below). They find cracks. Small (thread-like) cracks are covered with a repair compound. If there are large cracks, they are widened. If there are areas with exposed reinforcement, then treat the metal with an anti-corrosion primer and then cover it with a non-shrink repair compound. When the area of concrete destruction occupies more than 40% of the surface, it is completely repaired - a new reinforcing frame is laid with fastening to the facade, a screed is poured, the integrity of the ends is restored, and cracks from below are covered up.
- They carry out a rough “cosmetic” repair of the facade inside the perimeter of the balcony - they clean off dirt and old paint. Treat with a primer and antiseptic, seal cracks and chips. The surface of the upper balcony slab is repaired in the same way.
- Install window frames. Fastening to the facade and from above (to the slab) is carried out through expanders. The cross-sectional size of the upper profile of the expander must be greater than the thickness of the insulation plus the ceiling sheathing. The height of the profiles of the façade extensions should protrude beyond the finishing of the façade inside the balcony (a layer of decorative plaster or wall panels together with the sheathing).
- Install a canopy or canopy. The fencing sheathing is attached to the outside. Blow out the cracks with foam. External and internal decorative corners are attached to the fencing sheathing.
- The junction of the side expansion profiles of the window frames to the facade is covered with external strips. Install ebb tides. Double-glazed windows are installed.
But if the above work is often entrusted to professionals, then even an “amateur” with a regular set of tools can do the insulation of a balcony with penoplex with his own hands.