Water heated floors are the most economical floor heating system to operate. But the traditional method of laying in a screed is not always possible: one square meter can weigh up to 300 kg. Such a load is sometimes unacceptable for wooden floors or old buildings. Another disadvantage of installing in a screed is the large height of the “pie” - 7-10 cm or more. Not every room can be painlessly removed by 10 cm of height.
But for any of these cases, installation of water heating is possible if flooring systems are used. They allow you to install water underfloor heating without overloading the ceiling, have a small height, and can be used immediately after installation (no need to wait 28 days for the screed to mature).
Dry water heated floor - wooden system
But you have to pay for everything, and so it is here: flooring systems are less efficient (more coolant is used for heating) and less inertial - they cool down quickly. Which suggests that such systems can work mainly to increase comfort. To heat the entire room with such a system, most likely, the heat removal value will not be enough. Such designs can only provide a maximum of 50-60 W/m2. Although, if you live in the south, your winters are mild, and your house is well insulated (which is rare in these latitudes), then you need to do the math (determine the heat loss of the rooms and compare it with the heat transfer of the floor). If there is still not enough heat, or you live not quite in the south (or not at all in the south), other systems must provide the missing heat load. Traditionally these are radiators, in some cases - convectors, air heating.
Despite the low temperatures, the finishing coating is selected as for any other floor heating system.
“Less inertial” is both an advantage and a disadvantage at the same time: on the one hand, it takes less time and energy to reach operating temperature, the set temperature can be maintained more accurately (advantage), but on the other hand, the system cools down much faster (disadvantage). However, water heated floors without screed are often the only solution.
Types of “dry” installation of water floors
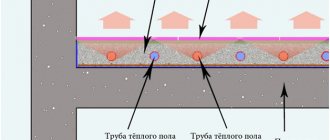
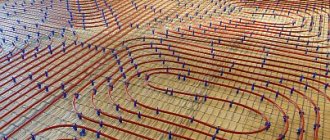
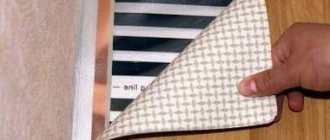
There are two flooring systems: wooden and polystyrene. Regardless of the material, they consist of two components: blocks of the flooring system and heat-distributing metal strips. Due to the low thermal conductivity of the base materials, laying pipes directly into the grooves of the blocks gives too low heat transfer. For better heat transfer, metal (aluminium-based) plates are laid.
Wood flooring systems
Wooden structures are more popular. Firstly, because they are natural (or almost, when using fiberboard and OSB), secondly, this material is more accessible, the system is easy to assemble independently.
There are ready-made modular “wooden water floors”. These are blocks made of OSB or chipboard, in which channels for laying pipes are formed. The width of such a module is standardized - 13, 18, 28 cm. They are connected to each other using a standard method - a lock.
A water heated floor can be placed on a wooden
There are inter-tube boards - this is already clean, processed, well-dried wood. The parameters of the boards (thickness*width) may vary from company to company, but 21*120 mm or 28*120 mm are more common.
Select the width of the block or board based on the required pipe laying step. The boards are nailed to the joists, and the blocks are also laid on the joists. In this case, both are positioned so that the grooves for the pipes repeat the selected installation pattern (simple or double “snake”, “snail”, etc.).
Polystyrene water floors
Polystyrene systems weigh even less. Standard modules can have a thickness of 15 mm, 30 mm, 50 mm or 70 mm, the pipe laying pitch is 15 cm and 30 cm. In this case, polystyrene is also thermal insulation.
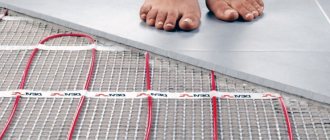
The slabs are laid on a flat and clean base. If necessary, first lay a layer of thermal insulation, and then on it - mats of a polystyrene dry-laying water floor system. The system plates can be simple or “rotary”. They are combined so that the pattern chosen for the pipes can be laid.
Interestingly, for laying dry, warm water floors, it is quite possible to get by with standard polystyrene slabs with fixing bosses. Metal plates are perfectly installed in them. Moreover, in this case it is possible to assemble a much more complex installation scheme than with special modules.
After the installation of wooden or polystyrene modules is completed, metallized heat distribution plates are laid out on them. They have grooves in which pipes are secured.
Metal plates are laid out on polystyrene mats for a dry water floor, and pipes are reinforced in them
Regardless of the chosen system, a damper tape is required around the perimeter of the room. It will compensate for the thermal expansion of the floor and prevent cracks from appearing between the floor and the wall. If there are several circuits in one room, they also need to be separated with a damper tape; circuits from different rooms that are connected (for example, a room and a corridor) should also be separated. Let's consider several options for a “dry” water floor system.
Installation
Attention: installation of water heated floors in a wooden house is carried out in all rooms separately. One floor section should be no more than 40 square meters. For rooms with a larger area, two sections are made.
Laying the base
PPS mats are laid out on the base in accordance with the drawing. Reflective plates are installed on them (the plates also have recesses for pipes). Pipes are laid in increments of 15-30 cm.
Wood-shaving modules are also laid according to the scheme and connected with tongue-and-groove locks. Pipes are laid in the channels.
With the slatted method, chipboard slats with a height of about three centimeters are attached to the laid plywood (slabs) in increments of two centimeters. It is necessary to ensure that the grooves in the places where the pipe turns are rounded.
After installing the base, a reflective layer of foil is placed. Other options: install heat-reflecting plates.
Pipe laying
There are two schemes for laying the working circuit: spiral and snake. The snake is led in zigzags from one wall to the other, opposite. The floor near this wall will be colder, because... As it moves along the circuit, the coolant cools down.
The spiral ensures uniform heating over the entire area: the first (hottest) coil is placed along the cold walls, and the cooled section is located in the center of the room, where it is warmer. From the center the pipe is led in the opposite direction, repeating the same turns in parallel. At the finish line it is connected to the return manifold.
A gap of at least seven centimeters should be left between the outer turn of the pipe and the walls.
Before installing the finishing coating, the system must be tested for leaks: connect to the collector, fill with water and leave for about a day.
The pipes are secured with narrow aluminum plates laid across the groove.
If laminate is used as the finishing cladding, an underlay is usually placed on the particle board base. The laminate can be laid on a polystyrene base without a backing.
Installation of floor with screed
For finishing screed, you can use a mixture based on M-300 cement. Plasticizers and polypropylene fiber are added to the solution. Another option is to buy a ready-made mixture for screeds.
- Place a waterproofing layer on the rough screed.
- Lay damper tape along all walls at the joints with the floor. If at least one wall is longer than eight meters, the tape is additionally placed in the middle of the room. This is mandatory, because When heated, thermal expansion of concrete begins. Without a damper, the floor will open up.
- Lay insulation. The approximate layer is 10 cm, the exact one depends on the heat calculation and the characteristics of the material (density, thermal conductivity).
- Lay the reinforcing mesh.
- Lay the pipe in turns with a pitch of 15-30 cm. Attach it to the mesh cells with plastic clamps with a pitch of thirty centimeters.
- Test the system for leaks and performance.
- Fill the screed 5-7 centimeters. If the floor is subject to high loads, another reinforcing mesh is placed in the screed during the pouring process. Wait for the concrete to harden (about a month).
- Lay the finishing coating: laminate with or without backing, ceramic tiles.
As a wood covering, you can use planed boards instead of laminate, but its thermal conductivity is lower than that of laminates for heated floors.
You can’t lay parquet boards, it will dry out quickly. In addition, in the production of parquet and parquet boards, chemical compounds are often used that reduce the environmental friendliness of the coating: when heated, it will release toxic volatile substances.
Boards should be laid with gaps to compensate for thermal expansion.
Wooden warm water floors
There are enough ways to make a water floor in a wooden house using the “dry” method, but when laying it on a rough wooden floor or on joists, there are some requirements:
- Depending on the finishing coating used, the logs should be located: every 30 cm, if you are laying tiles;
- after 60 cm under other coverings.
Read more about choosing materials for heated floors here.
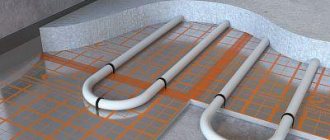
The first option: a “floating” floor without a rigid connection to the base. In this case, ready-made fiberboard modules with molded gutters are used. They are laid on floor joists, between which a layer of insulation is laid. A metal strip is placed on the fiberboard for better heat transfer, and the pipes are secured in it.
The pipe laying pitch can vary, as can its diameter. It is selected depending on the required amount of heat to replenish the heat loss of the room. Depending on the finishing coating you are going to use, you can lay a water barrier or a vapor barrier on top or not. If you plan to lay a soft topcoat (linoleum or carpet), you need to lay a gypsum fiber sheet (gypsum fiber board is the best option), chipboard and OSB. Boards with an adhesive component must have emission class E-1 or E-0, their thickness is at least 22 mm (for normal load-bearing capacity). These plates will serve as a rigid base and, at the same time, a heat distributor and accumulator.
A floating heated floor means that it is not connected to the base. The solution is rational, since different materials have different thermal expansion
The same pipe modules (or others, with a different pitch, different base thickness) can be laid on any flat base. They can be fixed, or you can make floating, disconnected heated floors. Floating floors are the best option due to the different thermal expansion of different materials.
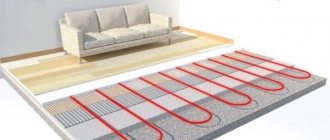
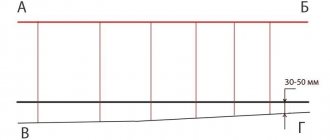
Second method : a wooden water floor system involves installing inter-tube boards rather than modules on the logs. These are boards of different lengths, but of the same thickness and width, from which a previously developed pipe laying pattern is laid out. Boards can also be laid on any flat surface, but the degree of thermal and water insulation is important. The figure shows an ideal option in which the difference in temperature expansion will not be felt.
Instead of ready-made (or home-made) chipboard modules, you can use well-dried boards (kiln drying no higher than 8% humidity)
The third option: the GRANAB system, which allows you to lay a water floor in a “dry” way on any base, even crooked and lumpy. The whole trick here is in special modules on adjustable legs. Having installed and aligned these modules, wooden (fibreboard) blocks for pipes are laid out on them, metal plates are placed on top, as usual, and pipes are in them. Next, hydro/steam protection, depending on the finishing coating used; for soft coatings you will need either gypsum fiber board or chipboard.
This is a system for those who do not want to level the base for laying heated floors
Pros and cons of this method
If we compare both methods of laying heated floors in terms of labor intensity and time, dry screed looks preferable. For those who decide to independently make a heating system with heated floors, this technology does not require specific knowledge and skills. All you need are tools, desire and materials.
In terms of time, laying the screed dry will also take significantly less time. You can do everything in several stages, without limiting yourself in time. After finishing the work with the heated floor, feel free to do other repair work.
For example: a concrete screed made from a sand-cement mixture poured indoors will dry to a solid state for at least 25-30 days.
Let's summarize. What are the advantages of a heated floor made without a wet screed:
- the main advantage is easy and quick access to the damaged water circuit for subsequent repairs;
- light weight of the structure (25-30 kg/m2), allowing work on any type of floor;
- the cake has a small thickness (35-60 mm), maintaining the internal volume of the premises;
- the ability to begin installation of the floor covering after completing the work on installing the heated floor;
- the ability to use any of the existing foundations (concrete and wooden floors);
- the ability to use the system in temporary residential premises;
The only deviation from the technology may arise as a result of leveling the concrete base. If there are obvious and visible flaws in the concrete base, it is necessary to make a rough wet screed, on top of which the remaining layers of the pie will be installed. This technology is called semi-dry screed.
Serious disadvantages in this case include a number of important points. The condition of a dry screed is extremely negatively affected by moisture. Plywood or gypsum board sheets begin to deform and become moldy.
This flooring design is definitely not suitable for baths and bathrooms. Moreover, in rooms where warm water floors are laid on a dry screed basis, it is impossible to erect additional elements of a residential structure. The system is not designed for additional load. No other significant shortcomings of this system of equipment for warm water floors were identified during operation.
Polystyrene water floor system
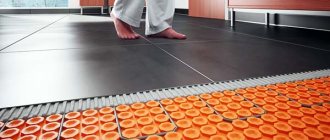
Dry screed for water heated polystyrene floors is laid on any flat base. Any material can be used as finishing material. Polystyrene boards of the required thickness, in which the grooves for the pipes are located at the pitch you need, are laid on the subfloor or old coating. Then metal plates are placed on top and pipes are secured in them. If there is a hard covering on top (laminate, floorboard, parquet), it is enough to lay a layer of waterproofing on top (in the simplest version, polyethylene film). For soft floor coverings you will need a rigid base - gypsum fiber board or chipboard.
The polystyrene system can have a base thickness from 15 mm to 70 mm
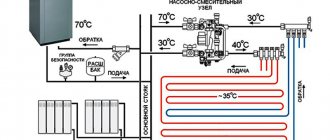
Hydraulics and circuit lengths
- Schemes for direct connection of all underfloor heating circuits directly to automated gas or electric boilers, which can produce a low coolant temperature of 60 - 65 degrees, appear to be workable. In this case, in short circuits (up to 50 meters are recommended), the energy output (temperature) is adjusted by changing the flow rate using a tuning valve. To create the simplest system, one manifold with such valves on each outlet is sufficient. For a solid fuel boiler, you will need an outgoing temperature stabilizer in the form of a buffer tank and a three-way valve...
- A more progressive option with automatic temperature maintenance in short circuits (up to 40 m in length) can be implemented using RTL taps - thermal heads that respond to the temperature of the coolant and which are installed strictly on the outgoing stream from each circuit. Here, too, the energy output of the circuit is regulated only by the amount of passing fluid. But it is also recommended to install a maximum temperature limiter in the heating system, for example up to +70 degrees.
- If you make a warm floor of a large area throughout a wooden house, then it is recommended to use classic hydraulics with long circuits of 80 - 90 meters and a temperature controller with a separate mixing pump unit, which would maintain the desired temperature in the entire system. In this case, adjustment of the energy output along the circuits is carried out by slightly changing the flow rate by adjusting valves.
Do-it-yourself dry heated floor
Knowing the handiness of most of the population, we can assume that many will want to make (and will make) such systems themselves. There is nothing complicated about this; if difficulties may arise, it will be with the molding of metal distribution systems, and even then not for everyone. It takes more time to make a wooden water floor than using ready-made modules, but the system is not so expensive.
So, to make your own wooden water floor system, you can use:
- sanded edged board;
- laminated and non-laminated chipboard and MDF with a thickness of 22 mm;
- moisture-resistant plywood from 20 mm.
All materials containing glue are taken with emission class E1 or E0, i.e. with minimal emissions of harmful substances. They will be heated most of the time, so they should be as safe as possible. High demands are also placed on humidity: no higher than 10%. Otherwise, when drying, the planks may warp.
Water heated floor homemade wooden system
Next, you need to cut the sheet materials into strips depending on the laying step:
- laying pitch is 150 mm, board or plank width is 130 mm;
- pitch 200 mm, board and plank - 180 mm;
- pitch 250 mm, board and plank - 230 mm, etc.
After the damper tape has been rolled out and secured around the perimeter (you can lay out expanded polystyrene or polystyrene sheets cut into 10 cm strips), you can begin installing the slats/planks. Lay it so that the gaps repeat the selected pipe laying pattern, the distance between adjacent strips is exactly 20 mm. In places where there are turns, the slats are rounded.
After completing the assembly of the system from the slats, metal plates are inserted into the grooves. They should cover 80% of the area. The pipe is laid out in the grooves of the plates. It is advisable to use PEX or PE-RT polyethylene. A film with a density of up to 200 microns is laid on top of the pipes, and usually a sheet of GVLV (moisture-resistant gypsum fiber sheet) is placed on it. Its thickness is 10 mm. This is enough for any topcoat except ceramic tiles. It will require another layer of GVLP (high-strength gypsum fiber sheets), on top of which tiles are placed on a thin layer of special adhesive for heated floors. Fasten the GVL to the joists with self-tapping screws ( be careful not to damage the pipes ).
When installing a dry water floor under the tiles, use a pipe with a maximum diameter of 20 mm, and the smallest laying step is 10-12 cm. Tile is the most heat-intensive material; in order for it to feel “warm,” it needs to be heated much more than other coatings. At the same time, it is important to provide high-quality insulation for the entire system.
This way you can secure the pipe at a bend.
With the design of a polystyrene system, everything is both simpler and more complicated at the same time: in fairly thick slabs (choose the thickness depending on the required degree of insulation from 20 mm), with a density of 35 kg/m3, grooves are cut out using a thermal knife, which will repeat the pattern of your pipe laying. To avoid mistakes, you can lay out the slabs on the floor, transfer the diagram (draw it with a marker) and then cut it out according to the markings. The laying order and layers of the “pie” repeat the wooden system, only polystyrene must be laid on a flat base. This can be a flat wooden floor or slabs of fiberboard, plywood, etc. fixed to joists.
Selection of materials
Before laying heating water circuits in a wooden house, it is necessary to insulate the floors. Therefore, you will have to choose 3 groups of components:
- type of insulation;
- pipe material;
- plate material.
Among the common and affordable insulation materials, mineral (basalt) wool is best suited for thermal insulation of wooden structures. It is permeable to water vapor, due to which it combines well with wood, gives it the ability to “breathe” and does not cause rot. Another thing is that when laying mineral wool, it is necessary to ensure the release and removal of these vapors, otherwise it will get wet through and stop serving as a heat insulator.
Mineral wool and shaped polystyrene foam boards
Advice. To insulate the covering of the first floor, it is better to use basalt fiber with a density of 40-80 kg/m³ and a thickness of at least 150 mm, and in the northern regions - 200 mm or more. Mineral wool with a thickness of 50-100 mm will be used for the interfloor ceiling. Its task is not to allow heat intended for the upper rooms to pass into the premises of the first floor and to serve as sound insulation.
Polymer insulation - foam plastic, foamed polyethylene and extruded polystyrene foam - practically do not allow moisture to pass through. Therefore, they must be used wisely, otherwise the wood in places of contact with the polymer will turn black and rot. The minimum thickness of materials for thermal insulation of the floors of the first floor is 100 mm; it is enough to put 20-30 mm in the ceiling.
We recommend: Calculation of heating radiators, number of sections and battery power
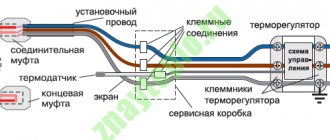
For heated floors without screed, installed on wooden joists, the following types of pipes with a diameter of 16 and 20 mm are used:
- made of cross-linked polyethylene with an anti-diffusion layer that does not allow oxygen to pass through;
- metal-plastic;
- copper.
The most popular pipes for heated floors are polymer
High-quality polyethylene pipes (for example, from the Rehau brand) are no cheaper than metal-plastic and are not inferior to it in terms of performance properties. Hence the conclusion: there is no fundamental difference between these types of polymer pipelines; they are equally good for heated floors.
Copper pipes are much more expensive than plastic ones, and installing them is more difficult and takes longer. But, from the point of view of heat transfer, copper has no equal, and therefore is successfully used for underfloor heating of any buildings. An important point: do not use copper heating circuits together with aluminum heat distribution plates; these metals are absolutely not friendly with each other.
Since the thermal conductivity of aluminum is higher than that of steel, plates made of this material are more preferable (excluding copper piping). But keep in mind that high-quality aluminum distributors are 1.5–4 times more expensive than galvanized ones.
Note. Prices for aluminum and galvanized plates from different manufacturers vary widely and cannot be compared because they are made from metals of different thicknesses. Hence the advice: try to purchase thick-walled products, they are able to accumulate and transmit more thermal energy.
Corrugated stainless steel is also an excellent option.
Of recently emerged materials, flexible corrugated stainless steel pipes are of interest. They are durable, can be installed without welding or soldering, transfer heat well and can be used in lightweight flooring systems.
Calculation of the pipe length in each circuit, laying pitch and surface temperature is presented in a separate publication. Familiarize yourself with the methodology in order to accurately determine the amount of materials.
Installation using Uponor technology
The technique has become widespread as the simplest and most affordable. Mineral wool serves as a thermal insulation material; you can use pipes and plates at your discretion and financial capabilities. The essence of the method is to lay wooden boards 20 mm thick on logs at intervals of 2 cm for the further installation of a water-heated floor, as shown in the diagram:
A ventilation gap is created between the thermal insulation and the base boards (not visible on the diagram)
Note. A similar scheme can be used in any residential buildings where wooden floors are laid on joists, including on top of concrete foundations.
To make heated floors using this technology with your own hands, you will need the usual set of plumbing and carpentry tools, as well as special scissors for cutting polymer pipes. When installing underfloor heating on the ceiling of the first floor (above the ground or an unheated basement), perform the work in this order:
- Nail cranial bars with a cross section of 25 x 25 mm flush with the bottom edge of the beams. Lay subfloors made of 20 mm thick boards on top of them, as shown in the drawing below.
- Cover the subfloor and joists with waterproofing membrane (technically called diffusion membrane), waterproof side down. Maintain an overlap between the panels of at least 10 cm and carefully seal the joints with double-sided tape.
- Place mineral wool slabs on top of the waterproofing so that they do not wrinkle, otherwise the basalt fiber will partially lose its thermal insulation properties. The thickness of the insulation should be at least 5 cm less than the height of the log in order to provide a ventilation gap between the surface of the wool and the future wooden flooring to remove moisture.
- Place vapor barrier film over the joists. The polyethylene must be pulled up and secured to the wood with a stapler so that it does not sag in the gaps between the beams.
- Nail 2 cm thick boards across the joists, 30 mm away from the wall. Depending on the pipe laying pitch (15 or 20 cm), leave 20 mm wide gaps between the boards for heat distribution plates.
- Insert metal plates into the slots and arrange the heating circuit pipes over them, placing them in the Ω-shaped grooves. To rotate the pipe, shorten the ends of the boards by 10-15 cm in this place.
- Run the ends of the pipes along the walls to the heated floor comb, connect them and check the tightness of the system. Lay the final floor covering.
Please note: when installing an insulated floor, the membrane and vapor barrier are swapped - the polyethylene film is laid from below.
The method of laying a water-heated floor over wooden joists is shown in detail in the video:
Work on the interfloor floors is carried out in the same order, only the subfloor boards can be nailed directly to the joists from below. By the way, instead of wood, you can use OSB boards here, while simultaneously hemming the ceiling of the first floor.
Important! Do not confuse the diffusion membrane with the vapor barrier film, otherwise the mineral wool will become saturated with water and cease to be an insulator. The waterproofing at the bottom of the “pie” protects the cotton wool from getting wet from the outside, and the top film prevents water vapor from penetrating. In floors, everything is the other way around - the vapor barrier is laid from below, the membrane - from above. To remove moisture from the insulation, use a 5 cm ventilation opening and vents made in the walls of a wooden house.
Along with its simplicity and low cost, this method of installing water heated floors has one drawback - the pipes can only be laid in a “snake” pattern, which is why the rooms of a wooden house have to be divided into several heating circuits in order to achieve uniform heating.
Installation Guide for Polystyrene System
This method of laying underfloor heating circuits allows you to complete the work much faster and easier, since it involves the use of two-layer polystyrene foam boards with guides in the form of protruding bosses. Polystyrene of different densities is used to make the plates - the top layer is more durable, the bottom layer is soft.
It is quite simple to make piping for heating floors according to this scheme
The technique is suitable for any floors with a flat surface, for example, made of OSB plywood (as in houses made of SIP panels). Warm water floors on a flat wooden surface are made using the following technology:
- Cover the joists with OSB sheets and fasten them with galvanized self-tapping screws. If work is carried out on a wooden floor of the first floor, then mineral wool insulation should be laid between the beams, as described in the previous section. The thickness of the polystyrene system is not enough to fully insulate the building from below.
- Attach damper tape to the walls around the perimeter of the room.
- Place polystyrene foam boards on the finished surface, fastening them together with locks.
- Install the dissipative plates in accordance with the layout and spacing of the pipelines, fixing them between the bosses. Unwinding the pipe from the coil, insert it into the recesses of the plates.
- Cover the heating circuits with plastic film, overlapping and gluing the sheets.
- Mount the base of the floor from gypsum fiber sheets (GVL), where you will subsequently lay the finishing coating (a popular option is laminate).
Details of the work are shown in the video from the Russian manufacturer of polystyrene foam systems -:
Advice. Before laying the finishing coating, connect the main lines from the circuits to the manifold of the distribution and mixing unit and conduct a leak test (pressure test) with a pressure of 4 bar.
The advantages of shaped insulation for warm water floors are obvious - simplicity and speed of installation work, the ability to lay out pipes not only in a “snake”, but also in a snail. There are also disadvantages:
- high price;
- the material can bend under heavy mechanical loads;
- Due to the gaps between the bosses, a small part of the heat is wasted on useless heating of the air under the floor covering.
Other pipe laying methods
Other products can serve as the basis for heating loops, into which metal plates can be inserted:
- expanded polystyrene boards with ready-made grooves;
- factory kits made of wooden products with cutouts for laying pipelines;
- polystyrene sheets with a density of 35 kg/m³, where the recesses are cut out with your own hands using a special thermal knife.
In addition to polystyrene foam with bosses, polymer slabs with ready-made recesses are also available in the retail chain. This option is suitable both for installation on a flat surface and inside the ceiling flush with the joists, as shown in the diagram:
We recommend: Advantages and disadvantages of electric boilers
Thermal insulation boards can be placed in the gaps between the joists
Note. The disadvantages of this option are the need to cut grooves in the joists for the passage of tubes and fastening the polymer at the corners so that it does not adhere to the wood. Therefore, it is better to place slabs with recesses on a base made of OSB plywood or leveled boards.
A set of wooden elements (left) and polystyrene foam with grooves for pipes (right)
A big plus of wooden sets for water underfloor heating is the ability of the coating to carry a large load from bulky furniture without deformation. Products with cutouts for plates are mounted on beams along with insulation, as described above (Uponor brand technology). A stacked wooden heated floor has only one drawback - the high price of materials.
Homeowners with time can save money on a polystyrene system by purchasing a thermal groove cutter and regular high-density foam. The technology is simple: insulation boards are laid out on a leveled surface, after which you need to burn out the pipeline route in them in accordance with the diagram. All that remains is to install heat distributors and insert pipes into them.
Burning grooves in polystyrene with a thermal knife
Results
Floor heating is good in cases where heavy screed cannot be laid due to the low load-bearing capacity of the floors, in wooden or old houses, or low ceilings do not allow it to be installed. Wooden warm water floors are more popular; polystyrene systems are used less frequently. But in any case, this method of installing floor heating can only be used as a means to increase comfort: heat output does not exceed 60 W/m2, which in most areas does not allow using these systems as the main heating.
Nuances to consider
Any job has its own subtleties and limitations, below is a list of points that you need to consider:
- The maximum length of the working circuit is 70 meters; if a pipe of this length does not cover the entire area of the room, then the organization of a second heating circuit is necessary;
- Reliable waterproofing. In a wooden house, the presence of excellent insulation from moisture is the guarantee that your floor will last a long time without repair. Waterproofing must be done in several layers.
Possible mistakes
At first glance, it will seem that dry screed under a warm water floor is very simple and no difficulties can arise.
But novice performers may encounter certain mistakes that will lead to ineffective operation of the water heated floor. To avoid this, you must first calculate the heated floor, both before starting work and after installation. The measurements taken may indicate possible errors, which would be better to eliminate first than to spend more effort and money later. The pressure on the floor base is also calculated here.
An ideal screed should not heat up above human body temperature. There are maximum temperatures that conventional piping can withstand, depending on the material chosen. But it is recommended to create an operating temperature of no more than 55 degrees.
Another possible mistake is installing temperature sensors deep in the structure. They cannot serve for a long time and periodically fail, requiring replacement. It will be very difficult to get them and check their functionality.
Under no circumstances should you rush to install a heated floor. It is better to check the completion of each stage and then enjoy the high-quality operation of the system for a long time. Experts recommend leaving the system alone even for several days after finishing work. That is, it should not be turned on. When all the elements adhere to each other, especially if glue was used during installation, you can begin to use it.
You cannot save on purchasing materials, as the system will last a very long time. It’s unlikely that anyone would want to lay down a floor covering and then dismantle it a year later to repair the water-heated floor.