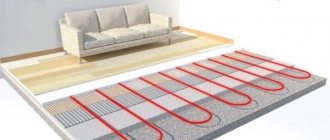
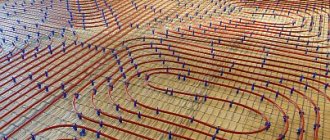
Today, a warm water floor is a popular heating system, which has a simple installation technology, has an acceptable cost and affordable operating costs. In addition, unlike electrical systems that emit electromagnetic waves, it is completely safe for human health.
It is important that the installation technology is not complicated, so installing a water heated floor with your own hands will not be difficult for almost every home craftsman. And an important advantage of self-installation will be a reduction in overall costs, which will undoubtedly affect the total cost of operation and installation of this heating system.
How to lay a heated floor: for a water heated floor, pipes with hot water are laid in a snake or snail pattern. For an electric floor, various heating elements are installed using certain technologies.
We also suggest you learn how to make a heated floor in a bathroom using a heated towel rail or in an apartment using central heating.
Warm floor and finishing coating
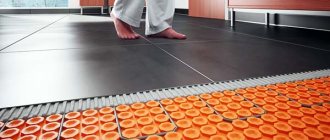
The warm water floor system is best combined with installation under porcelain stoneware and tiles.
- Firstly, both materials are strong and durable.
- Secondly, they do not emit harmful substances when heated.
- And thirdly, heating perfectly complements the tiles (the material itself is cold), and you can even walk on it barefoot thanks to its high heat capacity.
Of course, heated floors can also be installed under laminate, linoleum, PVC tiles and even carpet, if there is a special mark.
But, for example, there is no point in heating the carpet, and the surface temperature cannot be exceeded above 31°C, according to SNiP 41-01-2003. Otherwise, it will provoke the release of harmful substances.
| Zones | Floor temperature, °C |
| Living spaces | 26°C (average) |
| Rooms with high humidity | 31°C (average) |
| Non-residential premises | 31°C (average) |
| Above the pipe | 35°C (maximum) |
| Parquet and laminate floors | 27°C (maximum) |
| Permanent stay of children (according to sanitary standards VSN-49-86) | 24°C (maximum) |
Installation in an apartment
Probably, many residents have had the idea to independently connect water heated floors “for free” to a central heating or hot water system. And some even do this, but in most cases it is prohibited by local law.
For example, in Moscow there is government decree No. 73-PP dated February 8, 2005; Appendix No. 2 clearly states that it is prohibited to re-equip public water supply systems for floor heating.
If you break the rules, at best, you can get a fine on your first visit to the plumbers. And at worst, there is a risk of leaving your neighbors without heating.
In some regions the ban does not apply, but connection requires an examination so as not to disrupt the operation of the system.
In general, from a technical point of view, such options are possible, but only if a separate pumping and mixing unit is connected and the pressure in the system is maintained at the outlet.
Note! If there is a jet pump (elevator) in an apartment building, then metal-plastic and polypropylene pipes cannot be used.
Areas of application of electric flooring
Due to its specificity, heated floors are used in conjunction with centralized heating in houses and apartments. Here are a few examples of its effective use:
Heating the kitchen and rooms . This type of space heating helps normalize humidity and temperature. Uniform heating of the floor surface does not allow convection currents to arise, and the electronic thermostat automatically maintains the set parameters.
Heat exchange in a room with central heating (A) and heated floors (B)
Application in damp areas . If you connect the system correctly (via an RCD or differential circuit breaker), and also ensure reliable grounding of the electric floor and install waterproofing, then you can take a shower without a tray or rubber mat.
An example of how to properly lay and connect a heated floor, as well as cover it with porcelain tiles
Balconies and loggias . Even on a glazed balcony or loggia you can get a cold in the winter; the situation can be corrected by equipping them with electric floors. This is smarter than making a heating battery there.
Floor installation methods
There are several ways to create a warm water floor.
- The most popular and reliable of them is concrete screed. Unlike electric types, 16 mm pipes cannot be hidden in tile adhesive, and it will not work. Therefore, the screed is poured at least 3 cm above the pipes.
- The second method is to lay pipes in cut-out polystyrene foam grooves. The grooves are made by hand, pipes are laid inside, then the screed is poured.
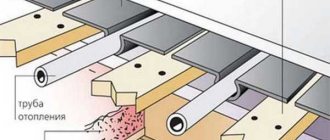
- The next option is often used in houses with wooden floors, although it requires a lot of labor - laying it in wooden grooves. To do this, boards are placed on the floor, which create a gutter of the desired shape for installation.
Types of pipes used
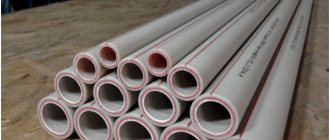
Three types of pipes are suitable for a warm water floor.
- Pipes made of cross-linked polyethylene (PEX-EVOH-PEX) are inconvenient to work with because it is difficult to give them the desired shape (they straighten when heated). But they are not afraid of liquid freezing and are repairable.
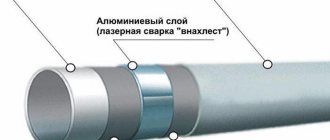
- Metal-plastic pipes are the best option: low price, easy to install, and keep their shape stably.
- Copper pipes are expensive; when used in a screed, they must be covered with a protective layer to prevent alkaline attack.
Calculation of a warm water floor
Before installation and purchasing materials, it is necessary to calculate the heated floor. To do this, draw a diagram with contours, which will later be useful when carrying out repair work in order to know the position of the pipes.
- If you are sure that furniture or plumbing will always be in a certain place, pipes are not laid in this place.
- The length of a circuit with a diameter of 16 mm should not exceed 100 m (the maximum for 20 mm will be 120 m), otherwise the pressure in the system will be poor. Thus, each circuit approximately occupies no more than 15 square meters. m.
- The difference between the lengths of several circuits should be small (less than 15 m), that is, they should all be of uniform length. Large rooms, accordingly, are divided into several circuits.
- The optimal pipe laying pitch is 15 cm when using good thermal insulation. If in winter there are often frosts below -20, then the step is reduced to 10 cm (only possible near external walls). And in the north you cannot do without additional radiators.
- With a laying step of 15 cm, the pipe consumption is approximately 6.7 m for each square of the room, when laid every 10 cm - 10 m.
In general, the question of how to calculate a warm water floor requires separate consideration, since many nuances are taken into account when designing: heat loss, power, etc.
The graph shows the dependence of the flux density on the average coolant temperature. The dotted lines indicate pipes with a diameter of 20 mm, and the solid lines indicate 16 mm.
The graph shows data that is valid only when using a 7 cm thick cement-sand screed covered with tiles. If the thickness of the screed is increased, for example, by 1 cm, then the heat flow density decreases by 5-8%.
- To find the flux density, the amount of heat loss in the room in Watts is divided by the area where the pipes are laid (the distances from the walls are subtracted).
- The average temperature is calculated as the average value at the entrance to the circuit and the return exit.
The optimal temperature at the inlet and outlet should not differ by more than 5-10 degrees. The maximum coolant temperature should not exceed 55°C.
To calculate the length of the circuit, the active heating area in square meters is divided by the laying step in meters. To this value add the size of the bends and the distance to the collector.
Using the above diagram, you can only perform a rough calculation and make final adjustments using the mixing unit and thermostats. For accurate design, be sure to contact professional heating engineers.
Selecting a collector-mixing unit
The choice of collector (see types, principles of operation and installation of the collector, connection diagram and configuration) is directly related to the number of circuits that are planned to be installed. The device must have as many outputs as the water floor structure will have.
The device allows you to adjust and supply heated coolant into the system, and discharge it back to the device after working out.
The simplest model of the corrector has only a shut-off valve, and it cannot be used to adjust the operation of the structure. More expensive devices are equipped with valves for adjustment; they make it possible to independently set the level of intensity of water flows, separately for each circuit.
In addition, a mandatory attribute of any manifold is an air vent valve and a drain valve for emergency situations. In order for the device to work normally, you only need to adjust all the valves once, according to the required parameters.
It is worth noting that inexpensive collector models are often installed. But if you do not need to save money, then it is better to buy a model with servo drives and mixing units. This device allows you to automatically regulate the degree of heating of the water supplied to the water floor.
The collector is installed directly in the heated room or in a room nearby. To install the device, a special cabinet is made, its standard size is 50 by 50, and its depth is 12 - 15 cm. It is placed above the surface of a warm water floor. It is not uncommon that the manifold cabinet does not spoil the interior of the room, it is recessed into the wall.
Manifold for heated floors. Three ways to configure flow meters.
Warm floor pie
The technology for laying a warm water floor consists of several layers, which are laid in a certain sequence. The total thickness of the cake is 8-14 cm, the load on the floors is up to 300 kg/sq. m.
If the base is a concrete slab:
- waterproofing;
- damper tape around the perimeter;
- insulation;
- reinforcing mesh;
- water heated floor pipe;
- screed
For waterproofing, it is permissible to use ordinary polyethylene film or special materials. Damper tape is made from cut strips of thermal insulation 1-2 cm thick, or you can buy a ready-made version with a self-adhesive base. The choice of insulation depends on several factors: region, base material. For example, for floors on the ground, extruded polystyrene foam with a thickness of at least 5 cm (optimally 10) is used, and if there is a warm base under the floor of the first floor, then thinner options from 3 cm can be used.
The main purpose of insulation is to direct the heat from the heating upward and prevent large heat losses.
If the base is ground floors:
- bulk soil 15 cm;
- crushed stone 10 cm;
- sand 5 cm;
- rough screed;
- waterproofing;
- damper tape around the perimeter;
- extruded polystyrene foam at least 5 cm;
- reinforced screed with coolants.
It is important to carefully compact the preparatory layers for the rough screed layer by layer. If the base is compacted tightly and extruded polystyrene foam is used, it will not be necessary to make a rough screed.
Features of room preparation
Due to the fact that the structure is heavy, with a long length of pipes and connecting units, the installation has its own technological features.
As a result, it is necessary to lay each layer strictly according to the instructions. But first, we will look at the features of preparing the premises.
WARM FLOOR in 1 day! DIY water heated floor part 1
Premises requirements
Water-heated floors are recommended for construction in private buildings - find out how to install them yourself on a concrete floor. In multi-storey buildings, in addition to the heavy load on the floors, there is a risk of flooding of the apartment from below.
In addition, the coolant circuit is connected to the general heating system, but it is most often not intended for this purpose. This can lead to cold risers in your or a neighboring apartment. This is due to the reluctance of the relevant authorities to issue permits for the installation of this system in multi-storey buildings.
Today, two systems are often installed in new buildings: one for standard heating, and the other for warm floors.
The ideal solution is to make a water-heated floor yourself, even at the time of building the house. When installing the structure in a finished house, you should consider:
- the height of the ceilings, since such a structure leads to a significant decrease in them;
- size of doorways - their required height is not less than 210 cm;
- foundation strength.
In addition, the heat loss rate should not exceed 100 W/m2.
Base requirements
When installing a water floor correctly, a prerequisite is the presence of a smooth and clean rough surface. If the property is old, you need to dismantle the old floor screed and level the base.
The process is complex and time-consuming, but it is necessary. After which, the base is thoroughly cleaned of debris and dust.
For a water floor to work well, you need a horizontal base without differences; deviations of no more than 10 mm are permissible. If cracks or flaws are found, they must be repaired.
If you are the owner of a new home with panel ceilings, then the heating elements can be installed directly on them.
Installation of heated floors
Let's say a good foundation has already been prepared: a flat concrete slab or backfill layer without strong drops. Differences should not exceed 7 mm when checking with a two-meter rod. If there are uneven spots, they can be filled with sand.
Waterproofing
Some people put waterproofing under the bottom of the insulation, some, on the contrary, at the top, and some use both. If extruded polystyrene foam is used, it practically does not need waterproofing, so its position is not so critical. But it will not allow cement laitance to penetrate between the seams of the insulation and go into the slab and will additionally hold back moisture from below. If you attach it to the bottom of the insulation, then you can attach the pipes to the heated floor directly to the insulation. If the waterproofing is laid on top, then laying a mounting mesh will be required to secure the pipes.
We lay the waterproofing with an overlap of 20 cm on the walls and on each other. We glue the joints with tape to seal.
Damper tape
If you bought ready-made tape, simply glue it around the perimeter. It usually has a thickness of 5-8 mm and a height of 10-15 cm. The height should be above the pouring level, the excess is cut off with a knife. If the tape is made by yourself, then be sure to glue or screw it to the wall with self-tapping screws.
The linear expansion of concrete is 0.5 mm per meter when heated to 40°C.
Insulation
Sheet insulation for a warm water floor is laid with offset joints so that it is tightly connected.
Reinforcement
The first layer of reinforcing mesh is usually laid on the insulation and used as a base for attaching the contours and uniformly distributing heat over the surface. The meshes are tied together with wire. The pipes are attached to the mesh using nylon clamps.
The diameter of the mesh rods is 4-5 mm, and the cell size depends on the pipe laying pitch, for convenient fastening.
In addition, it is imperative to lay the reinforcement on top of the pipes, since even when using a mesh from below, it will have almost no effect if it lies at the very bottom. Or, during pouring, place the mesh on stands, creating a gap.
Pipe fixation methods
A water heated floor can be laid in several ways, we list them.
- Polyamide tension clamp. Used for quick fastening of pipes to the mounting grid. Consumption – approximately 2 pieces per 1 m.
- Steel fastening wire. Also used for mounting to a grid, the consumption is exactly the same.
- Stapler and clamps. Suitable for quickly fixing pipes to thermal insulation. The consumption of clamps is 2 pieces per 1 m.
- Fixing track. It is a U-shaped PVC strip that serves as a base for laying 16 or 20 mm pipes into it. Rigidly attached to the floor.
- Mats for warm water floors made of polystyrene. A pipe is laid in the middle of the grooves between the posts.
- Aluminum distribution plate. Used when installing on wooden floors, it reflects and evenly distributes heat over the surface.
Application of various types of pipe fasteners
Pipe laying
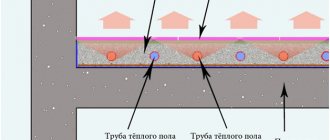
The pipes are laid with a distance of 15-20 cm from the walls. It is highly advisable to make each circuit from a single pipe without welding, and their length should not be more than 100 m. The pitch between the pipes near the walls is 10 cm, closer to the center - 15 cm.
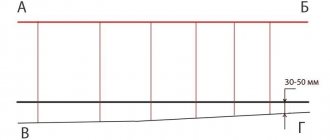
The layout of a heated floor can be different, for example, a spiral or a snake. On external walls, they try to make the laying step more frequent or draw a contour from the feed next to cold walls. An example of a circuit for enhanced heating of external walls is shown in the photo; this option is best used in cold regions:
In other cases, the contours are usually laid in a spiral (snail), this is a universal option.
In places with a large accumulation of pipes, in order to avoid overheating of the surface, some of them are covered with a heat-insulating tube.
Metal-plastic 16 mm and 20 mm are easy to bend manually, without the use of special tools. In order to bend the pipes evenly with an angle of a small radius and at the same time prevent it from cracking, the corners are bent in several passes (hand interceptions). At an angle of 90° you will need approximately 5-6 interceptions. This means, first, resting your thumbs, make a slight bend, then move your hands slightly towards the bend and repeat the actions.
It is unacceptable to have kinks on the pipes in places of sharp turns.
Polypropylene pipes are much more difficult to bend because they are springy. Therefore, to bend them, they are heated or welded using special fittings, but in the case of heated floors, they are simply attached to the mesh, making the bends less sharp.
Installation of a water heated floor begins by connecting the first end of the pipe to the distribution manifold, and after laying the room, immediately connect the return (second end).
Connecting circuits
In most cases, the circuits are connected through a distribution node. It has several functions: increasing the pressure in the system, adjusting the temperature, uniform supply to several circuits, and combining with radiators.
There are many connection schemes to the boiler, which we wrote about in the article about pumping and mixing units: with manual adjustment, with weather automatics and automatic adjustment using servo drives and sensors.
Eurocone fitting
The pipes are connected to the manifold using Eurocone clamp fittings.
Crimping
When you have completed the installation of all circuits, be sure to conduct pneumatic tests of the system for leaks. To do this, crimping is done using a compressor. A small household compressor with a pressure of more than 6 bar is suitable for testing. The pressure in the system is brought to 4 bar and left for the entire time until the system is started.
Since air molecules are much smaller than water molecules, even small depressurization can be detected. In addition, the water may freeze if you do not have time to turn on the heating, and nothing will happen to the air.
The eternal question: cable with guides, or ready-made rolls (mats)
From a technical point of view, there is no difference between laying a cable prepared on a grid or configuring it yourself. Theoretically, when installing a separate cable, you can save a little: you lay it exactly according to the planned plan. But you can cut thermo-floor rolls along the reinforcing mesh and bend the wires as you please.
So choosing the configuration of heating elements is a matter of ease of installation, nothing more. Recently, preference has been given to ready-made rolls, since the cost has dropped almost to the level of a linear meter of cable.
Heated floor screed
Filling the screed is done only after installation of all circuits and hydraulic tests. It is recommended to use concrete of at least M-300 (B-22.5) with crushed stone with a fraction of 5-20 mm. The minimum thickness of 3 cm above the pipe is done not only to obtain the required strength, but also to distribute heat evenly over the surface. Weight 1 sq. m of screed with a thickness of 5 cm is up to 125 kg.
If the screed thickness is more than 15 cm or under high loads, additional calculation of the thermal regime is required.
As the thickness of the screed increases, it takes more time to heat it up to a certain temperature after switching on, and the inertia of the system also increases. The lower the thermal conductivity of the screed, the higher the coolant temperature will need to be set.
Expansion joints
Examples of dividing a large room into zones
The absence or incorrect position of temperature gaps is the most common cause of screed failure.
Shrinkage seams are made in the following cases:
- the room has an area of more than 30 sq. m.;
- the walls are more than 8 m long;
- the length and width of the room differ by more than 2 times;
- above expansion joints of structures;
- The room is too curved.
To do this, a damper tape is laid around the perimeter of the seams. At the seam site, the reinforcing mesh must be separated. The deformation gap should be 10 mm thick at the base. The upper part is treated with sealant. If the room has a non-standard shape, it needs to be divided into simpler elements of a rectangular or square shape.
If pipes pass through expansion joints in the screed, in these places they are laid in a corrugated pipe, 30 cm of corrugation in each direction (according to SP 41-102-98 - 50 cm on each side). It is recommended not to separate one circuit with expansion joints; supply and return pipes should pass through it.
Correct passage of contours through technological seams
When laying tiles on expansion joints, the likelihood of them peeling off increases due to different expansion of adjacent slabs. To avoid this, the first part is laid with tile adhesive, and the second part is attached with elastic sealant.
For additional separation, partial profile expansion joints can be used. They are made using a trowel, 1/3 of the thickness. After the concrete has hardened, they are also sealed with sealant. If pipes pass through them, they are also protected with corrugation.
Cracks in the screed
A fairly common occurrence is the appearance of cracks on the screed after drying. This can be caused by a number of reasons:
- low density of insulation;
- poor compaction of the solution;
- absence of plasticizers;
- the thickness of the screed is too thick;
- absence of shrinkage seams;
- concrete drying too quickly;
- incorrect proportions of solution.
It's very easy to avoid them:
- insulation should be used with a density higher than 35-40 kg/m3;
- the screed solution must be plastic when laying and with the addition of fiber and plasticizer;
- in large rooms you need to make shrink seams (see below);
- You should also not let the concrete set quickly; to do this, cover it with plastic wrap the next day (for a week).
Screed mortar
For heated floors, it is necessary to use a plasticizer to increase the elasticity and strength of concrete. But you need to use special types of non-air-entraining plasticizers for heated floors.
Without experience, it will not be possible to make a cement-sand screed for a warm floor without crushed stone/gravel, and the correct branded DSP will cost more than factory-made concrete. Therefore, in order to avoid cracks due to a violation of the composition of the solution, concrete with crushed stone is poured.
Mortar M-300 from cement grade M-400, washed sand and crushed stone is made according to the following proportions.
- Mass composition C: P: Shch (kg) = 1: 1.9: 3.7.
- Volumetric composition per 10 liters of cement P: Shch (l) = 17:32.
- From 10 liters of cement you will get 41 liters of solution.
- The volumetric weight of such M300 concrete will be 2300-2500 kg/m3 (heavy concrete)
There is also another option using granite screenings instead of sand; the following elements were used for its preparation:
- 2 buckets of crushed stone with a fraction of 5-20 mm;
- water 7-8 liters;
- superplasticizer SP1 400 ml of solution (1.8 liters of powder is diluted in 5 liters of hot water);
- 1 bucket of cement;
- 3-4 buckets of granite screenings with a fraction of 0-5 mm;
- bucket volume – 12 liters.
High-quality concrete should not release water during installation (delaminate). If everything is done correctly and the air temperature is 20°C, it should begin to set after 4 hours, and after 12 hours it will not leave marks from heels.
3 days after pouring, the screed will gain half its strength, and will harden completely only after 28 days. It is not recommended to turn on the heating system before this point.
Installation on a wooden floor
Wood does not conduct heat as efficiently as concrete, but installation on it is also feasible. For this purpose, distribution plates made of aluminum are used. The pipes are laid in wooden grooves made by attaching pre-prepared boards.
For installation of linoleum, carpet and other materials that require a flat surface, a leveling layer of chipboard, plywood or gypsum fiber board is laid over the pipes. If parquet or laminate is used as the finishing coating, the design of the heated floor can be slightly simplified, without the use of a leveling layer.
When choosing plywood and chipboard, make sure that they have sanitary, hygienic and thermomechanical characteristics that allow them to be used together with heated floors.
Comparative characteristics
Since water and electric underfloor heating systems are the main ones, it is important to familiarize yourself with their comparative characteristics. Below are some questions to compare different types of systems.
Warm floor - which one is better to choose?
Table. Comparison of different floor heating systems.
| Question | Water system | Electrical system |
| Is there an EMR? | Absent | Depending on the type of cable used, electromagnetic radiation may be generated. |
| Is installation possible in apartments? | Exclusively in new multi-storey buildings, provided that there is a separate connection there | Yes |
| Are the systems easy to manage? | No | Yes |
| How long does installation take? | A lot, due to the implementation of the concrete screed | A little |
| What finishing coatings can be installed? | Almost everything | Some types of flooring cannot be installed |
| Ease of maintenance | Difficult maintenance and repair | When installing IR floors, maintenance is simple |
Choosing a heated floor
It is necessary to choose one or another type of heated floor taking into account not only your budget, but also the location of further installation. Once the system has been selected and all materials have been purchased, installation can begin.
Heated floor pipe circuit length calculator
Go to calculations