Electric underfloor heating can be used both as the main source of heat and as an addition to the main heating system. Film (infrared) and cable varieties of heated floors are available on the market.
Do-it-yourself electric heated floor
Familiarize yourself with the procedure for preparing the base, laying and connecting the heated floor, installing the finishing coating and get to work - you can handle all the activities on your own.
Do-it-yourself electric heated floor
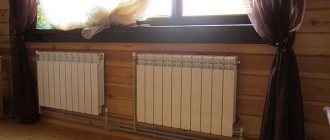
Connecting an electric heated floor
Connection diagram for an electric heated floor
They are pieces of a heating cable of a fixed length, equipped with an installation wire for connecting to the network through a thermostat.
Such cables cannot be cut unless otherwise permitted by the manufacturer in the instructions.
Cable systems are laid in a layer of screed or in a layer of tile adhesive.
The power of the cable heated floor is selected based on the area that needs to be heated.
To do this, use the following relationships:
- At least 110-120 W/m², if the cable system is used as an additional one together with another heating system (for example, together with radiators).
- At least 150-160 W/m², if the cable will be used as the main heating system. In our climate, using heated floors as the main heating is risky due to the fact that they give off less heat than, for example, radiators. You might just start freezing in winter. In addition, if you use a cable as the main heating, then the cable laying area should be at least 70% of the heated area.
- To heat a loggia or winter garden, it is also worth taking at least 160 W/m². This is due to large heat losses through windows.
Cable system installation
As mentioned earlier, the cable can be laid either in a layer of tile adhesive or in a layer of screed.
Installation begins with preparing the surface, which must be cleaned, leveled and primed.
Heated floors can only be laid on a dry surface, that is, the screed and soil must remain “drying” for at least 21 days.
Installation in a screed and in a layer of glue is different, so we will consider these methods separately.
Types of pipes and methods of their fastening
Various types of pipes are used in the construction of water floors:
- Metal-plastic products. They are considered the most optimal option. They ensure stable retention of the desired shape, are lightweight and easy to install, and are relatively inexpensive.
- Pipes made of cross-linked polyethylene. Resistant to liquid freezing and can be repaired. However, when heated, they straighten and have difficulty maintaining the required shape.
- Metal pipes (copper). They are distinguished by high performance and functionality. However, when using them together with a screed, a protective layer is required to prevent alkaline exposure.
Attaching pipes to the base can be done in different ways, depending on the design of the heated floors:
- A quick method of fastening with polyamide clamps directly to the mesh. Material consumption: 2 clamps per 1 meter.
- Steel wire for fastenings. Also used in conjunction with a mounting grid, the consumption is the same as for clamps.
- Quick fixation using a stapler directly to the insulating material. Two clamps are required per 1 meter.
- Special fixing tracks in the form of a U-shaped strip made of polyvinyl chloride. Pipes of 16 and 20 mm are laid in them, after which they are rigidly fixed to the floor.
- Polystyrene mats designed for water floors. Their plane is covered with grooves and posts, between which the pipe is laid.
- Installation in wooden floors is carried out using aluminum distribution plates. In addition to fastening, they perform the function of reflection and uniform distribution of heat over the entire surface.
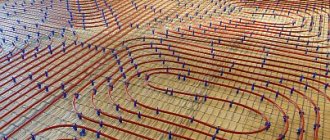
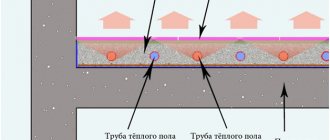
Laying electric heated floors in a screed
Scheme of laying a heated floor cable in a screed.
Installation of a heated floor in a screed is carried out in several stages:
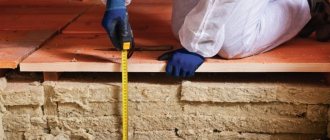
- Laying thermal insulation on the base.
- Filling the thermal insulation with the first layer of screed 1-2 cm thick.
- Laying the heating cable in loops and installing a thermostat with a sensor to control the heated floor.
- Check for damage and system functionality.
- Filling the top layer of screed with a thickness of 3-5 cm.
A metal mounting tape is used to secure the cable to the tie.
The cable is attached to the tape in the places where the loops bend, that is, along the edges of the heated area, without sharp bends or tension.
Between the edges, pieces of mounting tape are laid in increments of 0.5 meters.
Laying is done in such a way that the installation cable is located close to the junction box.
After laying the cable on the floor, its resistance is checked, the results of which are recorded in the warranty card.
Resistance determines the integrity of the cable insulation.
The resistance parameters at which the cable is considered serviceable are indicated in the instruction manual.
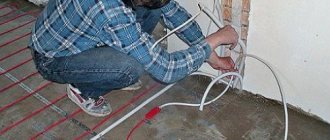
It is also necessary to install a thermostat with a temperature sensor. This is done according to the following algorithm:
Installing the thermostat and connecting the cable
Connecting an electric floor heating thermostat
- Niches are made in the wall for installing a junction box and a thermostat, plus grooves for laying a temperature sensor and installation cable.
- To install the temperature sensor, a special corrugated tube is placed in the groove, one end of which is plugged, and the other is connected to the thermostat. The tube must extend from the wall at a distance of at least 60 cm, in addition, it must be laid between the cable loops. This is necessary for the temperature sensor to work correctly. The bend radius of the corrugated tube must be such that the sensor can be easily removed from it if it breaks.
- After all these manipulations, the groove along with the tube is filled with screed.
- The installation cable is connected to the network through a thermostat. The connection diagram is indicated in the passport. The groove also needs to be covered.
Installation of electric heated floors under tiles
Laying an electric heated floor in a layer of adhesive
It is possible to install a cable floor heating system in a layer of tile adhesive.
The sequence of actions here will be as follows:
- The installation of a thermostat and distribution box is being prepared. That is, niches and grooves are made for the cables.
- The distribution box and corrugated hose for the temperature sensor are being installed. The end of the corrugated hose is tightly plugged to prevent tile adhesive from getting into it. After which it is necessary to check whether the sensor is removed from the hose, after which the groove is filled with a screed, and the place where the end of the hose is located is marked with a marker. This must be done so that the sensor does not accidentally end up “covered” by the cable.
- Re-clean the floor surface of debris. Then attach pieces of mounting tape to the floor to which the cable will be attached. The pieces of mounting tape are placed in the same way as when laying in a screed.
- Next, carefully attach the cable to the mounting tape. We do this in such a way that it is possible to connect the installation wire in the junction box. Do not forget that the temperature sensor must be placed between the cable loops when laid.
- We check the cable for resistance damage. Resistance parameters are described in the user manual.
- We connect the cable and thermostat. After this, we supply power for a short time and check the functionality.
- We lay a layer of tile adhesive 5-8 mm thick. and seal the grooves for the cables. We are waiting for the glue to dry.
- We lay the tiles on a new layer of glue. We are waiting for the glue to dry and you can use the heated floor.
Last stage: checking and screeding
The next very important stage is checking the functionality of the floor. It needs to be filled with water under pressure, which is one and a half to two times higher than the working one.
You can use not water, but air, which is pumped using a compressor. The main thing is to withstand the pressure and leave it like that for at least 2 days. Of course, in winter conditions you can only use an air compressor, as the water may freeze.
After everything has been checked and no leaks are found anywhere, you can make a concrete screed.
Stages of work:
- the pipes are covered with another layer of reinforcing mesh;
- install beacons;
- pour concrete in the proportions of cement and sand 1:3. For each bag of cement add a glass of PVA glue (200 grams). This is necessary for plasticity.
Important. During concrete work, the pipes must be under pressure. You should know that concrete must stand for about 26-28 days in order to gain the required level of strength. And only after that you can start the system.
The task of pouring a concrete screed will be greatly facilitated by a solution that does not require beacons. It has excellent quality, but the only drawback is that it is not cheap, because even a screed of half a centimeter will take a lot of it. Therefore, cement-sand mortar would be a good option.
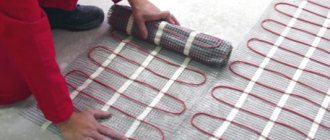
Heating mat for heated floors
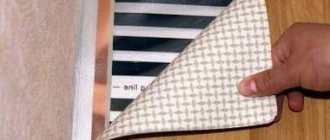
Heating mat for underfloor heating is a device
that consists of a heating cable that is attached to a mesh. They are sold in the form of rolls.
No mounting tape is required to secure the mat to the floor, making floor installation easier and faster.
In addition, you can make a warm floor over the old tiles.
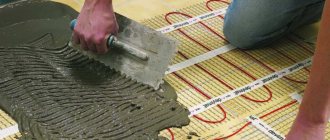
The mats are installed directly into a layer of tile adhesive, the thickness of which should not exceed 5 mm.
Installation of heating mat
Installation of the heating mat is carried out in the same way as installation of a cable in a layer of tile adhesive (see above).
The thermostat is installed in the same way.
Results
It is possible to lay warm floors in any room yourself if you know all the subtleties and features of installation. To decide how to lay a heated floor yourself, it is important to choose the appropriate heated floor option for a specific room. Cheap installation does not always justify expensive operation. The same can be said about the difficulties of installing a water floor. The equipment is cheap, but installation is complex and time-consuming. Therefore, electric floors are increasingly becoming a priority. Their main advantage is mobility and the ability to easily adjust the temperature. There are many installation methods for both electric and heated floors. It depends on the house plan, financial capabilities, choice of material and equipment.
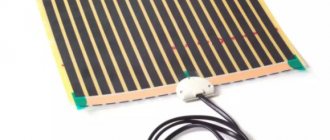
Infrared film heated floor
Infrared film heated floor characteristics
This type of heated floors can be laid in a layer of tile adhesive, under laminate or under linoleum.
These floors are produced in the form of rolls, which can be cut into sections of the desired length.
Heating is carried out using infrared radiation.
This type of electric heated floor is the easiest to install, which distinguishes it from the cables and mats described above.
Installation of infrared film heated floor
How to lay infrared film heated floors
As mentioned above, infrared film heated floors can be installed under tiles, decorative stone, parquet or laminate.
To install such a warm floor, the following requirements exist:
- Level the floor surface to avoid film creases.
- It is necessary to make a groove for the temperature sensor and place it in the corrugation. If the film is laid under the tile, then the end of the corrugation must be hermetically sealed. Without this, it will not be possible to replace the sensor in the event of a breakdown.
- Using a crown of the appropriate diameter is necessary.
- When laying under laminate or parquet, foil thermal insulation made of foamed polyethylene must be laid under the film.
- The maximum length of a section of a heated floor should not exceed 7-8 meters.
- The heated film floor must be laid with a distance of 10 cm from the furniture standing on the floor. To do this, the installation site must be pre-marked.
- It is advisable to place strips of film along the long wall of the room. This will help reduce the number of streaks.
The inclusion and operation of such floors is no different from those described above.
Selection of waterproofing materials and heat insulator
A water-heated floor requires the installation of a waterproofing layer. It can be ordinary polyethylene film of at least 150 microns. It is spread over the entire area under the entire contour.
There is a large selection of thermal insulators. The most effective is tile extruded polystyrene foam with bosses. It is not cheap, but it is incredibly reliable and very convenient to install.
Sometimes, in order to save money, foam boards with characteristics of at least 40 kg/m3 are used. But still, experts do not recommend doing this. It is believed that even such dense foam may not withstand. How do foam boards behave under heavy load? They “sit down,” and thus create a threat to the integrity of the installed underfloor heating system.
Regular tile extruded polystyrene foam without bosses, smooth, has a good margin of safety. It is affordable, and this is the golden mean among all heat insulators.
Safety requirements for electric heated floors
- It is prohibited to shorten the length of the heating part yourself.
- It is prohibited to use one section of heated floors for rooms with different types of coverage. In this case, each room should have a separate section with its own thermostat.
- As screed and tile adhesive, you can only use mixtures that are recommended for use with heated floors.
- It is forbidden to open heat-shrinkable sleeves at the junction of the heating and installation parts of heated floors
- It is prohibited to cover the installation areas of heating sections with carpets and place furniture without legs on them. This will impair heat dissipation from the cable and may cause a malfunction.
These requirements are most universal for different manufacturers of heating cables and mats.
For safe operation, be sure to read the instructions that come with the kit.
What will be required for the work?
So, to lay an electric floor you will need the following elements and materials:
- Underfloor heating system (heating cable, alone or in combination with reinforced mesh);
- Connecting wires;
- Fastenings;
- Regulator, temperature sensor;
- RCD protection system;
- Copper cable for grounding.
How to calculate the required number of heating elements and cables will be described below. First of all, you should plan the surface.