The base of the bathhouse must be reliable and durable, but in addition to all the indicators, the heat-saving characteristics are also very important. There is an opinion that it is not necessary to spend time and money on insulating the foundation of a bathhouse, but it is wrong. Of course, steaming more than twice a week is harmful, and you can heat the steam room longer, wasting a large amount of firewood. But when the foundation begins to collapse and the walls begin to give way, it will be too late to think about the problem. You should not be afraid of labor-intensive and expensive work, especially since everything can be done on your own. We will tell our readers how to insulate the foundation of a bathhouse with your own hands using various materials in today’s article.
The foundation of the bathhouse must be insulated, otherwise heat loss will be high and it will take a long time to heat the steam room.
Bathhouse foundation insulation technology
The method of foundation insulation depends on the structure of the soil and the foundation design itself. For a bathhouse, most often, strip, columnar or slab foundations are built.
Insulation of strip foundations
Insulation of the foundation and adjacent soils has two main goals:
- heaving soils - distance the process of freezing of adjacent soils from the foundations and minimize the depth of their freezing in winter;
- non-heaving soils – reduction of heat losses occurring directly through the foundation.
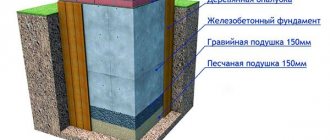
Traditional methods of reducing the effects of frost heaving consist of making a 10 cm thick sand preparation under the base of the foundation and backfilling the perimeter of the foundation with non-heaving soil.
But it is practically possible to completely eliminate the occurrence of frost heaving only by eliminating the very cause of soil freezing by insulating the foundation along its entire perimeter.
These works are performed in the following sequence:
- A trench is cut along the entire perimeter of the bathhouse, the depth of which is 0.5 m, and the width should be equal to the depth of regional seasonal freezing, which can be found for your specific area in building regulations or reference books or on construction Internet sites. For example, this value is 1.4 m for the Moscow region.
- Coarse-grained sand is placed at the bottom of the trench in a layer of 20 cm, thoroughly compacted and poured with water.
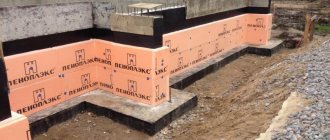
- Insulation is laid on the sand, with the seams carefully sealed with metallized tape. The slabs should have a slight slope away from the foundation. The thickness of the slabs is calculated using a special formula. For extruded polystyrene, there are tables that make it easy to determine the required thickness. Such tables are available in reference construction literature and on the Internet.
Since heat loss in the area of external corners is greater than in flat areas, in these places at a distance of 150 cm from the corners it is necessary to lay insulation 1.5 times thicker than in areas along the walls.
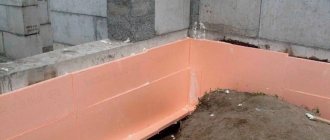
- Extruded polystyrene slabs with a thickness of at least 100 mm are attached over the entire surface of the underground part of the foundation and plinth. The insulation is fastened using special types of mastics and dowels with umbrella-type screws (with a wide head). In the underground part of the foundation there is no need for careful fastening, since this area will subsequently be covered with sand. The insulation slabs are fixed to the base at a rate of approximately 5 - 8 dowels per slab. Thermal insulation of the basement is protected by basement siding, porcelain tiles or cement plaster on a grouse mesh.
- A 30 cm layer of sand is placed on the insulation with careful compaction.
- On top of the sand, around the perimeter of the bathhouse, a concrete or asphalt blind area is made.
Such insulation effectively eliminates soil freezing around the foundation, preventing the occurrence of frost heaving, and reliably ensures a significant reduction in heat losses.
If there are any problems with performing insulation from the outside, insulation is performed from the inside. The fastening of heat insulators on the inside of the foundation is carried out similarly to that described above for external insulation.
Insulation of slab foundations
If the bathhouse is being built on weak, subsiding or silty soils, then the best solution is to install a slab foundation.
Thermal insulation boards are laid directly on the waterproofing layer. The protection of insulation slabs from the liquid components of the concrete mixture depends on the method of reinforcing the reinforced concrete monolithic slab.
If reinforcement is done by tying reinforcing bars, then it is sufficient to use a polyethylene film with a thickness of more than 200 microns laid over the insulation.
When reinforcing using welding work, it is necessary to install a protective screed made of lean concrete or cement mortar on top of the film, which is laid with an overlap of 15 cm. The seams of the film must be sealed with double-sided tape.
It is most effective and efficient to use extruded polystyrene foam as insulation. The use of other types of insulation will cost much more with less effective effect.
DIY thermal insulation
An individual application technology has been developed for each insulation. Before you get started, you need to study the step-by-step instructions.
Expanded clay and sand are similar in their characteristics and laying technology:
- Trenches are dug from the outside of the base. They are needed for soil drainage.
- The bottom is covered with geotextile, crushed stone is poured on top. Then perforated pipes are laid around the perimeter, connected and led into the prepared well. A layer of crushed stone is applied on top.
- The foundation is cleaned and dried.
- The trench is filled with sand or expanded clay. When placing, each layer is compacted.
Thermal insulation technology with mineral wool:
- Defects are removed from the surface of the base, cleaned, and dried.
- A frame is built from a metal profile.
- Mineral slabs are mounted on the structure.
- The open surface of the mineral wool is covered with a special film that protects the mats from wind, water, and steam.
- The mineral wool structure is covered with a brick wall (or ventilated slabs).
The technological process of applying bitumen mastic is simple - the surface of the foundation blocks is coated several times with a bitumen mixture, covered with a roll of waterproof material that will act as a heat insulator.
Foam application technology:
- Digging under the base, cleaning, drying, removing residual particles of oil, bitumen, fats.
- Applying a waterproofing layer.
- Foam boards are mounted using construction adhesive (dry mixture).
- Using the same glue, a fine metal mesh is applied to the surface of the foam plastic, designed to protect against pests. For reliability, the mesh is secured with plastic dowels.
- The foundation dug around the perimeter is covered with sand.
The technology of using sheet polyurethane foam insulation is similar to foam insulation. There is another way to protect the foundation from temperature changes - layer-by-layer application of polyurethane foam. In this case, a liquid polyurethane foam composition is used. The composition is applied in layers with a total thickness of 5 cm. Such a gasket is equivalent to a layer of extruded polystyrene foam 12 mm thick. Spraying polyurethane foam requires special equipment.
Working with tape base
Such a frame needs to be insulated from the outside, since it is important to preserve more free space for the underground room. Baths are sometimes equipped with basements, which serve as utility rooms. In this case, double-sided sealing will not hurt. To eliminate the unwanted greenhouse effect, the room is provided with vents.
The tape base allows the use of horizontal and vertical types of thermal insulation.
The insulation procedure requires a long time, since it involves following the instructions step by step:
- Undermining – 10 days of settling (moisture evaporation period).
- Cleansing, drying.
- Waterproofing - 5–7 days (drying).
- Treatment with mastic.
- Installation of EPS (extruded polystyrene foam) or polystyrene foam.
- Additional fastening of the above-ground part of the insulation.
- Reinforcement, treatment with plaster - 1–2 days (drying).
- Final leveling, sanding.
- Backfilling with sand, expanded clay, earth and compaction.
- Casting a concrete blind area - 1–2 days (drying).
Features of insulation technology
The foundation is insulated to a certain depth, the value of which is usually equal to the level of soil freezing in the coldest period of the year. The place for the heat insulator is prepared in advance, already at the stage of constructing the foundation itself. In this case, the formwork - the frame, which is subsequently filled with the foundation, is made wider by the thickness of the polystyrene foam layer. After pouring the foundation and removing the formwork, the heat insulator is attached from the outside to the concrete or cement base of the building, and the area protruding above ground level is finished with finishing material directly along the surface of the insulation.
Usually, before laying the insulator on the foundation, a layer of waterproofing is fixed - a polyethylene or foil film that protects the foundation of the building from the damaging effects of external moisture. This layer also serves as additional thermal insulation and protection of the foundation from mechanical damage. All seams between sheets of polystyrene foam and waterproofing are sealed using metallized tape. This problem can also be solved by laying the insulation overlapping or in two layers, with the second layer covering all the seams and joints of the previous one.
Expanded clay insulation can be used to seal areas around pipes or cables. In addition, insulation of the foundation, carried out by combining several materials, has recently gained particular popularity. The peculiarity of this modern method is the installation of the base of the building on pillars with a conical extension at the base. This significantly increases the stability of the structure, while a ventilated space remains under the foundation, which can be covered with expanded clay. Otherwise, thermal insulation is carried out according to the same rules.
The foundation of any structure serves as the basis for its strength and durability. For a bath, in addition to its main purpose, the foundation also retains the heat that is created inside the room. A fairly common misconception is that it makes no sense to insulate the foundation of a bathhouse due to the economic inexpediency of this work. Since staying in the bathhouse is periodic, it is easier to heat it thoroughly once or twice a week, even if you spend more firewood on it, than to carry out expensive and very labor-intensive work associated with insulating the foundation. But the possible premature destruction of the uninsulated foundation, and then the walls, will soon show the inconsistency of such reasoning. This article will tell you how to insulate the foundation of a bathhouse.
How to calculate the thickness of the insulation layer
To determine the optimal thickness of the thermal insulation material, it is necessary to know the heat transfer resistance coefficient required for a given design. The basic requirements for the thermal resistance of buildings are determined by SNiP II-3-79 (developed in 1979 and amended in 1995).
Formula for calculating the thickness of insulation: TU = (T - ShF/KTF)* KTU , where TU - Insulation Thickness, T - Thermal Resistance, ShF - Foundation Width, KTF - Thermal Conductivity Coefficient of the Foundation, KTU - Thermal Conductivity Coefficient of the Insulation
Example 1: We are building a foundation with expanded clay insulation for a house 6x8 m, freezing depth - 1.4 m. Foundation - reinforced concrete strip 0.4 m wide. Coefficient. thermal conductivity of reinforced concrete - 1.69 W/mS, expanded clay - 0.18 W/mS. Thermal resistance for the Moscow region is 3.2 m2C/W.
We calculate: TU = (3.2 – 0.4/1.69)*0.18 = 0.53 m. We round up and get the insulation thickness of 0.6 meters. Trench area for expanded clay = (6*0.6 + 8*0.6 + 1.2*0.6) × 2 = 18.24 m2. In total, taking into account the freezing depth, 18.24 × 1.4 = 25.5 m3 of expanded clay is required.
Example 2: We are building a foundation with insulation with expanded polystyrene (or penoplex) for a house 6x8 m, freezing depth - 1.4 m. Foundation - reinforced concrete tape 0.4 m wide. Coefficient. thermal conductivity of reinforced concrete - 1.69 W/mS, expanded polystyrene (indicated in the technical documentation of the material) - 0.032 W/mS. Thermal resistance for the Omsk region is 3.8 m2C/W.
We calculate: TU = (3.8 – 0.4/1.69)*0.032 = 0.114 m. We round up and get the insulation thickness of 120 mm. Those. You can use 60 mm panels in two layers with overlap.
Materials for installing an insulated foundation
To insulate the foundation of a bathhouse, various heat insulators can be used:
- insulation based on polystyrene foam;
- mineral and glass wool in the form of slabs and mats;
- Bulk insulation – expanded clay, slag, sawdust and so on.
The main requirements for thermal insulation building materials when performing foundation insulation work are the ability not to absorb water and not to shrink after backfilling with soil.
Mineral wool and heat-insulating materials based on it are more susceptible to moisture, and under conditions of high temperatures in the bathhouse, very unpleasant odors may arise after some time. In addition, mineral wool slabs are subject to compressibility under the influence of soil pressure.
Various bulk insulation materials, due to their fairly high thermal conductivity and low resistance to water, mainly serve as an addition to the main thermal insulation.
A good solution is to use sheet foam, which has a low thermal conductivity coefficient and is not susceptible to moisture absorption. But the durability of foam plastic is significantly less than that of the foundation material, which limits its use as insulation for foundations.
Foamed glass is more durable than polystyrene foam and has comparable thermal conductivity, but it is much more expensive.
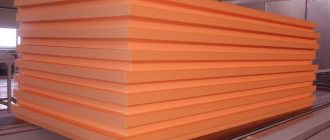
The best insulation for foundations is undoubtedly extruded polystyrene foam, which is several times cheaper than foam glass.
This is due to its following advantages:
- High strength indicators;
- Low thermal conductivity;
- Not susceptible to rodents, birds and insects;
- High resistance to various chemical and physical aggressive agents, low and high temperatures and moisture;
- Very high fire resistance;
- Increased elasticity, which allows the use of extruded polystyrene foam for insulating foundations of any size and shape;
- Increased, more than forty years, service life;
- This is an environmentally friendly material; when used, no harmful substances are released.
Recently, it has become very popular to insulate the outer surface of foundations with sprayed polyurethane foam.
Spraying ensures the absence of joining seams and uniform distribution of the heat insulator. Low thermal conductivity provides a high degree of thermal insulation with a polyurethane foam layer thickness of already 50 mm. The insulation is completely resistant to moisture and other aggressive environments.
The widespread use of this progressive modern method of thermal insulation is hampered by its high cost, which is due to the need to use special equipment for spraying. In addition, it is very problematic to perform thermal insulation with sprayed polyurethane foam on your own, which means it becomes necessary to resort to the services of expensive specialists.
Continuous external thermal insulation depending on the material of the load-bearing walls
How to insulate a bathhouse from the outside if it is not intended to seal the joints, but rather to install a thermal insulating lining? Let's look at the types of load-bearing walls:
Before insulating a bathhouse, it is necessary to correctly calculate the thickness of the insulation layer
Brickwork or concrete structure. The types are combined into one category because they relate to inertial buildings with high heat capacity and high permissible moisture accumulation.
Explore further
- Foam concrete and gas blocks. They occupy an intermediate position between log houses and brick baths.
- Log house Requires strict consideration of the relative vapor permeability of each layer of the insulating sandwich.
Brick or concrete walls
Of the two methods for selecting insulation relative to the structural material, it makes sense to use the dew point shift method. What does this mean? A thermal insulator with vapor permeability close to zero (for example, polystyrene foam) is taken and glued to the rough wall. The internal insulation also contains a vapor-impenetrable layer - a foil infrared screen. It turns out that the moisture condensing in the thickness of concrete or brick has nowhere to evaporate.
To prevent overmoistening, it is necessary to ensure that the dew point is located outside the rough wall - in polystyrene foam. To do this, it is necessary to increase the thickness of the external insulation to approximately a wall thermal resistance value of 4.0 - 5.0.
In central Russia, this corresponds to a thickness of EPPS slabs of 200 mm.
Wall insulation scheme
The material will cost a decent amount, but the work budget will be less than when implementing ventilated facade technology (with mineral wool, an air gap and molded finishing cladding). In addition, self-pasting walls with EPS boards is much more affordable for a non-professional than any other methods of external thermal insulation. For everyday use of such a steam room, only the reflective screen and clapboard lining should be left in the internal lining. For pair sessions 2 - 3 times a week, it makes sense to divide the calculated thickness of the insulation into 2 layers: 150 mm for the outer surface and 50 mm for the inner lining.
The choice of finishing on the street side should be correlated only with budget, the possibility of independent implementation and personal aesthetic preferences. From the point of view of the operation of an insulating sandwich, the physical properties of this layer are absolutely unimportant. If you don’t want to mess with plaster, you can decorate the bathhouse with any relatively light slabs or panels that are moisture resistant. The main thing is not to use chemicals that can destroy polystyrene foam.
Foam concrete and aerated blocks
Insulation of a bathhouse from the outside with polystyrene foam
How to sheathe a bathhouse built from cellular materials? To carry out the work yourself, you should stick to the same polystyrene foam.
The only difference with the previous version of the bathhouse will be that the thermal calculation will require a smaller thickness of the EPS layer (120 - 150 mm), all other things being equal - climate, thickness of the masonry and a given value of the heat transfer resistance of the wall sandwich.
Log house
This idea may look strange, but sometimes a log house needs a “fur coat.” Especially if we are talking about refurbishment of a bathhouse with a change in the purpose of the object (for example, from personal to commercial). The only insulation whose vapor permeability is higher than that of wood is mineral wool. However, the disadvantage of this idea is associated with the high labor intensity of the work. You will need:
Insulation of a wooden bathhouse from the outside
- Stuff horizontal slats to form sheathing.
- Lay rolled or slab mineral wool.
- Hang the windproof membrane, securing it to the sheathing with a stapler.
- Install vertical counter-lattice slats that form a ventilation gap and serve for installation of the finishing coating (for example, wooden or plastic lining).
- Lay a high-diffusion membrane (water barrier) along the vertical slats.
- Install decorative covering.
Formwork reinforcement
After hardening, concrete becomes completely inelastic; in order for it to withstand the effects of various natural factors well, it is necessary to give it additional rigidity and strength using reinforcement - steel rods connected according to certain rules.
Approximate layout of fittings
It is more convenient to install the reinforcement after the formwork has been assembled. To do this, pieces of reinforcement are driven into the bottom of the trench in two rows. They should be 5 cm apart from the formwork panels, and their height, after they are driven in, should be 5 cm less than the height of the foundation. Then horizontal reinforcement bars are placed on the bottom. They are tied with wire to vertical supports at a height of 7-10 cm from the bottom of the trench (to make it more convenient, you can place bricks under the reinforcement - this will be the desired height). The upper reinforcement belt should be buried 6-8 cm into the future foundation.
This is what foundation reinforcement looks like
After the reinforcement is completed, all that remains is to provide technological openings for the supply/discharge of water, light and ventilation. To do this, you need to cut a piece of plastic pipe and attach it to the reinforcement in the right place. To prevent the pipe from becoming clogged with concrete, it can be covered with sand.
After installing the reinforcement, it is necessary to provide technological holes
Process description
Many people consider insulating a bathhouse made of timber from the inside to be an unnecessary undertaking, or they focus their attention only on arranging the insulation of the ceilings and foundation. However this is completely false
However, this is completely false.
The fact is that insulating the walls in a bathhouse made of logs or timber may be necessary for many reasons.
For example:
- Small diameter of the crown in the log house;
- Poor insulation or its absence at all in the foundation of the building.
Important! With high-quality and comprehensive insulation, the cost of heating a bathhouse will be reduced by three times!
The structure of a well-insulated wall is as follows:
- A carefully prepared and clean wall;
- Hydrobarrier;
- Insulation layer;
- Vapor barrier membrane;
- External wall cladding.
Internal insulation of a bathhouse will be done quickly and without problems if you choose the right material. It must be environmentally friendly, not susceptible to rotting and insects, and also have fire-resistant properties.
Step-by-step instruction
The process of insulating a bathhouse from the inside with your own hands has a certain sequence, an algorithm of actions that you should familiarize yourself with.
- The first step is to prepare the surface of the walls. To do this, all cracks that exist on the surface should be treated with plaster. Sealant can also be used for these purposes. By the way, when plastering, the thermal insulation properties of the walls become better;
- After this, all structural elements must be treated with antiseptics and fire retardants to prevent fire and the spread of fire;
- Next, wooden blocks (50x50 in size) are attached to the walls of the bathhouse using self-tapping screws, for which holes have been prepared in advance both in the walls and in the bars. They must be placed in a vertical position with a step width of 55 cm. The bars must be in the same plane, for this you can use a guide cord;
- Next, insulation boards must be placed in the cells between the bars. It should be noted that the width of the insulation should not exceed the width of the cell too much;
- After the insulation boards are placed in place, it is necessary to install a vapor barrier layer. To do this, you can use foil, which must be attached to wooden blocks using a construction stapler. The resulting joints must be glued with metallized tape;
- Wooden blocks are nailed vertically on top of the carefully secured foil, onto which decorative lining is then attached.
Covering with penoplex
Penoplex is an excellent insulation for a bathhouse under the lining, which has many advantages:
- Moisture resistance;
- High strength;
- Light weight;
- Ease of installation;
- Low level of thermal conductivity;
- Vapor tightness.
Due to these characteristics, penoplex is often used to insulate bath buildings.
However, it also has disadvantages, since when heated it emits toxic fumes.
That is why it is not recommended to insulate a bathhouse with foam plastic, as well as penoplex, in a steam room.
Let's consider how the process of thermal insulation with penoplex occurs in a rest room or dressing room:
- First of all, the surface of the walls must be carefully prepared and leveled. To do this, you need to cover them with a double layer of primer and let them dry;
- Next, a layer of vapor barrier is laid;
- After this, a thick layer of glue must be applied to the foam sheet. It should be noted that the adhesive composition can only be used based on cement, polyurethane or bitumen;
- Fix the penoplex sheets over the vapor barrier, additionally secure them with nails;
- Once the entire surface of the walls is covered, you can begin installing the second layer. The foam sheets should be positioned so as to cover the seams of the first layer;
- After the glue has completely dried, it is necessary to treat all gaps with polyurethane foam;
- Next, a reinforced fiberglass mesh is installed over the surface of the penoplex;
- We cover the “pie” with a layer of waterproofing, and you can finish the walls using clapboard or wooden boards.
Why insulate the base of a bathhouse?
An uninsulated foundation has direct contact with the soil. The operation of the bathhouse leads to the formation of wet condensation on the lower surface of the floor adjacent to the foundation. Moreover, the outer side of the floor is a cold surface in contact with the air surrounding the bathhouse. You can easily understand that moisture will constantly accumulate on the underside of the floor and gradually undermine the base of the bathhouse, forming dampness, rot and mold.
When cold weather sets in, another problem arises. The moistened lower surface of the bathhouse and the foundation itself are a source of dampness in the soil. During the freezing process, moist soil layers form so-called “buoyant forces” - it is known that liquid expands when it freezes. And this, in turn, causes deformation of the base of the building, its distortion. It is not difficult to guess that such a foundation very quickly collapses under the simultaneous influence of “swelling” of the soil and dampness, mold and fungi from the inside.
When the owners insulate the foundation only from the inside, the outer surface of the building is practically given over to the freezing air. The uninsulated side is even more exposed to the influence of the swollen soil, freezes even more, which means it collapses faster
Therefore, it is very important to insulate the foundation, first of all, from the outside, and only then from the inside.
How to inexpensively insulate the base of a log bath?
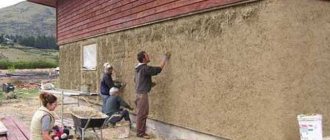
Often, in a chopped bathhouse, the floor turns out to be damp and cold. This means it's time to take up thermal insulation measures. When insulating the base, different technologies can be used. For example, insulation can be placed from the inside. But this will require dismantling the floor in the building. A more convenient method is to insulate the base from the outside.
The need to place thermal insulation materials on the outside can be explained by the fact that the most correct way to lay the insulation itself is on the cold side. Then the structure will not freeze. Internal thermal insulation should only be considered if you have decided to carry out complex insulation, which may be useful, but will be expensive. As for inexpensive insulation, it looks like this.
Inexpensive basement insulation scheme
- The bathhouse is dug in with a trench 40 cm wide. Rotten logs are removed;
- New logs are coated with antiseptic substances or drying oil;
- Jute is placed in the cracks between the logs to eliminate drafts;
- The logs of the bathhouse walls become jammed;
- The seams are caulked with jute and covered with gypsum putty with sawdust;
- A painting mesh is attached to the logs, which is then used for plastering;
- The surface is covered with roofing felt or other material for waterproofing;
- To eliminate the risk of freezing, earth and sawdust are poured into the trench.
How to insulate the foundation
Based on the above, insulation should be carried out from the outside of the foundation. To solve this problem, you can use sheet foam - an excellent material with very low thermal conductivity. It does not absorb moisture, so it deteriorates quite slowly.
But not slow enough. The insulation must “live” as long as the object it insulates. The durability of foam plastic is much inferior to the foundation material.
Foam glass is much more suitable - foam glass, which has thermal conductivity comparable to foam, but is much more durable. However, it is much safer to use extruded polystyrene foam specially created for such purposes.
This material is much lighter than foam, but much stronger.
Pouring a strip foundation for a bathhouse
If the load on the foundation is small, the winters are not very cold and there is usually little precipitation, you can use M-400 cement for concrete; in other cases, use M-500. If you will be pouring the foundation in the cold season (temperature below +5°C), you need to add a plasticizer and also take measures to insulate the concrete.
The mortar for pouring the foundation is made from cement, sand and crushed stone. The proportions are basically: 1*3*5. This means that for 1 part of cement take 3 parts of sand and 5 parts of crushed stone. Crushed stone is used in several fractions, usually medium (60-70%) and fine. To improve the plasticity of the solution, plasticizers are added to it. In private house construction, liquid glass is used to increase strength, and for better ductility, the most common is liquid soap (200 ml per batch in a concrete mixer) or dishwashing detergent (the proportions are the same).
The use of gravmass allows you to obtain very durable concrete
The first version of the solution guarantees high strength, but hardens very quickly, which is inconvenient if there is a shortage of workers (if the concrete has time to set, and another portion is poured onto it, the solidity will be broken, and, therefore, the strength will decrease). The second version of the concrete mixture hardens slowly, but has lower strength (although it is enough for any bathhouse).
Pouring strip foundation
All components of the concrete solution are mixed dry, then water is added (ratio of 0.5 to the volume of cement) and everything is mixed well again. The finished solution is poured into the formwork. To avoid the formation of “cold bridges”, it is advisable to fill the foundation at one time. If this is not possible, the concrete layers should not be less than 20 cm.
After the entire solution has been poured out and leveled, it is necessary to allow air to escape from the solution. To do this, you can pierce the concrete in several places and knock on the formwork, but it is more effective to use a construction vibrator.
After three days, the formwork can be removed (some do not advise removing the formwork earlier than after a week), but at least 3 weeks must pass before the solution completely hardens. If the weather is hot, the foundation needs to be watered periodically (two or three times a day); if, on the contrary, it is too humid, it needs to be covered with roofing felt or plastic wrap. Only after three weeks can you begin to build walls.
After the foundation has dried, you need to waterproof it and then start building walls.
Thermal protection method
You can insulate the foundation in two ways - before and after laying.
The first method is used before pouring cement. Insulation materials are laid on the outside of the foundation wall above the ground and underground (if there is a tunnel). The insulation of the underground part of the foundation block in contact with the ground is additionally covered with a protective layer. If the foundation block is shallow, its base is also subject to thermal insulation. After casting the cement mortar, in addition to finishing the interior with heat-insulating material, a blind area is laid - the outer layer that holds the base. Before filling the blind area, a heat-retaining layer is laid under it.
Often builders use formwork instead of an insulating layer. The structure is mounted not from wood, but from polystyrene foam. Therefore, it does not need to be removed after the concrete solution has dried. It is a good thermal insulation material and does not deteriorate under the influence of environmental factors. Wooden boards, unfortunately, are susceptible to rotting.
The second method is used after the construction of the building. In essence, it is equivalent to insulating the height of the base. The base, as with internal insulation, is protected with a blind area. This method is simpler, more economical, but less effective, since it is applied only to the front side of the foundation.
The main reasons for the need to insulate bathhouse foundations
The foundation of the bathhouse must be insulated for the following reasons:
- To prevent the formation of condensation on its internal walls. In the warm season, heated air freely penetrates from the street under the uninsulated foundation. The inner walls of the foundation are quite cold due to contact with wet soil. When a cold wall meets warm air, water condensation begins to form on it. The result is that the internal surfaces of the foundation will be constantly wet all summer. Gradually, mold and mucus form on them, which subsequently leads to the destruction of the structure. Within two to three years, there may be a need for major foundation repairs.
- To maintain a comfortable thermal regime in the bathhouse. According to studies conducted, up to a quarter of all heat losses can occur through an uninsulated foundation.
- To eliminate the consequences of frost heaving. In winter, freezing of wet soil layers inside the space under the bathhouse and outside the uninsulated foundation leads to swelling of the soil. The result is the occurrence of cracks and deformations in the body of the foundation and the walls of the bathhouse.
- Protection of waterproofing from various types of possible mechanical damage.
The result is greater durability of the foundation waterproofing.
The bathhouse foundation is insulated from the outside and inside
Important: it is strictly not recommended to carry out insulation work on the inside if insulation has not been done on the outside. Because in this case, increased freezing of the outer walls of the foundation occurs in winter while enclosing the heat generated inside the foundation
Soil heaving begins to occur more intensely, which leads to rapid destruction of the bathhouse foundation structure. Internal insulation is carried out only in the most extreme cases, when it is not possible or very difficult to perform external insulation. Of course, when insulating from the inside, there will undoubtedly be a positive effect, but still, freezing of the foundation surface occurs from the outside. If there is a financial opportunity, then it is most rational to insulate the foundation of the bathhouse both outside and inside.
Types of wallpaper
- Paper ones are the most democratic. They are cheap, can be found in any repair store, they come in embossed and smooth. However, they have one significant drawback - they are not durable at all and cannot be repainted often (no more than 5 times during their service life). To increase strength, some craftsmen coat them with a special varnish composition. This adds durability and gloss. However, it exposes all the irregularities of the wall. In addition, to repaint, the varnish will have to be removed, which can lead to very disastrous consequences.
- Vinyl is more durable. Consist of vinyl and foamed PVC. They can withstand up to ten repaints without losing integrity, but are afraid of mechanical damage. On sale you can find this type of wallpaper with an interesting texture - a pattern or imitation. They are well suited for the kitchen or hallway.
- Non-woven ones - created on the basis of a more technologically advanced material than those mentioned above. The composition includes three or even four different layers, which make the material very durable and unpretentious. They are elastic, withstand wet cleaning, as well as repainting up to 15 times. You can also come across negative statements, which mainly boil down to the non-environmental friendliness of this type of coating. The fact is that when heated strongly, non-woven fabric releases a certain amount of formaldehyde vapor. However, if you stick them on the walls of the hallway or hall and do not plan to set them on fire, you have nothing to fear.
- Fiberglass wallpaper is the most expensive and most technologically advanced type of wall covering in our review. It is obtained by processing glass with special additives. The high cost is more than covered by its excellent appearance, environmental friendliness and durability. In addition, they do not burn and do not emit any odors or harmful substances. If you intend to surprise your guests and plan to change the color of the walls often, this is the best option for you.
Liquid wallpaper. To complete the picture of the possibilities of decorating walls in residential premises, this type cannot be ignored. Essentially, it is a dry mixture of various materials, which just needs to be diluted with warm water, spread on the wall and wait until it dries. In terms of painting, they can be compared with paper ones, i.e. They practically cannot be painted and are very afraid of being treated rudely.
Features of extruded polystyrene foam
Thanks to the properties of the raw materials and the closed-cell structure, which prevents water from penetrating inside, slabs made from extruded polystyrene foam have excellent technical characteristics and a long service life of at least 40 years. This makes it an excellent material for organizing thermal insulation of the foundation of a bathhouse.
In addition, it has been found that rodents like extruded polystyrene foam less than regular granulated polystyrene foam. They spoil it much less often, even if it is a barrier to water and food.
For use in the foundations of civil and industrial buildings, thermal insulation boards with high compressive strength are used as vertical thermal insulation. In private construction, it may be somewhat less, because the depth of the foundations here is less, and accordingly, the pressure of groundwater and soil on the thermal insulation material is significantly lower.
In personal construction, it is recommended to use slabs with a strength of at least 200 kPa, while in structures that require increased strength properties, for example, when installing loaded floors, slabs with a compressive strength of at least 500 kPa should be used.
Calculation of thermal insulation thickness
The required thickness of thermal insulation of a structure installed below ground level can be calculated using a special formula. For areas elevated above ground level, there is another formula. But for those who do not want to bother with complex mathematical calculations, tables have been created that indicate the thickness of thermal insulation made from extruded polystyrene foam, recommended for individual regions.
The range of these materials includes specially created thermal insulation boards equipped with a surface with milled grooves. This device allows it, together with geotextile fabric, to work perfectly as wall drainage. So it successfully performs three functions simultaneously: it insulates the foundation, protects waterproofing from mechanical damage, and removes water from the foundation in the drainage system.
Practical recommendations
You can determine what brand of concrete is needed for the foundation of a bathhouse without weighing and complex calculations. The method is based on meeting the conditions under which the most durable material is obtained. The cementitious emulsion should fill all the free space between the solid fractions of the mixture.
To do this, take a measuring container and a 10 liter bucket. The sand and gravel mixture is poured into a bucket and filled with water, measuring the volume using a measuring cup. When the water rises to the surface of the mixture, record the measured volume of water. This will be the volume of cement that needs to be added to the solution.
If you managed to pour 2 liters of water into the bucket with the filler, then to obtain concrete, mix a bucket of sand-gravel mixture and 2-liter measures of cement. The cement-mixture proportion will be 1/5. Water is added to the dry mixture in portions until a plastic mass is formed.
Best answers
Cat's smile:
There are two options: 1) Drain water from all pipes between the fireboxes. ,
2) Heat with electricity.
It is better to arrange a drain, but if this is a problem, arrange an insulated box for the inlet faucet and part of the inlet pipe up to the faucet, and place a low-power light bulb in the box; its heat will be enough to prevent the faucet from freezing. , Drain the rest of the water inside the bath itself.
VD-23:
asbestos cord or cardboard
Massi:
try filling it with foam
Alexander:
there are many materials. old glass wool, new fiber materials.
Yuri Morozenkov:
there is a wire. or, more correctly, a thermal cord. it raises the water temperature by several degrees. Type it into a search engine. I saw him with my own eyes. but dear bastard
Vasily Zadov:
You can insulate it with anything, BUT, if there is no heat supply, and this is either a constant flow of water (water from the ground +4 somewhere), or additional heating, you can try a heating cable if you don’t mind electricity. But if there is no additional heat supply, then even a meter of insulation will still freeze within a week. If there was a diagram, I would advise in more detail.
We equip the blind area with penoplex
- After insulating the foundation, we backfill it 15–20 cm below ground level. At a distance of one meter we assemble formwork with a height of 20-25 cm;
- Level and compact the soil. After this, Penoplex slabs are installed along the entire perimeter;
- A waterproofing film and reinforcing metal mesh are laid on top of the insulation with an overlap.
- After that, cement mortar is poured into the formwork. The surface is leveled so that there is a slight slope away from the house;
- After the time required for hardening has passed, the formwork is dismantled and the surface of the screed is covered with “street” material, such as tiles. Or you can treat it with a water repellent for concrete. This is a very effective means of “removing” moisture. Insulating the blind area together with the foundation reduces humidity in rooms located below ground level.
A few words about insulating the foundation in a bathhouse.
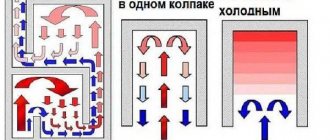
A very good thing. Its thermal insulation reduces heat loss, which means the bath warms up faster and cools down longer. The room will have a warmer floor. In addition, the level of humidity and the risk of condensation on the internal surfaces of the foundation are reduced. Well, biological destruction in the form of mold, rot, etc., slows down significantly. In the photo on the left, the photo was taken with a thermal imager. See the temperature difference.
That's probably all I wanted to tell you. As I promised last fall, I try to bring interesting material to the reader. Don't want to miss blog updates? Then subscribe to the news. Good luck to your family and a warm, cozy home! See you soon!
Wisdom Quote: The cruelest lies are often told in silence.
Repair of wooden base
Diagram of one type of foundation for a bathhouse made of blocks.
Sometimes the foundation for a bathhouse is prepared from thick timber, concreted directly into the ground, and sometimes a monolithic version is installed. You need to know some little things before you properly repair the foundation of a bathhouse or build a new foundation for a bathhouse with your own hands:
- For example, a wooden structure made from sleepers or a log frame is tightened from the outside with brackets in places where they settle. You can calculate how to tighten the frame, how many staples are needed. With other foundations it’s a little more complicated. You need to know how long it takes for the concrete itself to dry, and only then install the frame or beams. If the load-bearing blocks burst during installation and their height is small, you can add a reinforcing layer of concrete around the blocks, filling in all the cracks formed in the column.
- By deciding to make the foundation of the bathhouse yourself, you will not only save a lot of money, but also get a good experience. It’s not difficult to build a monolithic or any other foundation with your own hands; you just need to go through all the stages of construction one by one and not violate the technology.
- Make the correct calculations, markings for construction, soil development, reinforcement, and insulation. Do all necessary waterproofing work. It would be a good idea to consult with builders (developers) who have been building this type of foundation for a long time and have good experience.
Decide what material to build the foundation from, logs, sleepers, what the height of the building will be, how many sleepers or timber you need. Do you need a monolithic or concrete foundation for a log house, a wooden one made from sleepers, or a permanent foundation for a building made of foam blocks?
Knowing how to make a foundation for a bathhouse is not everything; you need to make preliminary calculations, and only then can you confidently begin its construction. It’s up to you to decide which foundation is best for a bathhouse, but it’s better to calculate how much materials you will need for this in advance and draw its structure. Having carried out a simple calculation, you can do everything perfectly, because you won’t need heavy equipment here, except perhaps a concrete mixer with a wooden chute and a concrete drain.
Foundation slab
When insulating the foundation slab, thermal insulation boards are laid on top of the waterproofing.
When reinforcing a monolithic foundation slab in a bathhouse using knitted reinforcement, a polyethylene film having a thickness of 200 microns or more is used to protect the insulation from liquid concrete.
When performing reinforcement work using welding, a protective screed is made on top of a film of cement-sand mortar or low-grade cement. In this case, the film sheets are laid on double-sided tape with an overlap of 130-150 mm.
Only in this way can you save the foundation from freezing and premature destruction. Take care of it today, otherwise tomorrow may be too late!
Reinforcement
The armored belt is made of thick reinforcement (>12 mm longitudinal and 6-8 mm transverse, vertical reinforcement). To work, you will need a grinder, wire for tying the armored belt, a welding machine, and a tape measure.
Reinforcement
The belt consists of longitudinal (four or more), transverse and vertical reinforcements. In this case, the entire structure must be 5 cm away from the formwork, soil and the top point of the foundation, and be reinforced in the corners of the building. The cross section of the armored belt is a rectangle or square.
The reinforcement is cut to the required length. Longitudinal and transverse rods are laid out on the ground and tied with wire at the points of contact. Welding the frame is not recommended, since the welded frame may lose its integrity when compacting the poured concrete or operating the constructed bathhouse.
The longitudinal rods are laid out and tied to each other with an overlap of about 30 cm.
Knitting longitudinal rods
The distance between the transverse and vertical rods should not exceed 50 cm. If the strip foundation is up to 120 cm wide, then it makes sense to make the frame not from two, but from three longitudinal reinforcement bars. If the foundation height is high, it is also worth increasing the number of longitudinal rods. The frame is also reinforced on top with U-shaped clamps, designed to increase the strength of the structure and reduce the risk of cracking of the strip base.
Clamps
At the corners of the bathhouse, the frame is additionally strengthened with reinforcement located at an angle of 45 degrees relative to the horizontal rods.
Corner reinforcement
Corner reinforcement
The finished connected frame is installed on plastic supports. To prevent movement during the pouring of concrete, plastic fasteners are inserted between the formwork and the reinforcement.
Strip foundation reinforcement
Reinforcement and laying of communications
Preparation and calculation
First, you need to draw a diagram of the site in accordance with the scale, designate the area for the installation of a bathhouse and conduct communications to it. The location of the building largely depends on the drainage device. When connecting the water drainage to the central sewer system, the bathhouse can be located anywhere in the summer cottage. If the drain is separate, then it is better to place the building away from bodies of water.
The bathhouse area must be fenced off from outsiders - a fence is needed on the site. The building can be surrounded by hedges. All additional plantings or extensions are also marked on the site plan.
The work begins with cutting off the top layer of soil. Next, the area needs to be leveled. This can be done using special equipment. Changes in height should be avoided - this will complicate the marking and make it impossible to lay the foundation evenly. The marking is made based on the design on paper, so the further arrangement of the base depends on the accuracy of the terrain image.
The outer perimeter of the foundation is marked using a tape measure and a construction angle. The extreme points are marked with pegs through which the cord is pulled. It is necessary to check the perpendicularity of the corners at each stage of marking. To check the accuracy of the placement of marks, measurements of the diagonals of the structure are taken. If the building is rectangular or square, then the diagonal dimensions will be equal.
To accurately place the pegs, you must use special geodetic equipment - a theodolite or level. You should check the length of each side and the degrees of the angles several times. The tensioned cable is the height level of the future foundation. After marking the outline of the building, the area is broken down.
When constructing piles, pegs mark the location of future wells. Their number depends on the area of the bathhouse. The excavation spacing should not exceed two meters. Piles also need to be placed at the junction of the load-bearing wall and partitions. If the number of floors of the future building reaches two or more floors, then the distance between the supports must be reduced. Dense soil allows you to reduce the number of piles, while loose soil does the opposite. The depth of the well depends on the type of soil: in heaving soil, the pile must be lowered 30-50 centimeters lower.
A monolithic foundation can be poured without preliminary calculations - the optimal thickness of the foundation should reach 25 centimeters. Reducing the screed may require additional reinforcement with reinforcement. With a foundation thickness of thirty centimeters or more, a strong structure is obtained, but such construction cannot be called economical. It is customary to cover a substrate of sand and gravel in layers not exceeding ten centimeters in thickness.
The insulation board should not exceed ten centimeters. A concrete base also requires a frame made of reinforcement. According to regulatory documents, for reliable construction, reinforcement should not be less than 0.3 percent of the total mass of the structure. The dimensions of the rods can be calculated with your own hands based on the cross-sectional area of the slab. To save time, craftsmen advise installing a frame made of rods 12-13 millimeters in diameter in two tiers.