Features of choosing the type of stove for a bath
This allows you to make the necessary design, which can fit perfectly into the right place with its dimensions. A sauna stove requires several of the most important components. So, a sauna stove must have a large tank for heating water, a chimney and a receptacle for stones.
It should be understood that installing a sauna stove is a very costly and expensive pleasure, so now many owners of country or country houses independently install a self-made sauna stove in their bathhouse.
Of course, if you make a sauna stove yourself, you can save a very significant amount of money, but you will lose in time. If you decide to make a sauna stove with your own hands, you will have to be patient.
The fact is that the process is long and in some cases complicated. At the same time, you need to understand that the final result should be exactly as you originally planned.
- As a rule, a sauna stove is installed in such a way that the combustion door is located in another room.
- Or here is the second option, where the furnace room is located in the steam room itself and this is where firewood is placed in the firebox.
- Many craftsmen advise installing the firebox in the next room, but if the room itself is very small, then you will have to use the second method of installing the firebox.
- As for water tanks, there are also nuances here. As a rule, tanks are mounted immediately behind the body of the stove itself, in some cases they are fixed above the firebox.
- In this case, professionals advise installing the water tank behind the stove body, since wall mounting is not very safe.
Next, you need to determine the volume of the water tank and the firebox of the stove.
Construction of a foundation made of rubble concrete
For laying the base of a sauna stove, the strength of the clay mixture is not enough. A regular mortar based on cement and sand will do. The most common foundation is made of rubble concrete.
Stages of work:
Digging a pit with a depth of 1 - 1.2 cm in dimensions exceeding the dimensions of the stove by 15 - 20 cm. Compaction of the soil with suitable cuttings of timber or logs. A timber measuring 100×100 mm is suitable. Laying crushed stone and compacting it to a layer 15 cm thick. Installing formwork. Waterproofing of its internal surface is required. Laying rubble 20 - 30 cm.
The maximum size of individual rubble stones is no more than 15 cm. Filling small fractions of voids between stones with crushed stone. Laying concrete mortar. Concrete must fill all the voids, for which its consistency is chosen to be similar to sour cream. This stage is repeated the required number of times until the desired height of the foundation. Laying the last layer of stones.
Ensuring a level height of 6 - 7 cm to the finished floor Controlling the horizontality of the surface Drying the concrete covered with a film for 15 - 30 days Dismantling the formwork Isolating the side foundation surfaces from water. You can isolate the foundation from water at the stage of its construction by adding special additives to the solution. Filling the space between the foundation and the edges of the pit with sand. A gap of at least 5 cm is required between the bathhouse and stove foundations. It must be filled with sand.
Calculation of the volume of the steam room and furnace firebox
Here it is necessary to measure the dimensions of the room, and it is necessary to take into account the surface (what material it is made of).
If there are windows, a glass door, concrete surfaces, brick or tile, it is necessary to measure their area.
Therefore, for 1 m2 of such surface you can additionally add 1.5 cubic meters to the volume of the room. All these indicators will be taken into account when calculating the size of the furnace.
How to fold a sauna portal
As with any large-scale construction, a preliminary construction plan is required.
To ensure an exact match between the expected and the obtained results, it is necessary to measure all sides and adhere to the planned dimensions when laying the walls.
- Clay - 2 parts.
- Sand - 1 part.
- Water - 0.5 parts.
Construction of walls
Having marked a place for the door, they continue to work, erecting the side parts to the right and left of them. There is nothing complicated here, you need to be careful.
To ensure the quality of the resulting frame, bandage the seams.
Remove excess cement with a trowel so that there are no unnecessary reliefs on the wall.
A hammer is used to level the height of all bricks. Tap each brick so that the walls come out even along the stove.
Decorative completion
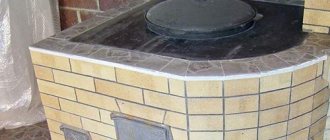
On the front side of the stove, where the firebox and woodshed are located, you can lay out various figures. For example, as most people do, line up the front frame with the letter P. You can alternate bricks around the firebox: white with red, yellow with white, etc.
Oven requirements
Perhaps the most important and basic requirement for such stoves is safety. The stove must meet all safety requirements; it must not be a fire hazard or cause burns to humans.
In addition, there should be no smoke entering the room, and the temperature regime should be recorded on working devices.
Possible difficulties
Fitting and cutting - in practice, these operations take too much time. Therefore, it is easier to calculate the length and height of the “front entrance” in order to use only whole bars, boards and other piece products.
The presence of a door at the firebox can make access difficult. If it is removable, it is better to dismantle it, carry out all the work calmly, and then install it again.
Vertical and horizontal deviations arise not only due to lack of experience, but also due to uneven floors or walls. So it is imperative to carry out constant level checks - it will help to avoid mistakes.
Step-by-step instructions for creating a heater oven
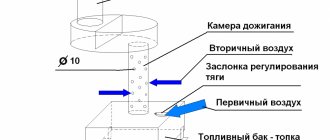
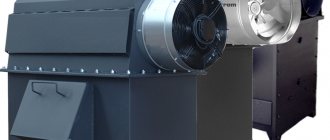
A heater stove is one of the simplest metal stove designs. It consists of a water tank, firebox and chimney. This is perhaps the simplest design that you can make yourself.
Attached to the water tank are a drain valve, the firebox itself and the heater, and a smoke exhaust pipe. Therefore, first, it is necessary to make the frame of the stove and firebox from sheet steel 8-10mm thick, and then make the heater and chimney.
- First of all, we make the base of the firebox frame from corners and pieces of sheet metal using welding. It is necessary to lay fireclay bricks inside the stove, this is important. Next, a heater is made where the stones will be placed.
- Then you can start making the chimney. The hole for the chimney is installed directly above the heater. Well, finally, you need to start manufacturing and installing the water tank.
- As a rule, in such stove models, the water tank is installed on the back of the stove. There must be a drain valve at the bottom of the tank to drain the water. After manufacturing the finished structure, it must be checked for the presence of smoke in the room and the presence of draft.
Another popular option for making a sauna stove is a brick stove. However, it should be understood that the cost of such a stove will be very high if you use the services of qualified stove makers.
But you can, of course, make your own brick sauna stove with your own hands. Only in this case you will have to spend a lot of effort and time, but at the same time, you can save a decent amount of money. Although, if you carefully understand and read a lot of literature on similar topics, then it is quite possible to make such a stove.
- Therefore, if you still decide to make a sauna stove with your own hands, you can follow the pictures below with a detailed description. But remember, this process is long and painstaking, and sometimes complicated, so you will have to have a lot of patience and endurance to achieve the desired result.
- Of course, at certain stages of the construction of the furnace, some incomprehensible nuances or difficulties may arise. In this case, our colorful and illustrated photos will help you, where all the main stages of construction will be indicated step by step.
- It is also necessary to remember that you need to make the oven carefully and slowly, so that there are no mistakes. Otherwise, it will be difficult to correct your “jambs” or miscalculations later, if at all possible.
Thus, you can make a stove for a bathhouse with your own hands, but the question is how well it will be done.
Masonry of furnace walls
The brick must be wetted before laying. Then apply the required amount of solution.
The brick fits tightly into place. The mortar displaced by the brick is removed.
There is no need to plaster the internal surfaces with clay; excess mortar is unacceptable here. Once dry, it peels off and clogs the chimney duct.
Furnace casting is installed directly during masonry and fixed with wire. To ensure that the doors fit tightly to the masonry, they are wrapped around the perimeter with asbestos cord.
The cord will seal the contact points and will not allow the cast iron door, which expands when heated, to destroy the masonry.
Photos of drawings of a stove for a bath
More about firebox rules
For your own safety, as well as for long-term, normal and problem-free operation of the heating unit and “gate”, adhere to the following recommendations:
- Splash water onto the stones carefully, without flooding them, in small portions - 50-100 ml, gradually reducing this volume.
- Use a fan to wet as much of the area as possible.
- Try to direct the liquid between the stones to obtain the hottest and dryest steam possible.
- Follow the sounds - when you hear the water hissing, you will understand that the temperature in the room is dropping.
- Pay attention to the color of the soaked stones - if they acquire a crimson glow, it means you are steaming correctly.
Preparation of the solution
Before finishing the stove in the steam room of the bath, it is necessary to prepare a masonry mortar. To do this, you need to choose the optimal ratio between clay and sand. This can be done by mixing a small portion and rolling it out into a thin cylinder. Then they fold it into a ring and look at the walls. If no cracks have formed, then the solution is of the highest quality.
Modern craftsmen use a different composition to finish a sauna stove. It includes Portland cement, sand and tile adhesive. All ingredients are mixed and work begins. With this composition, the brick holds quite tightly, which guarantees the durability of the masonry. But cement in the solution can have a negative effect when heated. So the choice will remain with the owner of the bathhouse.
Tags: bathhouse, framing, oven
« Previous entry
additional information
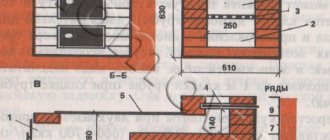
It is necessary to follow a certain sequence when building a brick stove for a bathhouse with your own hands. In this case, order is necessary. This is done so as not to get confused later during the assembly process. Each level has its own specific parameters. Only in this way will an effective and reliable structure be erected. The number of rows depends on the height of the room. The countdown must begin from the lowest. He is solid
This series should be given special attention. The diagonal of the foundation is measured very carefully
You should also pay attention to the outer bricks. They must be of high quality and have smooth edges. Depending on the design of the furnace, the required number of continuous rows is calculated. In some cases, only one is enough, and in others, two or more. The masonry of the furnace body is aligned with a plumb line along the first row. It is recommended to choose the same bricks. There is no need to mix regular red with fireproof. Depending on the heating rate, their degree of expansion varies. If the combination is unsuccessful, then cracks may appear in the structure.
Project selection
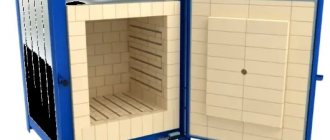
This stove project is suitable for many types of baths. The dimensions of the structure will allow you to heat the room (10-15 m2) up to 50 degrees, and when steam is supplied, up to 90 degrees. A tank with a capacity of 180 liters is built into the stove and satisfies all the necessary hot water for a comfortable washing process for all household members. To allow the heater to cool for a longer time after the end of the combustion chamber, iron pipes are provided (6 pieces, next to the water tank).
The pipes also support the stones above the combustion chamber. The pipes heat up quickly, and after the heating process is completed, they gradually release heat. There is a hole above the cobblestones through which water will be supplied to generate steam.
Having formed the project, you need to begin the assembly process itself. Assembling a stove with your own hands is not difficult. Guided by masonry drawings, the process takes little time.