Insulation of the foundation of a wooden house
Many owners of wooden houses are faced with the fact that in winter the floor freezes on the 1st floor. This phenomenon can only be eliminated in one way - to insulate the foundation of a wooden house from the outside. The foundation of a wooden house is built from different materials. The method of insulating the foundation of a wooden house depends on the type of supporting structure of the building. Modern thermal insulation materials are used to insulate the foundation of the house. This article presents options for insulating foundations of various designs.
Why do you need to insulate the foundation from the outside?
The foundation of a wooden house is a supporting structure that is in direct contact with the natural foundation and the structure itself. In addition to its supporting function, the foundation protects housing from the negative influences of the soil. It is important that the base of a wooden house does not cause heat leakage from the home.
The foundation of the house is constantly exposed to moisture penetration from the soil and changes in ambient temperature. In winter, moisture that gets into the body of the base of the structure freezes and destroys the supporting mass. The cold begins to penetrate into the home through cracks. As a result, the floors in the house will always be cold in winter. That is why it is necessary to insulate the base of a wooden house.
It is impossible to insulate an old foundation from below, but its walls are quite accessible for thermal insulation. Since supporting structures can be of different types, the thermal insulation of the foundation from the outside is carried out in different ways.
Materials for foundation insulation
Insulation of the foundation must be done at the stage of its construction. Although there are circumstances when careless builders did not take care of this in due time. And now the owners of the house have to re-insulate the base of the wooden house.
The time comes, and homeowners think about which insulation to choose. Among the wide variety of heat-insulating agents, it is necessary to highlight materials suitable for insulating foundations:
- expanded polystyrene;
- polyurethane foam;
- expanded clay;
- Styrofoam.
All these materials have low thermal conductivity and high resistance to temperature changes.
Expanded polystyrene
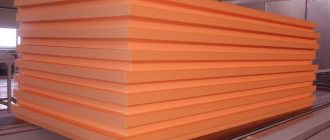
Penoplex (expanded polystyrene) slabs
This material has high thermal insulation properties, moisture resistance and insusceptibility to low temperatures. Thanks to these qualities, extruded polystyrene foam has gained great popularity as external insulation for the foundations of wooden houses. Expanded polystyrene is convenient for insulating strip foundations and plinths.
The material has a fine-cell structure. It is produced by exposing polymer granules to high temperature and pressure in carbon dioxide. Insulation comes on sale in the form of a slab material called penoplex. The service life of polystyrene is about 40 years.
Manufacturers often call expanded polystyrene boards penoplex. Penoplex with a thickness of 50 mm corresponds in heat-shielding properties to 75 mm of foam plastic and 95 mm of mineral wool.
Video on insulating the foundation with penoplex:
Polyurethane foam
The polymer is sprayed onto the foundation walls using special equipment. Once on the treated surface, polyurethane foam greatly increases in volume. In terms of its thermal insulation properties, a 50 mm layer of polymer is similar to a 120 mm thick sheet of expanded polystyrene.
Insulation of the foundation with polyurethane foam
The hardened foam on the walls of the base of the building forms a seamless, dense coating. Unlike sheet insulation, the sprayed outer covering does not require additional sealing of the seams. In addition, the polymer has high adhesion and “sticks” to almost any surface.
Expanded clay
Expanded clay granules are produced by firing a foamed clay solution. Expanded clay has high thermal insulation qualities. This is one of the cheapest thermal insulation building materials.
Lining the external walls of the foundation with expanded clay prevents the base of a wooden house from freezing, even in the conditions of the Far North. The only drawback of the material is its low commercial availability.
Styrofoam
Polystyrene foam is essentially the same polystyrene foam, but has not been extruded (pressure treated at high temperatures). Foam boards are used to insulate the foundation and basement of a house. To prevent heat leakage from a wooden house from below, foam plastic with a thickness of 40 to 120 mm is used.
Polymer boards are easy to process. Most often they are attached to the foundation walls using bitumen mastic. Foam plastic is also fixed to the wall with dowels - fungi.
Polystyrene foam, along with its high thermal insulation qualities, is a very fragile material, so the outside walls of the foundation lined with foam plastic necessarily need a final protective coating.
Methods for insulating the foundation of a wooden house
Mostly wooden houses are built on strip, column and pile foundations. In each case, it is necessary to cover the base and basement of the house with insulation.
Strip foundation
This type of foundation can be made monolithic or constructed from prefabricated reinforced concrete blocks. Also, the support strip under a wooden house is made of rubble stone or flagstone.
The technology for how to insulate the foundation of a wooden house from the outside with your own hands is as follows:
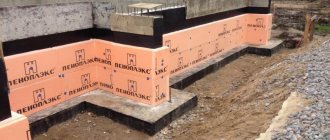
- A trench is dug along the perimeter of a wooden house to the depth of soil freezing.
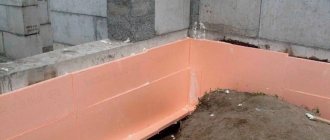
- The foundation walls are cleaned of soil residues and covered with bitumen mastic.
- The insulation boards are installed on a vertical surface, heating the bitumen waterproofing layer with a burner.
- A reinforcing metal or polymer mesh is fixed to the insulation.
- All surfaces are primed, puttied and plastered.
- Insulation is laid on the sandy cushion of the blind area.
- The blind area is concreted, asphalted, lined with ceramics or stone.
Scheme for insulating the strip foundation of a wooden house. The concrete monolith of the supporting strip of the house with a thickness of 40 - 50 cm does not need insulation. The physical characteristics of such a reinforced concrete mass have sufficient heat-insulating properties.
Columnar foundation
As a matter of fact, it makes no sense to insulate the columnar foundation itself. The main heat leakage occurs through the space between the bottom of a wooden house and the ground. The constant movement of air masses underground creates an outflow of heat from the lower floor of the building.
To prevent this negative phenomenon, the outer perimeter of the underground is covered with vertical fences. Fences can be made from a variety of materials: from wooden panels to reinforced concrete slabs. Enclose the base with siding (thin-sheet metal or polymer panels). Siding performs a purely enclosing function.
Due to the enclosed space, drafts stop and the underground air temperature stabilizes in the positive range, and this ultimately leads to effective insulation of a wooden house.
The basement fence is erected from brick, wild stone or other masonry material. It is important that the masonry of the fence is not rigidly connected to the columnar supports. Due to various geological movements, the pillars can move the masonry of the fence. In this case, the wall of the base may crack and collapse.
A hermetically sealed space inside the base can lead to increased air humidity. This in turn will create a favorable environment for the growth of fungi and mold. To prevent the air in the underground from stagnating, it is imperative to make vents in the basement enclosure - small openings that provide natural ventilation for the underground.
For greater reliability of thermal insulation of the base of the house, polyurethane foam is sprayed onto the internal surfaces of the fence.
Pile foundation
The principle of insulating the pile foundation of a wooden house is the same as in the previous case. The house, located on stilts, also has an open underground, which must be closed from the outside environment.
Wooden houses are supported on both wooden and reinforced concrete and screw piles. To insulate the basement of a house on a pile foundation, wooden panels, polymer or metal siding are most often used.
Features of foundation insulation with expanded clay
The method of insulating the foundation with expanded clay has its own characteristics. Since, unlike slab insulation, expanded clay is a bulk material, they do it this way:
- a trench around a wooden house is made 20 - 30 cm wide; the depth of the ditch is made just below the soil freezing mark;
- sand 10 cm thick is poured onto the bottom of the trench; then make a layer of crushed stone or gravel of the same thickness;
- sheets of roofing material are attached to the walls along the outer perimeter of the trench;
- the ditch is filled with expanded clay; pour the granules in layers of 30-40 cm; each layer is compacted;
- the top of the insulation is covered with a cement screed;
- a half-brick thick wall is placed along the screed; masonry is carried out to the height of the building’s base;
- a metal mesh is laid across three rows of bricks, connecting the masonry and the base of the house;
- the space between the masonry and the base is filled with expanded clay;
- a blind area made of cement mortar is installed on top of the masonry; the screed is covered with a galvanized sheet.
Insulation of the base with expanded clay If the roof insulation is not done simultaneously with the thermal insulation of the supporting structures of the building, then the thermal insulation of the foundation will not bring the desired result. The heat will go up, the floors and walls in the home will remain cold.
The base of a wooden house must be insulated, since the owners try to eliminate the cold in living quarters by increasing the load on the heating system of the house, and this results in exorbitant financial costs for heating the home. In this regard, it is better to properly insulate the foundation once and live in a warm house for many winters without incurring unnecessary expenses for heating the house.
Insulating the foundation of a house performs several functions: it not only prevents heat from escaping through the base of the house and reduces heating costs, but also acts as waterproofing and protects the foundation from frost heaving of the soil. Without thermal insulation of the foundation, the first floor of the house will be cold and damp. Practice shows that insulating the foundation of a wooden house from the outside solves all these problems. It is much more effective than insulating only from the inside. In some cases, thermal insulation of the foundation is done both from the inside and outside.
Advice from professionals
For high-quality insulation of the foundation from the outside, it is recommended to follow the advice of professionals:
- Bury the insulation 1 m below the ground. This will protect against the formation of cold bridges through which heat will escape from the room.
- After digging a trench, it is necessary to thoroughly dry the foundation. This ensures protection against mold growth.
- The surface must be coated with a primer, which will not only prevent the formation of mold, but also provide high-quality adhesion to the insulation.
- When gluing the insulation, each sheet must be pressed against the surface for at least 30 seconds.
- To drill holes for dowels when installing insulation, you need to go at least 5 cm into the foundation.
- It is better to carry out work in the warm season, on sunny days. On rainy days, it is better to avoid this, because the materials can absorb unnecessary moisture, which will worsen adhesion.
When performing work, you must adhere to deadlines. To do this, you need to be patient and wait for drying after each of the stages: after digging a trench (2 weeks), priming (24 hours), putty (3 days).
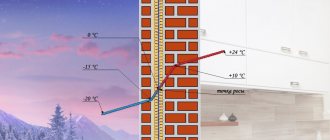
For insulation, it is best to use polystyrene foam, polystyrene foam or penoplex. These materials have low thermal conductivity and excellent resistance to moisture. The dew point, which was previously located in the concrete foundation itself, shifts towards the insulation after the work. Therefore, if previously moisture accumulated in the foundation itself, now it has shifted towards the insulation. And the latter, as is known, will withstand this aggressive influence more steadfastly than concrete.
Proper insulation of the foundation will not only ensure comfortable living in the house, but will also make the basement, if there is one, warmer and drier. Dampness will no longer appear on the walls of the building. But to get a quality result, it is recommended to follow the instructions and choose the right materials.
Why is it better to insulate the foundation from the outside?
Experts believe that this option is preferable for several reasons.
It is recommended to insulate the foundation from the inside only if the basement has good ventilation. Otherwise, the humidity in the basement will increase, in addition, the inner layer of insulation shifts the dew point, because of this the entire base is exposed to moisture and cold. This reduces its service life and leads to rapid destruction.
Wooden houses are usually placed on a columnar, pile or strip foundation. These types differ in their design, which means their insulation is done differently.
For thermal insulation of any type of base, extruded polystyrene foam (EPS, penoplex) is used. It is durable, has a long service life, does not emit toxic substances, is resistant to compression loads, does not allow water to pass through, and does not grow mold or moss. It is easy to use, attached to the foundation with special glue or with the help of umbrellas; the foam boards have a convenient connection to each other.
Possible mistakes
After the construction of the fence, the columnar foundation becomes closed.
If you do not provide for vents in advance, you will have to install them, disrupting the entire installed structure. It is important to choose dry insulation , especially for more permeable materials (such as mineral wool or expanded clay). Otherwise, the insulation will pick up moisture even faster and will have to be replaced.
Attention should be paid to the control of insects and rodents. Most modern materials are not to the taste of living creatures, but they are excellent as nests. Special preparations and equipment will help in the fight against this scourge, as well as careful insulation, making access to the insulation inaccessible.
Attention! During installation, it is better to pre-treat the materials adjacent to the insulation with fire-fighting and antifungal impregnations. This will provide protection from possible fire and rot.
Strip foundation
First, they dig a trench all the way to the bottom of the foundation. Its width is 80-100 cm, since the blind area is also insulated at the same time. If the foundation is of a recessed type, then the first 40 cm deep trench is dug to the width of the blind area, and then, to save effort, you can make it 50 cm wide.
If the house was built some time ago, cracks may appear in the concrete. They are covered with a mixture of cement and construction adhesive if the cracks are small. Larger damage is repaired with cement mortar.
The next step is waterproofing. To do this, the surface of the foundation tape is covered with bitumen mastic, onto which roofing material is glued. The sheets are glued overlapping, the seams are additionally coated with mastic. More modern roll materials are also used, such as self-adhesive roll waterproofing.
After this, the insulation is glued. Although penoplex is often attached to dowels, it is still better to give preference to glue or liquid nails - they do not violate the integrity of the sheets. How to insulate a strip foundation with polystyrene foam, watch the video:
The joints between the sheets are foamed with liquid foam.
After installing the insulation, geotextiles are glued onto it. It will reduce the effect of soil heaving on the heat-insulating layer.
Next, the trench is backfilled to the level of the blind area. Sand and small crushed stone are poured under the blind area in a layer of 0.15-0.2 m, and the cushion is thoroughly compacted. This layer will protect the blind area from loads arising from soil movement. A layer of dense insulation is placed on top. The same penoplex is suitable due to its resistance to compression loads. Concrete is poured on top; it can additionally be reinforced with mesh.
Attention! To reduce the effect of frost heaving, the insulation layer is placed at the level of the base of the foundation. The most effective combination of penoplex insulation up to the level of the walls in combination with insulation of the blind area at the level of the sole.
How to insulate with your own hands?
The insulation of the support-column foundation of both brick and wooden buildings is carried out using the same technology. The main thing is to adhere to the work algorithm and take into account the requirements for materials.
Pickup device
The fence is a wall between the foundation supports that insulates the basement space and protects it from dust and precipitation.
Its full insulation allows you to rid the building of drafts, provides a good microclimate and the absence of humidity.
Step-by-step instruction:
Between the supports you need to dig holes 20 - 40 cm deep.- Make a gravel-sand cushion - fill 1/3 of the gravel and sand into the holes.
- Then construct a sheathing from the bars:
- with the vertical type of fastening of the bars, one part is fixed in the pit, and the other in the lower part of the building;
- with horizontal fastening, the bars are attached directly to the posts;
- You need to insert boards (their thickness is 4 - 6 cm) into the grooves of the bars and carefully secure them.
- After this, you can proceed to arranging thermal insulation.
Features of working with foam plastic
Working with polystyrene foam is quite simple:
- first you need to clean the surface of the insulation from debris and construction dust;
- then remove the unevenness and seal the existing cracks;
- the insulation must be fastened from the bottom up;
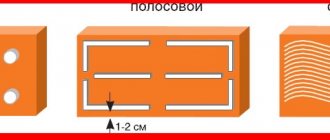
- glue must be applied to the slabs;
- then glue the slabs to the sheathing and secure with plastic dowels;
- then install the reinforcing mesh and putty;
- apply facade plaster.
Features of penoplex insulation
Installation is also easy:
apply a special adhesive mastic to the entire surface: from the sole to the grillage;- Press the slabs against the wall to the zero level;
- between the zero level and the grillage, secure the penoplex with umbrella dowels;
- to secure heat-resistant dowels, drill holes in the base;
- the panels are joined groove to groove - check the seams; To be sure, insulate them with polyurethane foam.
Thermal insulation with polyurethane foam
You can do all the work yourself if you rent a blowing machine:
- clean the entire foundation of dust particles, debris, and traces of soil;
- Apply foam to the base - it will fill all the cracks, voids, air pockets and uneven areas.
The foam has excellent adhesion. The material quickly sets on surfaces, resulting in a synthetic board of high strength.
Reference! Polyurethane foam does not absorb moisture. Experts recommend laying waterproofing made of a water-repellent material, for example, liquid rubber, polyurea and others, on top of the insulation layer.
It will not be possible to completely foam the foundation manually. If you can’t get a car, you will have to contact the company’s specialists.
Pile foundation
How to insulate the foundation of a wooden house on stilts? For a pile foundation, as for a columnar foundation, a fence is built - an imitation of a base, closing the space between the piles. This will already reduce heat loss to some extent. For effective thermal insulation of a pile foundation you need:
- arrange a basement,
- insulate it inside and out,
- insulate the floor.
You can build a thin brick wall around the perimeter, or you can use slab materials that are attached to the sheathing. If you choose the option with a brick wall, you need to pour a shallow concrete strip 20 cm thick on which the wall will be built. It is not necessary to use ceramic bricks; you can take foam blocks or foam glass.
Important! The space under the floor should not be sealed. After installing the intake, vents must be made in it - ventilation holes measuring 10-15 cm. They are placed evenly on all sides of the house so that they are opposite each other.
To fasten panels or slabs, a sheathing is made from a metal profile or wooden blocks. For example, DSP can be used as outer cladding. There are already insulated facade panels that perform decorative and thermal insulation functions.
A shallow trench is dug under the casing, into which a layer of sand (2-3 cm) is poured, expanded clay is placed on it, and the trench is covered with earth on top, so that there is no gap between the soil and the casing.
The video shows the structure and insulation of the false base:
To insulate a pile foundation, use
- expanded polystyrene,
- Styrofoam,
- foam glass in blocks,
- liquid penoizol (urea foam).
The first two options are most often used. Foam glass is too expensive for a private home, and liquid foam insulation requires special equipment or the work of specialists, which is also expensive. It’s easier to insulate the foundation of a wooden house with your own hands using polystyrene foam or expanded polystyrene from the outside. The main thing is that the material does not absorb water, so mineral wool will not work here. The foam is glued to the adhesive foam; for reliability, you can use additional wooden planks, which are attached with self-tapping screws to the sheathing through the foam.
Important! It is advisable to attach polystyrene foam or polystyrene foam to the guides, and not between them. In this case, there will be no gaps or cold bridges, since the thermal conductivity of wood, and especially metal, is greater than that of foam plastic.
You can insulate a pile foundation with polystyrene foam or EPS from the outside or the inside. If this is done outside, then the insulation is attached before finishing. If the finishing is already attached to the base, for example, if these are facade panels or DSP boards, then the insulation is mounted from the inside.
Floor insulation
To insulate the floor in a wooden house on a pile foundation, I usually use mineral wool, basalt wool, expanded polystyrene, foam plastic, and liquid insulation.
Thermal insulation is done during the construction and installation of the floor as follows:
- They make a subfloor on which the insulation will lie.
- A vapor barrier and windproof layer is first placed on the sheathing.
- Then they put insulation.
- Vapor barrier and waterproofing are placed on top.
- After this, a finishing floor is constructed.
The layer of mineral wool must be at least 10 cm. If it is necessary to lay wool in two or more layers, this is done in a checkerboard pattern (so that the seams do not coincide). The video shows floor insulation in a house on a pile foundation.
For waterproofing, you can use glassine, polyethylene, isospan, and wind- and moisture-proof film. Polyethylene is the cheapest option, but it is not the best.
Important! In a wooden house on a pile foundation, it is imperative to treat all wooden floor elements with an antiseptic.
The insulation of a columnar foundation differs little from the insulation of a pile foundation; the same materials and techniques are used.
Thermal insulation from the street side
To insulate a pile foundation from the outside, slab polystyrene foam or penoplex (the so-called extruded type of polystyrene foam) is most often used. The latter option has a smaller thickness (30 mm versus 50), and contains special fire-fighting additives.
External insulation of the base with penoplex Source stroyfora.ru
Overview of insulation options
Before sheathing the underground part of the foundation, the plinth from the inside or along the outer surface, you need to understand exactly why this is necessary. A layer of thermal insulation is necessary for the building to reduce heat loss; insulating the blind area solves another problem - preserving geothermal heat to eliminate swelling of clay soils.
There are several operating modes and building structures:
- a constantly heated house - the soil under the sole cannot freeze, however, it is necessary to insulate the blind area to prevent freezing of the soil layers adjacent to the reinforced concrete structures, which, when heaving, try to raise the foundation, or to create a crush-sliding layer of thermal insulation on the outer edge of the tape, which will prevent freezing tape, protects waterproofing, compensates for heaving forces;
- cottage with a basement floor - geothermal heat is stored in the lower level, it is only allowed to insulate the tape (basement) from the outside in order to shift the thermal circuit with the dew point to the street, forever eliminating condensation on the internal walls;
- lack of heating + strip foundation - to prevent freezing, the insulation must be glued to the tape outside, inside, placed under the sole (in the case of MZLF) and around the perimeter of the house under the floor or ceiling;
- periodic heating - the technology is completely similar to the previous case; on the outside, crushable sliding thermal insulation can be used.
Foundation insulation scheme
Attention: If the project includes a hanging grillage on pillars or piles, it is impossible to retain geothermal heat. It is useless to insulate the crawlspace, since there are no heat sources inside the underground. When using low grillages, the base and blind area are insulated from the outside.
Strip foundation
In 75% of cases, individual developers build strip foundations with their own hands. Depending on the depth of the sole, the effect of loads from swelling is not the same:
- the bottom of the deep tape is located below the freezing point of the soil, there is no heaving underneath it, however, the area of the side faces on which the tangential forces of frost heaving act increases sharply;
- with MZLF the opposite is true - the lateral area of the tape is too small for tangential forces to pull it to the surface, but uneven swelling is possible under the sole, since the freezing layer of soil is 0.7 - 1.5 m, a sand or crushed stone cushion cannot completely compensate for it able.
In both cases, it is enough to insulate the blind area and the outer edge of the tape, solving all the problems.
MZLF
In strip foundations, for ease of operation, a structural element is made - a plinth. It is often created from concrete, the service life of which is much higher than that of wall materials that work in contact with the ground. However, the reinforced concrete structure immediately becomes a giant bridge of cold:
- frost penetrates through the base to the ceilings and floors;
- heat loss increases;
- increasing energy consumption.
When insulating the basement from the outside, the following factors must be taken into account:
- the structure can protrude outward relative to the wall;
- go inside;
- or be flush with the facade cladding.
Insulation scheme for a shallow strip foundation.
In the first case, polystyrene foam insulation must be run over the plinth deep into the wall to prevent freezing of the concrete along the upper edge. In the latest versions, the thermal insulation is combined with polystyrene foam for the external wall insulation, and there are no cold bridges.
Attention: The insulation layer of the underground and above-ground parts of the foundation must be continuous, although different problems are solved.
Deep laying tape
Even if the cottage does not have a basement, but the foundation strip is deep, it makes no sense to install polystyrene foam or stone wool from the inside. The soil under the house cannot freeze, unlike a reinforced concrete structure, in which moisture can accumulate. After several seasons, microcracks in concrete will open much larger, and the service life will decrease.
Attention: If all measures to eliminate swelling have been taken (warm blind area + drainage around the perimeter of the tape + non-metallic material under the base, in the backfill cavities), high-quality waterproofing of the concrete, then the deep tape in a house without a basement does not need to be insulated from the outside to its full depth.
Pile and column foundation
When constructing a grillage on piles or pillars with your own hands, you must consider the following points:
- hanging grillage - swelling is not dangerous for screw and bored piles in tubular formwork, pillars buried below soil freezing; it is useless to insulate the blind area and backfill, since there are simply no heat sources underground;
- low grillage - monolithic beams are protected from swelling by an air gap of 15 - 20 cm, covered on the sides with sheet materials, geothermal heat is retained by the base of the building, there is no particular point in a warm blind area, but the end of the grillage, which is a cold bridge, must be covered with a heat insulator from the outside.
Attention: There are design solutions for low grillages with floors on the ground in the form of a floating screed. Even when backfilling with non-metallic materials is used, freezing of the lower heaving layers under the grillage is possible. Therefore, polystyrene foam is placed under the screed from the inside, and the base is covered with insulation from the outside.
Furniture in contemporary style
Functional furniture, which is the basis of the style, was and is created in order to accommodate all the necessary things, but at the same time not take up much space.
Therefore, characteristic interior items have appeared that allow you to save space in an apartment or house:
- Folding transforming tables. When folded, it looks more like a small shelf or chest of drawers, but if necessary, the structure transforms into a huge table, where it is convenient to seat many guests.
- Modular furniture - these can be pieces of upholstered or cabinet furniture, which consist of separate modules-parts of the correct geometry. It is convenient to unfold and connect as required by the position. For example, you can assemble 3 armchairs from a soft sofa or turn it into a bed.
- Folding sofas and folding chair forms. Such furniture could be found in every Soviet home, and it is still relevant today. Such items are easy to arrange or assemble to add a sleeping area or expand the room.
- Wall. Whatever you say, furniture walls significantly save space and accommodate many things and objects. Today, the walls do not look like one continuous line with a desk, but more like a suspended structure.
In an interior designed in contemporary style, it is not customary to install furniture made of expensive materials. And therefore: inexpensive types of wood, MDF panels, glass or plastic served as an excellent option for the execution of products.
Items made from these materials will last longer, are moderately environmentally friendly, and reliable. Their streamlined shapes will always be relevant and are easy to replace or complement.
The main slogan of the style is inexpensive furniture, but beautiful design and excellent wear resistance.
Is it possible to insulate from the inside?
The recommendations (albums of technical solutions) of leading manufacturers of extruded polystyrene foam contain options for buildings for seasonal residences, which are built with your own hands, mainly in gardens. If the building does not have heating, the base, together with the underground part of the MZLF, is covered with EPS from the inside. Vertical thermal insulation is connected to a horizontal layer of polystyrene foam under the floor along the ground.
Seasonal use (garden house)
The base is covered with a heat insulator from the inside in the only case - if there is no heating in the home at all. The thermal insulation diagram looks like this:
- expanded polystyrene is laid under the floors on the ground;
- fixed externally on the entire vertical surface of the MZLF;
- continues horizontally at the bottom of the trench along the perimeter of the dwelling (width 0.6 - 1.2 m).
Insulation of MZLF during seasonal operation.
An additional layer in the corners is not needed, nor is running along the top edge of the base. Cold bridges are inevitable here; the walls are usually not insulated.
Periodic operation (dacha)
When building a home in which heating is turned on periodically (for example, a summer house), a special insulation scheme is used:
- horizontal layer - under the floor along the ground in all rooms + under a blind area 60 - 120 cm wide from the walls of the building;
- vertical contour – base + underground part of the MZLF from the outside to the insulation of the blind area.
There is no need to glue polystyrene foam to the tape from the inside, since reinforced concrete freezes from the street. Unlike the warm blind area of houses with constant heating, there is no need to increase the thickness of the EPS in the corners. Episodic heat losses in this case can be ignored.
Attention: Expanded polystyrene is not intended for outdoor use, as it is destroyed by solar ultraviolet radiation. After gluing, the base must be covered or covered with an opaque material.
Frequent mistakes when insulating the foundation.
Thus, all options have been considered when using insulation with your own hands from the outside and inside. This will help reduce the construction budget without reducing the efficiency of the building's thermal loop.
Advice! If you need contractors, there is a very convenient service for selecting them. Just send in the form below a detailed description of the work that needs to be performed and you will receive proposals with prices from construction teams and companies by email. You can see reviews about each of them and photographs with examples of work. It's FREE and there's no obligation.
The maximum heat loss in any building occurs through the ceiling and floor. It is for this reason that special attention should be paid to the issue of thermal insulation of the room. Before insulating the foundation of a wooden house, it is necessary to select the correct insulating materials.
Why is additional thermal insulation necessary?
Foundation insulation can be done from the outside and from the inside. In the first case, we can talk about preventing the penetration of cold air masses. In addition, insulating the base of a wooden building with your own hands eliminates the possibility of the foundation freezing. This increases the overall lifespan of the building. Among the advantages of this procedure, the following points should also be noted:
- increasing the service life of communication system elements;
- saving on home heating;
- protection from the influence of groundwater;
- preventing condensation formation;
- formation of a favorable microclimate indoors.
In order for the implemented thermal insulation layer to provide reliable protection, you must first correctly select the most suitable insulation materials.
Operational features of modern insulation materials
The modern market of insulation materials offers a wide selection of necessary products. However, despite the large assortment of goods, polystyrene foam, expanded clay, polystyrene and polyurethane foam are most often in demand among consumers. Often, foam glass is also used for external insulation.
| Insulation | Operational Features |
| Polyurethane foam | Expensive material, the installation of which requires the use of special equipment. It is applied to the foundation surface by spraying. It has high thermal insulation capabilities. |
| Styrofoam | More affordable products in terms of price. The special structure of this material contributes to difficulties during installation - during cutting, the foam crumbles very much. Additional waterproofing may be required during work. |
| Expanded clay | The expanded clay layer is capable of absorbing moisture very well, due to which this material is positioned as a very good heat insulator. It creates a kind of cushion around the base of the house and prevents the penetration of cold air. |
| Foam glass | Used relatively recently. It is easy to process and prevents moisture penetration. |
| Polystyrene | Considering the flammability of such material, it is strongly recommended to refrain from using it as facade insulation. But for underground insulation, polystyrene is ideal. Its resistance to high moisture deserves special attention. |
Earth as insulation
The easiest way to insulate the foundation part of a wooden house with your own hands is to fill it with earth. However, there are many questions about this method. This method is advisable to use only before the construction of walls begins.
The complexity of this insulation method lies in the need to use a large volume of soil. In a different scenario, achieving a positive final result will be very difficult. Moreover, even if you insulate the foundation from the outside with earth, you may not get the expected effect. This is due to the low thermal insulation potential of the material.
It should also be added here that insulating the foundation with earth with your own hands will involve great difficulties. In this case, there is a need to use specialized equipment, the rental of which is expensive.
Methods for insulating the foundation part of a wooden house
Insulating the foundation from the outside is most often done using expanded clay, polystyrene or polyurethane foam. The affordable price level of these materials and high thermal insulation capabilities have a direct impact on this choice. Moreover, the likelihood of resolving this issue with your own hands is attractive.
Insulation with expanded clay
The material absorbs moisture and removes it from the base of the house. In the case of a correctly implemented insulation scheme, an air gap is formed, which is also a good heat insulator. Thanks to this, the likelihood of foundation freezing is minimized. Do-it-yourself insulation of the base of a building with expanded clay involves several stages.
Stage No. 1
When insulating a built house, it is very important to thoroughly clean the surface of the soil. If necessary, cracks should be repaired. Waterproofing can also be carried out.
Stage No. 2
At the next stage, the trench is filled with soil. A small concrete blind area is made on top of the formed embankment. It will protect the thermal insulation material from moisture. The basement part of the base of a wooden house can be insulated by plastering.
Stage No. 3
If necessary, you can also insulate the basement with your own hands using expanded clay. The insulation is poured during the flooring stage. A sand cushion is first prepared, on top of which a layer of waterproofing is placed.
Polystyrene insulation
Polystyrene is presented in the form of a modification of polystyrene foam, characterized by mechanical strength. To achieve the maximum effect of insulation outside the house, it is recommended to give preference to material with fire retardant additives.
- Preparing the foundation. At this stage, the base of the house is freed from soil, dust, traces of oil and bitumen. If necessary, cracks are sealed.
- Installation of polystyrene plates. The insulation is attached to the base of the building using an adhesive mixture. It may take about 48 hours for the material to dry completely.
- Basement insulation. Polystyrene from a wall made of wooden material should be separated by using non-combustible insulation. Basalt wool can be used as such a material.
Insulation with polyurethane foam
The main feature of using such insulation is its connection to the depth of the material. The larger it is, the higher the quality of thermal insulation will be. To install polyurethane foam you will need to perform a number of steps:
- Prepare the soil.
- Prepare the foundation.
- Waterproof the foundation of the house.
- Installation of insulation.
- Arrange external protection.
At the stage of excavation work, the base of a wooden house is completely freed from soil and excess dirt. For maximum effect, it is recommended to place a sand cushion at the bottom of the trench.
The cleaned foundation must be well primed. This will allow the thermal insulation material to perform its direct functions for the maximum period of time.
The implementation of a waterproofing layer allows you to minimize the likelihood of moisture penetration into the room. Thanks to this, the total service life of the building will tend to increase.
Polyurethane foam is positioned as a sprayed insulation. This structural feature of the material guarantees seamlessness and perfect evenness of the coating. High adhesion to any coating facilitates the issue of arranging external protection for the base.
Important! Polyurethane foam does not tolerate direct exposure to sunlight very well, therefore, if it is used to insulate the base, it is recommended to additionally cover the coating with other materials.
What's the result?
Insulation of the foundation of a wooden house from the outside can be carried out using various thermal insulation materials, which are presented in a wide range on the market. High-quality preparation of the foundation is the key to a positive final result.
Installation
Attaching beacon profiles to the wall can be done using devices or using the adhesive method. The most famous devices are:
- "Kremmer";
- "eared";
- clip.
Latch "Kremmer"
This type of fastening is made in the form of a rectangular galvanized plate with a slot in the middle designed to capture the head of the screw. Attached to the profile plane by bending the ends onto the beacon.
The presence of slots at the ends of the plate makes it possible to bend the ends by hand, without the use of special tools. When all the fasteners are installed, the beacon is pressed against the screws, and the Kremmer is pushed onto the hardware until the head of the screw is fixed in it.
Having many advantages over other types of fastenings:
- quick installation - the ends of the fastening can be bent by hand without using pliers;
- thin, which is why the plaster layer in many cases is not as thick as, for example, when using a clip, which significantly saves dry mortar.
Kremmer mount.
- can be used on any type of hardware (self-tapping screw, screw, dowel-nail);
- tensions the beacon guides well.
It is not as popular as the other two devices. The reasons are the shortcomings. Minuses:
- self-tapping screws should be installed at a distance of 30 cm from each other, which increases their number on the beacon line, and this means additional time for installing dowels and screwing in self-tapping screws;
- a slight deviation of the hardware head from the vertical line does not allow the Kremmer latch to grab it;
- It is difficult to attach it to the profile so that the cutout for the screw head is exactly in the middle of the beacon.
"Ushastik"
This type of fastening, like the Kremmer latch, is made of galvanized steel. It is a rectangular plate with a hole in the middle for a self-tapping screw and ears for bending onto a metal profile.
How to install beacons for plastering walls on the “eared”? The technology is the simplest:
- when screwing the screws into the dowels, the “eared ear” is passed under its head - the hardware is screwed in together with the fastener;
- after bringing all the screws into one plane, the profile is tightly applied to their heads, and the fastening ears are bent, fixing the beacon.
"Eared" fastening.
Clip
This type of fastening is made of polypropylene. Consists of two parts:
- a base that is attached to a self-tapping screw and holds the profile;
- plugs - fixes the entire structure motionless.
The clip (abbreviated as KDM-2) has a thickness of 6 mm, which is most acceptable for rough plaster, when its layer should be at least 12 mm (6 mm clip + 6 mm profile).
How to attach beacons to a wall under plaster using clips? The plug is removed from the mount. Its base is fixed on the head of the screw. The beacon is inserted into the clip and closed with a plug. The operation on the entire profile takes 3-4 minutes.
Fastening with glue (plaster mixture)
In a situation where there are no special mounts for beacons, you can use:
- ordinary plaster (cement mortar) with the obligatory addition of PVA glue (to speed up the setting process);
- gypsum dry mixture;
- tile adhesive.
How to install beacons for plastering walls with mortar? For this you will need:
- dry plaster mortar of any kind;
- plasticizers (PVA glue to speed up the setting process, liquid soap to slow it down);
- mixer;
- container for mixing the solution;
- trowel.
The instructions for this technology contain only 5 points.
- The guide beacons are cut to size using a grinder.
- The solution is mixed (each type of mixture has its own recommendations printed on the packaging).
- Along the lines of the beacons, between the screws, a solution is applied to the wall every 15 cm.
- The profile sits on the screws with the straps down until it fits snugly to the heads of the hardware.
- The solution that has come out from under the lighthouse is removed with a trowel.
The walls can be plastered only after the adhesive has completely dried. For gypsum this is 2-3 days, for other types of mortar - at least 8 days. Therefore, professional plasterers very rarely use this method of attaching guide beacons. If the apartment is being renovated on its own, the extra few days do not play any role.
Mortar beacons
If you want to save money and not bother with removing metal beacons from plaster, beacons can be made from mortar.
How to place beacons under plaster walls made of mortar? There is nothing complicated here either. The only requirement is that the beacons must be made from the same mortar that will be used to plaster the wall. The step-by-step process looks like this:
- Along the line of beacons, after 1 m, self-tapping screws, pre-lubricated with oil or soap, are screwed into the dowels;
- All screws are brought into the same plane with the first hardware, already aligned in accordance with the calculations;
- The solution is being prepared;
Mortar beacons.
- Using a trowel, the solution is transferred to the wall between the screws. A solid shaft is formed, from bottom to top, covering the screws by 1-2 mm;
- A rule, also lubricated with oil, is placed on the solution (so that the solution does not stick) and pressed until it comes into contact with the heads of the screws;
- Excess mortar that has come out from under the rule is removed with a trowel or spatula;
- After the hydration process is completed, the screws are unscrewed.
Work can be continued only after the mortar beacon has gained strength. If you do this earlier, the possibility of destruction of the lighthouse during leveling of the plaster with the rule cannot be ruled out.
Attentiveness and strict implementation of all recommendations will allow you to correctly install the beacons, which will serve as the key to well-executed plaster.