Despite technological progress in the heating equipment industry, home furnaces continue to enjoy continued popularity. They allow you to heat houses in areas remote from civilization. Where electricity and gasification are not provided. The construction of any furnace begins with the construction of the foundation. We will talk about how to make a foundation for a stove correctly in this article.
Sectional view of the foundation for the furnace
Making a stove, of course, requires a lot of labor, experience and knowledge of technology. When thinking about building a stove at your dacha and building a foundation, you can, of course, hire specialists. But in fact, arranging the foundation for a furnace can be easily done on your own.
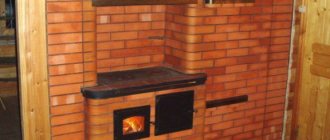
Home oven
This is not such a costly or complicated matter, but the pleasure from a self-built structure will more than pay for all the trouble.
In what cases is a foundation needed?
As mentioned above, the installation of structures must be accompanied by the construction of a base in the form of a foundation, with the exception of structures whose weight does not exceed 200 kilograms; in all other cases it is necessary.
Even light brick structures need a good foundation, due to the constant movement of soil and the general shrinkage of the house. And it’s not worth talking about massive, heavy, brick stoves - without a high-quality foundation, properly designed, they cannot survive in the modern climate.
Design Features
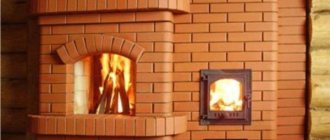
The main feature of the design of a furnace with a remote firebox is the independence and autonomy of the latter from all other elements. The remote combustion channel is welded to the main structure if it is light, or removable if it is heavy. Thus, the firebox with the door is located through the wall in the adjacent room. It is usually made in a rectangular or square shape; it is slightly wider at the place where the door is attached. There are models in which the external channel is located not in the next room, but on the street. This option is not very common, it is found mainly in commercial saunas, where one person looks after the firebox without the need to enter the sauna room itself. This model of heater can be made of metal or brick, but more often there is a combined option - a metal body lined with brick.
Foundation calculation with example
The choice of base for the furnace directly depends on the total weight of the structure; to do this, you first need to calculate it by counting the amount of brick and cement mortar used. Typically, 1 cubic meter of brickwork weighs 1350 kilograms - keep this in mind.
If the total weight of the heating system exceeds 750 kilograms, then a high-quality foundation will require a strong and durable foundation, with a deep foundation made of rubble or concrete stone. With a lighter structure, a base made of roofing iron, asbestos sheets, or even ordinary wood may be suitable.
When making calculations for the foundation of a brick stove, take into account the type of soil on the site. On soft, swampy and easily sinking wet soil, the foundation should have a height of at least 150 centimeters, while on dry soil the foundation can have a depth of only 70 centimeters.
Here is an example of calculations:
We decided to install a brick kiln, using 0.8 cubic meters of brick and using cement mortar with a total weight of 70 kg. We will carry out the installation on dry black earth soil, with large stones under the base for foundation stability. First, let's calculate the total weight of the structure:
1350*0.8=1080kg
We add 70 kg and we get the total weight of the heating system - 1150 kilograms. Since our soil is quite hard, but the furnace has a large mass, we will install a foundation with a depth of 1 meter - this will be enough for long-term stability.
If the foundation for a brick stove is laid before the walls are erected, then before installing it you need to determine where the heating system will be installed - it will be impossible to change the decision, so before you start building the foundation, think about where exactly your stove will be located.
Installation of stove and chimney
The installation of a metal stove itself is not difficult.
The main thing is to strictly follow the recommendations in the instructions supplied with the equipment, and also to align the structure at a horizontal level. In this case, the minimum distance specified above must be observed from the wall. Advice. Before installing the device in the house, it is recommended to carry out the first firing in the yard so that the thermal paint that covers the stove outside and inside is firmly fixed and loses its specific smell.
After installing the stove, the chimney is connected. The most successful option for a wooden house is a sandwich chimney. There is a heat insulator between the two layers of steel that it is made of, so the outer surface does not get too hot. Other advantages of chimneys of this type include the fact that they are not prone to condensation and less soot accumulates in them.
If the pipe is made of stainless galvanized steel, then it must be insulated with non-combustible material. But, despite the presence of insulation, the chimney, according to safety regulations, must, like the stove itself, be located no closer than 38 cm from the wall.
The rules for installing a chimney are as follows:
- In order to make chimney passages through the ceiling, a factory-made cutting (special box) is used. This type of cutting is called interfloor or attic.
- The box should be selected so that the diameter of its hole matches the outer diameter of the pipe.
- A square hole should be cut between the beams, the size of which should correspond to the square part of the cutting. You can make this hole a little larger so that you can metal it with two layers of basalt wool.
- After this, the assembly of the chimney begins. A pipe must be connected to the chimney outlet, which is located on the top or rear surface of the housing. A slide valve is mounted above, which is designed to regulate draft.
- To create hermetic connections, special heat-resistant compounds are used. If it is necessary to create a connection between pipes of different diameters, special adapters (so-called glasses) are installed. You should not make a chimney with a large number of turns - fuel combustion products will accumulate in them.
- Next, the chimney is passed through a box in the ceiling, and the space between the cutting walls and the pipe is filled with basalt fiber.
After this, all that remains is to remove the chimney through the roof. For this you will also need factory cutting, but this time for roofing. Such elements are produced with different slope angles and are selected in accordance with the angle of the roof. The technology for passing a chimney through the roof is approximately the same as for a similar operation with a ceiling:
- It is necessary to maintain a distance of 25 cm between the pipe and flammable materials.
- The chimney and the hole under it from above must be closed with a special part - a roof.
- After this, you need to put a comfrey on the pipe. This is an element that protects the chimney from precipitation.
- The areas between the rafters and the pipe should be filled with basalt wool, and a metal reflector should be attached below.
The chimney of an iron stove can be exhausted either through the ceiling or through the wall. In the second case, you need to arrange for fixing the pipe from the outside to the wall of the house to ensure its resistance to wind.
When passing through a wall, the thermal insulation of the structure is performed in exactly the same way as when passing through the ceiling. The only caveat is that a wooden wall may shrink over time. As a result, a sliding fit of the cutting must be implemented.
All these measures can be carried out on your own, but before putting the stove into operation, you will definitely need to contact the Ministry of Emergency Situations to obtain a certificate stating that fire safety rules have been complied with. However, we recommend entrusting the installation of equipment to professional craftsmen, and the tips from the article will help you monitor their work.
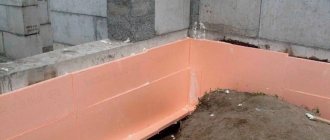
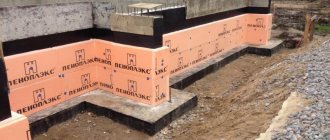
Concrete
The classic base for a furnace is a concrete slab, which is made by pouring cement-crushed stone mortar into a deep pit.
Circuit and device
The general structure of the foundation is the same regardless of the type of furnace and soil; usually it is a solid base in the form of a cube, which is made from a large amount of concrete mortar. The base structure is clearly shown in this diagram:
The diagram shows the base that we calculated above for a stove weighing 1150 kilograms.
Materials and tools
To install a high-quality concrete foundation, a certain list of materials is required:
- Cement;
- Coarse sand;
- Boards for formwork construction;
- Crushed stone;
- Waterproofing, which is ideally served by roofing felt or polyethylene film.
Also, to install a concrete foundation for a brick oven with your own hands, you need the following tools:
- Container for preparing mortar or concrete mixer;
- Bayonet and shovel shovels;
- Measuring tools: tape measure, corner, level;
- For making formwork: hammer, hacksaw, nails;
- To install waterproofing, a construction stapler;
- For laying the base, a manual tamper is used.
Preparation of the solution
The base for the furnace must be strong, so the concrete solution is prepared in the following proportions: 1 part cement, 3 parts sand, 5 parts crushed stone. This consistency can withstand large ovens for a long time.
Manufacturing instructions
- It doesn’t matter what kind of brick or concrete base is installed under the stove, it is initially necessary to dig a foundation pit for it. The depth of the pit depends on several factors: the mass of the stove, the type of soil, and the presence of groundwater. The width and length of the pit must correspond to the dimensions of the heating system and additionally have a certain margin of distance for the formwork. In order not to accidentally make a mistake, it is recommended to first prepare a drawing of the future concrete foundation.
- After this, formwork is installed, the dimensions corresponding to the final values of the dimensions of the structure, according to the drawing and diagram, which should have been prepared in advance. Sometimes formwork is not needed - if the soil is very hard and does not collapse from external influences on it.
- After the formwork is ready, the waterproofing is laid, attached to the formwork using a stapler.
- Pieces of brick or large stones are poured into the resulting hole - this is necessary so that the resulting concrete slab under the stove does not sag and is well adhered to the ground, as shown in the photo below:
- Then the concrete solution is poured so that the base rises 6 centimeters above the floor. When pouring, carefully measure its evenness using a building level and level it to perfection.
- If it is possible to line the ground part of the foundation with brick or rubble concrete, this can be done this way:
Before installing the heating system, the foundation under the furnace should dry for about 10 days; during the first week, spray the concrete surface with plain water.
Tips for laying bricks
Scheme of the “Heat” stove.
Before laying on the mortar, it is recommended to lay out the bricks without it. At the same time, number them, since some will have to be cut off. Submerge each brick in water for 7 minutes to remove any remaining air from the cavities. Wipe the already laid brick row with a damp sponge. When installing doors, start laying only from them. During work, constantly check the walls with a building level. Level the position of the brick with a rubber hammer. Remove excess solution using a spatula.
It will be easier to do all the work in tandem with an assistant. This makes operations easier to perform, and inaccuracies can be noticed earlier.
On stilts
Sometimes, in order to save cement mortar, a pile foundation is made for the furnace. It differs slightly in the method of construction from concrete, except that instead of pouring, a reinforced concrete slab can be used.
Circuit and device
As can be seen in the diagram above, the foundation for a furnace on screw piles is constructed in the same way as a classic foundation, but instead of pouring, it uses piles inserted into drilled wells.
Materials and tools
For installation you need a certain list of materials:
- Cement, coarse sand, crushed stone - for mortar;
- Instead of pouring, you can use a ready-made reinforced concrete slab;
- Waterproofing, which is ideally served by roofing felt or polyethylene film;
- Pipes made of asbestos or polyethylene;
The following tools will be needed:
- Earth drill;
- Container for preparing mortar or concrete mixer;
- Bayonet and shovel shovels;
- Measuring tools: tape measure, corner, level;
- Sledgehammer for installing piles;
Manufacturing technology
If you decide to make a pile foundation for a brick oven in a wooden house, then you must understand that you need an accurate measuring tool and the ability to use a building level - otherwise the base structure may be installed crookedly.
Let's figure out how to properly make a foundation for a stove using pile technology step by step:
- A layer of soil is removed to a depth of 25 centimeters for convenience and so that plant roots do not interfere;
- Then, using an earth drill, four holes approximately 1 meter deep are drilled, each of which should hold the concrete slab on the corner of the surface;
- Crushed stone is poured inside each well and compacted - this will make the foundation for the stove more stable;
- A concrete or asbestos pipe or a roofing felt sleeve is inserted into each well and concrete solution is poured on top.
Then you need to let the solution dry for about 8-10 days, after which you can begin installing the base.
When laying a reinforced concrete slab on piles, each pillar should rest against the corner of the structure as in the photo:
If it was decided to install self-made concrete on the piles, then reinforcement and formwork should be used to properly manufacture the structure:
Separately, a foundation on piles for buleryans and other light stoves should be highlighted; it can be made using metal corners and profiles:
Facing
Before you line a metal stove in a bathhouse with bricks, you need to prepare for work.
Preparatory activities
You can start laying only after the concrete and brick base has dried. A metal stove is installed on it, and future cladding is marked around it.
But first you need to install a fireproof shield made of any fire-resistant materials on the wooden walls around the fireplace.
Insulation of wooden walls and floors with mineralite
If you decide to prepare masonry mortar from clay, then you need to fill it with water for several days and carefully sift the sand. Since it is difficult to cover an iron stove with bricks and not stain its body with mortar, before starting laying it should be protected with paper, cardboard or film, securing them to the walls with tape.
To prevent water from the solution from being absorbed into the brick, it is soaked in water about half an hour before starting work.
Soaking the brick
Masonry
When deciding how to brick a cast-iron stove, it is better to choose half-brick masonry. A thicker screen will take longer to heat up, and a thinner screen will cool down faster.
The laying of the first row begins from the far corner, laying a whole brick
It is very important to lay it out evenly and neatly, since all subsequent rows will be aligned with it. They are laid out alternately, with an offset of half a brick. Don't jump over the row, first raising the corners and then filling the space between them.
Laying is done offset
- The permissible thickness of the horizontal seam is 8-10 mm, vertical 3-5 mm.
- The seams are filled completely with the solution, its excess is immediately removed from the surface with a trowel.
Bricks that go beyond the plane are knocked down with a hammer or mallet
During the laying process, you need to constantly monitor the verticality of the walls and corners using a plumb line or building level.
A cord stretched along the upper edge of the row will help to keep the row strictly horizontal.
Auxiliary vertical stands will make work easier
To strengthen the masonry, reinforcing mesh can be placed in the seams every two or three rows.
The photo shows the reinforcement of the masonry with metal mesh
Also, every two or three rows you should unstitch the seams until the mortar loses its elasticity, and wipe the surface from any remaining mortar with a wet rag.
Joining seams
When laying out the walls, it is necessary to leave ventilation holes in them: at least two at the top and two at the bottom. Cold air will flow into the lower ones, protecting the oven from overheating, and heated air will come out through the upper ones.
Furnace ventilation diagram
- As an option, you can line the stove with bricks laid in a checkerboard pattern with holes between all adjacent elements.
- Around the doors of the firebox and ash pit, masonry should be carried out taking into account their full opening.
The brick will have to be cut if it prevents the doors from opening
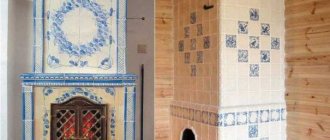
Where to finish the masonry is up to you. If you have a stove with a stove or heater, it is only brought to the top of the body. You can raise it to the ceiling. Or you can make figured masonry with a vault and chimney lining, turning an ordinary potbelly stove into something like a fireplace.
Metal stove for a bath, lined with bricks up to the pipe
Option with full height masonry and pipe lining
The brick portal turned an ordinary stove into a real fireplace. Now you need to let the solution dry for at least a day. It is desirable for this to happen in natural conditions, so it is better not to heat the stove for now.
From rubble concrete
You can make a foundation for a stove in a house using rubble stone. Rubble concrete structures are similar in production to classic concrete foundations.
Circuit and device
You should measure the dimensions of the furnace in advance and prepare a drawing according to which the structure will be made.
The diagram is very similar to the drawing of a conventional concrete base, the difference is the presence of rubble stone.
Materials and tools
The entire list of tools and materials is completely similar to the list for installing a concrete structure, only rubble stone or brick fragments are used in the solution instead of crushed stone.
Manufacturing technology
The preparation of the pit, formwork and waterproofing is carried out in the same way as in the case of a base made of ordinary concrete, only the method of pouring and the consistency of the solution differ. A rubble foundation for a stove in a wooden house takes longer to pour, but it allows you to significantly save on materials, namely cement.
- The solution is made in the following proportions: 1 part cement and 3 parts sand;
- The solution is poured to a height of 10-15 centimeters;
- Rubble stone is poured in an amount approximately equal to the amount of solution;
- A row of rubble concrete must withstand one day;
- The next row is poured and left for another day.
Thus, in 7-10 days the rubble concrete foundation for a stove in a wooden house will be ready, let it dry for another week, and the structure will last a very long time.
Application of high temperature sealants
If we limit ourselves to the topic of home heating, then heat-resistant sealing compounds are used in the following cases:
sealing cracks in the brickwork of the stove and chimney;
Cracks in the furnace masonry and sealing the interface between cast iron elements and bricks
- filling gaps between cast iron parts and stone;
- laying ceramic chimneys;
Fixing ceramic chimney elements
- sealing joints of metal chimney fragments;
- cutting device in places where chimneys pass through the walls and ceiling.
Sealing the passage of a sandwich chimney through the roof The use of high-temperature sealants in industry is even more widespread than in everyday life.
Conclusion
Every owner understands that a stove without a foundation cannot stand steadily for a long period of time; a foundation is not needed only for very light structures, and even small metal and brick heating systems need a good foundation.
Depending on the type of soil on your site, the size and depth of the foundation for the stove in the house are determined, the required consistency of the solution is calculated and various materials are used. It is important to remember that the stove should not be installed immediately after the foundation construction work is completed; the concrete solution must be given time to “set” and dry.
Where to put a metal stove?
Ideally, you should choose a location for a steel stove after windows have been installed and doorways have been erected. Then it becomes clear how the air flows inside the room will be directed. To achieve the most efficient operation of the furnace, it should be placed where there is not too much air movement.
- Narrow rooms are not a suitable place to install a stove. According to fire safety rules, there must be at least 130 cm to the wall opposite the firebox.
- In addition, the stove itself should be 110-125 cm from the walls, and when using insulation made from non-combustible materials - 40 cm.
- It is also not possible to install a stove in a room that is too small: heating equipment that runs on wood is allowed to be installed in rooms with an area of at least 16 m2.
If the device is equipped with a hob, then you can safely install it in the kitchen. For example, among the Teplodar stoves, the Matrix, Vertical, Meteor and other models have this design. These stoves can operate for up to 8 hours on one load of wood thanks to an effective two-channel afterburner system.
Owners of two-story buildings should take into account that to heat the second floor they will need another metal stove.
Project No. 1 – compact mini-fireplace
This hearth is suitable for heating a room of 16-20 m² in a country house or a small country house. Another option for using the structure is as an outdoor barbecue built in a garden gazebo. A special feature of the fireplace is the side convection channels that heat the air in the room. The size of the building is 102 x 51 cm.
To lay out a mini-fireplace, you will need the following materials:
- solid ceramic brick – 240 pcs. (chimney pipe is not taken into account);
- inspection door 24 x 14 cm – 1 pc.;
- cast iron grates 18 x 14 cm;
- valve 25 x 14 cm;
- stainless steel sheet 1 mm thick, size 500 x 1000 mm;
- sheet of black or galvanized metal, laid in front of the firebox, dimensions - 70 x 50 cm.
Sectional drawing of a mini-fireplace.
There are outlets for convection channels on the side walls. The mini-fireplace shown in the drawing is laid out in the following order:
- The first tier is solid. On the second, 3 air channels are laid - 2 side and one in the middle, located under the grate.
- On the third row, the bottom part and the grate nest are formed (made 5 mm wider than the product). Then the grill itself is installed.
- From the 4th to the 10th tiers a fireplace insert is built. On row V, 2 metal rods Ø5 mm are laid for mounting a stainless steel sheet.
- In the 10th row, the rear brick protrudes a quarter into the firebox, the side stones move outward by 40 mm. The width of the firebox in this place is 49 cm.
- The ends of the side stones of the 11th tier are filed at an angle of 28° to the vertical line. You will get the supporting platforms of the arched vault. 2 stones in the depths of the firebox are placed on edge.
- The vault is built from 9 stones, cut in the form of a trapezoid with base sizes of 65 and 52 mm, as indicated in the order. The circle radius is 51 cm.
- On the 12th tier, the formation of the vault is completed, the upper steel rods are installed and a stainless screen is installed.
- Tier 13-14 forms the outlet openings of the convection channels. An inspection door is installed here.
- 15th row - the ceiling is being built, 16-18 - the beginning of the chimney.
The master will tell you in detail the algorithm for laying a mini-fireplace in his video:
What needs to be done before you start pouring the foundation...
First, be sure to analyze the density of the soil, especially if the brick kiln is planned to be large and massive. Usually there are no problems with sandy and clay soils. But if the soil is loose, heterogeneous and contains a lot of excess moisture, be sure to take measures to compact it before starting work.
Secondly, it doesn’t hurt to know the groundwater level. If they are located low, then the base is made 15 cm larger on each side than the stove itself, and is buried as much as required by the weight of the stove structure, as well as the degree of heaving of the soil. So, for example, on loam the base should be below the freezing level of the ground.
And if you are building a stove on sandy loam soil, there is no point in “burying” deeper than 80 cm. If the groundwater is located close, then the deepening of the foundation will be minimal, but its dimensions for greater stability are much greater than the dimensions of the stove.