For comfortable use of the balcony room, it is necessary to take care of its insulation in advance. Most often, polystyrene foam is used for these purposes as the most inexpensive and effective insulation. Before you begin work, you should find out the features of this material, as well as the basic principles of installation. Our article will tell you how to insulate a balcony with polystyrene foam, as well as the main nuances of this process.
What type and method of insulation to choose
It is necessary to take into account first of all the purpose of the balcony room. If the loggia is not used year-round, the main task is to reduce heat loss from the living space. In this case, it is enough to insulate the side adjacent to the room.
When the loggia is intended for storing vegetables, all walls are insulated. The room does not need to be maintained at room temperature. Therefore, it is enough to choose a material that provides an average level of thermal insulation. Read more in the article “aluminum windows on the balcony”.
High demands are placed on insulation materials used on a balcony that is used year-round or combined with a living room. A thick layer of high-density insulation is required. All surfaces are insulated and it is checked that no drafts pass through the windows.
The specifics of installation work are determined by weather conditions. Insulation materials can be used at sub-zero temperatures. But for polyurethane foam, glue and solutions, you need to take into account the temperature conditions specified by the manufacturer. Frost-resistant products are more expensive.
If fire safety plays an important role, it is necessary to choose fire-resistant building materials. Mineral wool is considered the most resistant to open fire; penoplex has the least resistance. Another parameter is the budget. It determines the choice of insulation and the area covered by it. If funds allow, it is better to entrust construction work to professionals. Otherwise, you will have to purchase additional tools.
What are the requirements for insulation?
The following are desirable characteristics for wall, floor and ceiling cladding.
High-quality insulation must have the following properties:
- Light weight - this parameter is important so that a high load is not created on the balcony slab.
- Fire safety and environmental safety.
- Small volumes - the material will not take up much space in a cramped room.
- Possibility to carry out installation without the help of specialists.
- Affordable price.
We arrange an additional heat source
The cheaper the material, the worse it performs as a balcony insulator. But even expensive thermal insulation materials do not always achieve the desired result. For this reason, it is necessary to provide for the possibility of installing additional heat sources.
There are only two options: you can install a heating radiator on the balcony or make “warm” floors. In the first case, you will have to spend a lot of money and money to achieve the goal, while “warm” floors can achieve the same effect at relatively low costs.
Heated floors are divided into water and electric, and the second option is more preferable due to the fact that it is easier to install such a system yourself, and there are no problems with such floors during operation.
Insulation for balconies and loggias - types and properties
Insulation materials differ not only in cost and thermal insulation properties. When choosing, you must also take into account the installation method and the load created. Some building materials are only suitable for loggias with a solid concrete base.
Expanded polystyrene
Sheet high-strength material that resists open fire well. It provides a high level of thermal insulation and is at the same time resistant to prolonged exposure to moisture. Not affected by mold fungi. Available in the form of sheets that are easy to cut. But when burned, it can release life-threatening hydrocyanic acid.
Balcony insulation with foam plastic
This lightweight building material has high thermal insulation and sound insulation properties. It is affordable, and installation can be done on your own, without the help of professional builders.
Polystyrene foam has been tested by time; it has been used for insulation in both apartments and country houses for decades. It is easy to cut and is not afraid of high humidity and temperature changes.
Mineral wool
It is produced from rock melts, less often - from metallurgical slag. It has a structure with many small fibers.
Advantages of mineral wool:
- It is a non-flammable building material and does not deform when exposed to high temperatures.
- Due to the fact that there is air inside the pores, heat does not pass through the cotton wool.
- Fungus resistance.
- Low degree of shrinkage - the sheet retains its original shape.
The main disadvantage is the lack of resistance to moisture. If the insulation gets wet, it will lose its properties. To avoid getting wet, it is important to take care of waterproofing the balcony. Another drawback is that to install mineral wool you will have to build a frame from timber.
It can be used on unheated balconies, but there should not be high humidity in the room. Installation requires knowledge in the construction field; it may be difficult for a beginner to work with mineral wool.
Polyurethane foam or PPU
This low-flammability material is sprayed onto the walls using a special gun with a hose connected to a pressure-injecting unit. It can be easily sprayed onto any surface, including wood, metal and concrete. Can be used at temperatures from -150 to +140 degrees.
Polyurethane foam does not react with other materials, so they do not corrode when in contact with it. For installation you will need to call specialists. When exposed to fire, polyurethane foam does not melt, but forms coking coal. This means that in the event of a fire it will not become a source of fire. Even when heated to 80 degrees, it does not produce toxic fumes.
The advantage of polyurethane foam is that when sprayed, a seamless coating is obtained. As a result, there are no cold bridges and no need to fill the cracks with foam. You can choose how thick the layer to apply and thereby adjust the degree of insulation. Two centimeters of polyurethane foam have the same heat-saving properties as a half-meter brick wall.
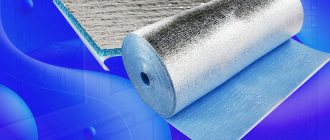
Penofol
Usually consists of two layers - penofol and a reflective aluminum substrate. Varieties are produced where there is a third layer - aluminum foil or a self-adhesive backing. Polystyrene sheet has excellent thermal insulation properties. The aluminum backing reflects heat into the house.
Thin penofol does not take up extra space. Therefore, there will be room for heated floors, built-in furniture, and a suspended ceiling. Penofol can be installed separately or together with other insulation materials. For maximum insulation, it is advisable to choose a variety covered with foil on both sides.
Penoplex or extruded polystyrene foam
Produced from polystyrene by extrusion. The insulation is resistant to mechanical loads, heat-intensive, and does not accumulate moisture. Penoplex is environmentally friendly and has a long service life. To insulate a home, sheets 4-6 centimeters thick are used. In terms of insulation efficiency, they are superior to mineral wool and polystyrene foam.
Read more in the article “How to insulate a balcony with penoplex.”
Expanded clay
This bulk material is porous granules of baked clay. It is used only if they want to insulate the floor on the balcony; the recommended fraction size is from 10 to 20 mm. With its help, you can improve not only thermal insulation, but also sound insulation. The only condition is the presence of double-glazed windows, otherwise the sound will pass through the windows strongly.
For thermal insulation, a layer at least 10 cm thick is required, which means that the ceiling height will decrease. Granules strongly absorb moisture, and wet expanded clay loses its valuable properties. Therefore, it is advisable to put waterproofing on top of the expanded clay.
Which material to choose
If a high level of sound insulation of the balcony is not required, it is enough to purchase inexpensive polystyrene foam. The density of the foam is only 10 kg/m3, it is lightweight and does not create a large load. Penoplex is a little more expensive, it is stronger and more effective than polystyrene foam. Mineral wool has better performance, with which you can turn a cold loggia into a room for year-round use.
But the prices are higher, and additional costs will be required for the purchase and installation of vapor barriers.
Penofol or isofol are effective and inexpensive building materials. They are recommended to be combined with other insulation materials, or laid in several layers. The reason is the insufficient thickness of the roll materials. If we compare a layer of polyurethane foam and polystyrene of the same thickness, then the first option has higher thermal insulation properties.
But the installation of polyurethane foam must be carried out by specialists, whose services will have to be paid separately.
Advice from professionals
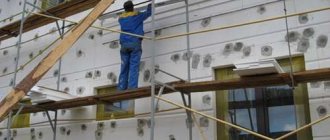
Insulation using wet facade technology is considered less expensive. Professionals often recommend this method. However, polystyrene foam is a soft material. If it is not reliably protected, dents will appear on the walls over time from accidental mechanical impacts.
Reinforcement will protect polystyrene foam from destruction
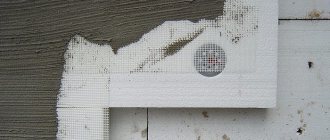
According to this technology of insulating a balcony from the inside using polystyrene foam, reinforcement is a prerequisite. The general surface is protected with reinforced mesh. In addition, it prevents the formation of microcracks in the plaster. The outer corners are covered with a perforated corner. The metal element is placed on an adhesive solution and embedded in the plaster.
Preparation
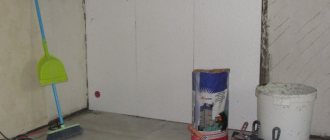
Before carrying out work, it is necessary to prepare the balcony. The number of preparation stages is determined by the state of the building, the building materials used and the selected installation technology.
Preparatory work includes the following steps:
- Cleaning things and furniture from the balcony.
- Removing or installing new fencing is usually required in older buildings.
- Construction of a parapet or its strengthening. It is convenient to use foam blocks for construction.
- Sealing cracks. In most high-rise buildings, the loggias are not initially glazed, but even after glazing there are many gaps left. They can be located at the junction of the slabs, between the floor and the wall. They should be sealed with foam.
- Strengthening and leveling the concrete slab.
After completing the above operations, installation begins. This may require preliminary installation of waterproofing.
Preparatory work
Today there are many insulation options using materials of different cost and efficiency. But any of these methods requires preliminary preparation of the premises, which is carried out in several stages:
- First, the balcony must be completely cleared of any objects, since the insulation will affect all surfaces: floor, ceiling, walls.
- The cleaned balcony must be inspected for various damages and defects from the inside and outside. If there are cracks and chips of various types, they must be eliminated.
- The gutters above the balcony are also subject to repair if necessary.
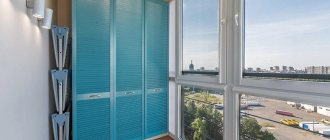
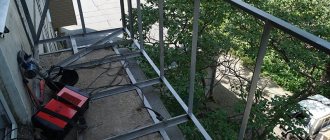
- In most cases, you will have to replace the windows on a glass balcony. If they are missing, the balcony must be glazed, since it makes no sense to insulate an open balcony.
Upon completion of all stages, it is necessary to get rid of the debris on the loggia that has accumulated during preparation and clean all surfaces of dirt, excess paint and dust.
Installation
The sequence of actions is slightly different for different insulation materials.
Typically the following steps are followed:
- Laying waterproofing – protects against moisture penetration. It is important to remember that dampness can penetrate micropores in a concrete slab. To avoid this, it is recommended to first coat the walls with a primer. If mineral wool is used, it should be covered on both sides with a waterproofing film.
- If the frame method is chosen, the racks and crossbars are screwed on.
- Next, the insulation is installed. With the frameless method, it is glued without first performing waterproofing.
- A membrane, film or penofol is laid on top. The insulation of the PPU loggia is carried out by professionals using specialized equipment.
- The floor on the balcony is being insulated.
- The final stage is finishing the balcony with plasterboard or clapboard (for more details, see the article “how to cover a balcony with clapboard with your own hands, step-by-step instructions”).
Insulation materials produced in rolls are attached directly to the wall. Tile materials, for example, polystyrene foam or polystyrene foam, are installed in several ways. The sheet can be glued with glue or attached with dowels. In this case, space is saved, since there are no gaps between the heat-insulating building material and the wall.
The second method, which is used most often, is fastening to a wooden or metal sheathing.
The insulation is cut according to the cell size, usually it is 60x60 centimeters. The resulting parts are placed inside the cells. When using this method, condensation does not form on the walls; due to the air gap, the level of thermal insulation is higher. You can screw the trim to the sheathing - plasterboard, hardboard or clapboard.
Two ways to install sheet or roll insulation
If you use the frame method, you will first have to secure wooden posts or a galvanized profile. Most often, wooden racks are used, since they can be selected according to thickness, and they are cheaper. The vertical elements are connected by crossbars. To make the structure, a 50x50 cm beam is suitable. Then you need to lay thermal insulation material inside the frame.
Do-it-yourself insulation of a balcony with polystyrene foam can also be done using a frameless method. It is easier to secure the sheets with glue; there is no need to install racks. Due to the absence of a frame, there are no cold bridges formed in places where the wood is not covered with insulation.
Only rigid material can be attached directly to the wall. In this case, the mineral wool will not hold. It is important to remember that the absence of a frame leads to increased loads on the thermal insulation. Over time, the sheets will begin to deform and their properties will deteriorate.
Balcony insulation with foam plastic
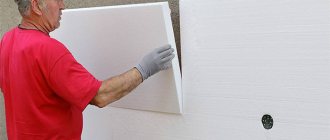
This type of thermal insulation is recommended to be installed at temperatures ranging from -5 to +30 degrees. To securely fasten it, it is recommended to use glue and fasteners. An adhesive is applied to the sheets and then pressed against the wall.
Typically, builders glue the foam using a gun filled with polyurethane foam. One cylinder is enough to treat 10 square meters.
Dry adhesive mixtures are suitable for insulating a balcony with polystyrene foam inside and out; they can be used to attach the sheets to a wooden sheathing. But dry mixtures are not suitable for fastening to concrete.
It is not recommended to use liquid nails; they do not create sufficient fixation. But nails harden quickly, so they are often used in combination with long-drying foam or glue. In this case, you will not have to put up supports to prevent the sheet from falling before the foam hardens.
To secure the foam securely, it is advisable to use fasteners. They can be combined with glue or used instead. For this operation, a mushroom dowel is used, which does not cause deformation of the thermal insulation.
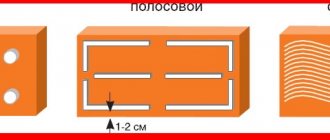
Insulating a balcony with polystyrene foam step by step:
- Select the dowels according to their length - they must pass through the material, a layer of glue and old plaster. Next, the fasteners penetrate the concrete to a depth of at least 50 mm, and the curvature of the wall must be taken into account. Typically, for foam plastic 50 mm thick, a dowel 110 mm long is enough.
- Holes are drilled in the foam that will be used for fixation. For 1 m2, six holes are enough - four in the corners and two in the center.
- Screw the mushroom dowel using a screwdriver; if fasteners with a nail are used, it is simply driven in with a hammer.
After installation, it is recommended to cover the foam with a mesh and apply reinforcing glue on top. You can attach trim on top of it. It is advisable that the reinforcing adhesive be made by the same manufacturer as the fastening adhesive.
When insulating a floor with polystyrene foam, logs from timber are first installed, then sheets are laid between the sheathing. The remaining gaps are sealed with polyurethane foam. The material should be flush with the wooden beam. The top is covered with plywood.
You can insulate the floor without installing a frame. But in this case, you will have to put a reinforcing mesh on top, and then make a concrete screed. This method is rarely used, since performing the screed requires some skills.
Both frame and frameless methods are suitable for attaching polystyrene foam to the ceiling. If wooden lathing is used, a layer of film must be placed between the frame and the material to avoid the formation of condensation. The foam is cut exactly to the size of the cells, since it is not subject to deformation. If the sheets are glued with glue, several additional fasteners are installed. For finishing you can use sheets of plasterboard.
Selection of tools
To insulate a balcony or loggia with polystyrene foam you will need:
- Spatula 100 mm, for scraping paint, attachment for cleaning surfaces for a drill.
- Notched spatula 200*10 mm, where there is a 10 mm protrusion of the tooth, for applying glue to sheets.
- Bucket 20 l. for preparing the mixture, mixer, electric drill.
- The roller is 250 mm wide, with a pile length of 12-15 mm.
- Wallpaper knife (spare blades for it), marker, tape measure.
- Primer tray, paint brush 50-60 mm.
- Hammer, 8 mm drill, hammer for attaching fungi
Balcony insulation with penofol
It is convenient to work with rolled insulation; it is easy to cut and does not crumble. Balcony insulation with penofol is carried out at any time of the year, regardless of temperature. Work begins with cleaning the wall of old wallpaper, eliminating cracks and leveling. All cracks must be filled with foam or sealed with cement mortar.
Penofol is attached to the wall using self-tapping screws. If double-sided material is used, it is important to secure it so that the foil is on top. The joints must be glued using foil tape. When insulating a loggia with penoplex and penofol, the foil material is secured with a second layer, attached to the sheathing.
The floors need to be cleaned and leveled (for more details, see the article “how to level the floor on a balcony”). Before installing penofol, it is advisable to put another insulation, since the slab conducts cold very well. To do this, you will have to lay down timber and make a sheathing. Then fill the gaps with polystyrene foam or polystyrene foam, and pour polyurethane foam into the cracks. Penofol is placed on top with the foil side up. Sheets of plywood are screwed to the sheathing.
Insulation of the loggia with penofol - after leveling, the floor is covered with penofol in two layers. The insulation will be held on wooden slats. The first layer is mounted using transverse slats, the subsequent one - using longitudinal ones. It is important that the last layer extends a few centimeters onto the walls. It will be convenient to attach the trim to the slats nailed on top.
Balcony insulation with mineral wool
Work is carried out only if there is glazing. If you are insulating a balcony with mineral wool yourself, you must first install a wooden sheathing. For its manufacture, timber with a thickness of 50 to 100 mm is suitable.
Thus, it will be possible to leave a gap between the insulation and the wall. Due to the air gap, the degree of thermal insulation will increase. It is inconvenient to use a metal sheathing; in this case, the cells should be 1 cm smaller than the insulation being laid. Then, after shrinkage, the mineral wool will not fall out.
It is important to install the material in the correct sequence - first the ceiling, then the walls, and the final stage - the floor.
First, a vapor barrier is stapled to the joists - this is a standard film 200 microns thick. Mineral wool is attached to the walls and ceiling using a mushroom dowel. For installation on the floor, you must use special glue. To increase the thermal insulation properties, it is advisable to lay sheets of insulation in two layers according to the principle of brickwork.
The mineral wool must be laid tightly so that there are no gaps. Another layer of vapor barrier is attached to the top. Next, the trim is attached; floorboards or plywood can be placed on the floor.
Flaws
Expanded polystyrene is a flammable material.
The disadvantages are flammability, but with the property of self-extinguishing (the material can catch fire, but does not support combustion).
The surface of expanded polystyrene is destroyed when exposed to ultraviolet radiation, contact with coal resin, paint thinners, and polyvinyl chloride.
When insulating a balcony or loggia with polystyrene foam, it is necessary to cover it on top with finishing material: clapboard, MDF panels, etc. We use glue suitable for working with this material.
Insulation of the floor on the balcony with expanded clay
First you need to clean the surface, seal cracks and irregularities with cement-sand mortar.
Now you need to set the beacons so that the floor remains level after insulation:
- Screw one screw into two corners of the loggia; it is important that it rises to the height of the expanded clay layer. Typically its thickness is 10 centimeters. A laser level is placed in the center of the room.
- One long strip is placed vertically on each self-tapping screw.
- At the point where the beam intersects with the staff, you must mark a point with a marker. One point is placed in both corners.
- If the mark does not coincide with the beam, you need to screw in or unscrew the screw harder. Thus, markings are made in the remaining corners.
Cement mortar must be poured onto each self-tapping screw. Next, the guides are secured, the beacon is placed on top of the solution and pressed. When it hardens, you can move on to the next stage.
Next, thin layers of expanded clay are poured and each layer is leveled with a rule. This is necessary so that there are no voids left, otherwise in some places the level of thermal insulation will be lower. After backfilling and leveling, a concrete screed is made. Before doing this, it is advisable to spill the expanded clay with cement laitance. If expanded clay is poured inside a wooden sheathing, a screed is not needed. The top is covered with plywood.
How to insulate a balcony with extruded polystyrene foam
Installation is carried out on leveled walls; after sealing the cracks, it is advisable to cover them with a layer of putty.
Balcony insulation with penoplex (expanded polystyrene) is carried out in the following sequence:
- Cut polystyrene foam with a construction knife to the size of the floor, ceiling and walls.
- A foil vapor barrier is attached to the wall. The foil should be on the polystyrene side.
- Glue is applied to the cut parts pointwise, retreating 5 millimeters from the edges. The thickness of the adhesive layer must be at least 2 mm.
- To improve fixation, plastic dowels are additionally attached for thermal insulation. It is recommended to install at least six dowels per square meter.
- Next, install the second layer of vapor barrier.
- After installation, a reinforcing mesh is installed on top of the glue. The cell size should be 5 millimeters. The mesh should not be pressed too hard and should not be buried in the glue.
When the insulation of the balcony with extruded polystyrene foam is completed, plaster can be used as finishing for the walls (for more details, see the article “finishing the balcony with decorative plaster”) or plasterboard. Installation on the floor is carried out only after leveling the slab. After installation, a concrete screed is poured over the reinforcing mesh. The next layer is to apply floor leveler.