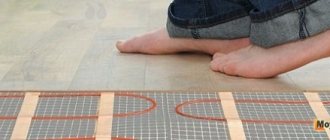
One of the alternative sources of heating a house or apartment is an electric underfloor heating system. Due to ease of installation and ease of use, cable flooring is rightfully one of the most popular among consumers.
Before considering how to make an electric heated floor, we suggest that you familiarize yourself with the advantages and disadvantages that this system contains.
Electric heated floor - advantages and disadvantages
Pros:
- the ability to be used both as the main and as an additional source of heating for housing;
- uniform heating of the entire area of the room;
- unlimited installation locations. Availability for installation in both living rooms and offices;
- compatibility with most floor coverings (laminated boards, ceramic tiles, linoleum);
- the ability to adjust the temperature regime - both throughout the apartment and separately in each room. The system on/off time is also set at the discretion of the users;
- no need to install additional equipment (as, for example, in the case of a water heated floor);
- relatively simple installation technology;
- aesthetics. The system is installed under the finished floor, this eliminates any restrictions when designing the available space;
- long service life.
Minuses:
- significant cost of using the system. This type of heating can hardly be called economical;
- danger of electric shock. Which puts forward special requirements for the calculation and installation of the heating element in all rooms, and in particular in the bathroom;
- the presence of an electromagnetic field created by the heating element (cable);
- The use of natural wooden flooring is excluded (laying under parquet or floorboards is not possible), because under the influence of temperature changes, the wood will dry out, as a result, cracks and creaks of the floor will appear;
- reducing the height of the room by installing a subfloor with a heating system;
- additional requirements for the power of existing electrical wiring.
Professionals and users who have installed electric heated floors themselves note that compliance with installation requirements and competent design make it possible to eliminate most of the listed disadvantages.
What affects energy consumption with cable floor heating
Factors affecting the energy consumption of an electric heated floor system
- climatic zone in which the house is built (private or multi-apartment);
- volume of the room (area);
- type of floor (type of floor covering);
- level of thermal insulation of the room (degree of fatigue);
- the state of the warm circuit (windows, doors) and the level of heat loss through them;
- purpose of the premises (living room, industrial facility);
- purpose and period of operation. Is the electric floor used as a primary or secondary heating system? Constantly or periodically;
- the degree of heat perception by people living in the room.
According to reviews from those who already use electric heated floors - when using the system as the main heat source - its power is 170-200 W/sq.m., as an additional one - 100-150 W/sq.m.
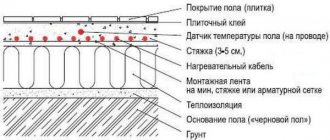
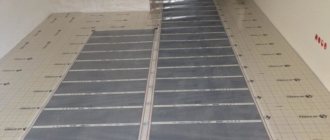
Fill the screed and lay the finishing coating
Filling the screed
The screed is best made from a special ready-made mixture. The packaging of this composition will indicate that it is designed specifically for use in combination with heated floors. Prepare the mixture according to the instructions. Sufficient layer thickness is 40-50 mm.
Approximate table for calculating the power and length of the heating cable
Spread the mixture evenly over the surface using a spatula. Make sure that there are no air pockets under the cable body. Because of them, the quality of heating will noticeably deteriorate. Let the screed dry completely.
Summary table of requirements for specific and linear power depending on the purpose of the room and type of heating
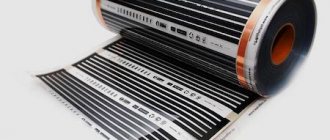
Important: infrared and heated floors require different “holding” times after installation. You can use the film floor after 2-3 days (if the screed has not been poured). The cable system must be allowed to settle for 3-4 weeks.
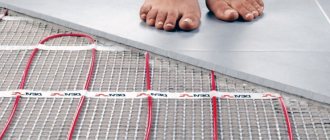
We lay the finishing coating in accordance with the installation technology of the selected material. Most often, tiles and laminate are laid on top of a warm floor. You can also lay parquet and even linoleum. If desired, you can use another coating. Focus on your preferences, the interior of the room and your available budget.
Approximate values of energy that should be emitted by a heated floor in domestic premises
Good luck!
Prices for various types of screeds and self-leveling floors
Screeds and self-leveling floors
Installation of electric heated floors - errors
Here are a few typical mistakes that, as evidenced by reviews from home craftsmen, are very common:
- buying extra material. The error is due to the fact that in the calculations the user is guided by the total area of the room, and not by the area that will serve as the basis for the heated floor. The calculations do not take into account the area occupied by furniture and heavy household appliances (refrigerator, washing machine);
- The cable used in the heating mat must not be cut. You need to choose a laying pattern in order to use the mat completely. It is better to leave part of the floor surface uncovered;
- You cannot turn on the floor heating system until the screed is completely dry, because this can lead to uneven drying of the layer and the appearance of cracks and voids.
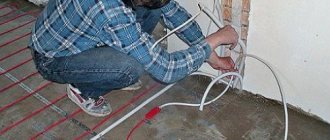
- The cable must not be laid on an unprepared surface. It is better to treat the surface of the subfloor with a primer to eliminate dust, which can cause air pockets to form around the cable and cause it to overheat;
- the temperature sensor is placed in a corrugation, so it can be dismantled and repaired if it fails;
- Resistance measurement is an important stage of pre-operation testing of an electric floor; it should not be ignored. In case of significant deviations, you need to make a decision to correct the situation on your own or involve professionals;
- The cable laying diagram will be useful when moving furniture and performing repair or maintenance work. The easiest way is to photograph the installed floor before pouring the screed.
Electric heated floors are easy to use, reliable (if you choose good components and install them correctly) and will last a long time.
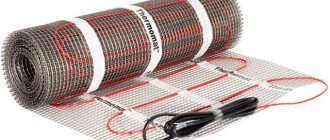
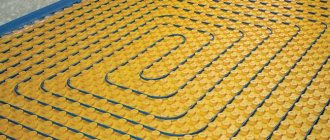
Laying diagram and main types of TP cables
There are two main types of cables for underfloor heating:
- Single-core - the contacts of the cold wires through which the power supply is supplied are located on both sides of the heating section. In the active state, such conductors additionally induce minor magnetic fields. Single-core heating cables have the following performance characteristics:
- the heating element has insulation made of fluoroplastic or cross-linked polyethylene;
- the grounding conductor is made of tinned copper;
- electric underfloor heating cables are inside a shielding shell, solid or mesh;
- general external insulation is made of polyvinyl chloride, which better resists ultraviolet radiation - can be used outdoors, for example, in anti-icing systems;
- contact couplings are located at both ends of the cable.
Structure of single and double core heating cable
- Two-core heating cable. In it, under a common external insulation, there are two conductors isolated from each other: the first is resistive, heating, the second is “cold” return. The connection contacts come out from one side of the working section.
An approximate diagram of laying a single-core heating cable in the kitchen
Important! In terms of service life and heating quality, both types of dog do not differ. At the same time, a two-core cable is more expensive, but its installation is much easier.
An approximate diagram of laying a two-core heating cable in a living room
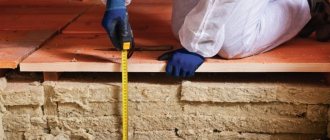
Thermal insulation
To prevent heat loss through the ceilings, thermal insulation is used. When choosing it, take into account the heat-shielding properties, on which the overall thickness of the screed depends. On the ground floor, slabs 5 cm thick are used as thermal insulation; if there is an apartment below with heating, insulating layers no more than 2-3 cm can be used.
The heat insulator is taken with a metallized coating. Aluminum foil does not withstand prolonged contact with the screed and is destroyed. It is necessary to use metallized coatings in the form of spraying with lavsan, etc.
The slabs are laid without gaps. The resulting cracks are filled with polyurethane foam, all joints are sealed with adhesive tape.
Prevention
Complication of mycotic eczema
Mycotic eczema is a chronic disease and tends to recur regularly. How long the remission will last depends on the patient himself, on how well he follows preventive measures. Eczema can be complicated by a long course and rashes all over the body, and wounds on the skin often become infected, suppuration appears, and in advanced cases, sepsis develops.
Prevention of relapses of mycotic eczema lies in the correct lifestyle. The patient needs to eat a balanced diet, excluding the consumption of allergenic foods, exercise regularly, harden and strengthen the body’s immunity in every possible way.
It is also very important to monitor the condition of the skin, immediately treat wounds and treat any rashes on the integument. Avoid exposure to household chemicals; all manipulations must be carried out with gloves.
It is necessary to maintain personal hygiene, regularly wash your hands and the whole body.
Electrical connection
The power supply circuits are the same for all electric boilers, the only difference is the number of phases. Devices with a power of up to 12 kW are connected to a single-phase 220 V network, more than 12 kW - to a three-phase (380 V). What you will need for installation:
- power cable with copper conductors;
- differential circuit breaker or combination of RCD + conventional circuit breaker;
- ground loop.
A VVG cable of any type is used as a power line; the number of cores depends on the number of phases - 3 or 5. Select the cross-section of the current-carrying part according to the power of the heat generator, usually this parameter is indicated in the product’s operating instructions. To simplify the task, we present the data for different boilers in the form of a table.
The rating of the differential circuit breaker also depends on the power consumption of the heater; the operating current is 30 mA. For example, to protect the power line of a 3 kW (220 volt) unit, you will need a device rated at 16 A; for a power of 16 kW (380 V), you need a 32 A difavtomat. The exact ratings are indicated in the product data sheet.
To independently connect a wall-mounted electric mini-boiler room, you need to remove the front panel, run the power cable inside and connect the wires of the corresponding colors to the terminal block contacts. As a rule, the neutral wire is indicated in blue, grounding in yellow-green. The control box of the induction and electrode boiler is connected in the same way.
Electrical connections between the control cabinet and the heating block of an electrode or induction boiler are made according to the individual diagram presented in the instructions. As an example, we give a connection diagram for the popular Galan electric boiler.
Automation diagram for single-phase 220 V network
The temperature of the coolant here is monitored by overhead sensors installed on the metal sections of the supply and return pipelines. The devices are connected in series with the contacts of the thermal relay that controls the magnetic starter. When the upper temperature threshold is reached, the circuit breaks and the starter turns off the heating.
Connection diagram for connecting the boiler to a three-phase 380 V network
Installation of thermostats
First of all, you should determine the location of the thermostat. It must be mounted on one of the walls of the room at a distance of at least 30 centimeters from the floor surface. Typically, thermostats are located close to switches. A recess is made in the wall the size of a standard socket box.
After installing the installation box, the power supply is supplied without connection - zero, phase and ground. Then lay the groove in the direction from the thermostat to the floor. Several sections of pipe or corrugated hose are placed in it. 1 – 2 segments are taken out of the wall near the floor surface and connecting wires from the cables are placed in them.
The section of pipe located between them must be laid along the floor to a mark located 50–100 centimeters from the wall. Now, if the sensor breaks down, it can be replaced without any problems; to do this, remove the thermostat panel and remove the damaged element by the wires from the pipe. Then the new product is inserted and connected.
Surface preparation
Before installing heated floors in the room, you should prepare the surface for work. In some cases, it will even be necessary to remove the old screed if it is very damaged and has serious defects. It is removed to the base, to the floor slab if possible. After this, all debris and dirt are removed from the surface.
If there are slight differences in height along the floor in the room, potholes, cracks, then it is best to fill in a slight layer of rough cement-sand screed. Further work can be started only after the solution has completely dried.
When everything is ready, a layer of waterproofing is performed. In addition to the base of the floor, the material should also extend onto the wall, approximately 10-15 cm. In the future, excess areas can be easily cut off with a construction knife. We must not forget about the damper tape (vertical waterproofing), which is necessary to suppress the thermal expansion of the screed during the operation of a warm electric floor.