Installation of film heated floors is simple and requires no major repair procedures. All work can be done independently, you just need to study the technology of laying the canvas and understand the criteria for choosing components and related materials. Before starting installation, you should complete the preparatory work and purchase all the necessary materials and tools.
Installation should begin only after checking the completeness of the heated floor and fully understanding the sequence of operations. This will allow you to get optimal results, high-quality installation and performance of the film heated floor. Let's consider the features and procedure for laying infrared film heated floors with your own hands.
Infrared film heated floor - what is it?
IR underfloor heating is popular due to its unique operating principle. Despite the fact that it is a type of electric underfloor heating (since it requires electricity to function), an infrared floor is much more economical and safer than its predecessor.
The operating principle of IR underfloor heating is based on the release of thermal energy in the infrared range. Long waves of radiation heat a person and the surfaces of surrounding objects: furniture, walls. And they, in turn, being a secondary heat source (reflectors) heat the air in the room. This approach to heating a house allows you to subjectively feel the heat before the air warms up.
Thermal reflective insulation
| Manufacturer: | HEATED FLOOR chain store |
| Length: | 1m |
| Equipment: | per cut |
| Thickness: | 4 mm |
| Width: | 1m |
for comparison
177 rub.
Product added to cart
| Photo | Name | Price per piece | Quantity | Price |
| Thermal reflective insulation | 177 rub. | < 1 > | RUB 177,177 |
There are 0 items in the cart worth 0 rub.
Go to cart
Buy
Availability
Advantages and disadvantages of infrared heated floors
Pros:
- there is no electromagnetic radiation;
- simultaneous damage to the entire system is reduced to zero, thanks to the parallel connection of the units;
- installation on any surface (horizontal, vertical, inclined) does not cause difficulties;
- uniform heating of the floor surface. What is very important when installing infrared heated floors under laminate;
- DIY installation will not be difficult;
- it is possible to dismantle the film, for example, when moving;
- installation of the floor is possible in rooms of any purpose (including wet ones) and under any type of covering;
- Let's install the film in an open space (veranda, terrace) and closed (rooms in an apartment or house, office, warehouse, etc.);
- high heat transfer (97%) and efficiency (30% higher compared to other electric underfloor heating systems).
Minuses:
- the need to comply with the rules for connecting and operating the system;
- not recommended as the main source of heating due to the high inertia of the system (heats up quickly, cools down quickly);
- Unlike water heated floors, film floors are not resistant to mechanical stress and damage.
Procedure
Installation of infrared film heated floor is a sequence of procedures that logically follow from one another. You should not try to simplify the task and ignore any steps, as this may result in failure of the heating fabric. Let's consider the stages of creating a film heated floor:
Calculations
Before starting work, you need to calculate everything correctly
Before starting work, it is necessary to calculate the amount of materials and draw up a diagram for laying the radiating sheet. It is necessary to draw a plan of the room to scale and indicate on it the order of furniture arrangement. All free space (with a distance of 10 cm from the walls) will be the area for laying the film heated floor.
It is better to lay thermal insulation and protective film over the entire area of the room to avoid the formation of steps and height differences. After the quantity of all materials is known, purchase a complete set of heated floors and move on to the next stage.
Installing a thermostat
Installation of a thermostat
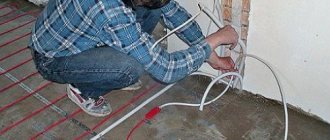
Installation of the thermostat is carried out immediately after completion of the calculation part and purchase of all components. The location of the device is marked on the wall, after which the groove line for the wires is marked. Make a vertical (not inclined) recess all the way to the floor, into which all the wires should fit (power supply, heating floor connection, temperature sensor). Use a brush cutter or grinder with a diamond blade. As an option, a hammer drill with a special attachment is suitable.
This procedure is performed first of all so that later you do not have to clean the floor from dust and concrete chips. Many novice craftsmen make the mistake of first laying out all the elements, and only after that proceeding to install the thermostat. This option is only suitable for open wiring (in a plastic cable channel).
The installation location of the thermostat is chosen so as to minimize the length of the connecting wires. The best option is installation on a wall, the plane of which is perpendicular to the direction of the underfloor heating strips.
Preparing the subfloor
The floor surface must be cleaned and freed from old coating. It is imperative to level it, remove all protruding objects - old nails, screws, other hardware. If the floor is uneven, you will have to perform a series of actions to level the surface as much as possible. In the most difficult cases, a layer of screed (or self-leveling floor) is poured, ensuring the most even and horizontal plane.
Laying thermal insulation
Features of laying thermal insulation
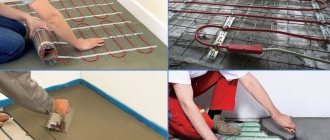
When the surface is ready, begin laying the thermal insulation. The best option is considered to be a 3-mm Marpe polymer heat insulator, which does not conduct electricity and is not capable of creating a short circuit. The insulation sheet is laid end-to-end, connecting all seams with adhesive tape.
This material is safe and easy to use - it is easy to make recesses in it for laying connecting wires. In addition, the material is quite dense, which eliminates excessive movement of the floor covering after installation.
Installation of film sheet
You can start laying the film sheet
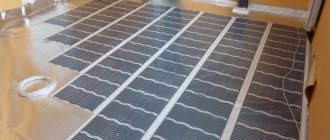
The film is laid with a distance from the walls of at least 10 cm. When cutting and placing strips, they are guided by the diagram drawn up during the calculation part. In this case, it is necessary to take into account the film cutting step - 250 mm. The strips cannot be laid closely; there must be a gap of at least 10 mm between them. It is necessary to take into account that the maximum length of the strip is 8 m. If the room is large, you will have to change the configuration of the strip.
The strips are attached to the heat insulator with pieces of tape (they cannot be attached with a continuous strip). After this, clamps are installed at the ends of the strips to connect the web into a single radiating complex. To ensure that the clamps do not protrude above the plane of the heated floor, a socket is cut out in the heat insulator into which the clamp will be completely recessed.
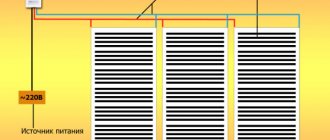
Parallel connection of strips with copper wire is carried out so that the wiring can subsequently be hidden under the baseboard. All contacts are carefully crimped with pliers and an insulating layer of tape is installed. They also cover the free end of the strips.
Attaching the temperature sensor is usually done by fixing it with tape in the center of the second section. The sensor is placed under the film, and a nest is made for it in the heat insulator. The wires are brought out and connected to the thermostat.
The connection procedure must be carefully studied in the instructions for the thermostat and the warm floor itself. Different manufacturers may have their own connection methods, so you need to keep the instructions at hand and constantly check them during the work.
Flooring installation
Flooring installation
After completing all work, you should perform a test run of the heated floor. If no complaints or defects are found, a protective layer is laid on the film (usually a backing for laminate or other floor coverings) and installation of the floor covering begins. It is performed in the usual way, but taking into account the specifics of the heated floor. They use special types of coatings (on the back there should be an icon - a snake with arrows, indicating readiness to work with heated floors).
Types of infrared film heated floors
Despite the relative novelty of infrared heating systems, manufacturers offer several varieties:
- film infrared heated floor. The essence of this system is that the heating element is a fiber laid between two layers of polymer film. The heating film is flexible, durable, wear-resistant, and is also a good dielectric.
In turn, film flooring has its own varieties. The division is based on the composition of the heating element:
- carbon – carbon-graphite;
- bimetallic - copper and aluminum.
The first system became more widespread among users.
- rod infrared heated floor. The peculiarity of the system is that the function of the heating element is performed by carbon rods connected by wire. This is the most innovative of the systems, allowing to reduce heating costs by 60% (compared to other systems). The widespread use of carbon rod floors is hampered only by their high price.
Comparing these systems for specific operating conditions will make it possible to find out which infrared heated floor is better.
Features of this heating system
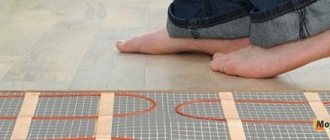
A film-type warm floor is a rather complex electrical system that you certainly cannot make yourself, but it is possible to purchase this film and install it yourself. You just need to have a general understanding of how to work with electrical devices, as well as follow all the rules for laying this product.
IR film for heated floors
A film floor can be called a universal heating system, since in some cases it can replace heating in a small room and also help create comfort in it. The film itself has special heating nanoelements, which are made of carbon-containing materials. Under the influence of electric current, they can create infrared radiation, due to which the surface is heated. The radiation is not noticeable to the human eye, but the body will immediately feel it.
Types of IR film floors
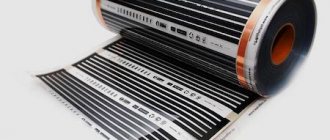
The nanoelements themselves are closed on both sides with a special polymer material, as if sealed inside it. The width of one strip of carbon substances is only 15 mm, and there are a lot of them on one piece of film. They are parallel to each other, and the film looks striped. The strips of heating elements are connected to each other by special silver-plated copper busbars. Thanks to the polymer film covering the heating strips on both sides, the system is protected from a number of influences, including moisture.
SNiP 2.04.05-91. Heating, ventilation, air conditioning. Downloadable file (click the link to open the PDF in a new window).
SNiP 2.04.05-91
Table. Some characteristics of the heating element.
| Parameter | Meaning |
| Film roll width | 50-100 cm |
| Length of material in 1 roll | 50 m |
| Material thickness | 0.2-0.4 mm |
| Power (consumption) | 25-80 W/h per 1 sq. m. |
| Possible heating level of the carbon element | 30-50 degrees |
Specifications
Operation of infrared film heated floor
Recommendations:
- if a significant amount of water gets on the film floor, it must be turned off immediately and dried (naturally);
- you cannot turn on the system in order, for example, to dry the carpet after wet cleaning);
- It is not allowed to fasten anything (for example, a door stop or baseboard) using hardware. They will damage sections of the film;
- It is prohibited to spread carpets, blankets, metallized films (foil) on the floor, or to rearrange furniture. This may cause the system to overheat.
Stage 3
To connect electrical wires to the heating elements, it is necessary to install contact terminals . One strip of IR film requires 2 terminals. In ready-made kits, connecting terminals are already installed on the heating film; installation of additional terminals from the kit on other strips is carried out according to the sample.
Installation of contact terminals, fig. 1
Installation of contact terminals, fig. 2
The finished KEEPLY OPTIMAL 160 2 m2 kit contains 2 sets with two connecting terminals in each. Also 2 terminals are pre-installed on the film. If you purchase film for cutting (VIOLET FLOOR), then you need to purchase additional VF kits with the required number of terminals based on the number of film strips.
For example, to connect two strips of film you will need an additional VF2 kit, which includes 4 terminals. To connect three strips of film, the VF3 kit with 6 mounting terminals is suitable, for 4 strips - VF4 with 8 terminals, etc.
Selection of necessary materials
The main thing is to choose quality materials. Below are the basic principles of selection.
Substrate
The underlay is a polymer material laid between the subfloor and the heating film. Serves to prevent contact of infrared film with the rough concrete floor, prevents heat loss, and reflects infrared rays emitted by graphite strips.
Penofol
Foiled foam foil on one side with a thickness of 3-4 mm is used as a substrate when installing infrared floors.
Important! When laying heated floors, it is not permissible to use a substrate with a reflective surface made of aluminum or other metal foil.
Thermal film
When choosing a thermal film, take into account such characteristics as the maximum consumed (peak) power:
- from 110 to 160 W/m2 - film heaters with this power are used for heating small rooms with finished floors made of linoleum, laminate, carpet;
- from 160 to 220 W/sq.m. — this thermal film is used for heating spacious rooms, offices, and small workshops. It is laid under floors made of ceramic tiles and porcelain stoneware;
- more than 220 W/m2 - heating film with this power is used for heating large industrial premises, greenhouses, and warehouses.
Roll with thermal film
Control elements
For the convenience of adjusting the temperature background inside a room heated with an infrared heated floor, it is connected to an electronic programmable thermostat. This device allows you to very accurately set and maintain the temperature in the room, has a convenient interface in the form of a large liquid crystal display, touch or push-button heating controls.
Protective covering
When installing infrared heating film under carpet, laminate, linoleum, ceramic tiles, it must be protected from mechanical damage using materials laid on top of it such as:
- polyethylene film;
- wall plasterboard 9 mm thick;
- plywood 8-10 mm thick;
Important! In rooms with high humidity, instead of conventional drywall or plywood, their moisture-resistant analogues are used.
Wiring
To connect the heating strips to the thermostat, stranded two-core copper cables with polyvinyl chloride insulation are used.
The cable cross-section is selected taking into account the maximum power of the entire heating film being laid.
The cable selection algorithm is very simple and consists of 2 steps:
- By multiplying the peak power of 1 square meter of thermal film by its area, the total power of the heated floor is found.
- Using special tables in regulatory documents (GOST 16442-80, PEU-7), the cross-section of the supply cable is selected for the found load (total power of the heated floor).
For example, to connect a thermal film with an area of 20 m2 and a maximum power of 150 W/m2 (3 kW total power), cables with a cross-section of at least 2.5 mm2 are used.
Additional kit VF2
| Manufacturer: | VIOLET FLOOR |
| Equipment: | bitumen insulation - 10 pcs., mounting terminals - 4 pcs. |
| Application: | for connecting 2 strips of heating film |
for comparison
368 rub.
Product added to cart
| Photo | Name | Price per piece | Quantity | Price |
| Additional kit VF2 | 368 rub. | < 1 > | RUR 368,368 |
There are 0 items in the cart worth 0 rub.
Go to cart
Buy
Availability
Additional kit KEEPLY PS-2.5x16
| Manufacturer: | KEEPLY |
| Cross section: | 2.5 mm2 |
| Length: | 16 m |
| Application: | up to 4.4 kW |
for comparison
RUB 1,072
Product added to cart
| Photo | Name | Price per piece | Quantity | Price |
| Additional kit KEEPLY PS-2.5x16 | 1,072 rub. | < 1 > | 1,072 1,072 rub. |
There are 0 items in the cart worth 0 rub.
Go to cart
Buy
Availability
Additional kit KEEPLY PS-1.5x16
| Manufacturer: | KEEPLY |
| Cross section: | 1.5 mm2 |
| Length: | 16 m |
| Application: | up to 3.5 kW |
for comparison
723 rub.
Product added to cart
| Photo | Name | Price per piece | Quantity | Price |
| Additional kit KEEPLY PS-1.5x16 | 723 rub. | < 1 > | RUB 723,723 |
There are 0 items in the cart worth 0 rub.
Go to cart
Buy
Availability
How to prepare a place for a thermostat
It is convenient to install this device in the wall, raising it approximately 20-30 cm from the floor. A 2 cm recess is made in the wall. The size corresponds to the dimensions of the thermostat.
From the resulting hole down to the floor, cut a groove. Cables will subsequently be laid there to connect the film floor to the thermostat and the electrical network.
Advice. It is best to hide the cables in a corrugation. This will greatly simplify the task of repairing them.
Additional kit VF1
| Manufacturer: | VIOLET FLOOR |
| Equipment: | bitumen insulation - 5 pcs., mounting terminals - 2 pcs. |
| Application: | for connecting 1 strip of heating film |
for comparison
194 rub.
Product added to cart
| Photo | Name | Price per piece | Quantity | Price |
| Additional kit VF1 | 194 rub. | < 1 > | RUB 194,194 |
There are 0 items in the cart worth 0 rub.
Go to cart
Buy
Availability
