Installation sequence
To lay cable flooring you will need:
- heating cable or mat;
- thermostat;
- temperature sensor;
- insulation;
- insulating materials;
- clamps;
- perforator;
- pliers;
- RCD protection system;
- hammer;
- chisel;
- roulette.
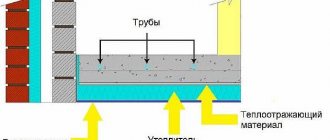
To lay the tiles efficiently, the base must be level and without damage, so it is leveled using a screed. If a cable is used, then it must be laid in a concrete screed, and if mats are used, then they can be mounted with tile adhesive.
A waterproofing layer and thermal insulation are placed under the screed so that heat goes into the room and does not spread downwards. Most often, penofol is used as insulation, which is covered with foil on one side and has a self-adhesive layer on the other.
In addition to its thermal insulation function, this material also acts as sound insulation, so the house will be more cozy and comfortable. Since the cable is laid in the screed, before pouring it, a damper tape is glued around the perimeter of the room, which will not allow the coating to expand and not be damaged.
The resistance of the wire is checked before and after it is laid.
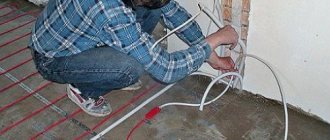
Using a hammer drill, a place is made in the wall for mounting the thermostat, grounding and power wire are connected to it, and a groove is made for connecting the heating cable. The cable or mats are laid according to a pre-made scheme. They do this only in a usable area, that is, where there is no furniture or other stationary objects.
The cable is secured to the base using mounting tape. If a cable is laid, then it should be in one piece, and if there are mats, then they can be cut, but so as not to damage the wire. Connect the heating and power electrical cables, check the resistance and connect to the thermostat.
Warm electric floors must be connected to a separate residual current device (RCD).
The system is tested in different modes, if everything is normal, then the cable is covered with a screed, and ceramic tiles can be immediately laid on the mats.
Features of installation of the sensor and thermostat
The temperature sensor records its readings and transmits them to the thermostat. There are devices for soft and hard finishing. Those designed for tiles and porcelain stoneware are large in size and placed in a protective gel shell; it protects the sensor from the negative effects of screed or glue, as well as from damage.
You can install a temperature sensor in the box between the heating cable and the thermostat or directly between them; the latter option is more often used.
For ease of use, the thermostat is usually placed at a height of 50-90 cm from the floor and placed in a mounting box. The sensor is placed in a plastic tube between the cable, which is located at a distance of 50-100 cm. To prevent solution from getting into the tube, its end is closed. The functionality of the system can only be checked after the screed has dried.
There are thermostats with a built-in floor temperature sensor. It is better to buy a device that has a remote and built-in sensor.
How to lay tiles on an electric heated floor
Installation of ceramic tiles is carried out as usual, only you need to use glue for heated floors. If the cable is hidden in a screed, then the tiles are laid after they have dried. You can immediately lay tiles on the mats. There should be about 5 mm of glue above the heating element; all voids are filled with it; a notched trowel is used for this.
Laying tiles begins from the far corner and moves towards the exit. To obtain identical seams, plastic crosses are used. After laying all the tiles, you need to wait a few days for the glue to dry and only then can you turn on the heated floor.
Marking
Before laying the tiles on the heated floor, markings are made. It is necessary to decide on what pattern to lay it. For example, there will be a lot of trim along the diagonal. You can lay them staggered so that the vertical seams do not coincide. With normal masonry, all seams, vertical and horizontal, will coincide.
Important! The choice of installation scheme does not affect the quality of floor heating. It is necessary to navigate based on personal preference.
Having decided on the layout scheme, markings are applied to the floor. Using a beating cord with paint, beat off the line of the first row. This guide will help you lay out all the tiles evenly. If there is a pattern, lay the coating on the floor dry. This will help you make the markings correctly.
Calculation and selection of coating: warm floor for a bathroom, room, loggia or balcony
First of all, it is necessary to determine exactly what functions are planned for the electric “warm floor” - whether it will be the main source of air heating or only an auxiliary one. In any case, the amount of heat that can be emitted by a given system under given installation conditions is checked.
The indicators indicated in the table are the final thermal radiation that has already passed through the installation layer (screed, glue) and the floor covering layer. It should be taken into account that different coating materials transmit heat differently. In addition, some (parquet, solid wood) do not tolerate heat above 26...28 degrees Celsius.
The illustration below will help you imagine the overall picture.
If we take it in numbers, then for the calculation it is convenient to use not standard data on heat transfer resistance, but the thermal conductivity coefficient of the material.
As can be seen from the table, only when laying ceramic or stone tiles can you not worry about loss of power. Accordingly, when calculating, data on the thermal radiation of the heating system can be taken “as is”.
If we are talking about laminate, carpet and parquet boards (namely parquet boards, not parquet!), one should take into account: only a tenth of the heat emitted by the cable, mat or film will reach the consumer.
Example
It is planned to lay a film floor under the laminate in the bedroom as additional heating. Required radiation power – 120 W/m2. There is no screed, the thermal insulation of the subfloor is sufficient, a special laminate is used “for a warm floor” with a thermal conductivity coefficient of 0.15 (regular laminate has a coefficient of 0.1, see the table above). It is planned to use Caleo GOLD film flooring with a power of 170 W/sq.m.
Considering the coefficient of 0.15 for laminate, the room will be penetrated
170x0.15=25.5 W per square meter.
According to standards, the main heating per square meter should produce about 100 W.
Consequently, even with insufficient heating by central heating, an additional 25 W/sq.m. give quite a sufficient “increase” in heat.
Important: film “warm floors” are not installed over the entire area of the room! Film is placed under plumbing fixtures, large furniture and appliances! The same applies to cable systems and thermomats.
Taking into account the above calculation example and focusing on minimal energy losses, the optimal type of floor covering for underfloor heating systems is ceramic or stone tiles.
Counting the number and power of mats
First you need to decide on the power of the mats, and then calculate their number. Since tiles are installed mainly in the bathroom and kitchen, it is worth taking the indicators for these rooms as a guide:
- average power for the kitchen – 110-130 W/m2;
- the average power for a bath, shower and toilet is 120-150 W/m2.
These indicators are relevant only if the heated floor is installed as an auxiliary heating system. If the electric floor is designed to thoroughly heat a kitchen or bathroom, the power of one mat should be at least 140-180 W/m2.
Next, we calculate the usable area of the room - multiply the length of the room by the width and subtract the area that household appliances will occupy.
Now you can calculate the number of mats - divide the usable area by the area of one element of the selected power.
Why is infrared film a controversial option?
Film heating systems are designed for installation using the “dry” method under laminate, linoleum, and carpet. Filling a screed on top or applying tile adhesive means that over time this heating system will be damaged. The alkaline environment of solutions has an aggressive effect on the film. As a result, this will lead to short-circuiting of the exposed heating elements. Moreover, the concrete screed does not stick to the film, so the tile turns out to be “floating”, which will lead to cracking over time.
The concrete screed will also collapse, since the film will not allow it to adhere properly to the subfloor. The consequences are difficult to avoid, even if you can carefully make technological holes without damaging the film.
If you have a strong desire to lay infrared film under the tiles, you can try to build an auxiliary “sandwich”: separate the film and adhesive solution with a waterproofing layer and a hard covering (for example, fiberboard). In addition to the additional installation costs, there is another disadvantage - you will need to choose a film with a higher rated power. This will result in increased energy consumption during operation.
Surface preparation
Make sure that the installation work of the heated floor has come to an end. The system is working properly and has been tested/pressurized. The base for the tiles must be dry and level.
Laying tiles on a screed is much easier. To do this, try to fill it level. In this case, the tiled layer will be minimal. Any contaminants and solution build-ups are removed.
The cleaned and prepared screed is coated with a primer. The use of a deep penetration primer is recommended. After two hours, the surface is primed again for better adhesion of the tile adhesive.
Important! Don't forget to turn off the underfloor heating. Otherwise, the glue will dry out quickly and it will not hold the tile.
We analyze the types of heated floors
Installation of heated floors under tiles begins with the selection of heating equipment. Some experts and consumers say that it is much more profitable to lay water floors, but this is not always possible. In addition, they have certain disadvantages:
- To lay water pipes, you will need a powerful concrete screed - it is poured on top of the laid pipes, its thickness reaches 70-80 mm;
- Concrete screed creates pressure on subfloors - this is important in multi-story buildings where floor slabs are not designed for such loads;
- The water pipe is at risk of failure - this can lead to flooding of neighbors and unnecessary repair costs.
They are more applicable in private households, where it is possible to equip them during the construction or renovation stage.
Please note that if the water heated floors break, you will have to repair not only your own apartment, but also someone else’s.
Electric heated floors for tiles come in three main varieties:
- Heating cable is the best option;
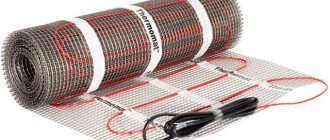
- Heating mats are somewhat expensive, but effective;
- Infrared film is not the smartest option.
Let's consider the possibility of using them in conjunction with tiles.
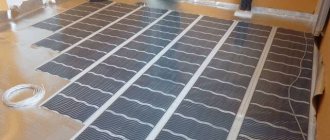
Infrared film
When choosing electric heated floors under tiles, consumers will certainly become familiar with infrared film. This film provides heating of floor coverings using infrared radiation, under the influence of which they become warm. But it is not suitable for laying under tiles or porcelain stoneware - the smooth film will not be able to bond properly with tile adhesive or mortar, which is why the tile simply falls off, albeit not immediately, but over time.
Also, the electric infrared film will not be able to provide a connection between the tile adhesive and the main floor, despite the presence of special technological holes. The finished structure turns out to be unreliable and short-lived; it threatens to fall apart in parts. We conclude that some other heating equipment is needed under the tiled floor; infrared film is not suitable here.
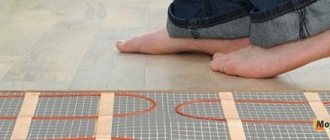
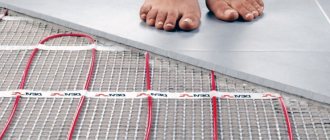
Heating mats
The ability to install an electric heated floor without a screed under the tiles is provided by the above-mentioned heating mats. They are modular structures, ready for installation work - these are small sections of durable mesh on which sections of the heating cable are fixed. We roll it out on a flat surface, apply glue, lay the tiles, let it dry - now everything is ready, you can safely walk on it and place furniture.
Electric heated floors under tiles, created on the basis of heating mats, are easy to install. They do not require a bulky and heavy cement screed, but are distinguished by their high cost - this is a small disadvantage that you will have to put up with. But we can safely mount them on rough surfaces and immediately begin laying tiles or porcelain tiles.
Heating cable
Warm cable flooring under tiles is a more standard and cheaper solution compared to the above-mentioned mats. It will delight you with warmth and long service life, as well as a low probability of breakdown. Electric heated floors of this type are mounted using three types of cable:
- Single-core is not the most worthy solution. The thing is that this cable format requires connecting wires to two ends at once, and not to one. This is not very convenient and leads to significant labor costs;
- Two-core - a more advanced cable for installing electric heated floors under tiles. It is easy to install as it does not require a ring connection;
- Self-regulating cable - it can be easily cut to almost any length; thanks to its special internal structure, it can automatically regulate the heating temperature.
Using a self-regulating cable to install an electric heated floor under a tile, you get the opportunity to save on electricity. Also, experts and consumers note more uniform heating, which is difficult to achieve when using other types of heating elements.
Final conclusions
We can implement electric floor heating under tiles in two ways - using a heating mat or a heating cable. Infrared film is not suitable for our purposes; it is better to use it with laminate. More precisely, you can use it, but only at your own peril and risk - if you lay the tiles directly on the film, then no one can guarantee the long service life of such a structure. There is a high probability of its failure in the very near future.
Preparation of glue
After marking, tile adhesive is prepared. The kneading is done based on the manufacturer's recommendations. Pour water into the mixing container. Add a mixture of a given proportion to it.
If you do the opposite, the glue will form a lump that is difficult to break. The tile adhesive is mixed with a construction mixer. The finished consistency should resemble a creamy mass.
Check the quality of the glue: put the mixture on a spatula; it should not flow or fall when the spatula is tilted. The mixture should be held on the spatula.
note
After preparing the tile adhesive, allow it to rest for 15 minutes. After this time, re-mix the glue.
Without practice, the speed of laying tiles will be low. Therefore, do not mix glue in large quantities. Calculate the batch for 30 minutes of work. During this time, the glue will not dry out and a crust will not form on it.
Electric heated floor in a screed: how much cable is needed
The main parameters of the cable, thanks to which the required quantity can be calculated, are the length and the pitch between adjacent loops. These are two values that are calculated based on the laying area S. Other quantities:
- Qs is the amount of thermal energy for heating;
- Qkb - specific thermal power per 1 m of cable length (specific thermal power must be indicated in the technical documentation).
S is calculated after measuring, calculating and summing up the areas of the sections where the cable will be laid. The required cable length is calculated by the formula: L = S × Qs / Qkb. After calculating the length, you can determine the distance between the parallel loops and the cable laying pitch - N = 100 × S / L. where S is the area, L is the cable length.
By the way! When calculating the required amount of cable, it is important to understand that it cannot be laid under stationary pieces of furniture. You also need to leave 50 cm from furniture and walls, and 100 cm from heating devices (convector, heating risers, radiators)
If the subfloor is cold and the heating system is installed as the main one, then the cable should ideally cover 70-75% of the total area of the room. The cable is sold in standard lengths with already installed couplings (connection and end). This means that it is enough to select the optimal cable length for a particular model range. If the room is too large, then the estimated length may be higher. You can also divide the base of the floor in half and make your own cable calculations for each part, taking into account the area of the room, equipping each circuit with its own thermostat during installation.
Reference! Before installing a cable heated floor under the tiles, it is recommended to make the necessary accurate calculations. First, draw a diagram of the cable layout, then, to scale and on the basis, do the laying.
Calculation of heating cable length
The length of the electrical cable will depend on the total power of the system. It is calculated by multiplying the average power (W/m2) by the total area of the room; it is also recommended to add a reserve of 30% for heat loss. Here you can focus on the optimal indicators for the kitchen and bathroom described above.
Then we determine the type and rated power per linear meter of cable - it can vary from 10 to 60 W/m. Next, we divide the total power of the system by the power of the linear meter of cable - we get the length.
Thus, it is obvious that the more powerful the heating cable is chosen, the less of it will be needed for installing the electric floor.
Preparatory work
Installing an electric underfloor heating system with your own hands is difficult. Mistakes made and violation of technology rules can lead to improper functioning and even the creation of a dangerous situation. If you carry out the work carefully and step by step, then you can carry out the technology for installing the system under the tiles without the involvement of specialists.
Initial work that must be carried out before laying an electric heated floor under the tiles:
- Leveling the floor surface. Uneven subfloors are a common occurrence in apartment buildings. First, the old coating is removed, cracks, cracks, unstable and loose areas are sealed. If the base of the floor is severely deformed, then you cannot do without a concrete screed of the old covering. And to avoid rapid failure, it is impossible to install a heating system on an uneven floor under ceramics.
- Thermal insulation is used to calculate the degree of insulation of the base base so that electricity is not wasted on heating unnecessary areas of the floor or floor slabs. If extra kilowatts are constantly spent, the owners may simply go bankrupt. Of course, when laying heated floors on the first floors or private houses, under which there are cold unheated basements, first lay a layer of thermal insulation. Then lay the electrical system on 70-80% of the floor, taking into account the total area.
- Availability of power line nearby. Check if there is a properly installed ground connection. What is the power in the wiring, since the underfloor heating system requires the installation of a thermostat.
- Buying a thermostat with a sensor, which are often not included in heated floor kits. You can choose a thermostat for installation in a standard socket for a switch and socket as desired: electromechanical, push-button, with indication. To mount it on the wall, a convenient place is selected, a groove is made at the initial stage of work, from where the cable will be output.