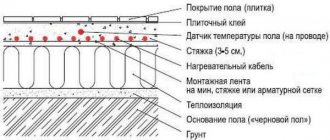
The main advantage of ceramic tiles is the possibility of laying them on any of the existing heating systems: water or electric, since they have high thermal conductivity.
If the question is which type of heated floor is best to choose for tiles, then our answer is electric , because it is easy to install and does not put pressure on the ceiling like a water heating system.
Let's take a closer look at all floor heating devices used under tiles to find out which is better in each specific case.
Choosing the best option
You can heat the floor covering using a heating cable or thermomat. Each option has its own advantages and disadvantages, which you should know about before going to the store.
Cable electric underfloor heating has a lower cost, but it is quite difficult to correctly calculate the cable length and install it. In addition, laying a cable heated floor under the tiles involves installing a thicker floor screed, which will lead to a decrease in the height of the room.
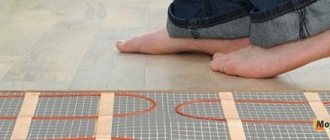
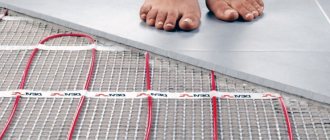
A heating mat is an improved version of a conductor and therefore has great advantages. Among the design features, we can highlight the placement of the cable on a special mesh made of fiberglass fabric with an even pitch between the turns.
One of the advantages of a thermomat is the simple calculation of the material; for this, it is enough to know the area of the room. Using this parameter, a roll of the required size is purchased in a specialized store.
Pros and cons of electric floors
Electric heated floors allow you to quickly achieve uniform and highly efficient heating of the room. The heat from them rises from the floor covering throughout the entire room where the heating system in question is installed. The heat flows from the battery must still disperse from the window to the far corners. At the same time, a considerable part of the air heated by the radiators will remain under the ceiling, where no one needs it.
Advantages of electric heated floors
The advantages of electric heated floors are as follows:
- Versatility - such systems can be installed in bedrooms, hallways, kitchens and bathrooms.
- There is no even minimal risk of water leaks.
- Possibility of precise temperature adjustment.
- Connection to a regular electrical network without any tricks or installation of additional equipment such as boilers or boilers.
- The minimum period from the start of work to commissioning - installation of a film electric floor in a small room of up to 15 m2 takes at most a day.
- Uniform heating over the entire heated area above the heating system.
- Possibility of laying on top of almost any floor covering - tiles, linoleum, porcelain stoneware, laminate, etc.
- Easy to repair and high reliability - with proper installation, the risk of a short circuit is minimal.
- There is no need for complex maintenance and seasonal preparation on the eve of winter.
- Minimum load on the interfloor floor - electrical cables and mats weigh relatively little, and also do not require a heavy thick concrete screed.
With a large heating area, a warm floor powered by electricity consumes quite a lot of energy in kilowatts per hour. It requires about 100–200 W/m2. However, in the vast majority of cases, such a system is sufficient to have an existing 220 V network. Connecting it to the power supply is even easier than connecting a water heater to a water supply or a dishwasher to a sewer.
Temperature distribution in a heated floor system
Among the disadvantages of electric floor heating are:
- High power consumption.
- Possible problems associated with short circuits and electric shock.
It is not necessary to coordinate the connection of the electrical equipment in question, as in the case of a gas boiler, with utility companies and power engineers. The main thing is that the electrical network of the cottage or apartment is designed for the connected load. If there is not enough free capacity, then you will have to lay another cable from the nearest transformer. And this can cost a lot of money.
Installation of heated electric floor
Laying cables and mats is carried out according to the same scheme, only the basic processes differ. At the same time, it is very important to understand how to properly install a heated floor under the tiles.
Surface preparation
To ensure high-quality installation work, you should pay careful attention to the surface preparation stage.
- The old coating is removed and the surface is cleaned of debris, dirt and dust.
- If there are unevennesses, make a rough floor screed. To do this, level the surface with a solution, the thickness of which can be about 7 cm.
Drawing up a laying scheme - how best to lay a heated floor
A wiring diagram for an electric heated floor is necessary for the correct placement of the heating mat or cable. It is drawn up before installing a warm floor under the tiles and calculating the required amount of materials.
When drawing up a diagram, you must adhere to the following recommendations:
- The distance from the walls to the contour of the heated floor should be at least 10 cm.
- Do not place the material under furniture without legs or household appliances. In this case, the heat given off will return back, which will cause the conductor to overheat and fail.
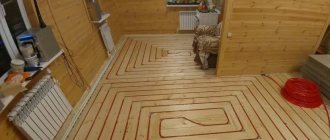
- Laying can be done not only in a straight line. Trimming individual sections of the grid allows you to direct the path in the desired direction. As a result, a certain area is heated, which helps reduce energy costs.
What type of heating should you choose?
Heating mats, water and electric water floors are best suited for tiles. The cable system option is worth considering if you have the skills to install such floors yourself or you can order such a service for a reasonable price. It is worth remembering that problems may arise with diagnosing and repairing breakdowns.
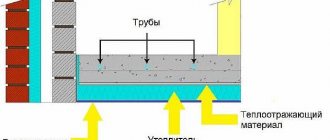
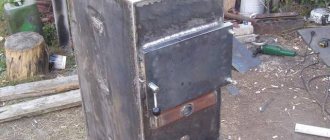
A water floor is a relatively cheap heating option. If it is possible to connect the heating circuit to a gas boiler, you can provide economical floor heating. If you have to use electricity, it is better to give preference to an electric-water system
Film infrared floors are considered the worst solution, despite their efficiency and cost-effectiveness. They are perfect for installation under laminate, but do not “get along” well with tiles. Experts advise choosing a different, more practical heating option.
Rules for performing calculations
Before laying an electric heated floor under the tiles with your own hands, you need to make the correct calculations:
- If the system is used as the main heating, then to heat an area of 1 sq. m. requires a heater with a power of 140-180 W.
- If the heated floor will be used for additional heating, then you can use a heater with a power of 80 W or more.
In both cases, the quality of the room's thermal insulation is taken into account.
When performing calculations, it is necessary to calculate the usable area of the room. To do this, multiply the length of the room by its width and subtract the area occupied by household appliances and furniture without legs. Then, in accordance with the obtained values, the total power of the heating element and its length are calculated. Depending on the manufacturer, the power of 1 meter of heating cable is 16-21 W.
The choice of heating mats follows a similar principle; the usable area of the room and the total power are also taken into account. To attach thermomats to a concrete screed, an additional purchase of a special mounting tape is required.
Infrared carbon floors
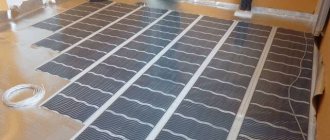
Infrared floors consist of heating elements filled with a carbon mixture and fixed to a polypropylene base. When exposed to current, carbon emits heat waves with a length of 8–14 microns; the waves pass through the floor covering and warm up the objects in the room (the air only slightly). A room heated by an infrared carbon floor is always very comfortable - there is no dry air, which is why we suffer so much in winter.
RavaFORUMHOUSE Member
It heats up objects: tables, stairs, walls, that’s the whole point. You open the windows wide, ventilate, and when you close everything, it’s warm again. Because not only the air is warm, but everything around it.
Infrared floors are not afraid of frost: you can come to a cold country house in winter for the weekend after a week of hellish minuses, turn on the system and it will work normally, and a comfortable temperature will be established very quickly (the system enters operating mode in 5-7 minutes, but it also cools down such a floor immediately).
Film and rod floors have their own characteristics.
| Film floor | Rod floor |
| Installed without wet processes, on a dry, flat surface under the finishing coat. Installation is quick, with the ability to dismantle the system and use it again. | Laying is carried out in a screed or a layer of tile adhesive (2 cm) with mandatory thermal insulation of the rough base. Foil materials are not allowed for the coating substrate. |
| It is not recommended under carpet, carpet tiles, linoleum on felt - these coatings reduce the heating efficiency several times. Parquet and solid boards are possible if the operating temperature of the system is not higher than 28 degrees. | Self-regulating system: if the floor temperature rises in the area under the furniture, the power consumption of the heating elements decreases. And vice versa. |
| It can be cut into pieces and placed arbitrarily - this allows you to heat only some local areas of the room: passages, places where children play, etc. | A core floor can be installed in any room; large furniture and equipment can be placed on top. |
| If any section breaks, the floor will work as before - you won’t even notice it. | Thanks to the parallel connection scheme, the system will operate stably even if several heating elements fail. |
Heating coatings of this type are used to heat stairs and porches in private homes, to prevent the formation of ice.
Checking the electrical wiring
Before laying a heated floor under the tiles, you should check the functionality of the old electrical wiring. After all, to heat a large room, you need a powerful heater, which during operation will put a significant load on the wiring. Therefore, it is important to correctly determine the cable cross-section and find out whether it matches the new heating system.
If necessary, the electrical wiring in the room should be replaced with a more powerful version. In addition, appropriate RCDs and circuit breakers are additionally installed.
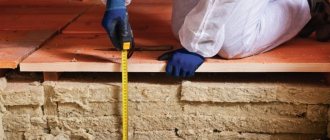
How to properly lay insulation on the floor under tiles
The first stage of direct installation of heating elements is floor insulation. The efficiency of the entire system and the cost-effectiveness of its use depend on the quality of the work performed. The most popular among thermal insulation materials used for underfloor heating systems is penofol. This roll insulation has a self-adhesive layer and a foil coating. For insulation, the material is rolled out and glued to the surface, the joints are taped with foil tape. To increase the thermal insulation characteristics of the room, foam foam is overlapped on the walls by several centimeters.
After laying the insulation in the lower part of the walls, a damper tape is glued around the perimeter of the room. It compensates for the expansion of the floor covering when heated.
A metal mesh is laid on top of the heat-insulating material to prevent the heating element from coming into contact with the insulation and to simplify the installation of the heated floor under the tiles.
Advantages and disadvantages of electric flooring in the house
Advantages of installing electric floors:
- The use of electricity makes it possible to conveniently change the degree of heating.
- When such a floor operates in the lower part of the room, uniform heating occurs over the entire area. One consequence of this is the absence of air currents from top to bottom or in horizontal directions. There is no accumulation or movement of dust and dirt particles.
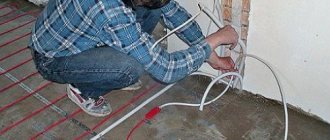
Cable laying for heated floors
Cable laying for heated floors
- High level of security. The parts of the device are securely hidden, which eliminates the possibility of accidental burns or electric shock.
- This heating system works efficiently. Since there is convenient adjustment, you can set the optimal degree of heating depending on the specific situation.
- The installation of such heating devices can be done without professional skills. Simple installation allows almost any owner to install the system themselves.
These floors have a long service life.
Benefits of use
Installation of control devices
Special devices help control the operation and manage the system: a thermostat and a temperature sensor. The thermostat can be mechanical or electronic; with its help, a certain temperature regime and the time for turning the system on and off are set. This device is placed in close proximity to sockets, mounted in the wall.
It is recommended to place temperature sensors on the floor. To install this device, a vertical hole is drilled in the wall from the thermostat to the temperature control point, into which a sensor is placed, previously placed in a corrugated insulating pipe. The control location must be chosen between the heater turns.
The use of corrugation avoids unexpected damage to the sensor. In addition, this design provides quick access in case of an emergency. One end of the corrugated pipe is located in the concrete screed, so there is a risk of solution getting inside. To avoid this, the end of the corrugation is filled with sealant.
Fixing heating cables or mats
After complete preparation of the surface, you can begin laying and securing cables or heating mats and directly deciding how to lay a heated floor under the tiles.
The cable can be secured using mounting tape and special plastic clamps. The use of these elements makes it faster and easier to fix the heating cable. During the installation process, it is necessary to maintain the same distance between the turns, otherwise the floor will heat up unevenly.
In heating mats, a certain pitch is maintained between the turns, so their installation is much easier and faster. It is enough just to arrange the material according to the diagram and make the correct connection to the thermostat.
After fixing the heating element to the floor, it is necessary to test the operation of the system and measure the resistance using a multimeter. The readings obtained must correspond to those recorded before laying the material.
How to properly install a thermostat and temperature sensor
To ensure full control over the operation of the heated floor under the porcelain tiles, it is necessary to install two important automation elements - a thermostat and a temperature sensor. When installing these devices, it is necessary to take into account a number of recommendations:
- Temperature regulator:
- Mounted on a wall adjacent to the floor.
- It is recommended to install at a height of 100 to 140 cm from the tile surface.
- To install the thermostat, a hole is made in the wall into which the base of the device with a cable outlet is recessed.
- To lay the cable, a groove is cut in the vertical structure.
- It is recommended to lay the power cable in a protective box.
- When connecting a cable core to a heated floor structure, it is necessary to provide effective insulation in the form of electrical tape or heat-shrinkable tubing.
- If possible, instead of terminal connections, you should resort to soldering contacts.
- Temperature sensor:
- Placed at a distance of at least 100 cm from the nearest wall.
- It is recommended to install strictly between the turns of the heating cable.
- If there is a screed, it is necessary to place the temperature sensor in the corrugation.
- There should be no other heating elements in the immediate vicinity of the highly sensitive control equipment head that could interfere with its readings.
- The sensor is connected via a cable to the thermostat, which allows the automatic relay to send a signal in time to turn it off or on again.
When the automation operates correctly, a comfortable temperature for the user is established in the room, which exactly corresponds to the settings previously set on the devices.
Screed
One of the stages in solving the question of how to lay a warm floor under the tiles is pouring the screed. To prepare a concrete solution, you will need materials taken in the following ratio:
- Sand - 4 parts.
- Cement - 1 part.
- Crushed stone - part 5.
- Water – 0.6 parts.
In addition, it is necessary to add a special plasticizer, which will make the solution more elastic. The additive is taken in an amount of 1% by weight of cement.
The total thickness of the screed should be no less than 3 cm and no more than 5 cm. The poured solution is left until completely dry, which most often takes about a month. Premature activation of the system is not allowed.
It should be remembered that the screed is made only when using a heating cable. You can immediately apply tile adhesive to thermomats.
Floor tiling
Laying tiles can begin after the screed has set, usually 2-3 days are enough for this. However, the work must be carried out by a professional tiler, who will ensure that the tiles fit correctly and make the surface horizontal. To lay tiles on a warm electric floor, you must use a special glue.
At this point, the process of installing an electric heated floor under the tiles is considered complete. You can do all the work yourself if you follow the instructions on how to properly lay a heated floor under the tiles.
Installation sequence
To lay cable flooring you will need:
- heating cable or mat;
- thermostat;
- temperature sensor;
- insulation;
- insulating materials;
- clamps;
- perforator;
- pliers;
- RCD protection system;
- hammer;
- chisel;
- roulette.
To lay the tiles efficiently, the base must be level and without damage, so it is leveled using a screed. If a cable is used, then it must be laid in a concrete screed, and if mats , then they can be mounted with tile adhesive .
A waterproofing layer and thermal insulation are placed under the screed so that heat goes into the room and does not spread downwards. Most often, penofol is used as insulation, which is covered with foil on one side and has a self-adhesive layer on the other.
In addition to its thermal insulation function, this material also acts as sound insulation, so the house will be more cozy and comfortable. Since the cable is laid in the screed, before pouring it, a damper tape is glued around the perimeter of the room , which will not allow the coating to expand and not be damaged.
The resistance of the wire is checked before and after it is laid.
Using a hammer drill, a place is made in the wall for mounting a thermostat , grounding and power wire are connected to it, and a groove is made for connecting the heating cable. The cable or mats are laid according to a pre-made scheme. They do this only in a usable area, that is, where there is no furniture or other stationary objects.
The cable is secured to the base using mounting tape . If a cable is laid, then it should be in one piece, and if there are mats, then they can be cut, but so as not to damage the wire. Connect the heating and power electrical cables, check the resistance and connect to the thermostat.
Warm electric floors must be connected to a separate residual current device (RCD).
The system is tested in different modes, if everything is normal, then the cable is covered with a screed, and ceramic tiles can be immediately laid on the mats.
Features of installation of the sensor and thermostat
The temperature sensor records its readings and transmits them to the thermostat. There are devices for soft and hard finishing. Those designed for tiles and porcelain stoneware are large in size and placed in a protective gel shell ; it protects the sensor from the negative effects of screed or glue, as well as from damage.
You can install a temperature sensor in the box between the heating cable and the thermostat or directly between them; the latter option is more often used.
For ease of use, the thermostat is usually placed at a height of 50-90 cm from the floor and placed in a mounting box. The sensor is placed in a plastic tube between the cable, which is located at a distance of 50-100 cm. To prevent solution from getting into the tube, its end is closed. The functionality of the system can only be checked after the screed has dried.
There are thermostats with a built-in floor temperature sensor. It is better to buy a device that has a remote and built-in sensor.
How to lay tiles on an electric heated floor
Installation of ceramic tiles is carried out as usual, only you need to use underfloor heating adhesive . If the cable is hidden in a screed, then the tiles are laid after they have dried. You can immediately lay tiles on the mats. There should be about 5 mm of glue above the heating element ; all voids are filled with it; a notched trowel is used for this.
Laying tiles begins from the far corner and moves towards the exit. To obtain identical seams, plastic crosses are used. After laying all the tiles, you need to wait a few days for the glue to dry and only then can you turn on the heated floor.