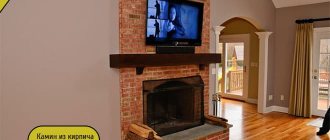
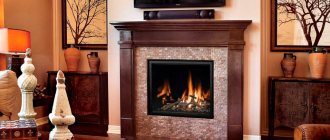
To create a cozy atmosphere in your home, to add originality to the design, you can always install a fireplace. This building brings with it comfort, warmth, positive emotions and spiritual balance. It’s good when in a private house you can gather by the fireplace, listen to the crackling of wood and look at the fire, but what should city residents do if they simply cannot install such a system in their apartment?
The answer is obvious, build an imitation fireplace, the so-called false fireplace. Assembling such a decorative fireplace with your own hands is not at all difficult; in most cases, you don’t even need special skills. An interesting solution could be a corner false fireplace, which not only looks great, but also saves space in the room, which is very important for small apartments.
Convenient location of an imitation fireplace
In this article we will try to tell you how to build a corner fireplace from plasterboard with your own hands, and we will also look at simpler options made from cardboard, or rather from cardboard boxes.
Tools for work
If you decide to start building a fireplace, get a hand-held circular saw.
It is the size of a hair clipper and is equipped with a dust removal system that works in conjunction with a household vacuum cleaner. Cutting drywall with it is much more convenient, and the work is much more accurate than with a jigsaw, not to mention a hand saw. Just make sure when purchasing that the cutting depth is at least 16 mm, and better yet, more than 24. Power, brand, etc. don’t really matter; plasterboard is a malleable material. Then, get an abrasive mesh and several bars for it of various configurations. What it is? An abrasive mesh works like sandpaper, but when processing loose and crumbling materials it does not become clogged with dust. And a mesh is placed on a special block for precise processing. A simple block in the form of a parallelepiped allows you to process planes; curved (shaped) bars – surfaces of complex shape.
With the above tools at your disposal, you can build a fireplace that, to an outsider’s eye, is indistinguishable from the real thing. Subject to some additional conditions, but more on that later.
Cladding works
The finishing material gives the fireplace a pleasant appearance. Of course, depending on the installation budget, you can choose different materials. The most accessible and cheapest way to decorate a corner false fireplace with your own hands is to stick a special film. It can be of different colors and with different patterns. But this method is not durable; the film may become deformed. First of all, it begins to peel off at the joints, and the color of such a film may fade over time.
Painting is also an inexpensive way to decorate a fireplace. Paint is applied to the surface only after the putty and primer have completely dried. You can choose different colors depending on the interior. The most common is white.
Ceramic tiles are a reliable, durable and not too expensive material, which can also be chosen in the desired color or stone imitation. It can be of different sizes, for example, there is a model of small tiles that imitates brickwork (Fig. 5). Having decided to cover the structure with tiles, you need to calculate its size so that you do not need to cut it.
Rice. 5 The structure is tiled
Wooden panels are an excellent natural material, thanks to which you can emphasize the English style of the interior. You can use carved panels.
Using drywall, you can decorate the entire corner with your own hands by making various shelves and niches above the fireplace. Also considered decor are various baseboards that are attached to the fireplace and give it a more attractive look.
Sheathing of metal profiles
When the frame is ready, you need to cover it with plasterboard. This is relatively easy to do by following a few simple rules:
- Sheathing is done both outside and inside the structure. To simplify this process, you first need to cut pieces of drywall to the size you need.
- When forming corners, it is advisable to use special metal corners, which will allow you to create even planes at the desired angle, and also prevent premature destruction of the structure.
Fastening drywall sheets is done using special self-tapping screws, which can be found in almost any hardware store.
How to make a fake plasterboard fireplace?
Step-by-step instructions to help you install a decorative fireplace in a city apartment:
- Attach the support frame to the wall using dowels, then assemble the entire frame using self-tapping screws. In this case, install the rack profile on the guide.
- After installing the next element, check the verticality and horizontality of all planes.
- Check the squareness of the sites using a tape measure. Measure the length of the diagonals of one rectangle, which should be equal.
Methods for attaching profiles for drywall
If you need to create curved planes, cut metal profiles at equal intervals and then bend them to get the desired shape. At the next stage, you need to cover the prepared frame with plasterboard sheets. In this case, the side panels and the crossbar must be covered with plasterboard on both sides of the metal profile. Fasten the material using countersunk screws every 10-15 cm. Using construction silicone, glue several plasterboard sheets. Cut out the desired shape from the prepared material, which will serve as a podium. Using the technology described above, make a shelf that will be placed above the fireplace. Using self-tapping screws and construction silicone, attach the shelf and podium to the body of the decorative device. Carefully putty all joints and places where screw heads are located. After preparing the base, apply putty to the entire surface of the body.
Plasterboard putty when making a fireplace portal
If necessary, glue decorative elements, plaster moldings and other objects that will give the unit made of plasterboard sheets special expressiveness. Paint the body of the device in pastel colors using water-based paint. At the same time, take into account the overall design in the room where the fireplace is located.
Marking the base
Installation of any structure begins with marking the frame and its subsequent construction. First of all, you need to transfer all the dimensions from the drawings to the surface. This is done using a pencil and specially made layouts. This will make it possible to position the metal profile as accurately as possible and make the system symmetrical.
If, when creating decoration for a fireplace, it is planned to form a stand pedestal, then it must be mounted before performing all other work. This process is carried out step by step in several stages:
- Initially, according to the drawing, the guide profile is fastened. Fixation is carried out using special dowels, holes for which must be formed both in the frame itself and in the concrete base using a drill or hammer drill. In the same way, you need to sheathe the perimeter of the future fireplace stand.
- At this stage, a rack profile is attached to the previously installed element. Please note that if it is impossible to screw it to the wall due to large unevenness, then experts recommend using direct hangers.
Decoration equipment
But what about the flame? Without it, a fireplace is not a fireplace. The beneficial effects of contemplating dancing tongues of fire have been genetically ingrained in us since prehistoric times. A fire in a cave meant the well-being and safety of the tribe.
But you can’t light a fire in a city apartment. Modern firefighters do not understand primitive psychology. Should you make a tacky dummy or buy a ready-made one made of plastic? Put candles in the firebox? This is all wrong.
There are such things on sale - electronic photo frames. This is an LCD display designed to display pictures. The control electronics of such a frame are much simpler than those in a computer or tablet, which is why frames cost much less than computer displays. Many models of electronic photo frames allow you to display moving images in the form of animated GIF files, etc.
With the help of an electronic photo frame, the appearance of your apartment “hearth” can be changed every day, depending on your mood. And with some simple manipulations, a fireplace can even become an aquarium.
The price of an electronic photo frame is largely determined by its memory capacity and set of service functions. But we don’t really need them for the fireplace! We need to show just one animated picture: dancing flames.
Under this condition, a frame with a diagonal of 17” (40 cm) made in China will not put a burden on the family budget, and 40 cm diagonally is the size of the firebox of a quite decent-looking fireplace. If more is even better. And keep in mind - the frame with the flame will be in the depths of the artistically decorated niche for the fireplace. Such an imitation of a fireplace can mislead anyone, but will give you the complete illusion of a real flame.
What can be placed in a false fireplace
Inside the fake fireplace, real candles are placed in metal candlesticks, a bright salt lamp, and an LED strip around the perimeter of the portal. Inside the structure they place logs or their imitation made of cardboard, old chests and read books, shoe boxes and baskets made of pine roots, inside of which souvenirs or board games are stored. For beauty, they are painted to look like birch firewood with bark.
When determining the location, the size of the room, the height of the ceiling, and the arrangement of furniture for visual contemplation are taken into account.It is permissible to decorate the structure before each holiday. Bright garland lights and shiny foil snowflakes for the New Year, paper or cotton angels for Christmas, green leaves in the spring and yellow-red-brown ones for the beginning of autumn. On Halloween, the fireplace is decorated with small pumpkins, faces carved on them and lanterns inside. Paper flowers, forest driftwood, children's drawings, crafts made from acorns and pine cones are also quite acceptable.
The fireplace is installed in such a place that it does not interfere with the movement of residents.
The wall-mounted fireplace plays the role of the main accent in the interior; sofas and armchairs are placed around the viewing point.
How to make a fireplace using cardboard?
Assembling a false fireplace begins with the manufacture of the central block. First you need to form the columns. To do this, you need to cut out rectangular parts according to the dimensions.
We must remember that cutting cardboard is not difficult, but making straight folds on it is more difficult work. In order to make an even fold, you will need an even bar or ruler and an object to secure the fold. For this purpose, it will be quite convenient to use a regular spoon or pen.
The ruler is placed along the fold line, the cardboard is carefully folded along the ruler and a line is drawn on the back side. This must be done carefully so that the fragile cardboard does not break through.
The finished parts are assembled using tape. As mentioned above, it is convenient to use double-sided tape for these purposes.
To ensure that the product is evenly painted, you can apply a white primer before applying the paint. A layer of primer will smooth out any existing unevenness. After the cardboard absorbs the applied primer and dries well, you can begin painting.
A mandatory attribute of a fireplace is a shelf on top. It should be dense and hard. To make a shelf, you will need to roll the cardboard in three or four layers - this will ensure the necessary rigidity.
As an alternative to cardboard for the shelf, you can cut a strip from thin plywood. Another option for a shelf is polystyrene foam. The material is light and durable. Such a shelf will also allow you to fasten the frame of the fireplace.
Installation master class
Having prepared the project, start marking. Building a false fireplace body is a simple process, so you can do it yourself. At the points where the metal profile is attached, make marks on the floor and wall.
After this, secure the guide profiles and install the racks to them. Check the evenness of the installed parts. Secure the frame using self-tapping screws.
When the metal frame is ready, cut out the parts from the plasterboard
When doing everything yourself, it is important to accurately observe the dimensions of the necessary parts. The next stage is cladding the frame
Recess the screws into the casing by a millimeter so that there are no protrusions.
Metal carcass
Complete the fireplace base and mantel. If necessary, sand the corners and make flutes. Attach the foot with glue, and mount the shelf using self-tapping screws for reliability. If you plan to use a candle in the fireplace, attach heat-resistant material to the drywall in the upper part of the firebox.
c61ac5fc08288b9c169b02c3c3faba61.jpe
After this, carefully fill the cracks and holes from the screws. After drying, sand the surface with a mesh or sandpaper. It is better to putty in two or three layers until a flat and smooth surface is formed. If necessary, glue sockets and other decorative parts to the side and cross parts. Materials must be made of non-wetting material; the putty used for final finishing must be water-based.
Using a photo frame in a fireplace
We create a fireplace from plasterboard with our own hands: step-by-step instructions from frame to finishing
The plasterboard fireplace itself is not difficult to build; everything can be done with your own hands; it is enough to have basic skills in working with profiles, plasterboard and finishing materials. The profile is cut to size using metal scissors or a hacksaw, the parts are fastened together with self-tapping screws, and one part is inserted into the U-shaped profile of another. If it is necessary to make an arch, then the sides of the profile are slightly cut with metal scissors and the profile is bent with the untouched part inside the arch.
Drywall can be easily cut with a sharp knife or hacksaw. The drywall is fastened to black hardened self-tapping screws, recessing the cap 1-2 mm into the material; later these places, along with the joints, are puttied or lined with finishing materials.
Gypsum elements are cast in silicone molds or made by hand molding. You can also use ready-made gypsum stucco. If the hearth in the fireplace is decorative, without heating, you can use polystyrene or polyurethane elements.
To install an electrical fireplace, you need to provide a socket at such a distance that the cord does not become strained. The cross-section of the copper wire for an electric fireplace with a power of 2 kW must be at least 2.5 mm2.
- Draw a sketch of the fireplace and calculate the material. If you are planning to install an electric built-in fireplace, check the installation dimensions of the selected model. Mark the floor and walls and cut the material.
- The fireplace frame is made of galvanized profile, fastened with self-tapping screws. Stiffening ribs should be in all corners and at the joints of gypsum board sheets; in addition, if you plan to install heavy objects on the mantelpiece, make additional struts and vertical posts.
- The frame is sewn up with sheets of drywall using self-tapping screws and a screwdriver. The upper planes on which the shelves will be installed are left open. The firewood arch is made from separate strips or thinner plasterboard is used - 6.5 mm. An electric firebox is installed in the finished frame, and the connection to the network is checked.
- Start finishing the fireplace. First, a plaster solution is mixed from alabaster and water and stucco molding, pilasters and moldings are cast in silicone molds. You should not mix a large amount of solution at once - it hardens quite quickly. To extend the life of the solution, you can dilute it with milk rather than water.
- Attach decorative elements to gypsum putty, leveling and rubbing the seams. This can be done conveniently using a spatula and a soft, damp brush.
- They begin lining the portal with stone. It is also attached to gypsum putty with grouting, and the selection of elements is carried out before gluing begins. It is better to start with small stones, placing them in the center of the element. To form the corners, the stone is cut slightly obliquely with a sharp knife so that there are no sharp changes.
- The wall above the fireplace is lined in a similar way, imitating an apron and a smoke duct.
- After finishing, the joints are finally grouted with the same putty, and the stone itself is painted with white acrylic paint using a brush. Coloring gives the stone a fresh look and matte shine.
- Moldings and stucco are painted with “golden” paint using a thin brush; after the paint has dried, they are aged - treated with a bituminous patina, trying to paint hard-to-reach places. After treatment, part of the patina from the protruding elements is wiped off with white spirit. Not all elements can be covered with patina, but only some of them, for example, a console or pilasters.
- Artificial stone mantels are installed on the upper surfaces. Glossy dark stone in combination with a plaster finish looks very rich and advantageous, but you can also use other materials, such as MDF or natural wood.
- The final chord is to coat the stone and decorative elements with acrylic varnish with a wet stone effect; this can be done in several layers. After the coating dries, the surface of the fireplace will acquire dust-repellent properties.
- It's time to try out the firebox. They connect it to the electrical network, set the mode, turn it on and enjoy the beauty, safe flame and warmth.
If you don't want to spend money on an electric fireplace, you can do without it. It is enough to decorate the inside of the firebox with stone or tiles; you can also install mirrors. A backlight is installed in the niche - for this purpose it is convenient to use an LED strip, gluing it to the bottom of the firebox and connecting it to the electrical network. A living flame can be created by placing candles of different shapes in glass or ceramic candlesticks.
If you do not have the necessary skills or time, you can only make a frame with a niche and purchase a ready-made polyurethane fireplace portal, selected to fit your firebox.
Decoration
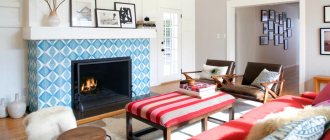
This is perhaps one of the most interesting stages in creating a corner fireplace from plasterboard with your own hands, since it is this that gives you the opportunity to show your imagination, and the huge selection of finishing materials presented on the construction market today guarantees that it will not be limited.
The simplest and most affordable finishing option is wallpaper that imitates brick or stone. The design of corner fireplaces made of plasterboard looks especially impressive if clinker tiles are used for cladding. This material is resistant to high temperatures, so it can be safely used with an electric fireplace. Clinker tiles resemble bricks in appearance, and their color range is varied, which allows them to be used to implement a wide variety of design solutions.
Another classic finishing option looks no less attractive - lining the surface of the portal with decorative stone. Like clinker tiles, the stone is mounted using regular tile adhesive.
The final touch: fireplace decor
A decorative portal on the wall or in the corner of the room can be supplemented with candle flames by installing a bio-fireplace with real flames in the firebox or by placing a heater there, stylized as burning logs. In any case, an artificial hearth will look no worse than a real one, and can perform the functions of a decorative element in the interior even better. After all, to light a fire you will not need either wood or coal, which can stain the carpet or floor.
It is not enough to just build a fireplace with your own hands from plasterboard. It is also necessary to decorate the finished structure. A few photos will help you choose the desired design style and make a reliable frame suitable for a specific interior.
The sufficient strength of gypsum board allows you to decorate the hearth even with materials such as imitation wild stone and tiles. Tip: the easiest way is to buy ready-made stucco molding from polystyrene foam.
Fireplaces for a rustic-style interior (photo in Fig. 3) can be covered with light tiles that reproduce the surface of rocks. Before finishing, cover the surface of the gypsum board with putty for better adhesion of the tile adhesive. Installation of tiles is carried out according to general rules:
- stick the elements;
- dry;
- perform grouting and jointing (if necessary).
The tiles are fixed in the same way. For interiors in bourgeois style, you can find tiles that imitate tiles in trade organizations. Such fireplaces can be complemented with stucco molding painted in shades of paint on the tiles.
Interior products: polyurethane molding
The greatest scope for imagination is provided by the classic style. Polyurethane foam and plastic moldings, baseboards, and stucco moldings allow you to create masterpieces in the Rococo and Baroque styles, as in the photo (Fig. 4), turning your apartment into palace apartments. This design of fireplaces should be approached very responsibly, trying to combine the appearance of the hearth and other furnishings.
Depending on whether you plan to use the fireplace as a decorative element, or whether you want to receive some heat from it on winter evenings, it’s up to you to decide, but you can choose to imitate different types of flames. The portal looks elegant, in the firebox where the bio-fireplace is installed. Such design will 100% comply with fire safety rules.
How to light a fire in a fireplace?
You will probably think that lighting a fireplace is the easiest task - throw in a couple of branches, papers, bring a match and here it is - beauty. In reality, everything turns out differently. The first fire can tell you a lot.
After manual construction, if you suddenly doubt the effectiveness of your miracle fireplace, call a specialist to the site for an assessment and initial heating
Otherwise, there may be a strong risk of ignition if installed incorrectly, as in the 2016 American film “Manchester by the Sea,” where the main character inadvertently burned down the entire house by throwing in a couple of extra firewood. There are other pitfalls that may emerge after a short time
Still from the film Manchester by the Sea (Manchester by the Sea) burning house
There is no need to rush things when it comes to the finish line. Your efforts may be ineffective, so read one of our articles in advance on how to properly light a fireplace.
In conclusion, check out this funny video of a Dalmatian and a horse having fun against the backdrop of enchanting flames - relaxation is guaranteed.
https://youtube.com/watch?v=UTxsZn7ZVkg
Decorating the fireplace
External finishing of such structures is the final stage of construction. Today, several types of facing materials are increasingly used to carry out such processes:
- Moldings and decorative stucco molding made of polyurethane. These products can only be used for fireplaces that do not get very hot and are not directly affected by these factors. Perfect for creating columns, arches and other unique elements. To add originality, stucco molding can be painted to match the interior design.
- Decorative tiles. The segment of these materials is very huge and universal. There are products here that tolerate heat well, which allows them to be used both in imitation and standard fireplaces. The design of tiles is very diverse, but today elements that imitate natural stone, brick, marble and many others are very popular.
A corner fireplace is a unique design that brings warmth, comfort and original beauty to the house. When creating them, don't be afraid to experiment and use different materials, as this is a testament to individuality.
Design of corner fireplaces and their features
For those who have a small living space, but want to make a false fireplace for themselves, corner versions of such designs are suitable.
But before production begins, we will describe the advantages and disadvantages of these types.
The advantages of corner fireplace imitation include:
- saving free space, because they are installed exclusively in the corners of the room;
- occupy and decorate corners of rooms that are often empty;
- low cost of materials and the entire structure;
- have a beautiful and original appearance.
There are not many disadvantages of angular views, but they are still present. The main disadvantage is the criterion that in almost every apartment there are windows or central heating radiators near the corners. And it is almost impossible to install this type of fireplace in these corners.
But if they nevertheless install these systems in corners with heating pipes, then they additionally make an imitation of a chimney, which hides the passage of pipes for radiators, and this means additional costs, time and finances. From the point of view of experienced designers, the interior of the room should have two free corners. And by installing imitations, you are breaking the rules.
Installation of a corner fireplace
The production of this type of structure is no different from the frontal varieties; only the external shape changes. Designing a corner fireplace with your own hands, a decorative version made from plasterboard, goes like this:
We calculate the sizes. In this case, it is necessary to take into account all dimensions, including the passing heating pipe that needs to be hidden. It is necessary to accurately calculate all dimensions and design a structure that will allow easy access to the pipe, especially if there is a shutter valve on it. We install the frame. The cheapest metal profile is suitable for the frame. The construction of the frame is carried out in the same way as in the version located near the wall. Placement of sockets
But this is done when choosing the angle for the structure. Finally, we cover the frame with plasterboard. And then we cover it with the selected material.
We carry out the design
In order to construct a corner portal or any other, you will need to determine at the first stage the quantity and type of all the necessary materials and fittings cladding.
A corner fireplace, or rather its initial design, should consist of the following points:
- Height, width and depth of the portal;
- Dimensions of the podium, if any;
- Where will the mechanisms and panels with the firebox buttons be located if you plan to install it?
- If an electric fireplace is installed, there should be an outlet near the portal;
- Even for an electric fireplace you will need to build an air outlet. This will allow the structure not to overheat;
- You may need to use heat-resistant and fire-resistant materials and linings if the firebox has a heating function.
If you want to get the perfect option, pay attention not only to your specific wishes regarding the false fireplace, but also to the general interior and style of the room. If you cannot decide on the choice of color and design on your own, it is recommended to seek help from a designer who, if necessary, will not only give professional advice, but also create a fireplace portal project.
Next, we select the room and the specific place in which the false fireplace will be installed. We make the markings and proceed to further work.
We create a fireplace for an electric fireplace ourselves
How to make an electric fireplace with your own hands, step-by-step instructions for which include dividing into several blocks? Let's look into this issue. After the portal and logs have been created, you should think about making the heart of the electric fireplace - the hearth.
You can make a fireplace for an electric fireplace with your own hands, both ordinary and with the effect of a live fire. You can make ordinary hearths with your own hands from scrap materials. For example, candles, fabric, wire, tree branches.
We recommend that you study the material on how to decorate a fireplace for the New Year with your own hands and find answers to your questions.
Hearth of many candles
Lots of candles will create the illusion of a burning flame. Candles are located at different heights and distances from each other. The disadvantage of this imitation is that the candles smoke.
The hearth is located in the fireplace portal. Fire is simulated by many candles
An original hearth made of tree branches, fabric and LED bulbs
- You can buy an LED lamp socket that shimmers with red and yellow colors in a chaotic manner.
- Lay out the base from tree branches in the shape of a well and glue it with construction glue.
- Push the lampshade through from below and fix it on the top of the resulting well.
- Take a strong wire and cut it into 4 pieces, 25 centimeters each. Then fix some ends on the branches, and twist the other ends together at the top.
- Fasten a light fabric over the wire. For example, chiffon, organza.
About
How to make it yourself?
Let's get acquainted with a detailed description of the construction of the simplest structure for those who want to make a fireplace portal with their own hands. Let's look at the step-by-step instructions for installing the box. You will need to stock up on the following materials: metal profile, drywall, brushes, metal mesh, serpyanka, self-tapping screws, dowel nails, a knife with removable blades.
You will need graph paper, a building level and a plumb line, a triangle with a right angle.
- The first step is to determine where the fireplace will be located in the room. We choose the form and function: for installing an electric heater or bio-fireplace, for arranging shelves for decorative items or placing a TV. The height, width, complexity and structural content of the frame depend on these tasks.
- The next step is to complete a scale drawing of the future structure. The drawing shows the diagram of a frame made of a metal profile or wooden bars. In the absence of experience, it is better to take a ready-made project as a basis and make the necessary changes to it. As an example, here is a drawing of a classic portal. The sizes are standard and can be varied as desired.
- Based on the finished drawing, the required amount of profile and drywall is calculated. For complex designs, life-size patterns are made from paper or foam and tried on the wall. A diagram of the portal is drawn on the wall and floor using a pencil according to the pattern and adjusted if necessary. Using the adjusted pattern, parts are cut out from plasterboard.
- Proceed with the installation of the frame. To do this, you will need drywall profiles, self-tapping screws and dowel-nails. The profile is cut into pieces of the required length and the frame begins to be mounted on the wall along the marking lines. The upper guide, the decorative firebox cover and two lower horizontal guides are connected to the vertical posts. The profile frame of the parapet is also made on the floor.
- The next step is to install the façade frame, securing it with transverse strips. When making arched elements, you need to make cuts in the side parts of the profile in 2 cm increments. After this, slightly bend the profile with your hands. If the strength is insufficient, stiffeners are added from sections of the profile. All stages of work are controlled by a building level and plumb line to avoid deviations from the vertical. The parts of the stiffeners are regularly measured and ensured that their location is strictly at an angle of 90 degrees. This will ensure proper load distribution and will contribute to good performance of the future design.
- After assembling the frame, the electrical wiring is placed. Install switches and sockets. The wires are insulated with corrugation and secured to the wall in places that will then be covered with drywall. For convenient and safe use, sockets and switches are mounted in visible, accessible places. Electronics for controlling LED lighting from the remote control are also located here.
- Start covering with plasterboard. The parts are cut out using a construction knife: the outer part of the cardboard is cut on the front side, the rest is broken. Curvilinear parts are cut with a special hacksaw for drywall. The finished parts are screwed to the frame with drywall screws, which are fastened at a maximum interval of 15 centimeters. A homemade fireplace box is considered prepared.
- The edges of all joints are cut at an angle of 45 degrees to a depth of 0.5 centimeters and glued with sickle tape. Serpyanka is glued to a special putty for drywall. Then one or two coats of primer are applied. After drying, the top layer is leveled with putty to hide defects from self-tapping screws and sickle strips. Dry putty is rubbed over with a metal mesh manually to prepare the fireplace box for finishing.
Algorithm for constructing the main frame
After the surface of the walls and floor is marked according to the previously thought out drawing, you can begin to build the base for the false fireplace. This process consists of several sequential steps:
- A “UD” profile is attached to the floor. For this purpose, special screws are used. The distance between the individual fastening elements must be maintained at approximately 25-30 cm. All side elements are fixed in such a way as to prevent them from going beyond the boundary of the first profile.
- After this, the wall profile is screwed to the base wall. This operation is performed according to the markings, constantly monitoring the location of all structures. Then, using special fasteners, all horizontal elements are attached to the vertical frame to form the desired configuration. When performing such operations, you need to use only high-quality fasteners so that the plasterboard structure on the wall can easily withstand the weight of the finishing material and the fireplace itself.
Types of fireplace: configuration and location
When starting a project to install a fireplace in your home, you first need to think about its location.
There are several options for placing this heating unit:
- Central location. By placing a fireplace in the middle of the room, you certainly make it the main focus. It looks stylish and allows you to give the interior a special charm of country coziness. This arrangement also allows you to effectively warm the room, since warm air will circulate freely throughout the room.
But there is also a drawback to such a dislocation: the fireplace will occupy most of the area and interfere with movement. Therefore, if you are limited in square meters, then it is better to refuse this option.
- Wall fireplace. One of the most common options, which has a lot of advantages: saving room space, efficient heating, the ability to create a separate recreation area, etc.
The only drawback is that you will have to take proper care of fire safety and lay an additional layer of insulation between the fireplace and the wall.
- Corner fireplace. This option is suitable even for the smallest room, as it occupies a very small area. In addition, the corner design looks especially stylish. Another advantage of this arrangement is a simple ordering scheme that even a beginner in the stove business can handle.
If to build a free-standing fireplace you need to have a certain experience, knowledge and skill, since all the walls are visible, then the corner design will hide all the flaws. The main thing is to do the front part well; all other sides can be hidden from view with finishing materials.
The following factors must also be taken into account:
- A wall opposite the entrance to the room is not the best solution, since cold air blown inside will interfere with the natural circulation of warm air.
- It is better to choose a place where the fireplace is slightly offset from the entrance. Avoid drafts in the path of the fireplace.
What does it represent?
A false fireplace performs only a decorative function, so the use of open fire is not practiced in it. This is due to the design features and materials used. In some cases, it is possible to install special heating elements that are powered from the mains. This will allow the fireplace to perform its direct functions.
Corner structures are suitable for both spacious private houses and small apartments, since they practically do not hide space. Any such thing consists of the following elements:
- base;
- frame (most often this part is made of metal profiles);
- internal niche (size depends on the chosen design);
- a place for a device that simulates fire;
- external finishing.
No. 1. Raised fireplace made of cardboard boxes
Having a large amount of cardboard or small cardboard boxes from shoes or small appliances, you can very easily “build” a real fireplace. In addition to cardboard, you will need:
- a lot of wood glue;
- masking tape;
- roulette;
- scissors or stationery knife;
- something heavy as a press;
- something writing.
The beauty of this method lies not only in its ridiculous cost, but in the fact that the creation process can be carried out in a playful way, in which your children will happily take part. Moreover, there is no need to drill anything, and there is nothing to spoil. So, let's begin.
For the first time, we recommend using simpler forms to make the portal. Moreover, such a false fireplace can be used as a disposable one. For example, make it for the New Year and conduct a small family photo session against its background. You will get a lot of positive and memorable moments, surprise your friends and loved ones and make the most unusual decoration from the most ordinary materials.
If you have a large box from large equipment, then you need to carefully unfold it and make a pattern. To do this, draw out the dimensions of the back and side walls on its surface. You should end up with a rectangle that needs to be folded into the letter P. The sides need to be made voluminous. To do this, they should be folded as shown in the figure.
Drawing up a drawing
The first step in creating a decorative design is drawing up a drawing. This stage requires accurate calculations. Regardless of the size of the future product, it is recommended to draw the drawing on a scale of 1:1, which will greatly facilitate further work.
To draw up a drawing you need to prepare:
- whatman;
- ruler;
- pencil.
A sheet of paper needs to be attached to the place where the fireplace will be located, and then outline the main lines. The drawing must indicate all the details of the fireplace, including dimensions, relief and shape.