Do-it-yourself boiler installation : recommendations and videos. Boilers are most often installed in a private house where there is no centralized water supply.
In an apartment where there are frequent interruptions in the supply of hot water, if it flows rusty, the best way out of the situation would be to purchase this device. Installing boilers with your own hands has its own characteristics that should be taken into account during work.
Features of boiler installation
There is a huge selection of models of water heating devices on the plumbing market; they can be installed in an apartment or in a private house in any convenient room. The required volume of liquid determines the size of the tank.
Electric boilers for domestic use are:
1.cumulative.
2.flow-through.
Water heaters have their own characteristics, but with proper installation, the devices can serve both the shower and the faucet at the same time. That is, one device will supply hot water directly to the kitchen and bath.
Both types of devices have the same operating principle: they convert electrical energy into thermal energy, so the design is based on a heating element.
If you have a connection diagram and the necessary tools, you can independently install a boiler in a house or apartment.
Regardless of the type of design, an electric water heater operates on the principle of converting current energy into thermal energy.
A video with connection instructions will tell you in detail about the installation features.
Main types of water heaters
Devices for heating water to the temperature desired by the user can have different designs and configurations.
The range of water heaters is very extensive
According to a separate classification basis, all boilers can be divided into types:
- according to the method of water treatment - storage and flow;
- by power source – electric and gas;
- by form factor - cylindrical, flattened, rectangular;
- by connection location - vertical and horizontal;
- according to the degree of activity - indirect and active;
- by installation method - wall and floor;
- by type of control - mechanical and electronic.
The variety of equipment presented serves to most fully and adequately satisfy diverse user needs. For example, for a private house with an autonomous gas or solid fuel boiler, an indirect heating boiler is perfect. It does not contain a built-in thermoelement, and the water in it is heated from a heating boiler. By the way, such units are usually floor-standing, making it more convenient to connect them to a similarly located boiler. In an apartment building, this option is unacceptable.
Storage electric boilers
It is this type of water heating technology that has given the word “boiler” a place in the mass consciousness.
Typical representative of the budget segment
The source of energy for heating is the household electrical network. Structurally, the boiler is a container filled with water from the water supply. A built-in thermal electric heater (or simply a heating element) increases the water temperature to a set value. A thermostat helps him in this - a device that records the water temperature and turns off the heating when the required values are reached. Usually it is combined with a scale and a switch, on which the user can set the parameter he needs. For the most part, electric boilers are wall-mounted units. This is driven by the desire to save space in small spaces in bathrooms and kitchens.
The filling can be either electronic or mechanical. The advantage of such devices is their versatility . It is rare that a home is not connected to electrical networks. Sometimes this is the only type of energy source in the area where the house is located. For apartment buildings, installing a boiler where there is neither centrally supplied hot water nor gas, this becomes the only solution to create minimal comfort. The boiler also becomes an indispensable assistant in those apartments where there are frequent interruptions in the supply of hot water, or it is supplied on an hourly basis. Apart from high energy consumption, such a product has almost no disadvantages . The device is completely safe if the installation rules are followed.
For more detailed information, see the article on how to choose an electric storage water heater for an apartment and connect it. Information about the main advantages of storage tanks, as well as nuances that should be taken into account when hanging a boiler.
Flow-through electrical devices
Structurally very simple, and even much more compact than other models.
Takes up almost no space
They are in demand when installed in places where there is physically no room to place a large boiler . Such a boiler consists of a curved channel along which a heating spiral is laid using the entwining method (external placement of the spiral) or the coaxial cable method - the spiral in a waterproof tube is located inside the channel through which water moves, repeating all its bends. To heat water to the required values under high pressure, it is necessary that the thermoelement heats up very quickly and to high values. Therefore, the power of flow devices is always higher than that of storage devices - about two to three kilowatts. But the heater works only at the moment when the water is turned on - the rest of the time it is inactive, blocked by special fuses from accidental operation. Possible areas of application are points with occasional and short-term water withdrawal, for example, washstands or shower heads. Drawing a bath of hot water this way will be expensive.
Gas storage devices
This type is rare, although in terms of water heating costs it is one of the most economical. The reason is that where it is possible to use gas to produce hot water, instantaneous water heaters are installed much more often. The temperature generated by the gas burner is more than enough to heat the flowing water. Instantaneous water heaters are more compact than storage water heaters, so most users see no point in installing a larger household appliance. To install it, a full-fledged smoke exhaust duct with working ventilation is required. An open type burner consumes air directly from the room. Given the small volume of bathrooms, a constant supply of oxygen is needed for combustion so that the air does not become stale. The significant advantages of this type of boiler are high heating speed and efficiency indicators .
A rare guest in Russian apartments
Gas water heaters
Such units are almost never called boilers, because they have a special name - columns. Entire houses and neighborhoods that do not have a central hot water supply, but have a connection to the gas main, are equipped with instantaneous gas water heaters. They have been known since Soviet times, but since then they have become much more compact, more accurate, safer and “smarter” thanks to the electronic control board. The heat exchanger through which water runs during the heating process is always smaller than the storage tank with burner, especially when it comes to volumes of more than 50 liters. Gas consumption is slightly higher than in gas storage appliances, but it is still cheaper than heating water with electricity.
Compact and economical
Prices for popular models of gas instantaneous water heaters
Gas instantaneous water heater
Video - All about water heaters. Selecting a water heater, operating principle, installation, startup
How to choose the right boiler
When choosing, you need to take into account the various parameters of boilers, and focus on the most suitable one.
Shape and size
At first glance, the shape of the boiler creates only an aesthetic effect and does not affect the design in any way. However, when combined with volume, and therefore the size of the device, the shape can make use more comfortable.
Buyers of an electric or gas water heater are faced with the question of the volume of water that will constantly be spent on household needs and must be accumulated in the tank in a heated form. At the same time, it is impossible to make a calculation by simply adding up the approximate norm of 30 - 50 liters per person - then the figure will turn out to be too impressive. This is not necessary, since all family members never use hot water at the same time and do not drain their entire supply at one time. But much depends on the nature of the water collection points.
Volume matters a lot
For example, if the apartment has a shower, then the consumption will be the same, but if there is a spacious bathtub that is filled several times a day, it will be much more. Approximate recommendations for choosing the volume of the storage tank are given in the table:
Table 1. Approximate boiler volume per family.
| Number of people | Minimum volume, l | Optimal volume, l |
| 1 | 30 | 50 |
| 2 | 50 | 80 |
| 3 | 80 | 100 |
| 4 | 100 | 120 |
| 5 | 120 | 150 |
As can be seen from the table, the optimal volume for a certain number of people in a family is also the minimum capacity of the device for a family with more than one person. This means that the boiler can be used, and in most cases its volume will be sufficient, but the risk increases that with intensive use, one of the family members may end up with cold water.
Small boilers of 30 or even 20 liters will be convenient not as the main one, but as a point source of hot water, for example, for a kitchen sink or washbasin. Among the most typical form factors in which water heaters are manufactured, two options predominate:
- cylindrical;
- flattened.
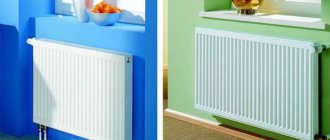
In this case, the ratio of the metric characteristics of a cylindrical boiler varies. Many 50-liter options are equipped with tanks that are large in diameter but small in height. It is optimal to place them at a certain height, under the ceiling of the bathroom - then they do not “eat up” the usable area, and you will not hurt your head on them. Larger capacity boilers are made vertically elongated. While maintaining the volume, this allows you to reduce the thickness. Any cylindrical boiler is convenient for installation in a corner .
Typical corner location
Flattened boilers appeared on the market later than cylindrical ones as an attempt at a more ergonomic solution. They have rounded edges and corners, so they do not look bulky or heavy. But their advantage is not only in appearance. Thanks to its flat design, a 100-120 liter has a thickness that is two or more times smaller than its cylindrical counterpart. Such units can be placed not only in corners, but also on an open wall.
Modern boilers can have not only a bottom communication connection, but also a side and even top connection. The layout of the input and output fittings does not affect the operation of the device; it is intended for ease of connection. When choosing a boiler, immediately figure out where you are going to place it and what the shape of the connecting pipes or flexible hoses will be. Thus, for a lower location under the sink, an upper arrangement of mounting pipes is provided. A common side connection diagram is for horizontal flat boilers.
Prices for popular models of indirect heating heaters
Indirect Heaters
Tank material and thermal insulation layer
Since manufacturers have been producing different types of boilers, there has been ongoing debate among users about which tank is better in terms of performance characteristics. Most tanks are made with enamel coating and stainless steel.
The enamel is applied to the inner surface of the tank, which consists of ordinary iron. The stainless steel tank is homogeneous, but has a welded seam. The warranty for devices equipped with different types of tanks can range from 1 year for enameled and glass-ceramic tanks to 5 years for stainless steel ones. This indicates a longer service life of stainless steel as a material in contact with water.
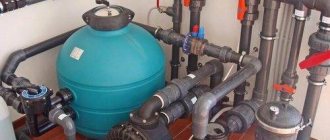
Interior view of a stainless steel tank
But enameled boilers have one indisputable advantage - an affordable price. This trump card for many buyers trumps other considerations. In addition, with proper operation and the presence of a magnesium anode, which reduces the deposition of solid sediments on the walls and heating element of the water heater, the latter successfully serves its owners for many years.
Other characteristics
Each boiler has a certain group of features that do not directly affect its operation, but can optimize operation and make it more convenient:
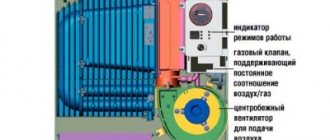
- Control type. The mechanical system contains a physical type sensor, which, when a certain water temperature is reached, expands and opens the electrical circuit that supplies current to the heating element. The sensor is connected to a handle and a graduated scale. All boilers, regardless of the type of control, are equipped with an LED indicator , which signals the readiness of water in the device. Electronic control is a push-button or touch panel, to which in boilers priced above average is also attached a display, which displays all information about the state of the unit. Electronic control is more accurate and reliable, but it has a higher risk of breakdown, and its repair will cost a considerable amount.
- Degree of protection. Users rarely pay attention to this parameter, but in vain, because the safety of use depends on it. Since contact of water with conductive materials is theoretically possible in a boiler, it must necessarily provide protection in case of breakdown of the heating element . A ground loop is also required.
- Case thickness. The thicker the walls of the boiler, the better , because a layer of heat insulation is laid between the outer shell and the inner tank. The better quality it is, the less the water in the device will cool during the day, if you don’t even open the tap.
Sometimes a remote control is also included
DIY water heater installation
In order to carry out the work correctly, you should understand the basic principle of operation of the device, and also understand the operation of plumbing fixtures.
During connection, you must strictly adhere to the installation diagram so that the device works properly and for a long time.
Attention! During installation, you should follow safety rules, which have their own nuances depending on the type of device.
Preparatory stage before installation.
1.choosing a place to install the device.
2. free access to the device must be ensured during installation work and after.
3.The strength of the wall must match the weight of the device.
4.check the quality of the wiring in the house.
Important! The wiring must be in good condition to ensure safe operation of the boiler.
5. It is necessary to check the quality of the pipeline and riser; if necessary, parts should be replaced.
6. Have a diagram with you that shows the wiring of the circuits for the shower and faucet.
The device consists of parts:
1.cases.
2.wires for connecting to power supply.
3.pipe for removing liquid.
4.pressure regulating valve.
Gas heater installation
Installing a horizontal gas water heater is more difficult than an electric one. In this matter, it is better to turn to professionals. But in case of self-installation, you must strictly follow the instructions, symbols and rules. The ceiling height must be at least two meters, and the room area must be more than 7.5 square meters. meters. In addition, the room must have a window; in addition, the room must have a door. Most often, such devices are installed in the kitchen, next to the gas pipe.
A very good way to detect gas leaks is to install a gas analyzer. Such a device detects a propane leak and gives a warning signal. But ventilation is also required. For proper operation of a gas water heater, a chimney must be connected to it. It can be included in the overall system or taken separately directly to the street. It should not have more than two right angle bends, and its total length should not exceed three meters. When installing equipment on a wooden wall, the chimney should not come into contact with it. Be sure to lay thermal insulation, for example, from mineral wool.
You need to know that a gas water heater should not be placed on a load-bearing wall. The distance to the opposite wall must be at least one meter. Gas pipes must not be installed in walls. But you also need to take into account that gas equipment cannot be placed above the stove. It is not advisable for the water heater to be constantly exposed to sunlight and overheat. In order to check the tightness of gas pipes, you can use ordinary soap. It needs to be dissolved in a container of water, and then applied to the pipe joints with a brush. If bubbles appear, there is a leak. And it must be urgently eliminated. It is prohibited to check pipes for leaks using fire. This can lead to irreparable consequences.
How to choose a device
Water heaters differ in volume, power level, installation, cost, and production.
The device should combine average cost, while having high quality and useful functions.
What general requirements for the device should be taken into account when choosing a water heater:
1.device reliability.
2. The boiler must have a universal installation method so that it is easy to install and dismantle.
3.Both types of boiler must cope with the load to provide water to both the kitchen and the bath.
4. The design must have a safety valve in case of device failure.
5.The material of the boiler must be of high quality.
6.When purchasing a device, you should clarify the details of use so that the device works for a long time.
How to install a boiler with your own hands.
During installation, you should strictly follow the instructions for use and take into account safety rules. The flow type of installation has its own characteristics in contrast to the storage type.
Preparatory work
Connecting a boiler to a water supply with your own hands is not a very difficult task, which any self-respecting owner can cope with.
Preparatory work for connecting the boiler includes:
- Detailed study of the instructions supplied with the boiler.
- Installing a boiler on the wall.
- Supply of water pipes to the boiler. If the boiler is located near a water supply, and an open one at that, the task is simplified and this point can be omitted. Otherwise, the water supply must be connected to the boiler using metal-plastic or polypropylene pipes.
Installed instantaneous water heater - Preparing the necessary tools: tape measure, pipe cutter, soldering iron for plastic pipes or welding, adjustable wrench.
- Purchase of related materials: shut-off valves, fittings, tees, pipes or flexible connecting hoses, American women, flax tow and fum tape.
Advice. When choosing related fittings, keep in mind that cheap, low-quality materials will not last long.
Installation of instantaneous boiler
A design feature of this type is their compact appearance. The device can be installed under the sink in the bathroom or kitchen. The water is heated while in a metal pipe; parts for high-power heating are located in it.
An instantaneous water heater requires proper wiring that can withstand enormous loads on the network. It is better to select a separate channel that leads a large diameter cable to the device.
After determining the state of electricity and connecting the wire, installation of the device begins. It can be installed temporarily or permanently, so the layout will be different.
If the device is installed temporarily, it means that the pipe supplying cold water is equipped with a tee with a valve through which the boiler and the pipe are connected. To do this, apply voltage to the device and open the hot water tap.
If the device is installed on a permanent basis, then the operation of the device with the supply and intake of water occurs in parallel with the entire water supply system. To do this, install tees for cold and hot water. Next, two shut-off valves are installed and sealed with oakum or with fum tape.
Further installation steps:
1. connect the inlet pipe to the water heater with a pipe through which cold water is supplied.
2.The outlet pipe is connected to the hot water tap.
3.check the work done: turn on the water and see if there are any leaks.
4.If the device is working properly, you can connect it to the mains, so heated water should appear from the tap.
5.For safe operation of the system, a safety valve should be installed.
You can watch the installation of a flow-through boiler in the video.
How to install a storage water heater
Prepare tools and materials
- Water heater;
- hammer drill or impact drill;
- concrete drill;
- level;
- hammer;
- wrench and pliers;
- screwdriver;
- roulette;
- pencil;
- anchor bolts or hooks;
- FUM tape;
- safety valve;
- 2 flexible hoses;
- 3 tees with a diameter of ½ inch;
- 3 taps DN15;
- PVS cable 3 × 2.5;
- difavtomat 16 A.
Select installation location
It is better to place a storage water heater closer to the cold and hot water risers in order to reduce the length of the supply pipes and ensure good pressure. Small-volume boilers can be mounted on any walls; for models with a capacity of over 80 liters, only load-bearing partitions made of brick and concrete are suitable: the water heaters themselves weigh little, but together with water the load is significant.
Taking this into account, there are not many suitable places in the apartment. As a rule, the choice comes down to four options:
- above the toilet in the toilet - next to the risers, does not take up space in the bathroom, can be hidden behind a false wall in a box with communications;
- above the bathtub - for combined and small bathrooms, almost does not interfere with bathtub lengths from 160 cm;
- under the kitchen sink - only for small models of 10–15 l;
- under the ceiling in the hallway or corridor - mainly used with horizontal boilers and to save space, but requires additional pipe laying.
Secure the water heater
Installation is carried out using hooks that are attached to the wall, and the drive is placed on them. Or a special strip, it is mounted to the surface with anchor bolts, and the boiler is fixed to it.
Master Lancaster YouTube channel
Having measured the dimensions of the tank, estimate the location on the wall so that there are 2-3 cm gaps from the corners and edges of the niches, and the protective cover can be removed for repair and maintenance. It is necessary to make a gap of at least 5–7 cm from the ceiling in order to hang the tank on hooks or a bar.
Master Lancaster YouTube channel
Using the template, mark and drill holes for hooks or anchor bolts. If there is tiling, go through it first with a special drill bit for ceramics. Then drill into the main part of the wall using a hammer drill or impact drill with a concrete bit.
Master Lancaster YouTube channel
Install dowels into the holes and screw in the hooks. Alternatively, insert anchor bolts through the mounting plate holes into the wall and tighten them with a wrench.
Master Lancaster YouTube channel
Hang the boiler on the fasteners. Using a level, check for horizontal and vertical deviations. Otherwise, there will be a risk of air locks forming and failure of the heating element.
Important! Water heaters with a vertical location should never be mounted horizontally to save space.
Connect to water supply
Hydraulic piping is carried out according to the following scheme. The connections themselves can be made using flexible hoses or metal-plastic or polypropylene pipes. The first option is simpler, so let's consider it.
YouTube channel “Vladimir Romanchenko”
Screw a ½-inch diameter tee onto the boiler's cold water connection, marked in blue. Connect a safety valve to the bottom outlet (arrow towards the water heater), and a ball valve to the side outlet. It will come in handy when you need to drain the water. Seal all threaded connections with FUM tape.
Master Lancaster YouTube channel
Install a tee on the inlet valve of the cold water riser and connect the ball valve to it, having previously wound the FUM tape onto the thread. Connect the new tap to the safety valve on the boiler using a flexible hose. Place rubber washers under the union nuts and tighten them with a wrench.
Screw a ball valve onto the hot water pipe of the boiler, and a tee onto the inlet valve of the hot water riser. Seal all threads with FUM tape and connect the new tap to the tee using a flexible liner with gaskets installed under the nuts. Tighten the connection first by hand and then with a wrench.
If it is not possible to install tees on the hot and cold water risers, then connect the boiler to the nearest mixer. In this case, the tees are installed on the hot and cold water fittings of the washbasin, and then the flexible connections of the mixer and water heater are connected to the tees.
ad-cd.net
Place a hose on the spout of the safety valve and lead it into the sewer. Water will sometimes drip through it as it heats up and expands - this is normal. If the boiler is located above the bathtub, you don’t have to remove the tube: the drops will simply fall into the drain.
Connect to the mains
If the water heater already has a ready-made cable with a plug, you just need to insert it into a grounded outlet. Extension cords and tees cannot be used in this case, since the load on the network is quite high: all additional contacts will become very hot, which can lead to a fire.
ad-cd.net
In other cases, you will have to connect the cable yourself. If it is not included, use a three-core wire with a cross-section of 1.5, or preferably 2.5 mm². It is advisable to connect directly from the electrical panel.
Before starting work, turn off the power supply by turning off the switch in the entrance. Lay a 3 × 2.5 mm² cable from the apartment panel and connect it to the boiler via a 16 A differential circuit breaker. Then connect the wires to the terminal block on the water heater: phase - to terminal L, neutral - to N, and grounding - to the PE contact or to frame.
Do a test run
Before turning on the boiler, be sure to fill the tank with water. To do this, turn off the tap on the DHW riser, and then open the valves at the inlet and outlet of the water heater. Turn on the hot water at the nearest faucet and wait a few minutes until a smooth stream comes out of the tap without interruptions and air.
Master Lancaster YouTube channel
Close the mixer. Carefully inspect all connections on the boiler and make sure there are no leaks. Plug the water heater into a power outlet or through a heater and start heating using the button or temperature regulator.
Necessary tools for installing storage heater
Any installation begins with the preparation of tools. If it is fully equipped, then the work will be done quickly and efficiently.
To install the boiler you will need:
- a drill with an impact mechanism or a hammer drill plus a set of drills for concrete;
- screwdriver;
- a grinder if the water supply is made of metal pipes, or a pipe cutter if it is made of plastic;
- a pair of gas wrenches or adjustable wrenches;
- building level;
- pliers.
Additionally, you may need a tool for installing pipe connections:
- for steel water supply: welding machine and set of dies for threading;
- for polypropylene: a heater for welding pipeline parts (it is called a soldering iron or iron);
- for metal-plastic: press pliers, if you plan to use press fittings, as well as calibration to align the end of the pipe before installing the fitting.
In addition to tools, you will need sealing material to seal the threaded connections between the pipeline elements. For this, experienced craftsmen use tow or plumbing flax in combination with Unipak paste, but a beginner will find it easier to work with FUM tape or a special flax thread such as “Tanget Unilock”.
7b2feb9ad864df6ea91eb5883aa37213.jpeList of required tools
Before you learn how to properly connect a boiler to the water supply in an apartment, you should start selecting the necessary tools to carry out the work. It should be noted right away that for installation it is not necessary to use high-quality and expensive tools; most often, most of these materials are at hand for each owner. If there are none, they can be easily purchased at construction points of sale.
Fastening can be done using:
- construction and assembly gun;
- hammer drill or electric drill;
- metal hooks;
- dowels;
- high quality hose;
- screws;
- cable;
- special pipes;
- the unit itself.
Special steel hooks with a diameter of 10 mm and dowels are used as fastening elements for the tank. All this is secured using a construction gun; if one is not available, then holes for fasteners are made using a drill or hammer drill.
If there is a layer of finishing material on the wall, you can use ten centimeter screws; the part made of plastic should be at least eight centimeters.
You should not use flexible hoses or cheap products when supplying water to the unit. They become unusable very quickly and need frequent replacement. It’s better to spend a little more money on quality materials once and be calm while using the installation. It is also not recommended to use metal products; copper components are ideal for such work.
Connecting the boiler to water
To do everything correctly, follow the instructions:
Prepare two pipes for installation.
Install the brass tee.
Install a ball valve on the side thread of the tee.
Install the safety valve with the drain hole facing down. Place a tube over the neck of the drain hole and lead it into the sewer. Install the American tap. Just tighten the union nut. This is what you should get:
Attach the polypropylene elbow. Insert the polypropylene corner for the outlet to the wall. Go to the tank exit. Install an American tap there. Attach the polypropylene coupling.
Next you need to solder all the pipes to the water supply. If you are sure that everything was done correctly, you can proceed to testing the water heating.
The most popular connection errors
- Installing not a safety valve, but a regular check valve. As a result, the excess pressure does not decrease, which leads to damage to the water heater. The water-containing container becomes deformed, the protective anti-corrosion enamel peels off, and the rubber gasket is squeezed out. The seal of the tank is broken, causing water to seep out.
- No safety valve. A typical installation error that leads to increased pressure inside the boiler and damage to it. The heater may burn out.
Safety valve, tee, ball valve - all this must be connected to the water heater. If you follow the basic rules for operating the boiler, the device will last a long time and will not break.
Permanent or temporary installation?
stationary layout
A stationary option for connecting an electric instantaneous or storage boiler can provide simultaneous supply of cold and hot water. With this option, the work is performed simultaneously with the installation of the main water supply system. The essence of this installation is to insert tees into the pipe and place valves on each of them. When using this connection method, it is possible to avoid installing an electric boiler in the water supply system. A heating element is used to connect to a pipe with cold water, and hot water is discharged using a flexible reinforced hose or a metal-plastic pipe, which is connected to a shut-off valve.
Step-by-step installation instructions
To correctly carry out the process of connecting the water heater to the water supply, follow the instructions:
Measure the height of the water heater, mark the lowest point where the bottom of the boiler will be located. Start taking measurements from the bottom mark.
Measure the distance from the bottom of the water heater to the mounting strip.
Measure the resulting distance on the wall and mark it.
Using a level and a marker, draw a horizontal line. Measure the distance between the hooks. Make notes on the wall.
Prepare hooks for fastening. Check its dimensions. Make sure that the hooks you have prepared can support the hanging tank.
Drill holes at the marked points and drive in dowels and screw in the hooks.
This completes the process of installing an electric water heater; now you can approach the procedure for connecting the water supply.
Popular designs for private houses and apartments
Modern direct-heating electric boilers can operate by releasing heat when current passes through:
- active resistance of the heating element;
- winding of the coil, which induces eddy currents in the core.
Resistance Heating Models
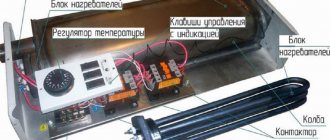
The design of a direct heating boiler with a heating element - a thermal electric heater - is shown in the picture.
The outside of the boiler body is protected by a layer of thermal insulation, which prevents energy loss, and an anti-corrosion coating is used inside:
- stainless steel;
- or titanium sputtering;
- or glass porcelain.
A magnesium anode built inside the boiler improves corrosion protection. It requires periodic monitoring and replacement after six months of operation or a little more.
Induction Heated Models
The design of the tank and its filling are created using the above technology. The difference lies in the method of heating the coolant.
An ordinary winding of an electric coil, like that of chokes and transformers, is switched on under mains voltage and creates an electromagnetic field around itself, which induces eddy, inductive currents in the magnetic circuit. In transformers, they are combated by using special grades of steel and core fusion, creating artificial resistance for their flow, causing heating losses.
In a boiler, the magnetic circuit structure is created with the minimum possible resistance for the passage of induction currents. What is important here is the heating of the core inside the boiler, the temperature of which is transferred to the coolant.
When choosing a boiler design, pay attention to the fact that when installing it on the wall there is a distance from the ceiling of at least 10 cm. Otherwise, it simply will not be possible to fix it on the mounting brackets.
The performance of hot water supply depends on the design and dimensions of the tank. A volume of 10÷15 liters is enough to wash hands and dishes for all family members. When you need to take a shower, the capacity should be at least 50 liters, or better yet, increase it.
The design of any model with electric heating uses cold water supply and hot water supply lines. For this purpose, special flanges are mounted on its body.
Connecting the boiler is carried out in two stages:
- the equipment is permanently fixed at the installation site and the hydraulic system is assembled;
- The electrical circuit is being installed.