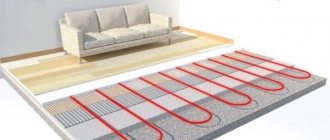
Heating a house with warm water floors is not uncommon today, and increasingly this system is preferred when choosing a heating method.
The design of water floors consists of pipes laid in the floor with a coolant moving inside (usually water). The system is connected to central heating, hot water supply or a specially equipped boiler.
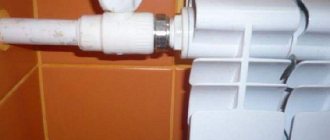
There are many types of pipes that can be installed in the construction of heating floors; today we will talk about polypropylene.
Warm floor made of polypropylene pipes
Just 5-10 years ago, heated floors could easily be called an expensive pleasure.
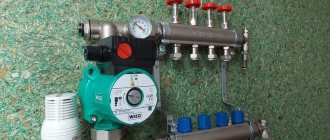
Water heating, which uses underfloor heating, was considered a luxury item. This heating method was in most cases installed in luxury housing. Today the situation has changed radically. Watery floors are becoming commonplace. An increasing number of consumers prefer this option for heating residential premises. The main reason for the popularity of warm water floors is their efficiency, affordable price and high efficiency. In addition, consumables, instruments and devices have appeared on the heating equipment market that allow you to independently install heated floors in your home, saving both money and time. You can always choose materials that match the technological parameters of the heating system and your personal requirements for this heating method. If the equipment included in the pumping and mixing unit for underfloor heating is a separate discussion, then the pipes deserve special attention.
Despite the fact that today the choice of consumables is quite large, preference is given to the option when the heated floor is made from polypropylene pipes. Why? Let's look into the details.
Manufacturers
There is a lot of competition among pipe manufacturers in the market. Which ones to choose?
- Russian brands: Politek, PRO AQUA, Heisskraft, RVK, Santrade; Germany: Akwatherm, Banninger, Rehau, Wefatherm; Czech Republic: FV-Plast, Ekoplastik; Turkey: Pilsa, Kalde, TEBO, Firat, Vesbo and Jakko; China: Dizayn and Blue Ocean.
The characteristics of all products are indicated in the labeling and must comply with international standards. It’s impossible to say for sure which brand to choose. It's a matter of personal preference.
Warm floor - features of this heating system
Let's start with the fact that underfloor heating can be used as the main heating option in a living space or act as an additional heat source. Depending on the technological characteristics of the residential building, it is up to you to decide which heating option to use in the case of heated floors. For an apartment in an apartment building, a warm floor may be an exception. In some cases, residents try to use a heated tiled surface to increase comfort in the bathroom or other technological areas.
Important! It should be recalled about the existing ban on the installation and installation of warm water floors in residential premises of apartment buildings. The reason for this situation is the unpreparedness of the engineering structures of a residential building for the installation of a complex heating system, such as water floors.
In a situation when it comes to installing a heating system “warm floors” in a private house, there are no prohibitions or obstacles to the implementation of the project. It is possible to carry out the installation and installation of heated floors of any size in various combinations.
For those who have decided to install heated floors in their home, it is important to know about the necessary equipment and consumables. Pipes for any water heating system are the main working element. It is through them that the prepared water circulates, transferring thermal energy to heating sources. These can be radiators or, in the case of water floors, a heated concrete screed, or a stacked wooden floor structure. The transfer of thermal energy from the floor surface coolant is carried out through water heating circuits. What material the water loop pipe is made of depends on the speed of installation of the in-floor pipeline and the quality of heating the floor surface.
Why is polypropylene chosen today for the contours of heated floors?
Today, manufacturing companies are ready to offer consumables for every taste. It all depends on the financial capabilities of the consumer. On the practical side, the following types of pipes can be used for underfloor heating equipment:
- copper;
- corrugated, metal;
- metal-plastic;
- consumable material made of cross-linked polyethylene;
- polypropylene.
Any option has the right to be implemented, but here the factor of efficiency and technological feasibility comes into play. In this aspect, polypropylene pipes look preferable in many respects. Why do many consumers today prefer consumables made from polypropylene?
Warm floors made of polypropylene pipes are currently the most common option. It's all about the price. When installing large-scale heating systems, when it comes to water floors with a total pipeline length of several hundred meters, the economic component comes to the fore. In this regard, polypropylene heating circuits are a good solution to the problem.
The advantages of such consumables include the following parameters:
- the necessary mechanical strength and elasticity of polypropylene pipes;
- necessary tightness of connections;
- durability;
- high technological characteristics that simplify the installation of heating circuits;
- low cost.
There are a couple of points to make here. Polypropylene is highly resistant to low temperatures. Freezing of the coolant in the pipeline will not lead to mechanical damage to the heating circuit. This pipe is perfect for heated floors installed in country houses and country houses where the heating system operates periodically.
A special welding method for polypropylene pipes ensures tight connections. A pipeline laid in a concrete screed can safely function normally for decades. By following the necessary instructions and installation technology, you can create a heated floor in your home, forgetting about its design and installation for a long time.
For reference: in accordance with the instructions for the products, polypropylene pipes are able to withstand the operating temperature of the coolant up to 75 0 C at an operating pressure of 7.5 atm. According to the product data sheet, a polypropylene pipe can be used for 25-30 years.
Having assessed the advantages of this option, do not forget about the negative sides of polypropylene heating circuits.
Important! Polypropylene in its usual version has a high coefficient of thermal expansion, so it is necessary to lay a pipe made of reinforced polypropylene pipe into the thickness of the concrete screed.
The main disadvantages when using polymer-based consumables are low-quality raw materials and non-compliance with installation technology. In other words, it is not uncommon to encounter pipes in which the top layer swells as a result of exposure to high temperatures. The bending of the water circuit may be done incorrectly, without taking into account the coefficient of thermal expansion of the material.
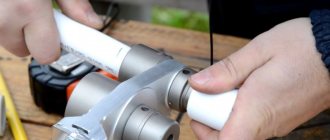
The challenges of manual docking are innumerable
Experienced craftsmen, who have thousands of successfully completed joints of polypropylene pipes behind them, rely on their professionalism. But success does not always depend on the personal skill and conscientiousness of the performer! Are there many construction sites with stable power supply? Meanwhile, increased voltage in the network speeds up the heating of the soldering iron, and decreased voltage slows it down. It is enough to be distracted from work a little, and the sense of time becomes confused.
Both overheating and underheating are detrimental to butt joints of plastic pipes. Overheated plastic becomes brittle and after some – usually very short – time it cracks. Underheated pipes do not connect well due to insufficiently deep diffusion of polypropylene. The joint turns out to be fragile and may not withstand the operating pressure of the heating system.
Overheated polypropylene pipe joint
Insufficient cleaning of welded parts from contaminants leads to a decrease in the quality of the connection. Dust and sand prevent the parts from setting. Organics and lubricants seal the plastic at the tight contact point. The chips generated when cutting a pipe form internal layers at the joint.
Sometimes foreign inclusions are welded into the plastic. A small piece of metal wire caught in the joint of polypropylene pipes vibrates with the coolant current and destroys the plastic array.
Excessive effort by the worker during manual installation of the joint - and the plastic, softened by heating, bulges into the internal space of the pipeline, eating away at the cross-section and reducing the throughput of the connection.
The saddest thing is that from the outside, high-quality and low-quality joints look exactly the same!
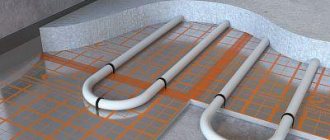
Features of the use of polypropylene pipes for underfloor heating equipment
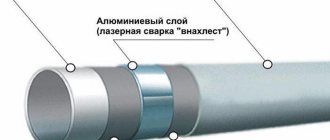
Plain polypropylene pipes are commonly used for water supply and sewerage pipelines. For underfloor heating, using a simple polypropylene pipeline is dangerous from the point of view of the product not meeting the thermal and hydraulic loads. It is better to create warm floors on the basis of reinforced pipes. This product has all the necessary characteristics characteristic of this heating method. The channel is three-layer. Between the inner and outer layers of polypropylene there is a reinforcing layer made of aluminum foil or woven synthetic threads (fiberglass).
The photo shows two options for making pipes, with an aluminum layer and with fiberglass in the middle.
The presence of a reinforcing layer allows the pipeline, walled up in a concrete screed, to withstand temperatures up to 95 0 C and water pressure up to 10 atm.
Existing markings of polypropylene pipes
In order to avoid mistakes already during the installation process, you should understand the existing markings on polypropylene products. Today, manufacturing companies offer the following types of polypropylene pipes on the market:
- PN10, a marking that appears on ordinary products with a homogeneous polymer structure. These consumables are used to equip conventional water supply systems at an operating water temperature of 20 0 C and with an operating pressure of up to 10 atm. The diameter of such a pipe usually varies between 20-110 mm.
- PN16, marking corresponding to a homogeneous product that can be used for installation of warm water floors. The permissible coolant temperature parameter should not exceed 80 0 C. The allowed operating pressure is 10 atm. The outer diameters are similar to products of the PN10 type, however, in this case there is an increased thickness of the pipe walls.
- PN20, marking for a homogeneous pipe in which circulation of hot water with a temperature of up to 95 0 C is allowed. Here, a working pressure of no more than 6 atm is allowed. Pipes are produced with diameters of 20-110 mm.
- PN20 AL (PN20 GF), marking for polypropylene, which contains a reinforced layer of aluminum or glass fibers. In all other parameters, these products correspond to pipes marked PN20. The main difference from other consumables is the lower coefficient of thermal expansion (CTEL).
Advantages
If you make underfloor heating using PVC pipes, you can achieve many advantages. These include:
Structure of polypropylene pipe
- long service life of a warm water floor. Polypropylene pipes can work effectively for 50 years;
- polypropylene has high chemical resistance;
- Such pipes are not subject to corrosion. Scale does not accumulate on their inner surface;
- such pipes have a low noise level;
- The individual elements of the system are interconnected monolithically. This ensures its long service life, since coolant leaks are eliminated;
Characteristics of polypropylene pipes - installation of polypropylene pipes occurs using a special welding machine. Any person without relevant experience can work with it;
- polypropylene provides high oxygen impermeability. This allows you to extend the service life of all metal parts that will not be subject to corrosion;
- The price of polypropylene pipes is good. Additional parts for installing the entire system (fittings and others) are also low in cost;
Service life of polypropylene pipes of different types with temperature and pressure indicators - polypropylene is highly durable. It is able to work effectively in the presence of high pressure from the circulating coolant;
- light weight, which ensures ease of installation;
- When the coolant freezes, the walls of the pipelines do not collapse. They are able to expand and, after increasing temperature, take their original shape;
- polypropylene is considered environmentally friendly. It does not emit toxic substances during operation.
Handmade creation of a warm water floor from polypropylene pipes
We continue the topic of warm water floors, and in this part we will look at how to properly install pipes.
In the first part, it was shown how to correctly fill a subfloor made of expanded clay. Now we have a more important task ahead of us, because the owners of the house have put forward several requirements for the water floor: firstly, it is the preservation of the existing heating system based on the AOGV-17.4 gas boiler. This means that we will crash into a system with natural coolant circulation. Secondly, it is possible to turn off the heated floor, ensuring it quickly warms up when starting up. We will have to use a circulation pump and reduce the thickness of the screed. And finally, the third requirement: the ability to operate the heated floor when the power supply is turned off, that is, in natural circulation mode.
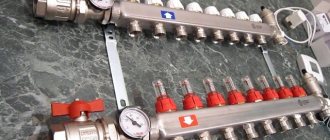
Installing connectors and taps on battery outputs
We begin the installation of the new system with the battery outputs. For old cast iron pipes we will use appropriate fittings.
Plumbing flax and sealing paste are used as a seal. We will install connectors, taps and other fittings. All operations are performed sequentially, with mandatory tightening with keys.
Note that when using more modern heating devices, we would use polypropylene pipes and fittings, but the desire of the owners to maintain the existing heating system imposes certain restrictions. We will install adapters, taps and corners at the battery outlet.
The heating system of this house is assembled on 3/4 inch metal-plastic pipes. Let's install the appropriate adapter to connect the return pipe to the battery.
So, we have a ready output for the return pipe from the battery and in the same way we assembled the second output of the battery for connecting the heated floor.
We have a feed from above, and below the flow is divided into two parts.
Which pipes are best to use?
For floor lines, only those circuits that can withstand high temperatures are suitable.
Today on the market there is a variety of products made from the following materials: copper, metal-plastic, cross-linked polyethylene. Separately, we will talk about galvanized pipe materials.
Each type has its own characteristics and is intended for use in specific conditions.
PEX pipes made of cross-linked polyethylene
Pipes made of cross-linked polyethylene have excellent performance characteristics, which give them an undeniable advantage over other materials, and are therefore popular both for cold water supply and for installation in heated floor structures.
The material for their manufacture is polyethylene with a certain density. Stitching of products is carried out using several methods.
Depending on the production process, the pipeline is of different classes:
- PEX-a - high-density polyethylene is used in production. The production method is peroxide, which involves melting polyethylene under high temperature. After which, the resulting amorphous mixture is squeezed out through a special forming hole, this method is called extrusion.
PEX-a is a multi-layer construction, with an aluminum insert placed between the layers, which helps maintain the shape of the product. A special glue is used to connect the layers; it does not change its properties under the influence of temperature.
For your information! The product is capable of transmitting oxygen to the coolant. To eliminate penetration, manufacturers began to equip it with an EVOH protective coating on the outside - this is a layer of thin plastic (polyvinylethylene).
- PEX-b - for its production, medium-density polyethylene is taken, which is softened to a solid consistency. With this method, crosslinking is done after extrusion.
- PEX-c - the raw material in this case is also medium-density polyethylene. Crosslinking is carried out at a temperature equal to the environment, while the state of the material is solid.
Hoses made of cross-linked polyethylene are widely used in the installation of heated floors, but PEX-a is more often used, as they have good elasticity and allow laying a line with a bend of up to 5 diameters.
PEX-b is harder and therefore breaks easily. And PEX-c does not tolerate high temperatures well, and therefore is more often used for cold water. In addition, products made from this material are durable and lightweight, which is a plus when installing it yourself.
PEX-a pipes have memory - when deformed, they are able to completely restore their shape; for this they need to be heated. PEX-b does not have such properties, while PEX-c has this property reduced.
Polyethylene PE-RT
PE-RT pipes are modified; they differ from PEX in the absence of seams. A system made from such tubes is practically silent and withstands sub-zero temperatures, but although it tolerates high positive temperatures well, it does not last long.
In addition, this material is susceptible to the action of aggressive substances, and there is no structural memory. But, despite this, heat-resistant polyethylene is widely used in heated floors, as it has a reasonable price.
Metal-plastic
A metal-plastic pipe for underfloor heating is an excellent option. It is flexible and plastic, and can be bent even without heating. In addition, the material is durable, tolerates temperature changes well and is environmentally friendly.
The metal-plastic pipeline consists of several layers - cross-linked polyethylene inside, then metallized foil, and a polymer coating on the outside, which protects against mechanical damage. In this design, corrosion does not form and scale deposits do not occur. If installed correctly, the pipeline will last more than 50 years.
If we compare which is better - metal-plastic or cross-linked polyethylene for heated floors, we can note the high thermal conductivity of plastic. But at the same time, there is a high risk of the coil breaking, and since such a product does not have the ability to restore its shape, this section will have to be removed.
Metal
Metal pipes for warm water floors are available in the following types:
- Copper ones have a high cost, so they are not very popular when installing hydrofloors. In addition, laying such a pipeline is not easy; special equipment is required, and it is unlikely that it will be possible to install it yourself.
However, it is worth noting that a copper pipe is an ideal option for heated floors, as it has excellent characteristics:
- high thermal conductivity;
- durability;
- not susceptible to corrosion;
- ductility and strength.
- Stainless steel corrugated steel is a relatively new type that is well suited for heated floors, but due to its high price it is not used often. The product has a protective polymer coating, and the stainless metal is not subject to corrosion and is resistant to mechanical, chemical and temperature influences.
In addition, this model has increased flexibility; installation in the most complex patterns is possible, without the risk of creasing.
To summarize , we can say that the most popular models that are used for heated floors are a metal-plastic pipe or a cross-linked polyethylene pipe .
They have good performance characteristics and are affordable. But if financial resources allow, then it is better to use a metal (copper) pipeline; it has high thermal conductivity and durability.
Choosing the best option for TP
If you carefully study the analysis of each type of pipeline, you can draw a preliminary conclusion: copper wins in all performance indicators, but significantly loses to polymers in price. Stainless steel corrugation will also not be an alternative to polyethylene - it is twice as expensive and has worse hydraulics.
Which pipe to use for underfloor heating first:
- Number 1 in our rating is PEX-AL-PEX metal-plastic, proven by many years of practice. The material is relatively inexpensive, easy to install with your own hands, durable, transfers heat well and elongates little when heated.
- Cross-linked polyethylene PE-X - pipes for professionals who know how to make high-quality TP contours. “PEX” is easily restored after a break, but it conducts heat worse and expands greatly when the temperature rises.
- Heat-resistant polyethylene PE-RT is a budget option for professional installation. The main disadvantages are oxygen permeability and a significant reduction in service life in case of overheating.
- The fourth place of copper pipe is due to its high price, which is inaccessible to most ordinary homeowners. If you do not take this factor into account, copper will be an ideal option for underfloor heating.
- Stainless steel corrugation is good for short sections, for example, connecting lines and hoses. Laying wavy pipes under the screed is not a very good solution.
- We do not use polypropylene at all.
Comment. When comparing different piping systems, the cost of fittings was not taken into account, since in-floor circuits are installed without connections.
Recommendation for the correct installation and concreting of PE-X and PE-RT pipelines. To reduce the elongation of the heating filaments, do not exceed the number of pipes in one circuit - 100 m, ideally - 80 m. Before pouring the solution, fill the system with water and pump up the test pressure (1.5 times higher than the working one). The TP installation technology is described in detail in a separate article.
Let's add a few arguments in favor of choosing polyethylene or metal-plastic for heating floors. Firstly, polymers have been successfully used in European countries for a long time. Secondly, the chemical composition of the main substance is continuously improved, and the properties are improved. Thirdly, polymer pipes are very durable, the standard service life is 50 years.
System operating modes
Let's consider the system as a whole and determine its operating modes. In natural circulation mode, the coolant moves directly through the red pipe of the water floor into the return circuit. Both taps are open at this moment. If you turn off the top tap, the coolant from the heated floor pipe will move through the additional pipe towards the pump. In this case, the pump must be turned on. This is a mode for quickly warming up a heated floor.
In order not to disturb the natural circulation in the general heating circuit in the fast heating mode, we can slightly open the second tap. Thus, part of the flow will be reversed. For circulation pumps with precise speed control, this problem can be solved using a mode switch.
Let's close the bottom tap. The pump must be turned off. In this mode, the radiator circuit in the kitchen and the heated floor are completely blocked. If we turn off only the warm floor, then circulation from the battery is carried out along the primary circuit through the return pipe.
This circulation pump model has three power selection modes. For the purposes of our system, we will need the most minimal mode. Its power consumption is 30 W. When the connection to the return circuit is completed, the system is filled with coolant.
For this private house, a system pressure of 1.5 - 2 atmospheres is used. Within the next 24 hours after filling, it is necessary to check the system for leaks and eliminate leaks.
All rights to the video belong to: DoHow
Heated floors are a worthy alternative to standard radiator heating, as they not only allow you to save on utility bills, but also achieve uniform heat distribution in the room. Laying a pipe for a heated floor is the most critical process when installing a heating system, however, all work can be carried out without the involvement of professionals.
Making a heated floor with your own hands
After the calculations, the floor installation is carried out in several stages:
- surface preparation for installation of a heating system;
- pipe layout and connection to the collector;
- system check;
- filling the floor.
Scheme of the finished structure
Is it possible to connect underfloor heating pipes or not?
When laying a pipeline for a heated floor, often the length of the circuit is not enough to make a solid loop. In this case, the question arises: is it possible to connect the pipes to each other, and how to do this? There are several methods for connecting contours, which depend on the type of material.
Important! When choosing a method to join floor pipes, you should take into account the operating pressure, since each connection is designed to withstand a certain load.
Let's take a closer look at the methods of how to connect underfloor heating pipes.
Connection of cross-linked polyethylene and metal-plastic pipes
Mini-review: how to install fittings?
Contours made of polyethylene or metal-plastic can be sewn together using fittings (brass, bronze and plastic); they can withstand high temperatures. Fittings are:
- Electric welding ones are effective, but their installation requires special equipment, so they are rarely used. The process looks like this:
- An electric welding fitting is placed on the pipe cut;
- welding equipment is connected to the terminals, it will supply voltage to the element, which will lead to heating and fusion of the joints;
- the device turns off, the resulting connection can withstand pressure up to 12 Amp.
- Pressing - the main advantage is that when pressing, the entire space is filled with polymer, thereby creating a high-strength connection.
- A nut is placed on the edge of the crimp tube, with the thread facing the connection;
- the split ring is put on with an indentation of 1 cm from the cut and fixed;
- the hose with the fitting device is stretched;
- The crimp nut is tightened tightly using two wrenches.
- Crimp fittings - these fittings are the easiest to install at home:
- a clamping sleeve is placed on the polymer hose;
- the end of the contour is stretched in diameter using an expander;
- with the stretched edge, the tube is pulled all the way onto the fitting fitting;
- the connection point is fixed in this position for several minutes, this is enough for the fitting to be tightly spliced.
Copper pipe stitching
Just as when installing a plastic circuit, copper can be joined using press or push fittings. This method is recommended in open areas, so that in case of leakage the part can be easily changed.
But the most reliable and practical way is to solder copper pipes. This is a more labor-intensive process, but the connection is durable and reliable. Sequencing:
- contour sections are cleaned from the outside and inside;
- a special connector for soldering copper floor heating pipes is used to lubricate the edges of the parts - only from the top;
- the products are joined, and the excess mixture is removed;
- the joint is heated with a gas burner and solder fills the gaps.
How to connect underfloor heating pipes (press fitting)
As mentioned above, the pipeline can be joined using press fittings. This part consists of:
- housings - come in different shapes (angle, tee, coupling);
- sleeves are the basis of the fitting, the raw material for its production is stainless steel;
- clips - an elastic ring (gasket) that connects the body and the sleeve.
For your information! The fitting body is equipped with a “window” to control the correct insertion of the tubular product. Only when the tube is visible in this hole can you begin pressing.
Pressing is carried out using special press jaws. The essence of the procedure is to compress the handles of the tool. The process is quick and easy, and no special skills are required to carry out this work.
The advantage of using such a connection is strength, long service life and the design does not require maintenance.
Features of polypropylene pipes
To lay a heated floor in a cement screed, polypropylene is chosen as the material from which the pipes are made for a number of reasons:
- Polypropylene, unlike a number of other materials, lies well in a cement screed and has particular strength and durability.
- Warm floors with polypropylene pipes are cheaper than warm floors made from other materials.
- Unlike products made of metal-plastic, it tolerates temperature changes well and does not burst when frozen.
- Light weight is an advantage when transporting and working with them.
- No corrosion.
- They lie well in the screed, while metal-plastic products cannot be rolled into concrete.
- High heat transfer efficiency.
- Polypropylene pipes can operate for up to 50 years without loss of quality.
There are also disadvantages to using:
- They cannot be used in areas with a high fire hazard. The optimal operating temperature for them is +75°C. Maximum - 95°C.
- Unlike a number of others, they bend poorly, which is why laying them in increments of less than 13 centimeters is problematic. However, larger spacing is usually used when laying.
- It is necessary to use reinforced pipes, since single-layer pipes in the screed can be severely deformed.
- Installation is not possible in harsh climatic conditions, since the coolant temperature in those places is over 110°C.
We recommend that you read: Where is PPR (polypropylene) pipe used?
Polypropylene is one of the recommended materials for underfloor heating in concrete screed; it is often chosen as a material with which you can work independently. Below we describe in detail how to make a warm floor in a concrete screed from polypropylene pipes.
Flaws
When using polypropylene pipes for underfloor heating, it is necessary to use elements with reinforced walls. The use of conventional materials will reduce the service life of the system. Unreinforced walls cannot cope with the high load from circulating coolant under pressure. Also, a certain impact is observed from the screed and other elements of the heated floor.
How to install polypropylene pipes
Another disadvantage of polypropylene is its instability to high temperatures. Therefore, it is prohibited to use it in areas with a high fire hazard. The normal operating temperature of polypropylene is +75°C (pressure up to 7.5 atm.). It can be operated at +95°C, but in this case the service life is significantly reduced. Therefore, when installing an underfloor heating system, care must be taken to ensure that the coolant reaches the optimal temperature.
Connection of underfloor heating pipes in a screed
Although experts advise laying a water-heated floor under a screed without joints, it is not prohibited to do so.
But it is worth noting that it is impossible to connect the floor contours using a threaded method: “American” or PRH. It is better if the pipes are connected using a press fitting or coupling.
Important! When filling such areas with screed, fittings or couplings should be isolated from the concrete solution. This can be done by wrapping them in plastic film.
How to solder a heated floor pipe
Soldering is a common method of connecting plastic pipes for underfloor heating. The technology is simple and does not require large financial investments. There are two soldering techniques:
- Coupling - for this, a shaped part is used (coupling or contour with a large diameter). This method is suitable for tubes measuring 63 mm. The welding process consists of melting the edge of the product on the outside and part of the coupling on the inside. After which, the parts are joined, forming a tight connection.
- Direct - involves melting small sections of two plastic pipes, which are then joined at the ends. This fairly simple method reliably combines two parts into a single outline.
For your information! Along with hot technologies, the method of “cold” soldering is practiced. A special solvent is used that softens the plastic.
Installation
The main method of joining polymer parts with a diameter of up to 40–63 mm is socket (socket) soldering. In the process of how to solder polypropylene pipes, there is a certain technological order:
- The soldering unit must be installed on a rigid, stationary base.
- Provide power supply - use an extension cord with the required wire cross-section (wire core no less than Ø1.5mm).
- The products are prepared: cutting is done at right angles. Dirt deposits are removed. The surface is degreased. When using a reinforced part PN25, the outer layer of polypropylene and the aluminum layer are removed using a shaver. Marks are applied indicating the size of the welding belt.
- The condition of the nozzles is checked - the surface must be clean, without external damage.
- The products to be connected are placed on the corresponding attachments: the pipe is on the sleeve, the fitting (coupling) is on the mandrel.
- Heat the parts to the recommended temperature, maintaining the required time (see table).
- The heated products are removed from the soldering iron and quickly joined to each other. The connection is made along the axis of the pipe, without turning. The part is seated in the coupling to the depth indicated by the internal collar. The mixture is kept in a quiet state until the parts cool down.
How to connect a heated floor pipe with a metal-plastic pipe
Although experts recommend using a pipeline made of one material when installing a heated floor, sometimes it becomes necessary to connect a metal-plastic circuit with products made from other raw materials.
For example, when connecting this circuit to steel (copper) parts of the plumbing or heating system. To do this, you will need a compression fitting and a calibrator. When joining products made of different materials, the thread should be selected according to the size of the steel pipe, and the cuffs and washers should be selected according to the metal-plastic pipeline.
Tow is wound onto the copper pipe, and then the fitting is screwed on. The edge of the product is pushed onto the cone and the nut is tightened.
If it is necessary to connect a metal-plastic circuit with polyethylene products, special threaded fittings can be used as a connector for underfloor heating pipes. This joint is most often made when connecting a heated floor to a boiler.
Calculation of the required pipeline length
Laying pipelines with your own hands in a screed should be reproduced according to a certain pattern. Warm floors made of polypropylene pipes can take the form:
- snakes;
- double snake;
- spirals;
- corner snake (and another).
Options for laying pipes
To install a heated floor with your own hands, the pitch between turns should be from 10 to 30 cm. In most cases, 30 cm is enough. In areas with significant heat loss, you can reduce the pitch to 15 cm. The high efficiency of underfloor heating is maintained if you make the water circuit in cement-sand screed with a maximum length of 80 m (ideal option - up to 50 m).
Calculation of the length of the water heated floor circuit
To calculate the required number of pipelines, you can use graph paper. On it, a plan of the room is drawn to scale, where a diagram of the heated floor is depicted. By measuring the length of the circuit, you can determine the required number of pipes. It is also easy to find out if you use regular thread. It is laid on the floor according to the pattern chosen for installing a heated floor.
After all the manipulations, it is enough to measure the length of the thread, which will correspond to the footage of the pipelines. When using any option, you need to increase the required volume by 10%.
Final stage
After installing the water circuit, you need to connect it to the collector group. One end is connected to the supply, the other to the return. After connecting to the collector, it is necessary to test the heating system. This can be done by running the coolant into a warm floor. The system pressure should be higher than the working pressure, but not more than 6 bar.
Connecting a water heated floor to the collector
Every half hour you need to raise its level to the previous level. These steps are repeated three times, after which the underfloor heating is left alone for 24 hours. If during this time the pressure has dropped by no more than 2 Bar, then the installation was successful. At the last stage they move on to the screed. When it is dry, you can begin laying the flooring. [ads-pc-2][ads-mob-2]
What to do if a heated floor pipe is broken?
If there are warm water floors in a house or apartment, there are times when the floor pipeline may be broken. First of all, if the floor is functioning, you should disconnect it from the water supply. But more often, such damage occurs during installation or repair of the system, when the topcoat is not laid and the screed is not poured - this is a huge plus.
If there is a concrete screed, in order to find the location of the damage, you will need a hammer drill, a chisel and a hammer to destroy the concrete. This should be done carefully so as not to damage the entire circuit.
What to do if the floor heating pipe is damaged. Repair of "warm floor". Installation of press fitting.
When pipes made of metal-plastic or polyethylene are pierced, they are repaired using press couplings using a special press.
For your information! If the heating element is filled with screed after repair, then the use of threaded fittings is not possible.
Having calculated the location of the breakdown, you should remove the damaged area and install a whole circuit in its place. The connection is made using press couplings, which should be wrapped in plastic film to protect them from cement mortar.
Preparatory work for laying a warm water floor
It is impossible to make a warm floor with your own hands using polypropylene pipes if you do not properly prepare the base for their installation:
- At the first stage, waterproofing is laid. To do this, it is recommended to use thick polyethylene film, which is not capable of allowing moisture to pass through. It is advisable to install waterproofing on the walls at a distance of 10 cm.
Preparing the base before installing a heated water floor
- Thermal insulation is being installed. You can use different insulation in the form of rolls or slabs. If extruded polystyrene foam is selected, care must be taken to ensure that no gaps form between the individual elements. They will become sources of cold air penetration. To do this, it is recommended to lay the insulation in two layers. The upper slabs must overlap the joints of the lower ones. To eliminate cold bridges, all cracks can be filled with polyurethane foam.
- A heat-insulating substrate with a foil coating is laid. Using penofol, you can significantly increase the efficiency of underfloor heating, since the generated heat will be reflected into the room. Scotch tape is used to seal the joints.
Installing damper tape and laying multifoil
Before connecting the pipes, we will do some preparatory work: along the perimeter of the walls we will install a so-called damper tape, which compensates for the expansion of the warm water floor when heated.
It is easy to make such a tape yourself from ordinary foil isofol with a thickness of at least 5 mm. To keep the tape against the wall, you can lightly glue it or use regular tape.
The height of the tape should be slightly higher than the future floor screed. We installed tape around the entire perimeter of our kitchen. Now let's lay down multifoil - a special foam insulation for heated floors.
The branded insulation has a special marking grid, which can help when calculating the distances between pipes. The multifoil is laid directly on the rough screed, and the joints are taped. To lay out, level and fasten the water pipes, we will use a metal reinforcing mesh with a cell width of 10 cm.
Having laid out the mesh around the perimeter of the room, we connect the individual elements using ordinary wire.
The reinforcing mesh is installed throughout the floor and has certain irregularities, but we will press it against the screed later, ensuring more convenient work on fastening the pipes. So, we have completed all the necessary work to begin installing the pipes - there are exits from the battery, we will use the current supply.