Today, in a private house, it is possible to independently install heating from polypropylene pipes, because for these purposes you do not need to have professional skills.
Almost every home master can solve this issue. The article provides instructions with video presentations to illustrate the processes.
If you are interested in detailed step-by-step instructions on how to properly solder polypropylene pipes, then see this article.
Main advantages of PP pipes
Among the advantages of this material are the following:
- do not react with the coolant and do not form oxides on the internal walls;
- a properly installed system can be operated without failure for many years;
- easy to repair and upgrade;
- Even a novice master can handle the installation of a heating system made of polypropylene pipes;
- the cost of PP pipes is lower than metal ones;
- installation does not require complex devices and components.
No special skills or abilities are needed to lay heating pipes.
What are cross-linked polyethylene pipes?
The name of the new material, which recently appeared on the market, means that polyethylene molecules are “cross-linked”. The result is a molecular three-dimensional network with cross connections. It is this structure that ensures the strength of the product.
Types of cross-linked polyethylene:
- plastic ingredients are exposed to high temperatures and peroxides (peroxides), marked PE-Xa;
- moisture treatment with silicon compounds (silane) and PE-Xb catalysts;
- when bombarded with electrons, cross-linked polyethylene PE-Xc is obtained;
- Application of nitrogen produces PE-Xd polyethylene.
Cross-linked polyethylene pipe
Cross-linked polyethylene, due to the uniform distribution of molecules, has high strength and is able to withstand a wide temperature range.
Characteristics of cross-linked polyethylene pipes
The material is very flexible, elastic with a large bending angle. This ability increases when heated. Thus, the number of connecting elements is significantly reduced.
- Polyethylene density 0.95 g/cc.
- Operating temperature range from -50°C to + 100°C (softens at t +132°C, melting +200°C).
- Under operating conditions of the system at t + 70°C and a pressure of 3 Bar, the service life is 50 years.
- Tensile strength from 350 to 800%.
Cross-linked polyethylene pipe in section
Table. Pipe diameter, bending radius
| Pipe diameter (mm) | Heat bending radius (radius/mm) |
| 12 | 27 |
| 14 | 31 |
| 15 | 34 |
| 16 | 36 |
| 17 | 38 |
| 18 | 40 |
| 20 | 45 |
| 25 | 56 |
In addition to heating systems and water supply (hot and cold), due to the strength of the material and resistance to low and high temperatures, it can be used to defrost gutters, clear snow, and heat open areas. Experts say that in the installation of heated floors, these pipes have proven to be easy to install and a high-quality, reliable wiring option.
Stages of preparatory work
Before starting work on arranging a heating system based on polypropylene pipes with your own hands, you need to draw up an accurate project plan.
Important! Not only the total length of the heating system pipes is taken into account, but also its configuration.
The following points must be taken into account:
- what type of connecting elements will be used to connect to the coolant circulation circuit - welded-in PP elements, or combined ones, with the possibility of threaded connection with metal pipes;
- the presence of hard-to-reach places in which it will be impossible to solder pipes. In this case, pre-joined elements of the future heating system are used;
- the type of system is determined: gravity circulation, or with forced convection of the coolant. Different installation rules apply for different systems;
- calculate the expected pressure in the circuit and the temperature of the coolant. This data is necessary for the correct selection of the type of polypropylene pipe;
- Installation of heating from polypropylene pipes in cold rooms is not allowed, due to the risk of thermal deformation of the pipe.
In order to save money, it is quite possible to install a heating system from PP pipes yourself. Minimal skills in handling the tool and strict adherence to all stages of assembly will help create a durable and reliable system.
Purpose of pipelines and their characteristics
Types of pipelines in heating systems
Before starting calculations and selecting materials, you should find out the operational features of heating pipelines. Their main task is to deliver coolant from the heating boiler (distribution unit) to radiators and radiators.
At first glance, installing a transport highway does not present any difficulties. It is enough to take into account the specifics of the material of manufacture, install compensators for heating pipelines in the right places, and ensure tightness. But in fact, after such an unprofessional approach, problems may arise during work. To avoid them at the design stage, you need to know in advance the basic requirements for the organization of pipelines:
- Nominal pressure value and temperature mode of heating operation . Pipes must withstand the maximum value of these parameters without deformation or change in their performance;
- Take into account the features of the chosen scheme - one-pipe or two-pipe. To carry out repair work in certain areas, jumpers are required in the heating pipelines. In particular - when tying radiators;
- External factors - exposure to direct sunlight, the possible influence of negative temperatures and the quality of the coolant. To maintain the original flow capacity, heating pipelines are periodically flushed;
- Observe the installation rules - angle of inclination, distance between heating pipelines and provide for the presence of shut-off valves. Availability of a safety group to compensate for excessive pressure and thermal effects from the coolant.
Where should you start designing heat mains in an autonomous system? First, a diagram is drawn up - one-pipe, two-pipe, collector. Then it is necessary to perform a full calculation of its characteristics. First of all, select the thermal operating mode, hydraulic resistance and optimal pressure. Based on the data obtained, pipes are selected.
For systems with natural circulation, it is necessary to install pipes of large diameter - from 24 mm and above. In this way, it is possible to compensate for the friction of the coolant on the inner surface of the line.
Equipment used for installation
A soldering iron for polypropylene pipes – or an “iron”, as it is sometimes called – is perfect for installing a do-it-yourself heating system from polypropylene pipes. When choosing a manual machine for welding PP pipes, you need to take into account a number of nuances:
- An inexpensive pipe soldering iron is equipped with only the most common nozzles. As a rule, these are metal elements coated with a protective layer of Teflon. More expensive models are equipped with copper alloy nozzles;
- The wider the temperature range and the higher the power, the more convenient this “iron” will be to use. High-quality installation of a heating system with polypropylene pipes is ensured by compliance with the temperature-time parameters of soldering;
- a cheap soldering iron for PP pipes will not work for long;
- The shape of the soldering iron is important. A tube-shaped soldering iron for polypropylene pipes is more expensive than a hammer-shaped soldering iron. But it is much more convenient for them to make counter joints and weld pipes with fittings – corners in hard-to-reach places – with their own hands.
A rich set of professional equipment is not yet a reason to purchase it. There are additional attachments for sale for a hand-held soldering iron for PP pipes.
The rules for installing heating from polypropylene pipes predetermine the exact correspondence of the diameter of the nozzle and the elements to be welded.
Soldering irons in the form of a pipe use nozzles of a different type; a standard “iron”, accordingly, will not be able to work with nozzles from a tubular welding unit for soldering PP pipes.
Professional installation teams use mechanical welding machines. To combine joints of large diameter pipes that are difficult to hold in your hands, a special hydraulic drive is used.
It makes it possible to comfortably work with polypropylene pipes with a diameter of over 4 cm. This device is characterized by a small temperature error coefficient and high reliability.
But installing heating from polypropylene pipes using a mechanical device will require certain operating skills from the operator.
Helpful advice! Any type of welding equipment for polypropylene pipes is prohibited from being used without a reliable stand, which is usually included in the kit. It is unacceptable to weld PP pipes that are damp, wet or dirty on the inside; in this case, there can be no question of the tightness of the seam.
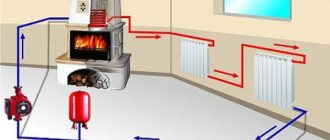
↑ Coolant supply diagrams
The main problem in battery operation is uneven heat transfer. Hot water is less dense, so it rises to the top of the radiator as it is displaced by denser cold water.
The coolant is supplied to the registers in different ways. Therefore, it is worth examining in detail the most common ones:
- bottom eyeliner;
- top;
- diagonal;
- lateral.
In appearance, the connection of polypropylene pipes corresponds to the name of the connection method: with a bottom line they are connected to the register from below, with a top line - from above, etc.
True, water flows differently in the register itself.
To direct the movement of hot coolant along the required route, they are equipped with different jumpers.
Each connection method also involves the use of certain design solutions for the entire heating circuit. Sometimes it is necessary to install an expansion tank, in some cases - an electric pump for normal coolant movement, in certain cases - to install both. Depending on the vertical or horizontal wiring, the technical room must be located above or below the heated room.
Upper eyeliner
The heating radiator has an upper and lower horizontally running collector, as well as vertical channels connecting these two collectors.
When connecting pipes, the upper part of the register heats up more than the lower part.
To prevent this, a jumper is installed in front of the last rib. Due to this, the coolant first passes through all sections, and only after that it enters the return line.
Simply put, the installed jumper increases heat transfer.
If the jumper is not in the register, then use a diagonal connection: the supply pipe is connected to the top of the battery, and the return pipe to the bottom.
Bottom eyeliner
This method of eyeliner is the simplest. The heating boiler is placed on the ground floor or in the basement of the house, from which the supply pipe goes up to the expansion tank, from which the acceleration or starting section of the pipe is equipped. It should be located 1.5 m or more above the first battery. The supply pipe is connected to the bottom of the register, and on the other hand, the return pipe is connected to it. This is how the remaining batteries are connected in series to the system.
If the system will function due to natural circulation, then polypropylene pipes must be laid with a slope.
The last battery in the chain should be no more than 3 meters higher than the boiler.
The optimal solution is to install an electric pump, as well as bypasses and shut-off valves on each heating register.
It is imperative to take into account that during power outages the pump will not work, so the coolant must circulate naturally.
Accordingly, it is necessary to make a system with a slope.
Thanks to bypasses and shut-off valves, it will be possible to repair or replace a failed battery without shutting down the entire heating circuit. Thanks to them, you can turn off any problem area.
It is also necessary to install a Mayevsky valve or air vent on each battery to bleed air.
This is required for normal operation of the system and high-quality heating of the premises.
Types of polypropylene pipes
PP pipes are divided into two main types:
- reinforced;
- unreinforced.
The former are used where high pressure and temperature are expected. Such pipes are classified as “stabilized”; they have a minimum coefficient of thermal deformation.
Unreinforced pipes are used in technical systems for circulating liquids without heating. Such PP pipes are also used for cold water supply systems, which are also easy to install with your own hands.
Table 1
| Marking | Application area | Characteristics |
| PN10 | Low-temperature water systems with minimum pressure levels | 10 atmospheres, 45 °C |
| PN16 | Cold water plumbing systems | 16 atmospheres, 60 °C |
| PN20 | Hot water systems, not for heating systems | 20 atmospheres, 95 °C |
| PN25 | Hot water supply systems, heating systems | 25 atmospheres, 95 °C |
| PPR | Heating, hot water supply. Not suitable for installing indoor cold water supply systems. | 25 atmospheres, 95 °C |
The thickness of polypropylene pipes also matters. The value ranges from 1.9 to 18.4 mm depending on the type and purpose of the pipe.
It is important to know! Pipes with the PPR index are used only for industrial purposes; their use for supplying drinking water is not recommended by the manufacturer. The standard size of a polypropylene pipe of any diameter is 6 meters.
For the installation of “warm floor” systems, specialized polypropylene pipes are used. Such pipes for heated floors are supplied in a coil, and most often they are not welded together, but are attached at the junction with the coolant manifold with crimp couplings.
The heated floor circuit is a seamless system. Various types of heated floor installation are used. The geometry of any of the selected methods - “snail” or “along the contour” - determines the ability of the pipe to bend along the smallest radius. Excessive bending leads to irreversible deformation of the pipe.
The PP pipe for underfloor heating is laid on the prepared base. Most often this is a heat insulator in the form of a polyurethane foam layer, supplemented with heat-reflecting foil.
Good to know! The crimp couplings are securely fixed with special pliers; the kit also includes a template for checking the correct installation. Crimping pliers are quite expensive; it is more profitable to rent them for the period of final assembly and commissioning of the system.
Classification and design parameters
Existing GOST standards (ISO10508) establish a classification of polypropylene hoses, based on which this material can be used under certain operating conditions.
The marking of PP pipes clearly indicates the operating parameters. Taking this designation into account, it is easy and simple to select a material for a specific heating system configuration
Long polypropylene products are divided into 4 classes (1.2, 4.5) according to typical areas of application and operating pressure values (4,6,8,10 ATI):
- class 1 (hot water systems up to 60°);
- class 2 (hot water systems up to 70°C);
- class 4 (underfloor heating and radiator systems up to 70°C);
- class 5 (radiator systems up to 90°C).
For example, polypropylene pipes are required to make a low-temperature heating system. Then, by the designation on the outer surface of the pipes, you can determine the appropriate material.
For this case, hoses with the designation Class 4/10 are quite suitable, which corresponds to the limiting temperature parameter of 70ºС and the permissible operating pressure limit of 10 ATI.
Industry, as a rule, produces products for universal use. The manufactured products support an extensive classification. In the documentation for such material, the marking of PP pipes is indicated by a standard listing of acceptable parameters (Class 1/10, 2/10, 4/10, 5/8 bar).
Each branded product has an application class designation on its external surface, which actually determines the operational parameters of the future home heating design
Thus, when planning to make heating in a polypropylene house with your own hands, the main material is usually chosen by the master in direct proportion to:
- from planned operating parameters;
- on methods of heating the coolant;
- on the applied regulatory system.
It is also advisable to calculate the service life of the future heating system using the following parameters:
- upper values Trab and Prab;
- pipe wall thickness;
- outside diameter;
- safety factor;
- duration of the heating season.
On average, the service life of polypropylene should be at least 40 years.
Welding polypropylene pipes - basic rules
The initial stage includes preparing the tools that will be needed during installation. In addition to the soldering iron itself, you will need special scissors for cutting polypropylene pipes that were chosen for the heating system.
Such scissors consist of a concave cradle, where the pipe is laid directly, and a guillotine knife with a stepwise force transmission unit.
Professional scissors for PP pipes are easy to distinguish from cheap fakes: they are massive, have a sliding spring and open wider than amateur ones. High-quality factory sharpening of the knife allows you to work with such scissors for a long time without much effort.
It is customary to cut the PP pipe exclusively at a right angle, this will simplify the welding process in the future. Aluminum-reinforced pipes should be cleaned; this will ensure a technologically correct flow of pipe soldering processes in heating areas.
To strip the pipe, use a special device, which is included in the set of professional equipment.
Degrease pipes using isobutyl or isopropyl alcohols, and nothing else. A surface that is not degreased will make itself felt during soldering - the seam will lose its tightness.
The attachments of amateur, and especially professional, welding equipment must be thoroughly cleaned. Adhered polypropylene fibers should be removed.
The easiest way to do this with your own hands is to heat the nozzle and carefully clean it with a thick cotton cloth or a wooden sliver.
DIY installation
In private homes, installation is often done independently. To do this, you need to draw up a project, acquire the necessary materials and tools.
Drafting
The project is essentially a master plan and a guide to action. Allows you to determine in a timely manner what materials and in what quantities will be needed.
During the development process it is necessary to consider:
- type and number of pipes and manifolds;
- number of pumps and filters;
- number of water points;
- volume of the water heater and expansion tank;
- the location of all elements of the system, the distance between them.
In order to determine the dimensions, you will need a drawing of all rooms and, if necessary, sections of the external part of the structure. The project is drawn up on a single scale.
Required tools and materials
In accordance with the project, materials and their quantities are determined.
Basic:
- tubes;
- fitting;
- shut-off valves, valves;
- radiators;
- expansion tank;
- pump.
In addition, you will need materials for fastening and finishing, that is, various kinds of hardware, clamps, as well as construction primers, putties, and solutions.
You will need two sets of tools: for fastening to the walls and for connecting the system elements. The first set will depend on the materials of the walls, the need to sew up pipes and the degree of readiness of the premises.
Common construction tools:
- perforator, drill;
- Bulgarian;
- roulette, level;
- hammer;
- screwdriver (screwdriver).
Connection tools depend on how they are installed. For welding you will need a soldering iron and nozzles. To connect fittings, radiators and other elements, you will need adjustable wrenches.
Pipeline installation
The pipeline is one of the most important elements of the entire system. It must also be displayed in the project.
Installation sequence:
- Marking.
- Installation of fasteners, clamps, gutters.
- Connecting areas.
- Insertion of fittings, valves.
- Installation to radiators.
Heating time, weld width and cooling time
There is no linear dependence of the heating time of PP pipes during welding of heating system elements. Equipment manufacturers supplement the package with an approximate table, which indicates the temperature conditions of the welding machine for PP pipes and the time for fixing the pipes in the soldering iron nozzle.
You should try to heat the elements being welded at the same time, this will ensure the best quality of the weld.
If simultaneous heating is impossible - for example, it is necessary to solder the pipe to the embedded element - use the separate soldering method - each element is heated separately, and the first heated element is heated slightly longer than recommended in the table.
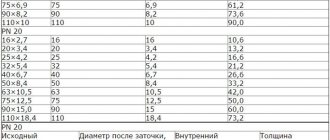
table 2
| Pipe diameter (millimeters) | Heating time (seconds) | Connection time (seconds) | Cooling time (minutes) | Welding belt width (mm) |
| 110 | 50 | 12 | 8 | 33 |
| 90 | 40 | 11 | 8 | 30 |
| 75 | 30 | 10 | 8 | 28 |
| 63 | 24 | 8 | 6 | 26 |
| 50 | 18 | 6 | 4 | 23 |
| 40 | 12 | 6 | 4 | 20 |
| 32 | 8 | 6 | 4 | 18 |
| 25 | 7 | 4 | 2 | 15 |
| 20 | 6 | 4 | 2 | 14 |
An ordinary construction tape measure will help you measure the required length of the pipe; even a novice craftsman can check the correct installation using a level. It is convenient to make marks for cutting pipes with a marker.
Helpful advice! Novice craftsmen often mark the cutting line without taking into account the fact that part of the polypropylene pipe will be hidden in the coupling or fitting. Make sure that further installation is carried out by a more experienced technician if you find three couplings on a two-meter straight section of pipe.
Due to the fact that PP pipes are inexpensive, it is possible to correct errors if they arise when installing heating with your own hands from polypropylene pipes. The accumulated experience will help you in the further arrangement of plumbing and heating systems.
Work on installing the heating system should be carried out in a ventilated area. Accuracy and attentiveness will help to avoid burns and injuries, and careful calculation of components will save you from exceeding the original cost of the heating system.
Source: trubamaster.ru/dlya-otopleniya/kachestvennyj-montazh-otopleniya-iz-polipropilenovyx-trub-osobennosti-texnologii.html
Heating system diagrams
The scheme option depends on the technical characteristics of the object, as well as the financial capabilities of the owner. The same object can be equipped in any of the ways.
Three heating schemes are most commonly used:
- single-pipe;
- two-pipe;
- collector
The first is the simplest, the second is more complex, but also more effective, the third is used for large installations, for example, for arranging heated floors or walls.
Single-pipe
Initially, if it was necessary to provide large residential areas with centralized heat, then this type of piping was used in order to save materials and simplify installation.
Such a system has one riser and one circuit, and the coolant supply is a closed system in which all technical components are connected in series. It can be vertical or horizontal. The first is used in multi-apartment buildings, the second is suitable for private houses.
Previously, the main problem with such a scheme for the consumer was that the further the radiator is from the source, the colder it is, since heat is wasted as it is delivered. The accompanying difficulties in regulating and distributing temperature also did not add to its popularity.
The single-pipe system did not take into account many factors of loss of both heat and resources, the costs required to deliver it to the consumer. In apartment buildings, such arrangement does not allow to control and maintain equal pressure in all elements of the system. A pump is needed, however, it cannot provide consistency, which leads to water hammer and leaks.
In the event of a breakthrough, the coolant must be replenished, which also leads to additional costs.
If one battery fails without a valve system, the supply of coolant to all radiators of the system is stopped for the period of repair.
For normal operation in a private home, an expansion tank is required, which performs the functions of stable temperature balancing. The technical room and this container are located in the attic.
Positive aspects:
- New technologies have eliminated the problem of uneven temperature distribution. Modern radiators are equipped with thermostats and thermostatic valves, which significantly eliminates heat loss from delivery to distant radiators.
- The use of valves, ball valves and bypasses allows you to repair an individual radiator without shutting down the entire circuit as a whole.
- Installation of such a scheme is simpler and less expensive, moreover, it requires half as many pipes, and accordingly the number of fittings is reduced. Using modern innovations, you can eliminate most of the disadvantages and save a lot, which makes this option extremely attractive in private housing construction.
Two-pipe
Unlike a single-pipe system, in a two-pipe system the coolant is supplied to each radiator separately through one riser, and through the second it returns back to the heating boiler. That is, the battery is served by two pipes - supply and return.
The disadvantage of such piping is a doubling of the number of pipes, as well as a significantly larger number of fasteners, fittings, and valves. Which naturally affects the costs of both materials and installation.
Now to the pros:
- Ensures uniform heat supply to all radiators.
- Allows you to avoid pressure losses. If a less powerful pump is required, the water can circulate by gravity.
- If necessary, it is possible to repair a separate radiator without damaging the heating.
It is possible to use associated and dead-end water movement in the system. The first involves installing radiators of the same power, otherwise it is necessary to install thermostatic valves. It is used in long-distance pipelines and provides ideal hydraulic balancing. The second, accordingly, is used in short harnesses.
It can be vertical or horizontal. The first is more often used in multi-apartment buildings, the second - in private houses (like a single-pipe system).
In private buildings, when using horizontal wiring, it is recommended to install a Mayevsky valve in each radiator, which is necessary for bleeding air.
In addition, a two-pipe system can have an upper and lower piping, respectively, the first involves placing a hot water supply riser on the ground floor, in the basement, the second requires placing the distribution line in the attic.
Collector
A metal comb with leads for connecting pipes and devices is called a manifold. Such a system, in fact, is also a two-pipe system; the supply to the comb is carried out from one common pipe, as is the return of the cooled coolant through the return manifold. The difference is that here the coolant is supplied through a separate pipe to each radiator or to floor and wall heating.
This scheme requires an expansion tank with a volume of at least 10% of the total volume of all heating devices and a circulation pump.
The manifold cabinet should be located at approximately equal distances from each radiator.
Both bottom and top feed are also possible here. The first is more preferable, as it allows you to hide the pipes in the floor.
Each circuit is an independent hydraulic system with its own shut-off valves, which allows you to turn off each of them without damaging the rest of the network.
Advantages:
- Uniform heat distribution, the ability to adjust the temperature of each radiator without compromising the others.
- The efficiency of the system is higher, since the coolant is supplied directly to each individual heating device.
- High efficiency makes it possible to use pipes of smaller diameter and a boiler of lower power, which reduces both one-time costs for the purchase of materials and equipment, and constant costs for heating and purchasing fuel.
- The possibility of using heated floors makes it possible to heat without the use of traditional radiators, which is practical and aesthetically pleasing.
- Allows you to repair each individual element without reducing the efficiency of the rest of the system.
- Ease of design: no need to make complex calculations.
Disadvantages can be divided into two categories: cost and practical. The construction of a collector is significantly more expensive than other options.
You will need:
- fitting;
- combs;
- shut-off valves;
- circulation pump;
- expansion tank;
- collector cabinet;
- a large number of pipes.
In addition to cost, there are other disadvantages that you should be aware of, but which, nevertheless, are not critical.
Practical disadvantages:
- All radiators must be equipped with Mayevsky taps, since airing of the collector system is a common phenomenon.
- Despite the simplicity of the project, installation of such a system is labor-intensive and costly.
- Space is required for the manifold cabinet, which should ideally be located in the center of the entire system (in a spatial sense).
Which polypropylene pipes cannot be used for heating installation?
Now let's look at the polypropylene pipes themselves.
Pipes differ in pressure and operating temperature.
The simplest, cheapest pipes (designated PN-10 - designed for operating pressure up to 10 atm).
They are thin-walled (wall thickness 2.5...2.8 mm). Installation of heating from polypropylene pipes of this type is NOT done. And they are used only for cold water supply.
There are also polypropylene pipes designated PN-16, designed for operating pressures up to 16 atm and operating temperatures up to 80 degrees. Such pipes have a wall thickness of 3...3.2 mm.
Next come the pipes designated PN-20. They are designed for operating pressures up to 20 atm and operating temperatures of 80...85 degrees. These pipes are thick-walled (wall thickness up to 4 mm).
All of the pipes listed are used mainly for water supply (thin-walled for cold water, thick-walled for hot water supply). These pipes are not used in heating systems. Why?
Because their linear expansion is too large. Because of this, straight sections of pipelines will bend after heating.
Marking
There are several types of plastic used to make pipelines:
- PVC pipes;
- polypropylene products;
- polyethylene parts.
A separate group includes tubes, during the manufacture of which a reinforcing layer of aluminum foil or fiberglass is placed between layers of plastic.
The marking varies depending on the type of polymer. There is no point in describing the designations on PVC, since this material is not used for the manufacture of water supply and heating pipelines. This type of polymer releases harmful substances when heated and has low performance characteristics.
Polyethylene marking:
- PE 32 is a type of polyethylene with the lowest density. It is rarely used for making pipes.
- PE 63 - used for assembling non-pressure systems. This could be sewer drains, an outdoor shower. This type of polyethylene cannot withstand high pressure and is destroyed by water hammer.
- PE 80 is a type of polyethylene with a high strength index. Used for assembling cold water supply systems. If the pipeline is laid outside buildings, additional insulation must be used.
- PE 100 - pipes made from this type of polyethylene have the highest strength index. They are used for the manufacture of industrial pipelines, hot and cold water supply systems, heating circuits.
The marking of polyethylene tubes contains the abbreviation SDR, followed by numbers. The lower this indicator, the stronger the product.
Marking of polypropylene tubes:
- PN10. Products with this designation can withstand pressure up to 1 MPa. The permissible liquid temperature is 45 degrees Celsius. Due to their low strength and heat resistance, such tubes are used for assembling sewage drains and cold water supply pipelines.
- PN16. The maximum permissible pressure level is 1.5 MPa. The coolant temperature should not exceed 60 degrees. Popular for the manufacture of cold water supply systems. Rarely used for assembling hot water circuits.
- PN20. Tubes made of this type of polypropylene can withstand pressure up to 2 MPa. The maximum permissible coolant temperature is 80 degrees. Used for assembling hot and cold water supply systems, heating circuits.
- PN25 is the most durable type of polypropylene. This material can withstand pressure up to 2.5 MPa. The coolant temperature can rise to 95 degrees. Withstands temperature surges - up to 110 degrees.
Marking of multilayer products:
- PPR - the outer layer of the tubes is covered with polypropylene;
- AL - has a reinforcing layer of aluminum foil;
- PP-RCT is a designation for modified polypropylene, which has increased thermostatic properties.
If there is a layer of fiberglass inside the pipe, the marking will contain the letters FG, FR.
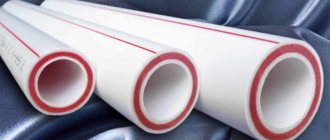
Heating pipes made of polypropylene
What polypropylene pipes can be used for heating installation?
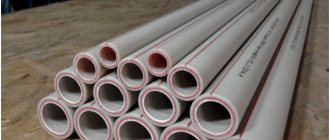
Heating installation is carried out from reinforced polypropylene pipes.
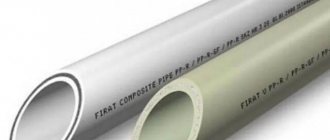
The reinforced pipe looks (when viewed in section) as shown in the photo:
There are layers of polypropylene inside and outside the pipe, between them there is a layer of reinforcing material (foil, fiberglass). Between the layers of polypropylene and the reinforcing layer there is glue. That is, the reinforced polypropylene pipe is five-layer.
The photo above shows a pipe reinforced with aluminum foil. The following figure is also a polypropylene pipe, but reinforced with fiberglass:
Such pipes are designed for operating pressures up to 25 atm and temperatures up to 90 degrees. The linear expansion of a pipe with fiberglass is greater than that of a pipe with foil, but, nevertheless, such a pipe is also often used in heating systems.
Especially where it is not visible that it bends. However, even with noticeable bends, such a pipe will not break; it’s just that some bends somewhat spoil the design look.
The next photo shows a pipe, also reinforced with fiberglass. But this is a pipe “for cleaning”:
That is, the outer layer of polypropylene is peeled off, and then the pipe is soldered to the fitting. Such a pipe is the most ideal option; it best withstands linear expansion. Disadvantage: due to the need for stripping, installation takes longer.
This is what a fiberglass pipe looks like (photo below). Such a pipe is soldered without stripping.
Advantages of polypropylene products in the heating system
- Very easy installation. You can lay such a network on your own, but for steel analogues you need to use a professional welder.
- Polypropylene products do not corrode, and this significantly increases the service life of the network.
- Deposits do not form inside the billets, and they do not clog like their steel pipe counterparts.
- Polypropylene products are very flexible, but at the same time they have a high level of mechanical stability; they operate at high temperatures and pressures.
- The liquid circulates better in such a line, and this increases the heat transfer of the network.
- The costs of such a network are significantly lower when compared with other materials.
All these characteristics have led to the fact that these pipe materials are used more and more often.
How to install heating from polypropylene pipes?
Let's look at several practical examples of soldering a pipeline from a polypropylene pipe.
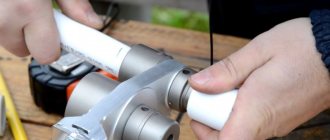
Soldering is done with a special soldering iron:
Each soldering iron has a temperature regulator (1). The temperature for soldering polypropylene is set to 270 degrees. The pipe is heated with a soldering iron for no more than 5 seconds.
The following must be taken into account. If the work takes place outside in cold weather, or in a cold room, the soldering time increases, because the soldering iron cools down quickly.
In this case, you need to either increase the heating temperature of the soldering iron or increase the heating time. The heating time also increases when soldering pipes of larger diameter, as illustrated by the following table:
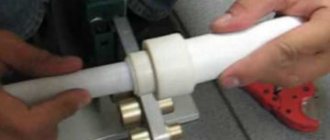
Actually soldering. The soldering iron has two nozzles: one for heating the inner diameter, the other for the outer diameter. At the same time, both parts that are supposed to be connected are heated:
We press evenly on both parts, as if towards each other - in the direction of the red arrows in the photo:
Attention: under no circumstances should you rotate the parts, this will damage the layer! We just press them evenly towards each other.
As it heats up, the coupling reaches the side, and a flange also appears on the pipe. After heating, remove the parts from the nozzles and dock them with each other:
After connecting the heated parts, they need to be fixed for a while
Important! In this case, just as when heating, no rotational movements should be allowed!
After joining, hold the parts for up to 30 seconds - so that they cool down and the connection hardens. The flange on the pipe must be uniform around the entire circumference of the connection.
This is how all polypropylene is soldered, regardless of the pipe diameter and purpose, be it a heating or water supply system. The only difference, as mentioned above, is the soldering time: the larger the diameter of the tube, the longer it takes to heat and fix after connection.
Important: it is not advisable to heat the parts for a long time, because the material begins to burn (this can be determined by the brown color of the polypropylene). The negative side of overheating the material is that if it is very melted, it can block the internal passage of the pipe:
A soldering iron attachment was developed to make the already simple life of the installer even easier.
The nozzle allows you to accurately determine the time when the parts to be soldered are already sufficiently heated. This nozzle has a special hole:
- through which molten polypropylene comes out. Once it appears in the hole:
- This is a signal: we remove and join the parts. There is no need to time the clock or count the seconds yourself.
There is also a ceramic nozzle that will prevent this type of melted pipe:
The advantage of such a connection (without the use of metal) is that, due to the absence of metal connections, hardness salts do not build up in such areas. And also after soldering, a monolithic connection is obtained.
During the soldering process, a bead should form at the joints of the parts being soldered. It is necessary to ensure that this edge is uniform around the entire circumference of the joint.
When working with polypropylene, you need to take into account all the steps in advance - in order to avoid getting into some inconvenient moments. Such “moments” can occur when, for example, you need to solder in some limited space, etc.
Therefore, before soldering, it is better to draw a pipeline diagram on a piece of paper (starting from the boiler) and write down the sequence of steps.
Optimization of heating pipelines using insulation
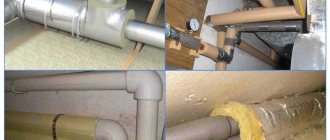
Thermal insulation of heating pipelines
The service life without repairs is affected not only by the correctly calculated diameter of heating pipelines, but also by the adaptation of the pipeline to its operating conditions. Most often, heating pipelines are thermally insulated.
This precaution is necessary to protect the pipes from external influences. They can also be expressed as follows:
- Negative ambient temperature . During crystallization, the water in the line will begin to expand, destroying it. Correctly selected insulation thickness of heating pipelines will protect against this. It is best to use thermal heating cables with it;
- The appearance of condensation . The temperature difference between the heating and the environment can lead to increased humidity on the pipes. This negatively affects their condition - especially for metal surfaces. To eliminate this, you can choose a small thickness of insulation for heating pipelines - up to 8 mm.
Taking into account these requirements for heating pipelines, it can be decided that it will be problematic to carry out work on calculating the selection of materials and their installation independently. It is important to draw up a primary diagram, which should be entrusted to professionals. Installation issues can be resolved on your own by studying the specifics and getting your hands on small sections of the pipeline.
How to choose heating pipes? This issue can be resolved by watching the video:
Performance characteristics
Plastic pipes connected in a permanent way (gluing, welding) have a very high resistance to pressure, including water hammer.
Temporary pressure increases of more than 40 bar are not dangerous for PVC pipes.
- Over time, this resistance decreases due to the aging of the material, so a reliable indicator of the strength of pipes is their pressure range, for example, PN 10, PN 20.
- This index indicates the minimum strength of cables during continuous operation at 20°C after 50 years in bars.
- The temperature limit for plastics with thermal stabilizers, at which they retain the continuity of their properties, is a temperature of 70-95 ° C. At temperatures above +95 ° C, resistance to pressure or water hammer drops disproportionately (strength diagrams for most plastics are violated).
Pipe manufacturers always indicate the temperature limit for the use of this material. This temperature can even be >100°C.
However, remember that the material can only perform under such adverse conditions for a short period of time, usually no more than a few hours or even a few minutes.
Therefore, such temperatures should be considered as random emergency situations. Safety regulations allow emergency temperatures to occur in plastic installations for a short period of time, and their height cannot exceed the maximum values specified by the pipe manufacturer.
The total time of occurrence of such temperatures over 50 years of operation of the installation should be less than 100 hours.
Advantages and disadvantages
Advantages:
- Plastic pipes do not collapse when exposed to moisture for a long time.
- The material is environmentally friendly. It does not emit harmful substances when heated.
- Due to low thermal conductivity, water reaches the heat exchangers without cooling.
- The average service life under normal operating conditions without overload is 50 years.
- Thanks to the high sound insulation of the material, the sound of water flowing through the pipes is not heard in the rooms.
- Plastic parts are easy to transport and assemble together without the help of others.
- Plastic does not deform when exposed to chemicals that may be contained in pipeline water.
- Plastic tubes have smooth inner walls. Thanks to this, plaque does not accumulate on them.
Flaws:
- High coefficient of linear expansion. It must be taken into account when connecting individual pipeline elements.
- Low heat resistance. Therefore, when installing a pipeline outdoors, you need to use additional insulation.
- The material ages faster when exposed to ultraviolet rays.
If pipes are mounted on vertical surfaces, more fasteners must be used to prevent individual pipeline elements from sagging.
Easy pipe installation
Features of materials that need to be taken into account during installation
In order for the system to function correctly, during the installation process it is necessary to take into account some features of PP hoses. One of them is linear expansion. This phenomenon causes a change in external and internal temperatures. As a result of heating, the plastic sleeve begins to sag. The linear expansion is compensated by the correct laying of the pipeline, guaranteeing freedom of its movement within the limits of the linear expansion value.
For this purpose, fastening clamps and compensators are used, the design of which includes both moving and stationary parts. Sometimes sagging can be eliminated by chipping the wall and laying a sleeve into it or installing additional clips. If these actions do not help, radical measures are used - the sleeve is disconnected in the area of the “American women”, the sagging section is cut off, the American woman is resoldered, then twisted.
Rules for welding pipes together
The procedure for connecting polypropylene pipes to each other by welding should be as follows:
- First, you should place the fitting on a heating pin specially designed for this purpose, and insert the pipe into the sleeve from the reverse side.
- After this, the parts should be kept on the soldering iron for such an amount of time that they soften sufficiently and are ready for bonding with each other (as a rule, this time depends on the thickness of the pipe walls). If desired, photos with the parameters of the exposure time of products on a soldering iron can always be found from specialists who install such equipment.
- Next, having removed the parts from the heater, they need to be quickly and tightly connected to each other by compression.