Working principle
Despite the fact that a jet stove made from a gas cylinder is very simple, its operation is based on avant-garde methods of generating heat by burning fuel:
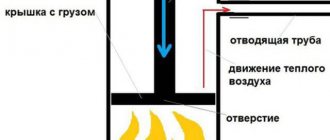
- free circulation of heated air and gases. The firewood in its combustion chamber burns due to natural draft, which appears when oxygen flows through the hole at the bottom of the structure (blower);
- afterburning of wood gases noted during fuel combustion (pyrolysis). Part of the fuel, converted into a gaseous state, burns out in an additional heat exchange device and a horizontal section of the smoke exhaust channel located immediately behind the combustion chamber. The wood gas in it moves very slowly than in a vertical channel, and a thick layer of insulating material does not allow them to cool, which allows the process of decomposition and afterburning to be carried out to a much greater extent.
The vertical pipe in the rocket stove from the cylinder is placed above the combustion chamber, according to the drawing, and is also insulated. The pyrolysis process when burning wood significantly increases the efficiency of the stove.
To make a rocket stove with your own hands, according to the drawing, you will need the following materials:
Advantages and disadvantages
Long combustion rocket stoves have the following advantages:
- high efficiency - at least 85%;
- high speed of heating the room - 50 m² will become warm in less than 1 hour;
- absence of soot - the exhaust during fuel combustion does not form soot, but is formed in the form of steam and carbon;
- the ability to operate on solid fuel of any type;
- low consumption - the fuel consumption of a rocket stove is 4 - 5 times less than a conventional stove under equal conditions: combustion time and heating temperature;
- the possibility of installing a warm bed;
- the duration of heat retention in a well-heated structure without adding fuel is up to 12 hours.
This stove has many advantages, but there are also disadvantages
Disadvantages include:
- manual method of controlling a heating device - fuel burns out quickly and requires regular reporting;
- the high heating temperature of some structural elements threatens owners with burns in case of accidental contact;
- the heating speed does not allow the use of a rocket stove for baths;
- the aesthetic component of such a device is not for everyone and is not suitable for every interior;
- danger of carbon monoxide entering living rooms.
Tools
To work on building a rocket stove for a garage with your own hands, you will need a set of tools and devices, which consists of:
- a household apparatus for electric welding with electrodes with a diameter of 3–4 mm;
- angle grinder or hacksaw for metal;
- hammer - slag separator;
- an ordinary hammer;
- pliers;
- chisels;
- iron brushes;
- electric drills;
- measuring instruments: tape measure, level and plumb line;
- marker or chalk;
- personal protective equipment: protective mask, dielectric gloves, special protective clothing made of thick fabric and closed shoes.
to contents ^
Safety precautions
Even if you are sure that the cylinder is empty, there may be residual liquefied gas at the bottom. Therefore, in order not to take risks, you need to get rid of it. To do this, leave the structure open for 12 hours. In this case, it is necessary to make sure that there are no sources of ignition nearby.
Before flushing the structure, you must unscrew the valve
After this time, it is necessary to rinse the inside of the cylinder with clean water, which will remove any remaining gas. In addition, it is allowed to use lime with water or chlorine to clean the structure. True, after such manipulations an unpleasant odor may remain, which quickly disappears.
Manufacturing instructions
Scheme and dimensions
Diagram of a rocket stove made from a gas cylinder
Preparing the balloon
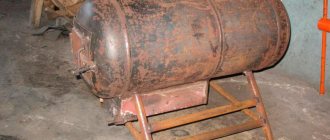
It is better to use 50-liter propane cylinders as blanks for the production of a rocket furnace. Their height is 85 cm, diameter is 30 cm.
A rocket stove made from a gas cylinder of this size will be able to burn fuel well and warm up a room up to 50 m². Also, such containers are often used in everyday life, so finding products that have exhausted their service life will not be difficult.
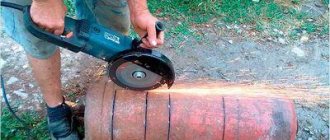
In a gas cylinder, even if not used for a long time, a minimal amount of substance remains inside. Trying to cut it without preparation can lead to tragedy. To prevent detonation during cutting with two containers, you must do the following:
- unscrew the valves to release the neck of the cylinders;
- stand for 2 - 3 days until the remainder of the gaseous mixture evaporates;
- pour water into them and leave them in this position for a day;
- remove water and allow to dry.
This preparation will make it possible to completely empty the containers of gas, eliminating any possibility of an explosion.
Working stages
After work on the construction of a reactive furnace from a gas cylinder, according to the drawing, it should be carried out in the following order:
- cut two 30 cm long sections from the steel pipe and one 35 cm long section for the deck chair;
- cut two holes in the deck chair - one for the combustion chamber, the other for installing a vertical pipe;
- cut one piece of square pipe lengthwise and attach one part to the combustion chamber. This part will help the flow of air masses into the combustion section;
- weld the combustion chamber with the pipe into a common system;
- make and install a grate from reinforcement. Its basis will usually be a square-shaped frame made of reinforcement measuring 115x115 mm. Afterwards, the bars for the grill are welded to it in increments of 8 - 10 mm. It will rest on the corners welded inside the combustion chamber;
- attach the door hinges to the combustion hole and to the ash pan;
- check the quality of the seams for the absence of defects, for example, cracks and holes;
- check the functionality of the first combustion chamber with a small amount of fuel;
- cut a piece 10 - 15 cm long from the pipe necessary for making a chimney;
- cut an opening from the bottom of the remaining pipe and attach the prepared elbow;
- cut an opening to clean the chimney just below the knee;
- cut off the top of one cylinder and cut a hole in its bottom;
- on the surface of this cylinder, use a tape measure and a marker to mark the location for the chimney and attach to it the elbow of the chimney pipe, which has a diameter of 110 - 120 mm;
- insert one part of a pipe with a smaller diameter, 0.8 m long, into a part of a pipe with a larger diameter;
- weld the gaps between the pipes along the entire circumference on one side;
- pour perlite sand into the space between the pipes for insulation;
- install the pipe in the very center of the prepared gas cylinder;
- weld the gaps between the pipes along the entire circumference on top;
- mark another opening on the same cylinder and attach the manufactured combustion chamber to it, and a vertical pipe to the sunbed;
- cut off the bottom of the second cylinder;
- clean cut areas from burrs;
- weld a valve hole in it;
- attach two iron rings to the edge of the cylinder;
- connect the cylinders to each other in the groove formed by the rings;
- seal the junction of the cylinders with asbestos cord for maximum tightness;
- Place thermal insulation material on the floor at the installation point, and a sheet of thick metal on top.
How to make a potbelly stove from a gas cylinder with your own hands - a step-by-step guide
Craftsmen have long mastered a number of industries in which they are able to make even complex elements from improvised means. The popular potbelly stove, which they learned to make independently from a gas cylinder, was no exception. How can you do such work yourself and without outside help?
What is a cylinder stove?
The first step is to understand what a stove-stove made from a gas boiler is. This parameter will be important for those who are planning to make the structure themselves.
A potbelly stove is a combustion chamber made of thick metal. In addition, this combustion chamber must be equipped with a door, grate, chimney and ash pan. These elements are necessary for the normal functioning of any oven. When making a potbelly stove with their own hands, they use a regular long-burning gas cylinder as a body, explaining this by the fact that it is made from the most suitable material.
Which cylinder is better to use?
Cylinders are different. In order to make a potbelly stove, it is best to use a cylinder with a volume of 50 or 40 liters. But if the stove is installed in a small room, then a capacity of 12 or 27 liters will be enough.
But at the same time, you should not take containers that are too small, for example 5 liters, they will be practically useless. Undoubtedly, such a potbelly stove will quickly heat up, but it will also cool down quickly.
Reference! The best solution is a freon cylinder; this choice is ensured by the thick walls of the structure itself, which will retain heat much longer after full heating.
What are the doors made of?
The doors and ash pan can be made from the materials that were cut out of the cylinder. Hinges and latches are soldered to these areas. They can be made from a thick chain, or you can purchase ready-made elements.
The user can choose two separate doors, the large one should serve for loading, and the small one for the blower. There are furnaces that form one single structure.
Ways to improve heat transfer
Heat transfer can be improved by using the fuel used to heat the stove. Such potbelly stoves are heated in different ways, from firewood to sawdust together with small debris. In order to improve heat transfer, you need to use compressed sawdust, briquetted or industrial coal. This is due to the fact that sawdust burns much more slowly, the initial load will last for long hours of combustion, and when heating a small room it will last for an even longer period of time.
Experts also recommend not installing the chimney in a vertical position. It is best to make a broken pipe so that it takes up as much space as possible. To do this, it is recommended to carry it out under the ceiling or along the walls.
The principle of operation of a potbelly stove from a gas cylinder
The principle of a potbelly stove made from a gas cylinder is very simple:
- Firewood or other fuel is placed inside the firebox;
- the fuel is ignited, but you need to monitor the heating process.
This stove heats up very quickly, which is the main advantage of such a system. This is due to the rapid heating of the metal, but there is also a disadvantage that it cools quickly. Therefore, if you have to heat a large room, you will need to systematically ensure that the firewood in the firebox does not run out. Only constant replenishment of fuel will help keep the heat for a long period.
How to make a potbelly stove from a gas cylinder with your own hands
Having analyzed the main advantages of such a stove and the principle of its operation, you can proceed to the phased production of the structure.
Horizontal potbelly stove
A horizontal potbelly stove is considered a classic version of such a stove. To make it correctly, you need to adhere to the following algorithm of actions:
- The cylinder cap is cut off using a grinder.
- A small hole is made in the back, which in the future will serve as a chimney.
Reference! It is to this hole that a pipe measuring 80-100 mm will be welded.
- A metal sheet measuring 4 mm is taken. A small pancake with a diameter that will be identical to the diameter of the front side is cut out of it. Using a grinder, you need to make two holes in it: for the ash pan and for the combustion chamber. The cut pieces are also used to make the door; hinges are welded to them.
- After this, a grate is welded to the inside of the cylinder. Most often, metal fittings are used. Welding the grid to the cylinder is the simplest method; first, two pieces are welded on the sides, and a piece of the main mesh is welded to them.
- Subsequently, four 32 mm pieces are cut from the pipe. They will serve as legs for a potbelly stove.
- Already at this stage, a pre-prepared metal pancake is welded.
After assembly, the oven is completely ready for use.
Vertical stove made from a gas cylinder
There is another type of homemade potbelly stove - vertical.
Vertical oven assembly process
A vertical stove differs in only one parameter - the position of the stove.
Reference! When making such a potbelly stove, the master does not have to worry about its lack of legs.
There are two main options for assembling such a stove:
- the first option is completely identical to the production of the first design. The cylinder is also cut, a grate is mounted in the inner part, and a previously cut pancake is installed in place of the lid. Also, two holes for the blower and combustion chamber are pre-cut;
- the second option almost does not involve cutting the cylinder. That is, the grille is installed through one hole made. But making such a stove is very inconvenient.
Reference! When manufacturing any furnace, the user must first bleed off the remaining gas and only then begin installation work.
Other types of long-burning stoves from a gas cylinder
There are also several other main types of such potbelly stoves. Their list includes the following options.
Furnaces with conical fuel stacking
Quite a popular oven option. The main feature is that a pin is mounted on the surface of the firebox. A metal or wooden conical structure is placed on it. Fuel is loaded through the top.
Reference! Such a stove is best heated using wood material: sawdust, shavings or wood chips.
Liquid fuel pyrolysis furnaces
The main type of fuel for such furnaces is diesel, diesel fuel, and waste oil. This choice is determined by budget cost. Ignition occurs as follows:
- the tap opens and oil is poured into it;
- 50 ml of gasoline is poured over the oil mixture;
- gasoline ignites and as the temperature rises, the oil begins to heat up;
- As the temperature rises, the metal heats up and releases heat into the room.
Before the ignition process, it is very important to pre-cool the stove gases in the chimney.
Long-burning solid fuel stoves
In order to light such a stove, users use the following materials:
- firewood;
- wood processing products;
- peat;
- coal.
Reference! Some even use shredded tires.
Features of using a potbelly stove
Which refers to a number of operational features:
- the user must monitor the condition of the chimney; it must be cleaned at least once a month;
- after the fuel starts burning, the door is closed;
- the firebox door should only open to add firewood;
- The heating of the oven cannot be checked with your hands, so as not to get burns.
This is what refers to the main features of the potbelly stove. You can make them yourself in several ways. Therefore, everyone can choose the most affordable and optimal option for production. You need to think about in which room the future stove will be used, then make drawings for yourself, prepare the tools and carry out all the work according to the instructions.
The author of the YouTube channel Glavnyiy Mehanik shared his personal experience with us.
Job
A stove of this type, like any heat generator with top combustion, does not stop working with the highest heat output only when the chimney is perfectly heated. Therefore, before loading a key portion of fuel into the firebox, the device must:
- warm up the chimney perfectly. For these purposes, you can use any quickly flammable fuel, for example, paper lumps, sawdust or shavings. It should burn not in the combustion chamber, but in the ash pit. The level of heating of the chimney can be judged by the attenuation of the sound or a change in its tone. Next we proceed to loading the key fuel into the combustion chamber. There is no need to light it at all; it should flare up from the coals remaining from the burnt “fast” fuel;
- manually adjust the flow of air into the combustion chamber. A rocket stove in a car garage cannot independently adjust to changing environmental conditions and the best fuel characteristics, so it must be adjusted manually. After loading the key fuel batch, the ash door must be fully opened, and when a characteristic hum appears in the furnace, it must be closed so much that the tone of the sound in the furnace is reduced to a rustling sound. As the wood burns, the door must be closed more tightly, achieving the same rustling sound. If this is not done, then excess air will enter the combustion chamber and cool the transition gas mixture. In this case, the pyrolysis process ends immediately and the oven begins to produce a roaring sound
Only dry wood can be used as fuel for such a stove, since the appearance of excess moisture when igniting wet wood provokes reverse draft and becomes an obstacle to creating the temperature necessary to start the pyrolysis process.
To ensure the safety of clients when working, the following rules must be followed:
- do not use liquid fuels for kindling and do not add them to the stove during combustion;
- beware of contact between open areas of the body and the surfaces of the furnace, since the cylinders and other metal parts will become very hot in the combustion chamber;
- Do not place the device near flammable surfaces;
- Clean the chimney at least once a week, and preferably after any use of the device.
to contents ^
A rocket stove made from a gas cylinder is considered a practical device for heating non-residential premises of a modest area. You can create this device with your own hands. Gas cylinders are made of very high quality steel alloy, resistant to high temperatures and corrosion. Thanks to this, such a stove will be able to last a long time, and the process of its manufacture does not take enough time.
What is a long-burning stove? On what principle is its work based?
First, we need to understand how wood burning actually occurs. In order for wood to ignite, it must first be heated to a temperature of about one and a half hundred degrees from an external heat source. As a rule, this task is performed by setting paper or wood chips on fire with a match. The wood begins to slowly char and, when it reaches about 250 degrees, it decomposes into simple chemical components. The white smoke we see when lighting a fire is the gases and water vapor released by heated wood. And so, having crossed the level of three hundred degrees, the gaseous substances released from the tree ignite, further accelerating the thermochemical reaction.
The decomposition of organic fuel, such as wood, into simple elements is called pyrolysis. And everything would be fine, but ordinary wood combustion does not fully utilize the entire potential contained in the energy carrier. A lot of waste remains, which ultimately does not contribute to savings.
Pyrolysis furnaces, one of the options of which we will consider in this article, use fuel much more efficiently. The main secret is that the combustion of gases released when wood is heated occurs separately from the energy carrier itself. In this case, the primary fuel smolders slowly, which allows for much longer operating time on one stack of logs. In “bubafonya” type stoves and other pyrolysis heating devices, everything burns out almost 100%, leaving behind only a small amount of ash.
How combustion occurs
Design and working principle
The rocket stove shown in the diagram consists of the following important elements:
- a bunker for storing firewood of a vertical or inclined design;
- firebox located in a horizontal position;
- pipe with lining - afterburner (the second popular name is riser);
- an iron cap that plays the role of an air pipe coil;
- blower;
- chimney channel.
In operation, the stove uses 2 principles: the appearance of natural draft from inside the vertical section and the combustion of wooden (gas-generating) gases. The first is realized due to the heating of the firebox and combustion waste products, tending to rise through the afterburner channel. The released gas generator gases burn out in it.
Reference. The name rocket or jet stove is directly related to the principle of operation - a powerful natural draft appears in the vertical channel, causing active combustion in the combustion chamber and the release of heat.
The method of operation of the stove is as follows:
- Firewood loaded into the bunker is ignited from below. The air supply is provided through the blower hatch.
- During the combustion process, flue gases heat up the insulated walls of the afterburner and rush under a thin metal hood, where they give off a considerable part of the heat to the air in the room.
- With the required amount of secondary air, the gas generator gases have time to burn from inside the riser, releasing additional heat.
- Combustion products are discharged directly into the chimney or first of all go into the smoke circulation of the stove bench.
Options for portable stoves "Robinson"
In a simplified camping version, the stove is made without a hood and insulation. Based on this, secondary gases do not burn completely, because they have time to fly out into the chimney. A small mobile heater, called “Robinson”, is designed for quick cooking using fuel of any quality and moisture level.
Internal structure of the long-burning stove "Bubafonya"
- The main element in the design of the “bubafoni” is its body. As a rule, it has a cylindrical shape: a cylinder, a large fire extinguisher, a barrel or a thick pipe with a welded bottom.
- Chimney for removing waste combustion products. It is made, in most cases, from a metal pipe 11-25 centimeters in diameter, welded to the top of the body.
- Feeder piston. It is a metal circle with ribs welded on the bottom, in the center of which an air duct pipe is fixed. The ribs allow you to create an additional air gap between the piston and the logs, which has a positive effect on the smoldering process and the activity of the release of pyrolysis gases.
- A control valve that allows you to control the supply of oxidizer inside the furnace.
- Cover with hole for air duct. Together with the piston, it forms a secondary combustion chamber, in which ignition of pyrolysis gases occurs.
Schematic diagram of a homemade pyrolysis furnace “Bubafonya”
Requirements for component dimensions
The main heat exchange element of the rocket stove is the iron cap; the intensity of room heating in the house depends on its size. In fixed structures made of brick, in most cases a 200-liter barrel with a diameter of 60 cm is used. Portable versions are made from standard gas cylinders of about 100 mm.
Diagram of a rocket heater with a stove bench
Based on this, other sizes dance from the dimensions of the barrel - diameter and cross-sectional area:
- the height of the cap is provided to be 1.5-2 times the diameter;
- the cross-sectional area of the afterburner is 5-6.5% of the diameter of the barrel;
- the length of the riser is such that there is a smallest gap of 7 cm between the upper cut of the pipe and the cover;
- the internal size of the firebox is equal to the cross-section of the afterburner, the ash duct is half as large;
- the diameter of the chimney is 1.5-2 times larger than the cross-section of the afterburner, the height is at least 4 m.
To make it easier for you to calculate the diameters of pipes and linings, we would like to present a drawing for a variety of variants of rocket stoves - from a cylinder, a barrel and outdated buckets (the riser is made of a round or steel pipe).
Heating unit with bench
A rocket stove with a stove bench is a device that can create a comfortable environment in one room. Such a unit cannot be used to heat several rooms, let alone the entire house.
Arranging such a long-burning unit with your own hands requires precise calculations - its power and the maximum permissible length of the hog on which the stove bed is located depend on the size of the stove body
It is also important to select the correct pipe cross-section for installation of the structure. Mistakes will result in the jet furnace becoming overgrown with soot in a short time or roaring loudly during operation due to turbulence in gas flows. Design of a stove with a stove bench
Design of a stove with a stove bench
Dimensions and proportions of the structure
To build a rocket stove with your own hands, you need to prepare detailed drawings, indicating the dimensions of all elements. At the project preparation stage, calculations are made based on the basic values to which all others are tied.
Basic calculated values are
:
- D – diameter of the drum (furnace body);
- S is the internal cross-sectional area of the drum.
Calculations of design parameters are carried out taking into account that
:
- The drum height (H) ranges from 1.5 to 2 D.
- The coating of the drum is carried out at 2/3 N (if its edge is planned to be shaped, then 2/3 of the height should be the average).
- The thickness of the coating layer on the drum is 1/3 D.
- The internal cross-sectional area of the vertical channel (riser) is 4.5-6.5% of S, the optimal value is in the range of 5-6%.
- The height of the vertical channel is the maximum, as far as the furnace design allows, but the gap between the upper edge of the riser and the drum cover must be at least 70 mm for normal circulation of flue gases.
- The length of the flame pipe (fire duct) must be equal to the height of the vertical channel.
- The cross-sectional area of the fire pipeline is equal to the corresponding indicator of the riser. Moreover, it is recommended to use a square-section profile pipe for the fire pipeline; in this case, the stove operates more stable.
- The cross-sectional area of the blower is ½ of the cross-sectional area of the firebox and riser. For stability and smooth adjustment of the furnace mode, a rectangular profile pipe with an aspect ratio of 2:1 is used, which is laid flat.
- The volume of the secondary ash pan depends on the volume of the drum minus the volume of the riser. For a stove from a barrel - 5%, for a stove from a gas cylinder - 10%. For containers of intermediate volume, it is calculated according to linear interpolation.
- The cross-sectional area of the external chimney is 1.5-2 S.
- The adobe cushion under the external chimney should be 50-70 mm thick - if the channel is made of a round pipe, the counting is from the lowest point. The thickness of the cushion under the chimney is halved if the bed is mounted on wooden floors.
- The thickness of the coating layer of the stove bench above the chimney duct is 0.25 D if the drum is from a 600 mm barrel, and 0.5 D if the drum is from a 300 mm cylinder. If you reduce the coating layer, the structure will cool faster after heating.
- The height of the external chimney pipe should be at least 4 meters.
- The length of the flue, on which the length of the stove depends: for a stove from a barrel - up to 6 m, for a stove from a cylinder - up to 4 m.
A long-burning rocket stove made from a 600 mm diameter barrel reaches a power of about 25 kW, and a heating rocket made from a 300 mm barrel reaches up to 15 kW. The power can be regulated only by the volume of fuel; such a stove does not have air regulation, since the additional flow disrupts the stove mode and provokes the release of gases into the room. Changing the position of the blower door regulates not the power, but the operating mode of the furnace.
Lining features
The quality of the riser's thermal insulation directly affects the efficiency of the heating unit. In our area, lightweight fireclay bricks ШЛ and river sand with an admixture of alumina are available for lining. The lining should have an external metal casing, otherwise the materials will quickly absorb carbon deposits and the furnace will roar during operation. The end of the lining is tightly covered with oven clay.
Please note: Types of vices and their scope of application
Proper execution of lining
When using hewn fireclay bricks, the remaining cavities are filled with sand. If only sand is used for lining, it is sifted to remove large debris and covered in layers - each approximately 1/7 of the height of the pipe. Each layer is compacted tightly and sprinkled with water to form a crust. The backfill must be dried for a week, and then the end must be covered with a layer of oven clay. Then the construction of the rocket furnace with your own hands continues according to the drawings.
Making a stove - a rocket
It won’t be very difficult to make a light camp stove, shown in the drawing, if you find the following materials in the house:
- round profile pipe with a diameter of 133-150 mm and a length of 0.5 m;
- profile pipe 14 x 20 cm, length 0.4 m;
- metal sheet 2-3 mm thick for grates;
- rod O8-10 mm for legs;
- scraps of iron for the stand.
A vertical round pipe is welded to the profile at an angle of 45°, after which eyelets for the legs are attached to the body (they should be easily removed). A grate is placed inside the inclined firebox, and a lid is fixed on the outside. For the convenience of cleaning ash at the bottom, it would be nice to install a second door.
Advice. First of all, weld a stand to the upper edge of the fire channel - gases must penetrate between the bottom of the dish and the body, otherwise “rocket” thrust will not appear.
Drawing of an improved version of the mobile oven
The design of the furnace can be improved by organizing the supply of secondary air inside the smoke pipe. The update will make it possible to increase the efficiency and duration of firewood burning. Drill holes on both sides on both sides, covering them with rocket “nozzles” according to the presented drawing. How this stove functions is shown in the video:
From a gas cylinder
The following materials will be used to make a rocket stove with your own hands:
- round pipes with transverse dimensions of 70 and 150 mm; with a wall thickness of 4 mm;
- square profile pipe 150-200 mm in diameter;
- chimney pipe section O10-15 cm;
- low-carbon steel (grade St20) sheet;
- dense basalt thermal insulation (80-120 kg/m3) or bulk fire-retardant materials, for example, vermiculite or perlite gravel.
To begin, cut the rolled metal into blanks according to the drawing. Afterwards, you need to cut off the lid of the propane tank, unscrewing the valve in advance and filling the tank to the top with water. The tool is an ordinary angle grinder with a metal wheel.
The subsequent assembly procedure looks like this:
- Cut the profile pipe lengthwise, 35 mm from the edge. One part will be used to make an ash pan, the second - a blower.
- Join the firebox and smoke pipe at an angle of 90°, making the necessary cuts. Cut an opening on top of the firebox where the loading hopper will be welded.
- Weld the riser with the firebox, then put on the casing from a 150 mm pipe, making a cutout at the bottom to fit the width of the firebox.
- Install and scald the bunker for storing firewood. Secure the doors of the firebox and ash pan.
- Place perlite between the walls of the afterburner and the shell.
- Make a side opening in the cylinder to insert the finished structure. It is better to make the lid removable.
- Carry out the final assembly and weld the chimney section of the pipe.
A specialist will tell you in detail about making a rocket stove from a cylinder in the video:
Made of brick
The simplest rocket stove for cooking can be made of bricks without using mortar, as shown in the diagram with the order. Such a structure is easy to disassemble and rearrange if necessary.
The rocket stove with a stove bench must be placed on a concrete foundation or rubble stone. Material – ceramic or fireclay brick, sand-clay or fireclay mortar, depending on this. The finished base is covered with rolled roofing material to protect it from the negative effects of moisture, after which a continuous first row of bricks is laid. The following workflow looks like this:
- Lay out the firebox, placing the bricks on edge. Thus, overlap the chamber, leaving the mouth for loading firewood and the riser.
- Build an afterburner pipe from 9 rows of stones installed “on edge” with ligation.
- Place a pipe or tin buckets on the riser, fill the resulting cavity with heat insulation or simple sand.
- Place the barrel upside down, with a section of smoke gas pipe leading out from the bottom.
- Build a brick bed from 3-4 horizontal channels.
- Coat the barrel and bench with clay mortar.
Main. Construction is carried out in compliance with the rules for laying the stove, described in the detailed manual.
The length of the smoke channels from inside the stove is limited by the draft in the rocket stove and the external chimney. It is better to keep the total length of the flues within 4 m. To prevent the heater from smoking back into the room, raise the top of the chimney to a height of 5 m, counting from the grate. How to build a brick stove - a rocket without a barrel, pay attention to the video:
Modernization of rocket heat generator
To expand the scope of application of reactive heating stoves, they are being modified, increasing the convenience and versatility of the design. In mobile structures, the platform intended for cooking is often replaced with a full-fledged stove. It is convenient to use such a hob in your own backyard for household purposes - for preparing food for pets or during the period of preserving food for the winter. A special feature of this type of rocket furnace is a wide and flat horizontal channel into which hot gases from the nozzle are directed. Passing under the surface of the stove, they heat it red-hot, after which they go into the vertical chimney. Comfortable legs give the structure stability, and the original shape allows the unit to be used as a stand or table when it is not in use for its intended purpose.
A jet stove with a stove is a necessary thing in a suburban area
A liquid heat exchanger cannot be installed in the flame tube of a jet furnace, but this does not mean that it cannot be used as a heat generator in a water heating system. To do this, the “rocket” is equipped with a kind of circuit of radiator plates, which create a kind of labyrinth in the afterburning zone. Thanks to their heating, heat is removed from the afterburning chamber to the water jacket. The efficiency of the unit depends on the area and heat capacity of the plates, so they are made in the form of massive metal strips with an area of up to ¾ of the cross-section of the fire channel. It must be said that such a heat exchanger is best used to produce hot water using the rocket stove itself in the traditional way.
Diagram of a rocket unit equipped with a water circuit
The rocket stove with a convector has an original design. To increase heat transfer, vertical tubes are mounted on the surface of the outer casing, performing the same role as the air channels of the buleryan. Cold air is trapped at the bottom of the tube heat exchangers and is heated as it moves upward. This ensures forced convection, which further increases the thermal efficiency of the installation.
Rocket heat generator casing equipped with a convector
Finally - the pros and cons of the stove
Similar buildings are actually made quickly, and the performer does not have to have a high specialty. The first and main advantage of rocket-type furnaces is their simplicity and undemanding use of materials. Plus, they perfectly accept a variety of fuels - damp firewood, branches, brushwood, and so on.
Now about the negative points:
- low efficiency and poor heat transfer when compared with other homemade heaters using wood and exhaust;
- if you wrap the cap with a water jacket or install a heated towel rail, the draft from inside the riser will become less, so it is better to heat the water only from the external chimney;
- the stove is unsuitable for a bathhouse because it is unable to actively heat the room with radiant heat;
- After a long period of inactivity, the version with a stove bench is difficult to put into operation mode - you need to warm up all the gas ducts by burning dry light fuel.
For the reasons listed above, a rocket heater is very inconvenient for a garage, where it is necessary to heat the room quite quickly. But the hiking option is indispensable in nature at any time of the year.
2 Types of jet heating systems - what do you need?
The simplest rockets are made from almost any tin container. A portable stove can be made from a bucket, a can in which paint was stored, and so on. Such systems are ideal for an outdoor picnic; they are often used on construction sites. Simple stoves are not suitable for heating rooms. They are used exclusively for cooking and heating water. A rocket made from a bucket can be heated with a small splinter, dry cones and leaves, and bunches of branches. In such a stove, combustion products do not have time to form wood combustible gas. They immediately go down the chimney.
More complex heating structures are created from an old gas cylinder or from a metal barrel and brick. These stoves are necessarily equipped with a riser to increase draft and a horizontal smoke exhaust duct. There are also rockets made entirely of brick. They can be equipped with several chimneys at once and are used for heating large rooms and heating floors. And if you want, you can actually build even a full-fledged stove-bed.
Yes, there is nothing wrong with making a rocket stove from a balloon
We will tell you how to make all of the indicated types of reactive heating devices yourself. Let’s start our master class with the simplest thing - making a basic garden camping stove from two tin containers (buckets, cans). In addition to them, we will need steel clamps with a cross-section of 10 cm, metal corners, an angle grinder, a stainless steel chimney pipe, scissors for metal, crushed stone. The scheme of work will be as follows:
- 1. Take two buckets. From a container of smaller volume (diameter) we make a lid for our rocket. Cut a hole in the bucket. It is necessary for organizing a chimney.
- 2. In the larger bucket, cut another hole at the bottom. We will connect the firebox to it. We perform all operations with metal scissors, bending the resulting petals (pieces of tin) inward.
- 3. We construct a direct flow from pipes and corners. We insert it into the bucket, and then, using a clamp, connect it with the curved petals.
- 4. Fill the space between the forward flow and the housing of the heating device with crushed stone. This building material will play the role of a heat accumulator and at the same time a heat insulator.
- 5. We put the second bucket on the stove.
- 6. We bend a small burner from wire on which you can place dishes with water and food.
Please note: How to get rid of grass between paving slabs, effective methods and means
It is advisable to paint the portable rocket with any paint with a high level of heat resistance. After drying, we can use a basic cooking stove
Note! The rocket is ignited through a pipe extending from the forward flow
Rocket stove from a gas cylinder: drawings, photos, videos
Rocket stove made from a propane cylinder: drawings, photos, videos. Step-by-step making of a stove from a gas cylinder with your own hands.
In a previous publication, we looked at the assembly process of a traveling-type rocket stove; the rocket-type stove design makes it possible to obtain the maximum permissible output of heat energy by post-combustion of gas-generating gases formed during the primary combustion of wood.
A rocket stove can also be used for heating rooms, cottages, and garages; in this article we will consider the design of such a stove made from gas cylinders.
In order for a rocket-type stove to heat the room well, it is necessary to additionally construct a chamber for afterburning gas-generating gases; in this way, the heat transfer of the stove becomes significantly greater and the fuel consumption will become less.
As a container for afterburning pyrolysis gases, you can use a simple propane gas cylinder, the diameter of the cylinder is 300 mm, the height is about 900 mm, such a container is excellent for the production of a rocket-type stove with afterburning gas generator gases.
Vertical oven assembly process
A vertical oven is more difficult to manufacture, but requires less space for its installation and has better user qualities. The volume of the cylinder is used more rationally. The principle of operation of the furnace does not change, but is implemented with greater efficiency. In the vertical version, two doors are made - for loading fuel and for the ash tray. Grate bars made of reinforcement are welded between these doors.
In principle, the entire upper part of the furnace can be dedicated to loading fuel, which will ensure long-term operation on one load. However, the volume of the combustion chamber is often reduced to accommodate additional heat exchangers in the upper part. One of the interesting options is through metal pipes welded into the upper part of the gas cylinder, through which air is driven by a fan (necessarily heat-resistant).
The process of assembling a vertical stove from a cylinder
Such a device will significantly increase heat transfer and reduce the heating time of the room several times. If forced water circulation is established through the passage pipes, a water heating system can be installed.
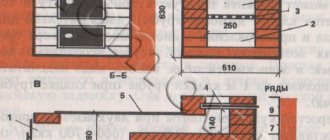
Diagram of a rocket furnace made from a gas cylinder.
The figure shows a diagram of a rocket stove made from a cylinder.
The working principle of a rocket-type stove is as follows: a vertical pipe is placed above the combustion chamber, which creates a reactive effect. When wood ignites in the combustion chamber, hot gases are pushed out in a whirlwind through the pipe with a specific hum, which is what gave the stove its name - “Rocket Stove”. From the pipe, gas generator gases penetrate into the heated chamber where they burn out, releasing additional heat.
How to do it yourself?
Before making a rocket stove, you need to decide on the location of its installation, the dimensions of the future structure, and make a diagram. The masonry technique itself is the most common; every novice builder can comprehend it.
The simplest design of a rocket stove can be built from 20 bricks on a dacha plot and used to heat food brought from home.
Selecting a location
At the beginning of construction, first of all, a location is selected. It is recommended to place rocket-type brick stoves closer to the front door. In this case, after cleaning, the ash will not need to be carried across the entire room, which will have a beneficial effect on the overall dustiness of the room.
It would also be nice if at the place where the pipe exits there are no rafter systems placed closer to the chimney than 40 cm. And yet, the stove should not be adjacent to the outer wall of the house, so that expensive heat does not go to heat supply to the street.
Preparation of the solution
Cement mortar will quickly crack under the influence of high temperatures, so for laying heating devices made of bricks, only a mortar consisting of clay and sand is used.
Their proportions are determined experimentally, depending on the quality of the clay. Very often in a ratio of 1:2 or 1:3, and the higher the fat content of the clay, the less it is added to the solution.
First of all, the clay must be soaked, strained, and then sand must be added. The resulting solution should be similar in consistency to thick sour cream. You can check its viscosity level in the following way:
- place a wooden stick or trowel handle into the mixture;
- pull out the tool and shake it off well;
- check the thickness of the adhering layer: if less than 2 mm add clay, more than 3 mm add sand.
The preparation of the mortar must be approached very seriously, since only an elastic mixture of the required thickness can fill all the unevenness of the bricks and ensure their strong adhesion.
Laying a rocket stove made of 20 bricks
Ordering a rocket stove for 20 bricks
Example of a brick rocket stove
Laying a rocket stove with a stove bench
A brick rocket stove, even equipped with a stove bench, is small in size. The order shown in the figures (below) allows you to assemble the structure without the use of metal products. Only the doors will be metal. Subsequently, the body can be coated with clay to give it a more rounded shape.
Making a rocket stove.
To make the oven you will need the following materials:
- Pipe length - 0.8 m (diameter 158 mm, wall thickness 4 mm).
- The pipe is 1.5 m long (diameter 127 mm, wall thickness 3.5 mm).
- Profile pipe 1 m long (section 120 x 120 mm, wall thickness 4 mm).
- Empty propane gas cylinder – 2 pcs.
- Sheet metal.
- Metal rods.
- Perlite sand.
- Chimney pipe with a diameter of 120 mm.
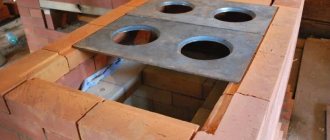
From a steel pipe we cut out two pieces 300 mm long and one piece for the sunbed 350 mm. Using an angle grinder, we cut out holes in the bed for the combustion chamber and vertical pipe.
We cut one piece of steel pipe lengthwise and weld it to the combustion chamber; this will be a channel for air supply to the combustion chamber.
We weld the combustion chamber with the pipe.
We make grate bars from reinforcement rods, and doors are created for the combustion chamber and ash pan.
Checking the performance of the furnace. The primary combustion chamber is ready, now we will make a secondary combustion chamber for gas generator gases.
From the part located at the bottom of the cylinder, an opening is cut out for the combustion chamber, and a pipe elbow with a diameter of 120 mm for the chimney is welded to the cylinder.
At the bottom of the pipe there is a door for cleaning the chimney.
A piece of pipe with a large diameter is put on the pipe and welded, and the combustion chamber is welded to the cylinder.
We fill the space between the pipes with perlite sand, which serves as insulation, and weld it.
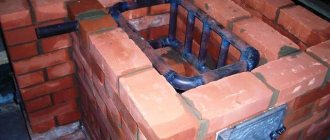
The bottom of the second cylinder needs to be cut off and the hole from the valve welded, this will be a container for afterburning gas generator gases.
Parts of the cylinders are joined together in a groove made of two welded rings, so that the connection is very tight; an asbestos cord is laid in the groove itself.
The oven is ready.
You can see the production process of a rocket stove in detail in this video, where the author demonstrates all the manufacturing steps and the stove itself in operation.
Materials
To make a rocket stove with your own hands, according to the drawing, you will need the following materials:
| No. | Name | Unit measurements | Quantity |
| 1 | Pipe section Dn158 mm with a wall thickness of 4 mm | m | 0,8 |
| 2 | Pipe section Dn127 mm with a wall thickness of 3.5 mm | m | 1,5 |
| 3 | A piece of pipe with a square cross-section 120x120 mm, wall thickness 4 mm | m | 1 |
| 4 | Empty gas cylinder 50 l | PC. | 2 |
| 5 | Sheet steel | m² | 1 |
| 6 | Armature | m | 1 |
| 7 | Perlite | kg | 2 |
| 8 | Pipe with a diameter of 120 mm for the chimney | m | 4 |
| 9 | Asbestos cord | m | 1 |
| 10 | Basalt wool | m² | 1 |
How does a heating device work?
There are 2 reasons for the appearance of the characteristic name: a specific hum emitted when fuel is burned, and the simple shape of the unit, reminiscent of an inverted child’s drawing of a rocket.
It is noteworthy that a hum during combustion indicates an irrational, inefficient combustion mode; it is better if the stove makes a quiet, even rustle. You can find the extended name of such a unit - the Shirokov-Khramtsov rocket stove.
The equipment can be portable or stationary. The simplest mobile modifications were developed for traveling conditions; they are adapted for cooking and heating water.
A more productive stationary long-burning rocket stove is equipped with a special hood, thanks to which the heat from the smoke is directed into the room. At the start, air enters in limited quantities; when fuel is burned, pyrolysis gases are formed. In the lower part of the vertical segment of the pipe they are burned out: secondary air enters here through a separate channel.
Combustion products that have a high temperature rise to the hood, gradually cool, fall between the walls and pass into the chimney. They are affected by the natural traction force in this channel, influenced by new gases coming from the firebox, and gravity. To collect as much heat as possible and direct it to heat the room, smoke channels of an intricate configuration are attached to the stove - they are laid in the base of the stove bench.